Craving a sweet treat without firing up the oven? You’ve hit the jackpot! In this guide, I’ll share my easy recipe for No-Bake Oreo Cheesecake Bars. These bars are rich, smooth, and full of cookie goodness. Plus, I’ll show you how to customize them for your taste or dietary needs. Let’s dive in and whip up a dessert that will impress everyone!
Ingredients
List of Ingredients
To make No-Bake Oreo Cheesecake Bars, gather these ingredients:
– 24 Oreo cookies, finely crushed
– 1/4 cup unsalted butter, melted
– 16 oz cream cheese, at room temperature
– 1/2 cup powdered sugar
– 1 teaspoon pure vanilla extract
– 1 cup heavy whipping cream
– 12 Oreo cookies, coarsely chopped (for the filling)
– Additional crushed Oreo cookies for topping (optional)
Optional Ingredients for Variations
You can change things up with these fun options:
– Add a pinch of salt for a salted caramel vibe.
– Swap out some Oreos for chocolate cookies for a twist.
– Use flavored cream cheese, like chocolate or strawberry, for a new taste.
Possible Substitutions for Dietary Needs
If you have special dietary needs, here are some swaps:
– Use gluten-free cookies for a gluten-free version.
– Replace cream cheese with vegan cream cheese for a dairy-free option.
– Use coconut cream instead of heavy cream for a lighter choice.
These ingredients will help you craft a tasty treat that everyone will love!
Step-by-Step Instructions
Detailed Steps to Make No-Bake Oreo Cheesecake Bars
1. First, crush 24 Oreo cookies until fine. You can use a food processor or place them in a plastic bag and smash them with a rolling pin.
2. Pour 1/4 cup of melted unsalted butter over the crushed cookies. Mix well until the crumbs feel damp.
3. Grab a 9×9 inch baking pan. Press the cookie mixture firmly into the bottom. Use the back of a spatula or a glass for a flat base.
4. In a large bowl, beat 16 oz of room-temperature cream cheese with an electric mixer. Mix until it is smooth and creamy.
5. Slowly add 1/2 cup of powdered sugar and 1 teaspoon of pure vanilla extract. Keep mixing until combined well.
6. In a separate bowl, whip 1 cup of heavy whipping cream on high speed. Stop when stiff peaks form.
7. Gently fold half of the whipped cream into the cream cheese mixture. Once blended, add the rest and fold until smooth.
8. Stir in 12 coarsely chopped Oreo cookies. Mix until they are evenly spread throughout the cheesecake.
9. Spoon this mixture over the crust in the baking pan. Smooth the top with a spatula.
10. Cover the pan with plastic wrap. Chill in the fridge for at least 4 hours to set.
11. After chilling, slice into bars. You can add more crushed Oreos on top if you like.
Tips for Preparing Your Workspace
– Clear your counter or table before starting. A clean space helps you work better.
– Gather all your tools and ingredients first. This saves time and keeps you organized.
– Make sure your cream cheese is at room temperature. This makes it easier to blend smoothly.
– Use separate bowls for mixing different components. This keeps flavors distinct and mixing easier.
Common Mistakes to Avoid
– Don’t skip chilling the bars. They need time to set well, or they will be too soft.
– Avoid over-mixing the whipped cream. This can make it grainy and less fluffy.
– Make sure to pack the cookie crust tightly. If it’s loose, the bars may fall apart.
– Don’t rush the slicing. Use a sharp knife for clean edges. Warm the knife under hot water for easier cutting.
Tips & Tricks
How to Achieve the Perfect Texture
To make your cheesecake bars creamy, use room temperature cream cheese. Cold cream cheese can create lumps. When mixing, beat until smooth and fluffy. Folding in the whipped cream gently helps keep the mixture light. Avoid over-mixing after adding the whipped cream. This keeps the texture airy. If you follow these steps, you will have a perfect, smooth cheesecake.
Presentation Ideas for Serving
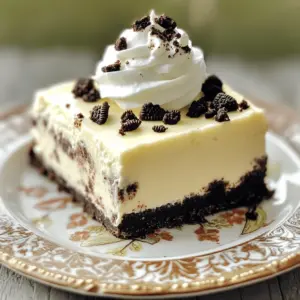
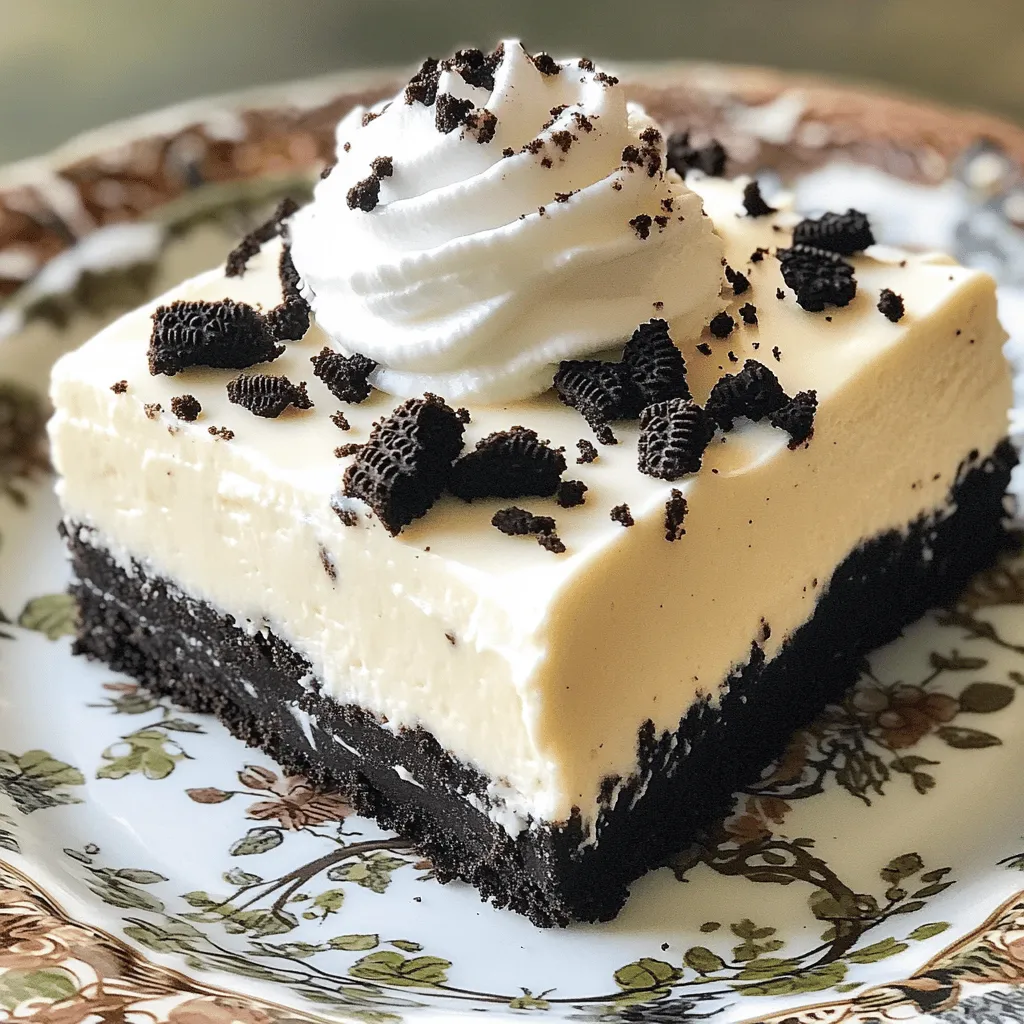
For an eye-catching display, serve each bar on a colorful plate. A dollop of fresh whipped cream on top adds charm. You can also place a whole Oreo cookie on each bar. This creates a fun and fancy look. Consider garnishing with a sprinkle of crushed Oreos for extra flair. Simple touches can make a big difference when presenting desserts.
Alternatives for Toppings
While crushed Oreos are a classic topping, you can get creative. Try drizzling chocolate or caramel sauce over the bars. Fresh fruit like raspberries or strawberries adds a pop of color. For a nutty twist, use crushed nuts, like walnuts or pecans. You can also use crushed candy bars for added sweetness and crunch. These alternatives can give your cheesecake bars a unique spin.
Variations
Different Flavor Combinations
You can easily change up the flavor of these bars. Try using different cookies for the crust. Instead of Oreos, use chocolate sandwich cookies or even graham crackers. You can also mix in flavors. Add peanut butter for a nutty twist. Or, try adding mint extract for a refreshing touch. You could also fold in mini chocolate chips for extra sweetness.
Dietary Variations for Gluten-Free or Vegan Options
To make these bars gluten-free, use gluten-free Oreo cookies. Many stores sell them, and they taste great. If you want vegan options, replace cream cheese with a vegan cream cheese. Use coconut cream instead of heavy whipping cream. You can use maple syrup instead of powdered sugar for sweetness. These swaps make it easy for everyone to enjoy!
Seasonal Additions or Enhancements
Seasons bring fun flavors too. In fall, add pumpkin puree and spices like cinnamon and nutmeg. In summer, mix in fresh berries like strawberries or raspberries. They add color and a fruity taste. For winter, try peppermint extract and crushed candy canes on top. These changes make your cheesecake bars festive and fun!
Storage Info
Best Practices for Refrigerating Leftovers
After making these bars, allow them to cool in the fridge. Cover them tightly with plastic wrap or foil. This keeps them fresh and prevents drying out. Store them in the fridge for the best taste. They are best enjoyed cold.
Freezing Instructions for Long-Term Storage
You can freeze these bars for later. Cut them into squares first. Wrap each square tightly in plastic wrap. Then, place them in a freezer-safe bag or container. This helps to keep the bars fresh for up to three months.
How Long Do No-Bake Oreo Cheesecake Bars Last?
When stored properly, No-Bake Oreo Cheesecake Bars last for about five days in the fridge. If frozen, they can last for three months. Always check for any changes in color or smell before eating. Enjoy these treats while they’re fresh for the best flavor!
FAQs
Can I make these No-Bake Oreo Cheesecake Bars ahead of time?
Yes, you can make these bars ahead of time. They taste even better after chilling overnight. Just cover them tightly with plastic wrap and store in the fridge. This way, the flavors blend nicely, and the texture stays creamy. I often prepare them a day in advance for parties. It saves time and adds to the fun!
What can I use instead of cream cheese?
If you need a substitute for cream cheese, you can use mascarpone or Greek yogurt. Both options give a creamy texture. Mascarpone brings a rich flavor, while Greek yogurt adds a tangy touch. You can also try silken tofu for a dairy-free version. Blend it until smooth for the best results.
How do I know when the cheesecake is set?
You know the cheesecake is set when it feels firm to the touch. After chilling for at least four hours, check the edges. They should hold their shape without wobbling. If you want to be sure, insert a toothpick in the center. If it comes out clean, your cheesecake is ready to slice!
In this blog post, we covered everything about making No-Bake Oreo Cheesecake Bars. You learned the key ingredients, step-by-step instructions, and helpful tips. We also explored variations for different tastes and diets. Finally, we discussed the best ways to store your delicious bars. Remember, baking can be fun and flexible. Don’t hesitate to try your own twists! Enjoy your cheesecake bars and share them with friends. Happy baking!