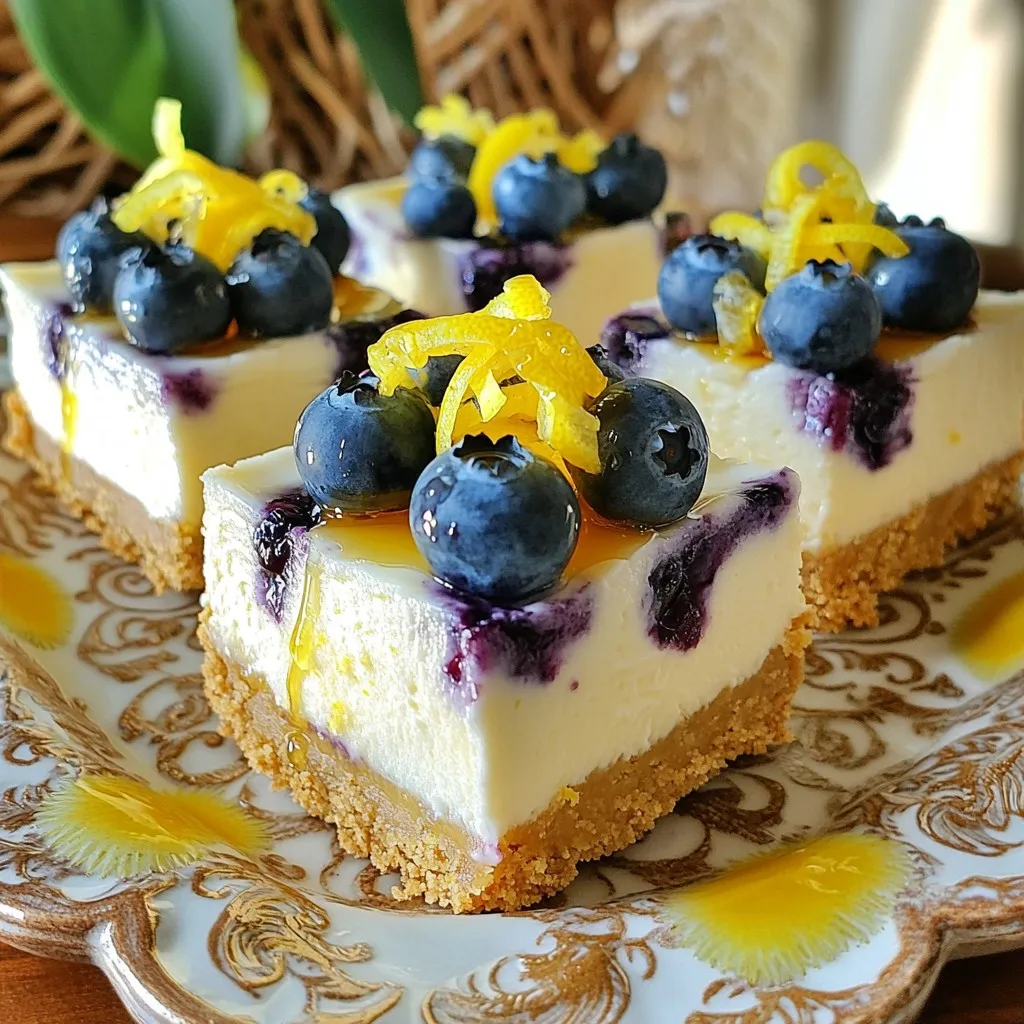
Skip to content
Tossed Tastes
  • Home
  • Appetizers
  • Desserts
  • Salads
  • Breakfast
  • Dinner
  • Privacy Policy
  • Contact
  • About

Chef Elliot

Carrot Cake with Cinnamon Butter Easy Baking Recipe

May 27, 2025 by Chef Elliot
- 2 cups all-purpose flour - 2 cups granulated sugar - 1 teaspoon baking powder - 1 teaspoon baking soda - 1 teaspoon ground cinnamon - 1/2 teaspoon ground nutmeg - 1/2 teaspoon salt - 4 large eggs - 1 cup vegetable oil - 3 cups grated carrots (about 5-6 medium-sized carrots) - 1 cup crushed pineapple, drained and patted dry - 1/2 cup chopped walnuts or pecans (optional) The base of the carrot cake is simple and easy to find. I love using all-purpose flour for a nice texture. The granulated sugar gives it sweetness, while the baking powder and baking soda help it rise. Ground cinnamon and nutmeg add warm flavors. Grated carrots add moisture and sweetness, and crushed pineapple makes it even better. - 1/2 cup unsalted butter, softened - 1 teaspoon ground cinnamon - 2 tablespoons maple syrup Cinnamon butter is the star of this cake. Using unsalted butter allows the spice and sweetness to shine through. Ground cinnamon adds warmth, and maple syrup gives a lovely, rich taste. This butter not only tops the cake but also adds a burst of flavor. - Chopped walnuts or pecans If you like a crunch in your cake, add chopped walnuts or pecans. They bring a nutty flavor that pairs well with the sweet cake. You can skip them if you want a smooth texture, but I highly recommend trying them! For the full list of ingredients and their measurements, check the Full Recipe. 1. Preheat your oven to 350°F (175°C). This step is key for even baking. 2. Grease two 9-inch round cake pans with butter or oil. Then, lightly flour them. This helps the cake slide out easily. 1. In a large bowl, mix the following: - 2 cups all-purpose flour - 2 cups granulated sugar - 1 teaspoon baking powder - 1 teaspoon baking soda - 1 teaspoon ground cinnamon - 1/2 teaspoon ground nutmeg - 1/2 teaspoon salt 2. Whisk these until smooth. Remove any lumps for a fluffy cake. 1. In another bowl, crack 4 large eggs. Beat them lightly. 2. Add 1 cup vegetable oil and 1 teaspoon vanilla extract. Whisk until smooth. 1. Pour the wet mixture into the dry mixture. Use a spatula to stir gently. 2. Fold in: - 3 cups grated carrots - 1 cup crushed pineapple, drained - 1/2 cup chopped nuts (optional) 3. Mix until well combined, but do not overmix. This keeps the cake light. 1. Divide the batter evenly between the two pans. 2. Place the pans in the oven and bake for 25-30 minutes. 3. Check doneness by inserting a toothpick; it should come out clean or with a few crumbs. 1. Once baked, take the pans out and let them cool for about 10 minutes. 2. Carefully invert the cakes onto wire racks. Let them cool completely to avoid sogginess. 3. To make the cinnamon butter, mix: - 1/2 cup softened unsalted butter - 1 teaspoon ground cinnamon - 2 tablespoons maple syrup 4. Spread the cinnamon butter on the top of one cooled cake layer. 5. Place the second layer on top and frost the top and sides with more cinnamon butter. For the full recipe, check out the details above. Enjoy the sweet and spicy flavors of this carrot cake! To get the best texture in your cake, avoid overmixing. Mixing too much makes the cake dense. Stir until the ingredients just come together. This keeps the cake light and fluffy. Pineapple adds moisture to your cake. Use drained and patted dry pineapple for balance. This helps the cake stay moist without being soggy. To make your carrot cake even better, try extra spices. You can add ginger or allspice for a unique twist. This can make your cake stand out. Adjust the sweetness based on your taste. If you like it sweeter, add a bit more sugar. Just remember, the cinnamon butter also brings sweetness. Serve your cake with whipped cream or ice cream. These pairings add a cool contrast to the warm spices. For decoration, sprinkle chopped nuts on top. You can also add a light dusting of cinnamon. This makes the cake look beautiful and inviting. Explore the [Full Recipe](#) for the complete guide to making this delightful treat! {{image_4}} You can easily make this cake gluten-free. Just use a gluten-free flour blend instead of regular flour. Look for blends that include xanthan gum for better texture. This option keeps the cake moist and delicious. If you want a new twist, try different nuts. Almonds or hazelnuts work great as alternatives to walnuts or pecans. You can chop them finely and add them straight into the batter. They add a lovely crunch and flavor to the cake. Want to make a vegan version? Swap the eggs for flax eggs or applesauce. Use vegan butter for the cinnamon butter instead of regular butter. This way, you keep all the flavor while making it plant-based. Your friends will never know the difference! For more details, check the [Full Recipe]. To keep your carrot cake fresh, store it in the fridge. Place the cake in an airtight container. This helps maintain its moisture and flavor. If you have leftover cinnamon butter, store it separately in the fridge too. It will stay good for about five days. For longer storage, freeze the cake. First, let it cool completely. Then, wrap each cake layer tightly in plastic wrap. After that, put them in a freezer-safe bag or container. This method prevents freezer burn. You can freeze the cake for up to three months. When ready to enjoy, thaw it in the fridge overnight. To enjoy your cake warm, you can reheat it easily. Preheat your oven to 350°F (175°C). Place the cake on a baking sheet and cover it with aluminum foil. This helps keep it moist as it warms. Heat for about 10-15 minutes. If you like, warm individual slices in the microwave for 15-20 seconds. Serve with fresh cinnamon butter for a delightful treat. Baking the carrot cake usually takes about 25 to 30 minutes. To check if it’s ready, insert a toothpick into the center. If it comes out clean or with a few moist crumbs, your cake is done. Keep an eye on it toward the end of baking to avoid overcooking. Yes, you can make the batter ahead of time. Mix your wet and dry ingredients as usual. Store the batter in the fridge for up to 24 hours. Just remember to give it a gentle stir before pouring it into the pans for baking. Decorating a carrot cake can be fun! Start with a thick layer of cinnamon butter on top. You can also add chopped nuts, shredded coconut, or even a sprinkle of cinnamon. For a pop of color, consider adding some edible flowers or fresh fruit on top. Pineapple adds a nice sweetness and moisture to the cake. However, it’s not necessary. If you want to skip it, you can substitute it with extra grated carrots or applesauce. This will help keep the cake moist while still tasting great. To make the cake more moist, use fresh grated carrots. You can also add a bit more oil or an egg. If you want, try adding some yogurt or sour cream to the batter. These adjustments will help keep your carrot cake soft and delicious. In this article, I covered how to make a delicious carrot cake. We explored key ingredients like flour, sugar, and spices. I provided step-by-step instructions, including tips for texture and flavor. You can even try variations like gluten-free and vegan options. Remember, baking is about joy and creativity. So, have fun with it! Enjoy your carrot cake with loved ones, and don’t hesitate to try your own twists. Let your baking adventures begin!

Are you ready to bake a delicious carrot cake with a sweet twist? In this easy recipe, I’ll guide you through making a moist carrot cake topped with creamy cinnamon …

Read more

Categories Desserts

Breakfast Bombs Flavorful and Simple Morning Treat

May 27, 2025 by Chef Elliot
- 4 large eggs - 1 cup shredded cheese (cheddar, mozzarella, or your favorite blend) - 1 cup diced vegetables (bell peppers, spinach, onions) - 1 cup cooked breakfast sausage or turkey, crumbled The essential ingredients are the heart of your breakfast bombs. The eggs bind everything together. The cheese adds creaminess and flavor. You can choose any cheese you love. I often use cheddar for a sharp taste. Diced vegetables bring color and nutrition. Bell peppers and spinach are my go-to favorites. The sausage or turkey gives a nice, hearty touch. You can even skip the meat for a vegetarian option. - 1 cup all-purpose flour - 1 tablespoon baking powder - 1 teaspoon garlic powder - 1 teaspoon salt - 1 teaspoon black pepper The dry ingredients are key for structure. All-purpose flour makes the bombs rise and hold their shape. Baking powder helps them puff up nicely in the oven. Garlic powder adds a hint of flavor without being too strong. Salt and black pepper are must-haves for seasoning. Adjust these spices to suit your taste. - ¼ cup milk - ¼ cup olive oil - Cooking spray for greasing The wet ingredients keep your bombs moist. Milk adds creaminess and helps mix everything. Olive oil provides richness and keeps the bombs tender. Don’t forget the cooking spray! It prevents sticking and makes cleanup easy. Using these ingredients, you can create a delicious breakfast treat. For the full recipe, check out the detailed steps to make these flavorful breakfast bombs. - Preheat the oven to 375°F (190°C). - Grease a standard muffin tin with cooking spray. - In a large mixing bowl, combine all-purpose flour, baking powder, garlic powder, salt, and black pepper. Mix these dry ingredients well. - In another bowl, crack the eggs and beat them. Add milk and olive oil, then mix until smooth. - Carefully pour the egg mixture into the dry ingredients. Stir gently with a spatula to combine, but do not over-mix. - Fold in the shredded cheese, diced vegetables, and crumbled sausage or turkey. Make sure everything is well mixed. - Fill each muffin cup about ¾ full with the mixture. This allows space for rising while baking. - Place the muffin tin in the oven and bake for 20-25 minutes. Look for a golden-brown top. - After baking, let the breakfast bombs cool for a few minutes. Then, remove them gently using a fork or spatula. You can find the Full Recipe for more detailed steps and ingredients. Baking Tips - Make sure your oven is the right temperature. This helps everything cook evenly. - Check for doneness with a toothpick. If it comes out clean, they are done. Ingredient Choices - Try using different cheeses. Cheddar and mozzarella are great, but get creative! - You can add more spices. Adjust them to fit your taste. A pinch of chili powder can add a fun kick. Presentation Tips - Arrange your breakfast bombs on a colorful platter. It makes them look tasty right away! - Serve with fresh salsa or creamy avocado dip. This adds flavor and pairs well. - For a fancy touch, sprinkle fresh herbs like cilantro or parsley on top. It makes the dish pop! These tips will help you create breakfast bombs that look good and taste even better. Enjoy making them with your own twist! {{image_4}} I love to experiment with breakfast bombs. They are fun and easy to make. You can change them up to fit your taste. Here are some tasty variations. To make a vegetarian version, skip the sausage. Instead, add more veggies like zucchini, mushrooms, or spinach. You can also use black beans for protein. This keeps your breakfast bombs hearty and filling without meat. You can mix and match your favorite vegetables to create endless combos. If you want a sweet start to your day, try sweet breakfast bombs. Mix in fruits like blueberries, bananas, or apples. Add a sprinkle of cinnamon for a dessert twist. This makes them like a morning treat. You can even top them with a drizzle of honey or maple syrup for extra sweetness. For those who need gluten-free meals, this recipe can adapt. Use a gluten-free flour blend instead of all-purpose flour. This still gives you the same fluffy texture. Plus, it makes breakfast bombs safe for everyone to enjoy. Just check the labels to ensure your other ingredients are gluten-free too. These variations keep breakfast exciting. Each one offers a unique taste. You can find the full recipe for all your breakfast bomb ideas in the [Full Recipe]. Store your breakfast bombs in the fridge for up to a week. Allow them to cool before placing them in an airtight container. This keeps them fresh and tasty. You can also wrap them in plastic wrap for extra protection. Label the container with the date for easy tracking. When you’re ready to enjoy them, simply take out what you need! If you want to keep your breakfast bombs longer, freeze them! Place them in airtight containers or freezer bags. Make sure to remove as much air as possible. This helps avoid freezer burn. You can freeze them for up to three months. For easy access, consider freezing them in single servings. To reheat your breakfast bombs, a few methods work best. The oven is my favorite. Preheat it to 350°F (175°C). Place the bombs on a baking sheet and heat for about 10-15 minutes. This keeps them crispy. You can also use the microwave for a quicker option. Just heat for about 30 seconds to 1 minute. Check to avoid overheating. Enjoy your breakfast bombs warm and delicious! Yes, you can make breakfast bombs ahead of time. To do this, prepare the mixture and fill the muffin tin. Cover it with plastic wrap and store it in the fridge for up to 24 hours. This way, you can bake them fresh in the morning. If you want to store them longer, bake the bombs and let them cool. Place them in an airtight container and keep them in the fridge for up to a week. You can also freeze them for up to three months. Just thaw them in the fridge before reheating. Breakfast bombs can be healthy, but it depends on the ingredients you choose. They offer protein from eggs and sausage and nutrients from vegetables. You can make them healthier by using turkey sausage or adding more veggies. Consider using low-fat cheese or even skipping cheese for a lighter option. If you're gluten-free, you can swap all-purpose flour for a gluten-free blend. This way, you still enjoy the flavor without the gluten. Breakfast bombs pair well with various sides. You can serve them with fresh salsa for a zesty kick. A creamy avocado dip also complements the flavors nicely. For something sweet, consider a side of fresh fruit or yogurt. If you want a heartier meal, serve them with crispy bacon or breakfast potatoes. You can also add a drizzle of hot sauce for those who like a bit of heat. You can find the detailed preparation steps and ingredients for Breakfast Bombs [here](#). Breakfast bombs are a fun and easy meal option. We covered all you need to know, from the essential ingredients to tasty variations. Remember, you can mix and match ingredients to suit your taste. Storage tips help keep them fresh, whether you refrigerate or freeze. Don’t forget the many sides you can serve with them. Explore these ideas and enjoy making your own breakfast bombs. They will add a burst of flavor to your mornings!

Looking for a fun and easy breakfast idea? Breakfast Bombs are your solution! These savory, bite-sized treats pack flavor and can be customized to fit your taste. With just a …

Read more

Categories Breakfast

Easy Chocolate Mousse Cups Luxurious and Simple Treat

May 27, 2025 by Chef Elliot
To make these easy chocolate mousse cups, gather these simple items: - 1 cup heavy whipping cream - 1/2 cup semi-sweet chocolate chips - 2 tablespoons powdered sugar - 1 teaspoon pure vanilla extract - Pinch of sea salt - Fresh berries (like raspberries or strawberries) for garnish (optional) - Fresh mint leaves for garnish (optional) Accurate measuring makes a big difference in baking. Use a liquid measuring cup for cream. Look for the meniscus, or curve, at the top of the liquid. For dry ingredients like sugar, use a dry measuring cup. Fill it and level it off with a straight edge. This keeps your amounts correct. You can swap some ingredients if you need. For a lighter version, use light whipping cream instead of heavy cream. If you want a different flavor, try dark chocolate instead of semi-sweet chocolate. For a vegan option, use coconut cream and dairy-free chocolate chips. This way, everyone can enjoy these mousse cups! To melt the chocolate, start with a microwave-safe bowl. Place 1/2 cup of semi-sweet chocolate chips in the bowl. Microwave it in 30-second bursts. Stir the chocolate well after each burst. This keeps it smooth and prevents burning. Once melted, let it cool a bit. You want it warm, not hot. Next, grab a large mixing bowl. Pour in 1 cup of heavy whipping cream. Use a hand mixer or a stand mixer with a whisk. Start whipping the cream on medium speed. Watch for soft peaks to form. This takes a few minutes. Slowly add 2 tablespoons of powdered sugar and 1 teaspoon of vanilla extract. Add a pinch of sea salt, too. Keep whipping until you see stiff peaks. This means the cream holds its shape well. Now it’s time to combine the melted chocolate and whipped cream. Take about one-third of the whipped cream. Gently fold it into the cooled chocolate with a spatula. This lightens the chocolate. Next, fold in the rest of the whipped cream in two parts. Be careful to keep the mix airy and fluffy. You want a smooth, light chocolate mousse. This mixture is the heart of your Easy Chocolate Mousse Cups. For the full recipe, refer to the previous section. To make sure your mousse is light and fluffy, focus on whipping the cream correctly. Start with cold heavy whipping cream. This helps create more air in the cream. As you whip, stop when soft peaks form. This means the cream holds its shape but is not too stiff. When you fold the whipped cream into the chocolate, do it gently. This keeps the air in the mixture and helps it stay fluffy. Chill time is key for the best mousse. After you mix the chocolate and cream, scoop it into cups. Cover them with plastic wrap and place them in the fridge. Let them chill for at least one hour. This helps the mousse set properly. If you can, chill them longer. The longer they sit, the better the flavors blend. For a beautiful touch, add garnishes to your mousse cups. Fresh berries like raspberries or strawberries add color and taste. A sprig of mint also looks nice and adds freshness. You can even drizzle some melted chocolate over the top for extra flair. Remember, the way you serve your mousse can make it even more special. For the full recipe, check out the Decadent Chocolate Mousse Cups! {{image_4}} You can make your chocolate mousse cups even better. Try adding flavors like coffee or mint. For coffee, mix in one tablespoon of instant coffee granules when melting the chocolate. This gives a nice depth. If you love mint, add a few drops of mint extract to the cream before whipping. This adds a fresh twist. Want a dairy-free treat? You can replace heavy cream with coconut cream. Chill a can of coconut milk overnight. Scoop out the thick cream and whip it just like you would with regular cream. Use dairy-free chocolate chips for a creamy texture. This option keeps it rich and tasty without dairy. Garnishing makes your mousse cups stand out. Use chopped nuts like almonds or hazelnuts for a crunchy bite. Sprinkle chocolate shavings on top for a classy look. Fresh berries, like raspberries or strawberries, add color and flavor. You can also add a mint leaf for a fresh touch. Get creative with your garnishes to enhance both the taste and look of your dessert. To keep your chocolate mousse cups fresh, you need to store them right. First, cover each cup with plastic wrap. This will help keep air out and prevent drying. You can also use a tight lid if you have containers. Make sure the mousse stays cold in the fridge. Chocolate mousse cups last about 3 days in the fridge. After that, the texture may change. If you want to keep them longer, you can freeze the mousse. Just scoop it into freezer-safe containers. It can last up to 1 month in the freezer. When you are ready to eat them, thaw them in the fridge overnight. Use small glass jars or plastic cups to store your mousse. They should have lids to seal in freshness. Clear containers let you see the layers, making them look nice. If you don’t have small jars, regular bowls work too. Just remember to cover them well. The right container keeps your treats tasty and beautiful. Yes, you can make chocolate mousse ahead of time. This treat stays fresh in the fridge for up to three days. Just prepare it, chill it, and store it in airtight containers. This allows the flavors to deepen and the texture to set nicely. You can impress your guests by making it the day before your event. Just remember to add fresh toppings just before serving for the best look. If your mousse is too runny, don't worry! You can fix it with a few simple steps. First, check if you whipped the cream enough. It should form stiff peaks. If it’s still runny, you can try to fold in more whipped cream. Make sure to fold gently to keep the air in. If it still doesn’t set, you can chill it longer. The cold helps thicken it up nicely. To achieve the best chocolate flavor, use high-quality chocolate. I recommend semi-sweet chocolate chips for a rich taste. Melt them gently to keep their flavor intact. Also, adding a pinch of sea salt enhances the chocolate’s taste. Don't skip the vanilla extract; it adds depth to the flavor. You can also consider adding a dash of coffee for a delicious twist. For the full recipe, check the section above. This post covered how to make delicious chocolate mousse. We explored key ingredients and tips for perfect measurements. I shared step-by-step instructions to melt chocolate and whip cream. We also discussed ensuring a light texture and the best chill time. You can even add flavors and find great storage tips. Remember, practice makes perfect. Enjoy making mousse your way!

Indulging in rich chocolate mousse doesn’t have to be hard. With my easy recipe for Chocolate Mousse Cups, you can create a luxurious dessert in no time! Perfect for any …

Read more

Categories Desserts

Blackened Fish Taco Bowls Flavorful and Simple Meal

May 27, 2025 by Chef Elliot
- 1 lb white fish (tilapia or cod) - 2 cups cooked quinoa or rice - 1 ripe avocado, sliced These main ingredients form the heart of the blackened fish taco bowls. The white fish provides a mild flavor and a great texture. You can use either tilapia or cod based on your preference. Quinoa or rice serves as a hearty base that fills you up. The ripe avocado adds a creamy touch and enhances the dish’s richness. - 2 tablespoons smoked paprika - 1 teaspoon cayenne pepper - Salt and pepper to taste Spices make this dish pop! Smoked paprika gives a rich, smoky flavor. Cayenne pepper adds a nice kick. Salt and pepper help balance the flavors. These spices create a bold crust on the fish when cooked, making each bite exciting. - 1 cup shredded lettuce - Lime wedges for serving Toppings bring freshness and crunch. Shredded lettuce adds a nice texture and color. Lime wedges are perfect for squeezing over the bowl. They brighten the flavors and make the dish even more refreshing. For the full recipe, you can check the complete instructions and tips to create these tasty bowls. Marinating the spices mixture Start by mixing spices in a bowl. Combine smoked paprika, cayenne pepper, garlic powder, onion powder, oregano, and salt and pepper. This mix gives the fish a bold flavor. Coating the fish strips Take your fish strips and rub the spice mix all over them. Make sure to coat both sides well. Let the fish sit while you heat your skillet. This helps the fish soak in the flavors. Heating the skillet Heat a large skillet over medium-high heat. Add olive oil and let it shimmer. This shows the pan is hot enough for cooking. Searing the fish Carefully place the fish strips in the hot skillet. Cook them for about 3 to 4 minutes on each side. Look for a dark crust to form. When done, the fish should be fully cooked and flavorful. Layering the base ingredients Grab four bowls and add a scoop of cooked quinoa or rice. This will be the base of your bowls. Adding the toppings On top of the base, layer shredded lettuce, diced tomatoes, sliced avocado, corn, and black beans. Make each bowl colorful and fresh. Top with Fish Place the blackened fish strips on top of the veggies. This makes the dish look great and keeps the fish warm. Garnish and Serve Sprinkle fresh cilantro on each bowl for a pop of flavor. Serve with lime wedges for squeezing over the top. You can also add salsa or hot sauce for extra heat if you like. Enjoy your delicious Blackened Fish Taco Bowls! For the full recipe, check out the complete guide. To ensure the fish is evenly coated, use your hands. Rub the spice mix on every strip. This will help the fish soak up all the flavors. Let it sit for a few minutes to absorb the spices. The perfect cooking time for blackened fish is key. Each side needs about 3-4 minutes in the hot skillet. You want a dark crust but not burnt fish. Check for a firm texture to know it’s done. Presenting the bowls can be a fun part. Start with a colorful plate. Make sure to layer the ingredients high. The mix of colors will draw everyone in. Add a slice of lime or sprinkle cilantro on the edge for flair. For beverage pairings, think light and refreshing. A cold lager or a citrusy soda works well. You could also serve with a simple iced tea. Both balance the spices nicely. For blackening, a heavy cast-iron skillet is your best friend. It holds heat well and creates that perfect crust. Make sure it's preheated before adding the fish. You’ll need a few essential utensils for assembly. A large spoon helps to layer the bowls. A sharp knife is great for slicing veggies. Keep a cutting board handy for easy prep. {{image_4}} I love to mix things up in my blackened fish taco bowls. You can swap fish for shrimp or chicken. Shrimp cooks quickly and adds a nice touch. Chicken provides a heartier feel. Just season and cook them the same way. For a vegan option, try grilled vegetables. Zucchini, bell peppers, and corn work well. Grilling gives them a smoky flavor that pairs perfectly with the spices. You can change the base of your bowl too. Instead of using quinoa, try couscous or rice. Both are light and tasty choices. If you want something low-carb, use lettuce wraps. They make a fresh and crunchy base. Just fill them with your toppings and fish. To add more flavor, think about new spices or sauces. Try some chili powder or cumin for an extra kick. You could also drizzle on a spicy sauce for more heat. Adding grilled pineapple or mango salsa is a fun twist. The sweetness balances the spices well. It creates a burst of flavor in every bite. For more details, check the Full Recipe for all the options. To keep your Blackened Fish Taco Bowls fresh, store them in an airtight container. This helps keep out air and moisture. Place the fish, veggies, and grains in separate containers if possible. This keeps everything crisp and flavorful. You can store leftovers in the fridge for up to three days. Keep an eye on the fish; it will not last as long as the other ingredients. When it's time to heat up your leftovers, I recommend using a skillet. Heat the fish on medium for about two to three minutes. This method keeps the fish from getting rubbery. Stir the veggies gently to warm them without losing crunch. If you have rice or quinoa, heat them in the microwave for about one minute. You can add a splash of water to keep them moist. To keep all ingredients fresh, avoid reheating more than once. Enjoy your meal just like you made it fresh! For blackened fish taco bowls, I recommend using white fish like tilapia or cod. These fish have a mild flavor and flaky texture. They soak up the spices well and cook quickly. You can also try snapper or mahi-mahi for a richer taste. Yes, this recipe can be gluten-free! Just make sure to use gluten-free grains, like quinoa or rice. You also want to check that your spices do not contain gluten. Most spices are safe, but it’s good to read labels. To add heat, increase the cayenne pepper in the spice mix. You can also drizzle in your favorite hot sauce over the finished bowls. Adding chopped jalapeños or a spicy salsa can kick it up a notch, too. You can serve these bowls with a side of black beans or a fresh corn salad. A simple avocado salad pairs well too. For crunch, add tortilla chips or serve with lime wedges for extra zest. You can also offer a refreshing drink, like a mango lemonade, to balance the spices. This blog post covered a tasty blackened fish taco bowl recipe. We began with main ingredients, like white fish and quinoa. Next, we went through the cooking steps for perfect fish. You learned great tips, like the right equipment and serving ideas. We also explored tasty variations, such as using shrimp or grilled veggies. In summary, this recipe is flexible and easy. You can enjoy it in many ways. Now, it's time for you to try making it and share your delicious results!

If you’re craving a quick, tasty meal, look no further than Blackened Fish Taco Bowls! They’re packed with flavor and easy to prepare. I’ll show you how to make a …

Read more

Categories Dinner

Spicy Shrimp and Avocado Rice Bowl Flavorful Meal

May 27, 2025 by Chef Elliot
To create a delicious Spicy Shrimp and Avocado Rice Bowl, gather these ingredients: - 1 lb (450g) large shrimp, peeled and deveined - 1 cup jasmine rice - 2 ripe avocados, diced - 1 red bell pepper, diced - 1 cucumber, sliced into rounds - 1 tablespoon olive oil - 2 tablespoons sriracha sauce (adjust to taste) - 1 teaspoon garlic powder - 1 teaspoon smoked paprika - Juice of 1 lime - Salt and freshly ground black pepper, to taste - Fresh cilantro leaves, for garnish Here are some common conversions to help you with your cooking: - 1 cup = 240 mL - 1 tablespoon = 15 mL - 1 teaspoon = 5 mL - 1 lb = 450g This can help you adapt the recipe for different serving sizes or ingredient availability. The Spicy Shrimp and Avocado Rice Bowl is not just tasty; it is also nutritious. Here's a quick overview of its nutritional benefits: - Shrimp: High in protein and low in calories. It also has healthy omega-3 fatty acids. - Avocado: Packed with healthy fats, fiber, and vitamins. It supports heart health. - Jasmine Rice: A good source of carbohydrates for energy. - Vegetables: Bell pepper and cucumber add vitamins, minerals, and hydration. This meal is balanced, offering protein, healthy fats, and carbs, making it a complete dish. You can find the full recipe [here](#). To cook the jasmine rice, you need a pot with a lid and a measuring cup. Rinse the rice in cold water until the water is clear. This step helps remove excess starch. Measure 1 cup of rice and 1.5 cups of water. In your pot, bring the water to a boil. Then, lower the heat and cover the pot. Cook for about 15 minutes until tender. Fluff the rice gently with a fork. Let it cool while you prepare the shrimp and veggies. For the shrimp marinade, gather these ingredients: olive oil, sriracha sauce, garlic powder, smoked paprika, lime juice, salt, and black pepper. In a bowl, combine the shrimp with the marinade. Toss them to coat well. Let the shrimp sit for about 15 minutes. This time allows the flavors to blend. Heat a large skillet over medium-high heat. Add the shrimp in a single layer. Cook them for 2-3 minutes on each side. They should turn pink and opaque. Remove the shrimp and set them aside. To assemble your rice bowl, start with a base of jasmine rice. Add the cooked shrimp on top. Next, layer in the diced avocado, red bell pepper, and cucumber. Make it look nice! You can arrange them in a way that shows off each color. For a finishing touch, sprinkle fresh cilantro on top. This adds a pop of green and flavor. You can also serve extra sriracha on the side for those who want more heat. Enjoy your beautiful and tasty meal! For the full recipe, check the recipe section above. Store leftover rice and shrimp in separate containers. This keeps the rice fluffy and the shrimp tender. Use airtight containers to keep the food fresh. You can store them in the fridge for up to three days. To reheat, warm rice in the microwave or on the stove with a splash of water. For shrimp, heat gently to avoid overcooking. Shrimp come in various sizes. The cooking time changes based on size. For large shrimp, cook for 2-3 minutes on each side. For medium shrimp, aim for 1-2 minutes per side. If using small shrimp, cook them for just 1 minute. Always watch for the color change to know when they are done. They should turn pink and opaque. You can boost flavor with extra ingredients. Try adding fresh lime zest for brightness. Chopped jalapeños give a spicy kick. Fresh herbs like basil or mint can add a nice twist. Alternatively, drizzle with sesame oil for a nutty depth. Feel free to mix in seasonal veggies to make it your own. Adjust the heat by adding more sriracha or chili flakes. For the full recipe, check out the link above. {{image_4}} You can swap ingredients for a healthier bowl. Here are some ideas: - Use cauliflower rice instead of jasmine rice for a low-carb option. - Replace shrimp with grilled chicken or tofu for a leaner protein. - Add extra vegetables like zucchini or spinach for more fiber. Want to change the flavor? Here are some fun ideas: - Try different hot sauces like chipotle or harissa for a smoky kick. - Use fresh herbs like basil or mint for a fresh taste. - For a tangy twist, add some lemon zest or vinegar to the marinade. You can make a tasty vegan bowl too! Here’s how: - Replace shrimp with marinated chickpeas or tempeh for protein. - Use a plant-based yogurt sauce instead of sriracha for creaminess. - Ensure you pick a vegan-friendly rice option, like brown rice. For the full recipe, check out the Spicy Shrimp and Avocado Rice Bowl. To store leftovers, let the dish cool first. Use airtight containers to keep the shrimp and rice fresh. You can separate the shrimp from the rice to keep the flavors intact. Store everything in the fridge. Leftovers can last for up to three days. When you’re ready to eat, reheat the rice and shrimp. Use a microwave-safe bowl for quick heating. Add a splash of water to the rice to keep it moist. Heat in short bursts, stirring in between. This helps the rice heat evenly. The shrimp can be heated on the stovetop for best texture. Freezing is great for long-term storage. Place the shrimp and rice in separate freezer bags. Remove as much air as possible before sealing. Label the bags with the date. You can freeze them for up to two months. To thaw, place them in the fridge overnight. Reheat as mentioned above. Enjoy your Spicy Shrimp and Avocado Rice Bowl anytime! For the full recipe, check the earlier sections. To make this dish, start with fresh ingredients. Cook jasmine rice until fluffy. Marinate shrimp in sriracha, garlic powder, and lime juice. Cook the shrimp until pink. Then, layer rice in a bowl and top with shrimp, avocado, bell pepper, and cucumber. Garnish with cilantro for a fresh touch. Follow the Full Recipe for detailed steps and tips. If you cannot use shrimp, try chicken, tofu, or scallops. Each option brings a unique taste. Chicken works well, but cook it longer than shrimp. Tofu is great for a plant-based dish. Scallops cook quickly and have a mild flavor. You can adjust seasonings based on your choice. Yes, you can use brown rice. It has a nutty flavor and is more nutritious. However, brown rice takes longer to cook. Typically, it needs about 40-50 minutes. Use 2 cups of water for every cup of brown rice. Check for doneness by tasting. To lower the spice, use less sriracha. You can also replace sriracha with mild sauces or no heat at all. For extra heat, add red pepper flakes or cayenne. Adjust based on your taste and comfort level. Always start with a small amount; you can add more if needed. In this post, we covered the ingredients, cooking steps, and storage tips for a Spicy Shrimp and Avocado Rice Bowl. You learned how to cook rice perfectly, marinate shrimp, and create a lovely bowl. Remember, you can substitute ingredients for healthier options and adjust the spice to your taste. With these steps and tips, you can make a delicious meal that impresses everyone. Enjoy creating your own flavorful version of this dish!

Are you ready to spice up your meal routine? This Spicy Shrimp and Avocado Rice Bowl is packed with flavor and is sure to impress. I’ll guide you step-by-step through …

Read more

Categories Dinner

Cheesy Garbage Bread Delight Savory and Easy Recipe

May 27, 2025 by Chef Elliot
- 1 large loaf of fresh Italian bread - 1 cup shredded mozzarella cheese - 1 cup shredded sharp cheddar cheese - ½ cup cream cheese, softened - 1 cup mixed vegetables (diced bell peppers, onions, and mushrooms) - 1 cup cooked chicken or leftover rotisserie chicken, finely shredded - 2 tablespoons garlic butter, melted - 1 teaspoon Italian seasoning blend - Salt and black pepper to taste - Fresh parsley, chopped, for garnish For this recipe, the most special items are the cheeses and garlic butter. You can find shredded mozzarella and cheddar cheese at any grocery store. Look for the cream cheese in the dairy section. Garlic butter is easy to make at home. Just melt butter and mix in minced garlic. If you want a shortcut, some stores sell it ready-made. For the mixed vegetables, fresh ones are great, but frozen works too. Choose a mix of bell peppers, onions, and mushrooms to add flavor. If you have dietary needs, you can change some ingredients. For a vegetarian option, skip the chicken and add more veggies. Use a dairy-free cream cheese to make it vegan. If you're lactose intolerant, look for lactose-free cheese. You can also use gluten-free bread to make this dish suitable for those who avoid gluten. Just make sure the bread is fresh and has a good texture for the best results. 1. Preheat your oven to 375°F (190°C). This step warms the air for baking. 2. Prepare the bread by slicing the Italian loaf in half lengthwise. Set the halves aside. 3. In a large bowl, mix together the mozzarella, cheddar, and cream cheese. 4. Add the diced vegetables and shredded chicken to the cheese mixture. 5. Pour in the melted garlic butter and sprinkle the Italian seasoning. Stir well. 6. Taste the mixture and add salt and black pepper as needed for flavor. 7. Spread the cheesy filling evenly on the bottom half of the bread. 8. Place the top half back on the cheesy bottom. Press gently to hold it together. 9. Wrap the loaf in aluminum foil. This keeps the bread moist while it bakes. 10. Bake the wrapped loaf for about 20-25 minutes. This helps the flavors blend. 11. Remove the foil and bake for an extra 10-15 minutes. This makes the top golden and crispy. 12. Let the loaf cool for a few minutes. Then slice it into thick pieces. - Use fresh vegetables for the best flavor. Diced bell peppers, onions, and mushrooms work well. - Shred the chicken finely for even mixing. Leftover rotisserie chicken is a great option. - Soften the cream cheese first. This makes it easier to mix with other cheeses. - Set your oven to 375°F (190°C) before you start. - Bake wrapped for 20-25 minutes, then uncovered for 10-15 minutes. - Check for a golden brown top. This means it’s ready. For the complete instructions, refer to the Full Recipe. To get that perfect cheesy texture, use a mix of cheeses. I love combining mozzarella and sharp cheddar. Mozzarella adds stretch, while cheddar gives a rich taste. Make sure your cream cheese is soft. This helps it blend well with the other cheeses. When you mix them, stir until smooth. This makes every bite creamy and delicious. One common mistake is not preheating your oven. Always preheat to 375°F (190°C). If you skip this step, your bread may not cook evenly. Another mistake is overstuffing the bread. Use the right amount of filling to keep it from spilling out. Lastly, don’t skip the foil wrap. It helps keep the bread moist while baking. Serve Cheesy Garbage Bread Delight hot and fresh from the oven. It pairs well with marinara sauce for dipping. A side salad adds freshness and crunch. Try a simple green salad with a light vinaigrette. For drinks, a cold soda or a glass of iced tea works great. Sharing this bread at parties makes everyone happy! For detailed steps, check the Full Recipe. {{image_4}} You can make cheesy garbage bread your own! Use different meats or veggies. Here are some ideas: - Pepperoni: Add slices for a pizza twist. - Bacon: Crumble cooked bacon for a smoky flavor. - Spinach: Mix in fresh spinach for added greens. - Broccoli: Diced cooked broccoli gives a nice crunch. - Olives: Chopped olives can add a briny bite. Feel free to swap ingredients based on what you like. The filling is flexible and fun! You can easily make this dish vegetarian or vegan. For vegetarian, skip the meat and add more veggies. Try these options: - Mushrooms: They add a hearty flavor. - Zucchini: Shredded zucchini gives moisture and taste. - Sun-dried tomatoes: They add a sweet and tangy kick. For a vegan option, replace cheeses with plant-based versions. Use vegan cream cheese, vegan mozzarella, and nutritional yeast for a cheesy taste without dairy. To make your cheesy garbage bread even better, try these flavor boosters: - Spices: Add red pepper flakes for heat or smoked paprika for depth. - Herbs: Fresh basil or oregano can brighten the dish. - Sauces: Drizzle some hot sauce or ranch dressing before serving for extra flavor. Experiment with combinations that excite your taste buds. Each tweak can lead to a new favorite! For storing leftovers, wrap the cheesy garbage bread tightly in plastic wrap. Place it in an airtight container. You can also use aluminum foil if you don't have plastic wrap. This keeps the bread fresh and moist. To reheat, preheat your oven to 350°F (175°C). Unwrap the bread and place it on a baking sheet. Cover it with foil to keep it from drying out. Heat for about 10-15 minutes. You want the cheese to melt again and the bread to be warm. To freeze, slice the bread first. Wrap each slice in plastic wrap, then put them in a freezer bag. Remove as much air as possible. You can freeze it for up to three months. When ready to eat, thaw in the fridge overnight, then reheat as mentioned above. For the full recipe, check out the ingredients and steps to make this delight at home! You can use cooked turkey or sausage instead of chicken. Both add great flavor. If you want a meat-free option, try using extra vegetables. Mushrooms or spinach work well. You can also use tofu or tempeh for a protein boost. Just make sure to season your substitutes well for the best taste. Yes, you can prepare Cheesy Garbage Bread Delight ahead of time. Assemble the bread and filling, then wrap it in foil. Store it in the fridge for up to 24 hours. When you’re ready to bake, just pop it in the oven. This makes it a great option for meal prep or gatherings. To spice things up, add chopped jalapeños or red pepper flakes to the cheese mix. You can also use pepper jack cheese instead of regular cheese. For a smoky flavor, try adding chipotle peppers in adobo sauce. Adjust the spice level to suit your taste for a zingy twist! Cheesy Garbage Bread Delight is fun and tasty. We covered key ingredients and specialty items. You learned substitutions for different diets. The step-by-step guide helps you cook with ease. Tips ensure the perfect cheesy texture, avoiding common mistakes. Explore variations to fit your taste. Also, effective storage methods keep leftovers fresh. This dish is great for sharing, and your friends will love it. Enjoy making and savoring your Cheesy Garbage Bread Delight!

If you’re craving a fun and cheesy dish, look no further! My Cheesy Garbage Bread Delight is here to satisfy your taste buds. This recipe is easy and perfect for …

Read more

Categories Appetizers

Ultimate Cheesy Pepperoni Calzone Delicious Recipe

May 27, 2025 by Chef Elliot
To make the best calzone, you need simple yet key ingredients. Here’s what you will need: - 2 cups all-purpose flour - 1 teaspoon active dry yeast - 1 teaspoon salt - 1 tablespoon sugar - 3/4 cup warm water (about 110°F) - 1 tablespoon olive oil - 1 cup shredded mozzarella cheese - 1/2 cup sliced pepperoni - 1/4 cup ricotta cheese - 1/2 teaspoon Italian seasoning - 1/4 teaspoon red pepper flakes (optional) - Marinara sauce for dipping (optional) These ingredients create a tasty calzone that is soft and cheesy. The dough needs flour, yeast, and water to rise. The filling combines cheese and pepperoni for a delicious bite. If you want to add more taste, try these optional ingredients: - Fresh basil leaves - Sliced olives - Bell peppers - Mushrooms - Spinach These add-ons bring new flavors and textures. You can mix and match as you like. Be creative and make the calzone your own! Choosing the right ingredients makes a big difference. Here are my tips: - Flour: Use high-quality all-purpose flour for the best dough texture. - Cheese: Buy fresh mozzarella for a gooey filling. Avoid pre-shredded cheese as it may not melt well. - Pepperoni: Look for thick slices of pepperoni for a bold flavor. - Olive Oil: Use extra virgin olive oil for a richer taste. - Fresh Herbs: If using fresh herbs like basil, choose vibrant green leaves. These tips help ensure your calzone tastes great. Quality ingredients lead to a better meal. For the full recipe, check the earlier section. To start, mix warm water, yeast, and sugar in a small bowl. Wait about 5 minutes until it looks frothy. This means the yeast is ready! In a bigger bowl, whisk flour and salt together. Then, add the frothy yeast mix and olive oil. Stir until it starts to look like dough. Next, knead the dough on a floured surface for about 5-7 minutes. You want it to feel smooth and elastic. This step is key for a great texture! Shape the dough into a ball and put it in a greased bowl. Cover it with a damp cloth and let it rise in a warm spot for 1 hour. It should double in size. While the dough is rising, make the filling. Grab a mixing bowl and combine shredded mozzarella, ricotta, sliced pepperoni, Italian seasoning, and red pepper flakes if you want some spice. Mix it well. This cheesy mix will make your calzone super tasty! Preheat your oven to 425°F (220°C). Once the dough is ready, gently punch it down to release the air. Roll it out on a floured surface until it’s about 12 inches wide. On one side of the dough, spoon your cheesy filling. Be sure to leave about an inch around the edge. This helps prevent spills! Fold the other half of the dough over the filling. Pinch the edges together tightly to seal it. You can also crimp the edges for a nice look. Now, place the calzone on a baking sheet with parchment paper. Bake for 15-20 minutes, until it’s golden and puffed up. Let it cool for a few minutes before slicing. Enjoy it with warm marinara sauce for dipping! For the full recipe, check the earlier section. To get the right dough texture, start with warm water. It should feel cozy, like a warm hug. This helps the yeast bloom. Blooming means the yeast comes alive and makes your dough rise. Knead the dough until it feels smooth and elastic, which usually takes about 5 to 7 minutes. If the dough sticks to your hands, add a little more flour. But not too much! You want it soft and supple, not dry. A soggy calzone ruins the fun, right? To prevent this, always bake your calzone on a baking sheet lined with parchment paper. This keeps it crispy. Also, make sure not to overfill it with sauce or cheese. Leave some space at the edges when filling. This will help seal it better, keeping the inside cozy and the outside crisp. Serving your calzone can be a blast! Try cutting it into wedges for easy sharing. You can even serve it on a wooden board for a rustic touch. Add a small bowl of warm marinara sauce for dipping. If you want to impress, sprinkle fresh basil on top. This adds color and makes it pop! You can also pair it with a light salad or some roasted veggies for a complete meal. Check the Full Recipe for more ideas! {{image_4}} You can easily make a vegetarian calzone. Just swap the pepperoni for fresh veggies. I love using spinach, mushrooms, and bell peppers. They add great flavor and color. You can also try different cheeses like feta or goat cheese. These options make a tasty and healthy dish. If you crave spice, add more red pepper flakes to the filling. You can also include jalapeños or banana peppers. These ingredients kick up the heat and add nice flavor. Adjust the spice level to what you enjoy. This spicy twist makes the calzone exciting and unique. Cheese is key to a great calzone. While mozzarella is classic, you can mix in other cheeses. Try provolone for a sharp taste or cheddar for a rich flavor. For a creamy touch, add some cream cheese or ricotta. Experimenting with cheeses gives your calzone a personal touch. Each blend brings a new taste experience to the table. To keep your leftover calzones fresh, let them cool first. Wrap each calzone in plastic wrap or foil. You can also place them in an airtight container. This helps keep moisture in and prevents them from drying out. Store the wrapped calzones in the fridge for up to three days. When you want to enjoy your calzone again, preheat your oven to 350°F (175°C). Unwrap the calzone and place it on a baking sheet. Bake for about 10-15 minutes. This will make the crust crisp and warm the filling. If you prefer a microwave, heat it for about 1-2 minutes. However, the crust won’t be as crispy. To freeze calzones, wrap each one tightly in plastic wrap. Then, place them in a freezer bag or airtight container. Label the bag with the date. You can freeze them for up to three months. To cook, thaw in the fridge overnight. Then, reheat in the oven as mentioned above. This way, you can enjoy your cheesy goodness anytime! You can tell your calzone is baked when it looks golden brown. It should puff up nicely. To check, tap the top; it should sound hollow. If it’s not golden yet, give it a few more minutes. Keep an eye on it to avoid burning. Yes, you can use store-bought dough! It saves time and is still tasty. Just roll it out and fill it as you would with homemade dough. This is a great option if you want a quick meal. Calzones pair well with many sides. You can try garlic butter for dipping. A fresh salad adds a nice crunch. Also, consider serving pickled vegetables for a tangy bite. These sides enhance the meal and make it more fun! You now have all you need to make cheesy pepperoni calzones at home. We've covered the key ingredients, the step-by-step process, and helpful tips to ensure your calzones are perfect. I also shared variations and storage options, so you can enjoy them later. Remember, fresh ingredients lead to the best flavor. Don’t hesitate to experiment with fillings. Cooking is fun, so make it your own! Enjoy your delicious creations and impress your friends and family.

Are you ready to indulge in a cheesy, pepperoni-filled delight? The Ultimate Cheesy Pepperoni Calzone is not just a recipe; it’s a delicious adventure! I’ll guide you through simple steps …

Read more

Categories Dinner

Chia Banana Bread Energy Bites Powerful and Healthy

May 27, 2025 by Chef Elliot
These bites are easy to make and packed with flavor. Here are the key ingredients you need: - 1 ripe banana, thoroughly mashed - 1 cup rolled oats - 1/4 cup chia seeds - 1/4 cup almond butter (or peanut butter) - 1/4 cup honey or maple syrup - 1 teaspoon pure vanilla extract - 1 teaspoon ground cinnamon - A pinch of fine salt These ingredients work together to create a tasty treat. The banana adds moisture and sweetness. Oats provide fiber and help bind everything together. Chia seeds bring extra nutrition and a nice crunch. Almond or peanut butter gives a creamy texture. If you want to get creative, consider these add-ins: - 1/4 cup dark chocolate chips - 1/4 cup chopped walnuts These optional ingredients can enhance both taste and texture. The chocolate chips add sweetness and richness. Walnuts provide a nice crunch and healthy fats. Each main ingredient has its own set of health benefits: - Banana: High in potassium and vitamin C, great for energy. - Rolled oats: A good source of fiber, which aids digestion. - Chia seeds: Packed with omega-3 fatty acids, protein, and fiber. - Almond butter: Rich in healthy fats, vitamin E, and magnesium. - Honey or maple syrup: Natural sweeteners that offer quick energy. These energy bites are not only delicious but also good for you. They make a great snack for any time of the day. For the full recipe, check [Full Recipe]. To start, grab a large mixing bowl. You need to mash one ripe banana until it’s smooth. Add in 1/4 cup of almond butter or peanut butter. Next, pour in 1/4 cup of honey or maple syrup. This gives your bites a nice sweetness. Don’t forget to add 1 teaspoon of pure vanilla extract for extra flavor. Mix all these ingredients together with a fork or whisk until everything is combined and smooth. This step is key for a good texture. Now it’s time to add the dry ingredients. Gently stir in 1 cup of rolled oats and 1/4 cup of chia seeds. Then, sprinkle in 1 teaspoon of ground cinnamon for warmth. Add a pinch of fine salt to balance the flavors. Mix well until you see no dry spots. If you want to get fancy, fold in 1/4 cup of dark chocolate chips and 1/4 cup of chopped walnuts. These extras add taste and crunch to your energy bites. With clean hands or a small cookie scoop, shape the mixture into small balls. Aim for about 1 inch in diameter. Place these balls on a baking sheet lined with parchment paper. This keeps them from sticking. Once you form all the bites, put the baking sheet in the fridge. Let them chill for at least 30 minutes. Chilling helps them firm up and makes them easier to eat. After that, they’re ready for you to enjoy! For storage, keep leftovers in an airtight container in the fridge. They stay fresh for up to one week. You can find the Full Recipe in the previous section. You can make these energy bites your own. Start with the base recipe. Then, feel free to add your favorite nuts or seeds. You might try pumpkin seeds for crunch or dried fruit for sweetness. You can also swap almond butter for peanut butter. This change can give a different taste. If you want a protein boost, consider adding protein powder. You can adjust the sweetness too. If you like it sweeter, add more honey or syrup. Store your energy bites in an airtight container. This keeps them fresh longer. A good tip is to layer them with parchment paper. This prevents them from sticking together. You can keep them in the fridge for about a week. For longer storage, freeze them. They can last up to three months in the freezer. Just thaw them in the fridge before eating. These energy bites are great any time of day. Enjoy them as a quick breakfast or snack. They also work well before or after workouts. If you have kids, they love these bites too. Serve them at playdates or school lunches. You can even pack them for road trips. They are easy to grab and eat. For a fun twist, serve them with yogurt or fruit. You can find the full recipe to try these ideas for yourself. {{image_4}} To make these energy bites vegan, simply swap honey for maple syrup. This keeps the sweetness while keeping it plant-based. You can also use almond butter or peanut butter. Both options work well and add a creamy texture. This vegan version stays just as tasty and filling as the original. For gluten-free energy bites, choose certified gluten-free rolled oats. This simple switch ensures you can enjoy these bites without worry. The other ingredients, like chia seeds and nut butter, are naturally gluten-free too. So, you can still have a healthy treat that fits your diet. You can mix things up with different flavors. Try adding dried fruit like cranberries or raisins. They give a nice chew and sweetness. Nuts like pecans or almonds can add crunch. For a fun twist, use spices like nutmeg or ginger. Even a dash of cocoa powder can make them chocolatey. Experiment with your favorites to find the perfect blend. For the full recipe, check out the details above. Store your Chia Banana Bread Energy Bites in an airtight container. Keep them in the fridge for the best taste and freshness. They stay good for about one week. If you want to enjoy them later, consider freezing them. To freeze your energy bites, place them on a baking sheet first. Make sure they are not touching each other. Freeze them for about one hour. Then, transfer the bites to a freezer-safe bag or container. This method helps keep them from sticking together. They can last for up to three months in the freezer. When you want to eat one, just take it out and let it thaw at room temperature. Check for changes in smell or texture. If they smell off or feel slimy, it’s best to toss them. Also, if you notice mold, discard them immediately. Fresh energy bites should be firm and smell sweet and nutty. Always trust your senses when deciding if they are still good to eat. Yes, you can use other fruits. Applesauce works well as a substitute. It adds moisture and sweetness. Mashed avocado can also work, but it alters the flavor. Try pureed dates for a rich taste. Experiment and find your favorite mix! You have options! Agave syrup is a great choice. Coconut sugar offers a less sweet flavor with a hint of caramel. Brown rice syrup is thick and sticky, perfect for binding. Stevia or monk fruit sweetener can be used for a lower-calorie option. Just remember to adjust the amount based on sweetness. These energy bites stay fresh for up to a week in the fridge. Store them in an airtight container to keep them from drying out. If you want them to last longer, consider freezing them. They will keep well for up to three months in the freezer. Enjoy them any time for a quick energy boost! In this post, we covered how to make chia banana bread energy bites. We explored the key ingredients and their benefits. I shared step-by-step instructions for perfect bites. You learned tips for customizing and storing them. Finally, we discussed variations, including vegan and gluten-free options. These energy bites are a tasty, healthy treat. Try different flavors to find your favorite. Enjoy making and sharing them with friends!

Looking for a quick and tasty snack? You’re in the right place! Chia Banana Bread Energy Bites are perfect for busy days. They are packed with flavor and nutrients. Plus, …

Read more

Categories Desserts

Reese’s Peanut Butter Banana Bread Irresistible Treat

May 27, 2025 by Chef Elliot
- 3 ripe bananas, well-mashed - 1/2 cup creamy peanut butter, at room temperature - 1/3 cup unsalted butter, melted and slightly cooled - 3/4 cup packed brown sugar - 1 large egg, beaten until frothy - 1 teaspoon pure vanilla extract - 1 teaspoon baking soda - 1/4 teaspoon fine sea salt - 1 1/2 cups all-purpose flour, sifted - 1/2 cup semi-sweet chocolate chips - 1/2 cup Reese’s Pieces candies The stars of this recipe are ripe bananas and creamy peanut butter. Ripe bananas add natural sweetness and moisture. You want them to be very soft and brown. Creamy peanut butter gives a rich flavor and adds to the texture. I suggest using unsalted butter to control the salt levels. Brown sugar brings a lovely caramel flavor, while the egg and vanilla extract bind everything together. Baking soda helps the bread rise, and sea salt balances the sweetness. The all-purpose flour creates the structure, while chocolate chips and Reese’s Pieces provide bursts of flavor in every bite. - Nuts (e.g., walnuts or pecans) - Dried fruits (like raisins or cranberries) - Additional chocolate chips If you want to switch things up, consider adding nuts for crunch. Walnuts or pecans work well here. Dried fruits like raisins or cranberries also add flavor and texture. For chocolate lovers, feel free to toss in more chocolate chips. The options are endless! Each choice can change the taste and feel of your banana bread. Always use fresh, high-quality ingredients for the best results. For the full recipe, check the link above. 1. First, preheat your oven to 350°F (175°C). This helps the bread bake evenly. 2. Grease a 9x5-inch loaf pan with butter or non-stick spray. This keeps the bread from sticking. 3. In a large bowl, mash three ripe bananas well. They should be smooth and creamy. 4. Add the melted butter and stir until mixed. This makes the base of your batter. 5. Pour in the creamy peanut butter and packed brown sugar. Mix until smooth. 6. Now, add one beaten egg and a teaspoon of vanilla extract. Stir until combined. 1. In a separate bowl, sift 1 ½ cups of all-purpose flour. This adds air and lightens the texture. 2. Sprinkle in one teaspoon of baking soda and ¼ teaspoon of sea salt. Mix well. 3. Gradually fold this dry mixture into your wet ingredients. Stop mixing once the flour is gone. 4. Now, add ½ cup of semi-sweet chocolate chips and ½ cup of Reese’s Pieces. Gently fold them in for bursts of flavor. 1. Pour the batter into your prepared loaf pan. Smooth the top with a spatula for even baking. 2. Place the pan in your preheated oven for 60-65 minutes. Check doneness with a toothpick. 3. If it comes out clean or with a few moist crumbs, your bread is ready. 4. Allow the bread to cool in the pan for about 10 minutes. Then transfer it to a wire rack. 5. For a great presentation, slice the bread and serve it warm. You can add a dollop of peanut butter and some extra Reese’s Pieces around it for a fun touch. Make sure to check the Full Recipe for more details! To get the best banana bread, start with ripe bananas. They should be soft and brown. Mash them well with a fork or a potato masher. This gives you a smooth consistency. Aim for no lumps in your banana mix. Mixing the batter is crucial. Combine dry and wet ingredients gently. When adding flour, fold it in slowly. Overmixing can make the bread tough. Stop mixing as soon as you see no dry flour. You can change the sweetener if you want. Try honey or maple syrup for a different taste. Just remember to adjust the amounts since these can be sweeter than sugar. Using different nut butters can also change the game. Almond butter or cashew butter can work well. Each nut butter adds its own unique flavor to the bread. For a fun way to serve, slice the bread warm. Top each slice with creamy peanut butter. Add a few Reese’s Pieces on top for color. If you want to gift the bread, wrap it in brown paper. Tie it with a twine bow to make it look special. This simple touch makes your gift feel extra thoughtful. For more details, check the Full Recipe. {{image_4}} You can lighten up this treat with smart swaps. Use less sugar or a sugar substitute. Applesauce works well in place of some butter, too. For a gluten-free option, try almond or coconut flour. These flours add a nice flavor and texture. Just remember to adjust the baking time, as gluten-free versions may cook faster. Want to change the taste? Add spices like cinnamon or nutmeg for warmth. These spices can make your bread smell divine. You can also mix in flavor extracts like almond or coconut. These will add a unique twist to your creation. Seasonal fruits can add fun flair. Try adding pumpkin for fall or zucchini in summer. You can also decorate for the holidays. Use festive spices and toppings to make it special. A sprinkle of nutmeg or a drizzle of chocolate can elevate your bread. Each variation gives you a new reason to bake. For the full recipe, check out the details above. To keep your Reese’s Peanut Butter Banana Bread fresh, store it right. When it’s cool, wrap it in plastic wrap or foil. If you plan to eat it within a few days, leave it at room temperature. Make sure it’s in a cool, dry place. If you want it to last longer, put it in the fridge. However, this might make it a bit dry. For long-term storage, freezing is a great option. Slice the banana bread first. This way, you can take out just what you need. Wrap each slice in plastic wrap tightly. Then, put the slices in a freezer bag. This helps keep them fresh for up to three months. The best way to store banana bread is to use airtight containers. These containers keep moisture in and air out. You can also wrap the loaf in plastic wrap or foil. If you prefer, use freezer bags for extra protection. Make sure to squeeze out as much air as possible before sealing. This helps prevent freezer burn. To check if your banana bread has gone bad, look for a few signs. First, check for mold. If you see any, throw it away. Next, smell the bread. If it has a sour or off smell, it’s best not to eat it. Banana bread stays good for about 3 to 5 days at room temperature. In the fridge, it can last about a week. When frozen, it can stay fresh for up to three months. Always trust your senses. If something seems off, it’s better to be safe! To ripen bananas fast, place them in a paper bag. This traps ethylene gas, which speeds up ripening. You can also add an apple to the bag for extra effect. If you need bananas today, bake them at 300°F (150°C) for 15-20 minutes. This will soften them quickly, but they will not taste as fresh. Yes, you can use frozen bananas! First, thaw them in the fridge overnight. If you’re in a hurry, place them in warm water for about an hour. Once thawed, drain any excess liquid and mash them. This will keep your banana bread moist and delicious. To make this recipe vegan, substitute the egg with a flax egg. Mix 1 tablespoon of ground flaxseed with 3 tablespoons of water. For butter, use a plant-based version like coconut oil or vegan butter. These swaps will keep the flavor rich and tasty. If your banana bread is too dense, check your mixing method. Overmixing can create a tough loaf. Make sure to fold the flour in gently until just combined. Also, ensure your baking soda is fresh. If it’s old, it may not rise well. Adding an extra ripe banana can add moisture and lightness, too. Reese’s Peanut Butter Banana Bread combines ripe bananas, peanut butter, and chocolate. Using simple steps, I showed how to prepare, bake, and store this delicious treat. I also shared tips on variations and optional add-ins. You can make it healthier or seasonal, depending on your taste. With this guide, you now have the tools to bake and enjoy a perfect loaf. Dive into this recipe, and share the joy of homemade banana bread!

If you crave a delicious twist on classic banana bread, you’re in for a treat! This Reese’s Peanut Butter Banana Bread blends ripe bananas with creamy peanut butter and sweet …

Read more

Categories Desserts
Newer posts
← Previous Page1 … Page11 Page12

TOSSED TASTES

Where flavors get playful! A fresh mix of easy bites, bold spices, and everyday cravings tossed into every recipe. 🍋🍅

PAGES

Home About Contact Privacy Policy Terms & Conditions Cookie Policy GDPR Policy Copyright Policy Disclaimer

CATEGORIES

Appetizers Desserts Salads Breakfast Dinner

Contact

  • Pinterest
  • Mail
Copyright © 2025 Tossed Tastes. All rights reserved.