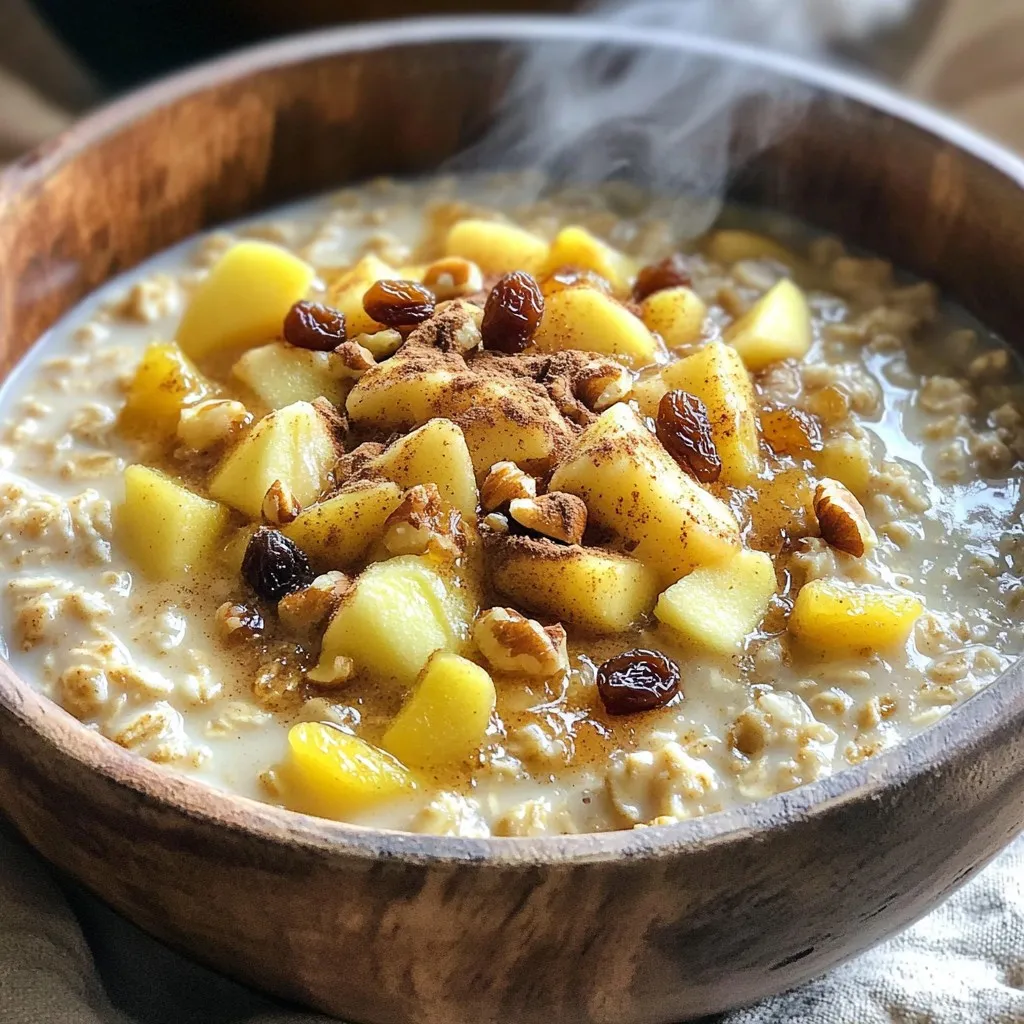
Skip to content
Tossed Tastes
  • Home
  • Appetizers
  • Desserts
  • Salads
  • Breakfast
  • Dinner
  • Privacy Policy
  • Contact
  • About

Chef Elliot

Crispy Air Fryer Zucchini Chips with Parmesan Recipe

July 1, 2025 by Chef Elliot
To make crispy air fryer zucchini chips, gather these main ingredients: - 2 medium zucchinis, washed and dried - 1 cup finely grated Parmesan cheese - 1 cup whole wheat breadcrumbs - 2 teaspoons garlic powder - 1 teaspoon onion powder - 1 teaspoon dried oregano - ½ teaspoon salt - ½ teaspoon freshly ground black pepper - 1 large egg, beaten - Cooking spray, for air frying You can add some fun twists to your zucchini chips with these optional ingredients: - Fresh herbs like basil or thyme for extra flavor - A pinch of cayenne pepper for some heat - Nutritional yeast for a cheesy flavor without dairy - Different breadcrumbs like panko for added crunch These crispy zucchini chips are a healthier snack option. Here’s a quick look at the nutrition: - Calories: About 150 per serving - Protein: 8 grams from the egg and cheese - Carbs: 18 grams, mainly from the zucchini and breadcrumbs - Fat: 7 grams, mostly healthy fats from the cheese - Dietary Considerations: These chips are vegetarian and can be made gluten-free with the right breadcrumbs. For the full recipe, check the Crispy Parmesan Air Fryer Zucchini Chips 🥒 details above. To start, wash the zucchinis under cool running water. Make sure to scrub off any dirt. After washing, dry them with a clean towel. Next, trim the ends off each zucchini. Slice them into thin rounds, about 1/8 inch thick. This thickness helps them cook evenly and get crispy. Now, it's time to make the coating. In a shallow bowl, mix together the finely grated Parmesan cheese, whole wheat breadcrumbs, garlic powder, onion powder, dried oregano, salt, and black pepper. Stir it well so that all the spices are mixed in. In a separate bowl, crack the egg and beat it until it looks smooth. This will be your egg wash that helps the coating stick to the zucchini. Preheat your air fryer to 370°F (190°C) for about 5 minutes. This step ensures your chips cook evenly. Take each zucchini slice and dip it into the egg wash first. Let any extra egg drip off. Then, press it into the breadcrumb mixture, making sure to coat it well. Place the coated zucchini chips in a single layer in the air fryer basket. Leave space between them to let air flow. If you have many slices, work in batches. Lightly spray the tops with cooking spray to help them get crispy. Air fry the zucchini chips for 10 to 12 minutes. Flip them halfway through to help them cook evenly. When they are golden brown, they are ready. After cooking, take them out and place them on a paper towel to cool. This helps absorb any extra oil. For the complete recipe, check out the full recipe section. To get that perfect crunch, use a light spray of oil. This helps the chips brown nicely. Place the zucchini chips in a single layer in the air fryer. Make sure not to crowd them. If they touch, they won’t crisp up well. Cook your zucchini chips in batches if needed. This gives them room to breathe and cook evenly. Flip them halfway through cooking. This ensures both sides get the same crispy finish. It’s a simple step that makes a big difference. Want to spice things up? Try adding smoked paprika or cayenne pepper to the breadcrumb mix. Fresh herbs like thyme or basil work well too. A little zest can turn a good chip into a great one. Feel free to experiment! {{image_4}} You can add fun flavors to your zucchini chips. Here are a few ideas: - Spicy Zucchini Chips: Mix cayenne pepper or red pepper flakes into the breadcrumb mix. - Herbed Zucchini Chips: Add fresh herbs like rosemary or thyme for a fragrant touch. - Cheesy Zucchini Chips: Mix in different cheeses like cheddar or mozzarella for extra zest. If you don’t have an air fryer, you can still enjoy these chips. Baking is a great option: - Preheat your oven to 425°F (220°C). - Spread the coated zucchini slices on a baking sheet in a single layer. - Bake for 20-25 minutes, flipping halfway through, until golden and crisp. Pan-frying is another choice: - Heat oil in a skillet over medium heat. - Fry the zucchini chips in batches for 2-3 minutes on each side until crisp. Need to adjust for dietary needs? Here are some options: - Gluten-Free: Use gluten-free breadcrumbs or ground almonds for the coating. - Low-Carb: Replace breadcrumbs with crushed pork rinds or almond flour. These changes keep your zucchini chips tasty while fitting your diet. For the full recipe, check out the complete guide. To keep your zucchini chips fresh, store them in an airtight container. Line the container with a paper towel to absorb moisture. Place the chips in a single layer if possible. This will help maintain their crunch. If you have a lot of chips, consider using multiple layers and changing the paper towel as needed. For longer storage, you can freeze the chips. Just make sure they cool completely before placing them in a freezer bag. Remove as much air as you can from the bag before sealing. When it’s time to enjoy your leftover chips, I recommend reheating them in the air fryer. Set the air fryer to 350°F (175°C). Heat them for about 5 minutes. This will help them regain their crispiness. You can also use an oven at the same temperature, placing the chips on a baking sheet. Avoid using a microwave, as it can make them soggy. Zucchini chips will stay fresh in the refrigerator for about 2 to 3 days. If you freeze them, they can last up to 2 months. After that, they may lose flavor and texture. Always check for any signs of spoilage before eating. If they look or smell off, it’s best to toss them. Enjoy your crispy snacks while they are at their best! For the full recipe, check out the Crispy Air Fryer Zucchini Chips with Parmesan recipe. To make zucchini chips less soggy, start by removing moisture. Here are some tips: - Slice Thinly: Cut zucchini into thin rounds, about 1/8 inch thick. - Salt the Zucchini: Sprinkle salt on the slices and let them sit for 15-30 minutes. This draws out moisture. - Pat Dry: Use paper towels to pat the slices dry after salting. - Avoid Overcrowding: Place zucchini chips in a single layer in the air fryer. This helps them crisp up. Yes, you can use other vegetables! Here are some ideas: - Sweet Potatoes: Slice them thin and coat as you would zucchini. - Eggplant: Works well if you salt it first to reduce moisture. - Carrots: Cut into thin strips and follow the same coating method. These veggies can also become crispy and tasty snacks. Just keep the cooking times in mind, as they may vary. Dipping sauces can elevate your zucchini chips. Here are some tasty options: - Marinara Sauce: A classic choice for a tangy kick. - Ranch Dressing: Creamy and flavorful, perfect for dipping. - Yogurt Dip: Mix yogurt with herbs for a refreshing sauce. These sauces add extra flavor and make your snack even more enjoyable. For more ideas, check the full recipe. In this post, we covered how to make crispy zucchini chips. We discussed key ingredients, detailed steps for preparation, and tips for perfecting the crispiness. You learned about flavor variations and storage tips. Finally, we answered common questions to help you succeed. With these easy methods, you can enjoy healthy and tasty snacks anytime. Now, grab your zucchini and get cooking!

Looking for a tasty snack that’s guilt-free and easy to make? You’ll love these crispy air fryer zucchini chips with Parmesan! This simple recipe brings out the best flavors and …

Read more

Categories Appetizers

Luscious Lemon Zucchini Bread Moist and Flavorful Delight

July 1, 2025 by Chef Elliot
To make this delicious bread, you need a few key ingredients: - 1 cup grated zucchini, thoroughly squeezed to remove excess moisture - 1 cup granulated sugar - 1/2 cup unsalted butter, softened to room temperature - 2 large eggs, at room temperature - 2 teaspoons pure vanilla extract - 1 tablespoon freshly grated lemon zest - 1/4 cup freshly squeezed lemon juice - 1 1/2 cups all-purpose flour - 1 teaspoon baking powder - 1/2 teaspoon baking soda - 1/2 teaspoon salt - 1/2 teaspoon ground cinnamon These ingredients mix to create a moist and flavorful loaf. The zucchini adds moisture while lemon gives a bright taste. You can enhance the flavor with a few optional add-ins: - 1/2 cup chopped walnuts or pecans for crunch - Powdered sugar for dusting on top These add-ins can make your bread even more special. The nuts bring a nice texture and the powdered sugar adds a sweet touch. To bake this bread, you will need some basic tools: - A 9x5-inch loaf pan - Mixing bowls - A hand mixer or stand mixer - A whisk - A spatula - A toothpick for testing doneness Having these tools ready makes the baking process smooth. With the right equipment, you can easily whip up this delightful treat. Don't forget to check the full recipe for detailed steps! First, gather your ingredients. You need: - 1 cup grated zucchini, thoroughly squeezed to remove excess moisture - 1 cup granulated sugar - 1/2 cup unsalted butter, softened to room temperature - 2 large eggs, at room temperature - 2 teaspoons pure vanilla extract - 1 tablespoon freshly grated lemon zest - 1/4 cup freshly squeezed lemon juice - 1 1/2 cups all-purpose flour - 1 teaspoon baking powder - 1/2 teaspoon baking soda - 1/2 teaspoon salt - 1/2 teaspoon ground cinnamon - 1/2 cup chopped walnuts or pecans (optional for added crunch) - Powdered sugar for dusting (optional for a sweet finishing touch) Preheat your oven to 350°F (175°C). Grease a 9x5-inch loaf pan or line it with parchment paper to make removal easy later. In a large bowl, combine the softened butter and sugar. Use a hand mixer or stand mixer and beat them together. Mix on medium speed for about 3-4 minutes until the mixture is light and fluffy. Next, add the eggs one at a time. Make sure to mix well after each egg. Then stir in the vanilla extract, lemon zest, and lemon juice. Mix these until they are fully combined. In another bowl, whisk together the flour, baking powder, baking soda, salt, and ground cinnamon. Make sure there are no lumps in this dry mixture. Gradually add the dry mix to your wet mixture. Stir carefully until just combined. Be gentle, as overmixing can make the bread tough. Finally, fold in the grated zucchini and any nuts you wish to add. Pour the batter into your prepared loaf pan. Smooth the top with a spatula to help it bake evenly. Now, place the loaf pan in the oven. Bake for 50-60 minutes. Check if it’s done by inserting a toothpick in the center. If it comes out clean, your bread is ready. After baking, remove the pan from the oven. Let it cool in the pan for about 10 minutes. Then, gently transfer the bread to a wire rack to cool completely. If you want, dust the cooled zucchini bread with powdered sugar before slicing. Enjoy this treat with your afternoon tea or coffee! For the complete recipe, check out the Full Recipe. To make your lemon zucchini bread moist, follow these steps: - Squeeze the Zucchini: Make sure to squeeze out excess water from the grated zucchini. Too much moisture can make the bread soggy. - Use Room Temperature Ingredients: Bring your eggs and butter to room temperature. This helps them mix better, leading to a light texture. - Don’t Overmix: When you combine the wet and dry ingredients, mix just until combined. Overmixing can lead to a dense loaf. Here are some pitfalls to watch for: - Skipping the Zucchini: Don’t skip using zucchini. It adds moisture and a subtle flavor. - Ignoring Oven Temp: Always preheat your oven. Baking in a cold oven alters the baking time and texture. - Not Testing for Doneness: Use a toothpick to check for doneness. If it comes out clean, your bread is ready. Cooking times may vary based on your oven and pan size. Here are some tips: - Check Early: Start checking at 50 minutes. Ovens vary, and you don’t want burnt bread. - Use a Dark Pan: If using a dark pan, reduce the baking time slightly. Dark pans absorb heat faster. - Add Time if Needed: If the center is still wet, add more time in 5-minute increments. Patience is key for a perfect loaf. For the full recipe, check out the detailed instructions above. Enjoy the process of making this delightful treat! {{image_4}} If you want a gluten-free version, swap all-purpose flour for a gluten-free blend. Many blends work well in baking. For a vegan option, replace eggs with flaxseed meal mixed with water. Use a 1:3 ratio; one tablespoon of flaxseed meal mixed with three tablespoons of water equals one egg. You can also use coconut oil instead of butter for a plant-based fat. You can tweak the flavor by adding spices. Try nutmeg for warmth or cardamom for a unique twist. Adding fruits like blueberries or cranberries can enhance sweetness. Just reduce the sugar slightly to balance flavors. For a citrus kick, mix in orange zest along with the lemon zest. Each addition creates a new taste experience. Serve this zucchini bread warm or at room temperature. A light lemon glaze adds sweetness and shine. Pair it with fresh fruit or a dollop of whipped cream for extra flair. You could also toast slices lightly for a crispy bite. Enjoy it with tea or coffee for a delightful treat. Check out the full recipe for more tips. To keep your luscious lemon zucchini bread fresh, store it in an airtight container. This helps prevent it from drying out. If you want to keep it longer, wrap it tightly in plastic wrap before placing it in the container. Keep the bread at room temperature for up to three days. For longer storage, consider freezing it. Freezing the bread is easy and keeps it tasty. First, let the bread cool completely. Then, slice it into pieces for easy access later. Wrap each slice in plastic wrap, then place them in a freezer bag. Be sure to label the bag with the date. You can freeze the slices for up to three months. When you're ready to enjoy, simply thaw at room temperature or warm in the oven. Luscious lemon zucchini bread stays fresh for about three days at room temperature. If stored in the fridge, it can last up to a week. However, the bread may dry out in the fridge. To keep it moist, always return it to an airtight container after each slice. Enjoy this delightful treat while it's fresh for the best flavor! Yes, you can use yellow squash in place of zucchini. Both have similar textures and moisture levels. The taste may differ slightly, but the bread will still be delicious. Just remember to squeeze out the excess moisture like you would with zucchini. This helps keep the bread moist without being soggy. To check if your bread is done, insert a toothpick into the center. If it comes out clean or with just a few crumbs, your bread is ready. The top should be golden brown and firm to the touch. If it’s still wet, bake for a few more minutes. You can enjoy Luscious Lemon Zucchini Bread in many ways. Here are some great pairings: - A dollop of whipped cream adds a creamy touch. - A light lemon glaze enhances the citrus flavor. - Serve with tea or coffee for a perfect afternoon snack. - Add fresh fruit or yogurt for a balanced meal. These options will make your experience even more enjoyable! For the complete recipe, check out the Full Recipe section. You learned about making delicious lemon zucchini bread. We covered key ingredients and optional add-ins. I shared step-by-step instructions to guide you. You now know tips to avoid common mistakes. Variations make the recipe fun and unique. Lastly, I provided storage tips to keep your bread fresh. Enjoy baking this easy treat and share it with others. Your kitchen will smell amazing, and you’ll love every bite.

Are you ready to bake a treat that dances on your tongue? This Luscious Lemon Zucchini Bread is moist, flavorful, and perfect for any occasion. With a bright lemon taste …

Read more

Categories Desserts

Pumpkin Zucchini Bread Simple and Flavorful Recipe

July 1, 2025 by Chef Elliot
- 1 cup grated zucchini - 1 cup canned pumpkin puree - 2 cups all-purpose flour - 3 large eggs (room temperature) - 3/4 cup granulated sugar - 1/2 cup packed brown sugar - 1/2 cup chopped walnuts or pecans - 1/2 cup chocolate chips - 1 teaspoon baking powder - 1 teaspoon baking soda - 1 teaspoon ground cinnamon - 1/2 teaspoon ground nutmeg - 1/2 teaspoon salt When I make Pumpkin Zucchini Bread, I gather my ingredients first. Grating zucchini is key; it adds moisture. I use one cup of grated zucchini, making sure to squeeze out the extra water. For sweetness, I mix in one cup of canned pumpkin puree. This gives the bread its rich flavor. Next, I grab my flour. I use two cups of all-purpose flour for the perfect texture. Three large eggs, at room temperature, help bind everything together. I also add three-quarters of a cup of granulated sugar. This makes the bread sweet and delightful. For more flavor, I sometimes add optional ingredients. A half cup of packed brown sugar gives a deeper taste. I love adding nuts, so I choose between walnuts or pecans. A half cup is just right. If I want some chocolate, I add a half cup of chocolate chips. Spices bring life to my bread. I use one teaspoon of baking powder and one teaspoon of baking soda to help it rise. One teaspoon of ground cinnamon gives warmth. I add half a teaspoon of ground nutmeg and half a teaspoon of salt. These spices blend well with the pumpkin and zucchini flavors. For the full recipe and detailed steps, check out the [Full Recipe]. - Preheat oven to 350°F (175°C). - Grease or line two 9x5-inch loaf pans with parchment paper. - In a large bowl, combine 1 cup of grated zucchini and 1 cup of canned pumpkin puree. - In another bowl, whisk together 3 large eggs, 3/4 cup of granulated sugar, 1/2 cup of packed brown sugar, 1/2 cup of vegetable oil, and 1 teaspoon of vanilla extract. - In a different bowl, combine 2 cups of all-purpose flour, 1 teaspoon of baking powder, 1 teaspoon of baking soda, 1 teaspoon of ground cinnamon, 1/2 teaspoon of ground nutmeg, and 1/2 teaspoon of salt. - Gradually add the dry mixture to the wet ingredients. Stir gently until just combined. - Carefully fold in the zucchini and pumpkin mixture. - If you'd like, add 1/2 cup of chopped walnuts or pecans, or 1/2 cup of chocolate chips. - Distribute the batter evenly between the two loaf pans. - Bake for 60-70 minutes. Check with a toothpick; it should come out clean. This process will lead you to a delightful loaf of Pumpkin Zucchini Bread. For detailed ingredient measurements, refer to the Full Recipe above. Enjoy the sweet and spicy aroma filling your kitchen! - Avoid overmixing the batter: Mix just until you see no dry flour. Overmixing makes the bread dense. - Ensure eggs are at room temperature: This helps the batter blend better, giving a light texture. - Use fresh spices for better aroma: Fresh spices create a warm and inviting scent. They improve the taste too. - Experiment with different nut or chocolate varieties: Try walnuts, pecans, or even dark chocolate. Each adds a unique twist. - Pair with cream cheese or powdered sugar: A spread of cream cheese adds richness. Powdered sugar gives a sweet touch. - Serve warm or at room temperature: Warm bread melts toppings better. Room temperature is perfect for flavor. For the full recipe, make sure to gather your ingredients and enjoy the process! {{image_4}} Gluten-free option You can easily make this bread gluten-free. Just substitute all-purpose flour with a gluten-free blend. This swap keeps the bread soft and moist. Look for a blend that contains xanthan gum. It helps mimic the texture of regular flour. Vegan alternative For a vegan version, replace the eggs with either flaxseed meal or applesauce. To use flaxseed, mix 1 tablespoon of flaxseed meal with 2.5 tablespoons of water. Let it sit for 5 minutes to thicken. If using applesauce, replace each egg with 1/4 cup of unsweetened applesauce. Both options give the bread the moisture it needs. Additional flavors Want to jazz up your bread? Incorporate cranberries or raisins for extra sweetness. These dried fruits add a nice burst of flavor. You can also try different spices like ginger or cloves. These spices bring warmth and depth to the bread, making each bite special. For the full recipe, check out the complete guide above and see how to make the most of these variations! To keep your pumpkin zucchini bread fresh, store it in an airtight container at room temperature. This method lets the flavors meld and keeps the bread soft. If you want to keep it longer, place it in the fridge. This can extend its shelf life by a few days. If you have extra bread, freezing is a great option. Wrap the bread tightly in plastic wrap or aluminum foil. This helps prevent freezer burn and keeps the bread fresh for up to 3 months. When you’re ready to eat it, thaw the bread at room temperature or in the fridge overnight. Enjoy it just like it was fresh! For more detailed steps, check out the Full Recipe. Pumpkin Zucchini Bread typically remains fresh for about 4-5 days. To keep it tasty, store it in an airtight container at room temperature. If you want it to last longer, consider refrigerating it. Yes, it can be baked and stored in advance. I often bake a batch on the weekend. Then, I can enjoy slices during the busy week. Just let it cool completely before wrapping it up. If you don’t have zucchini, consider using shredded carrots or apples as alternatives. Both add moisture and sweetness. Just remember to squeeze out any extra moisture to keep the bread from getting soggy. You can find the full recipe for Pumpkin Zucchini Bread above. This blog post walks you through creating delicious Pumpkin Zucchini Bread. We covered main and optional ingredients, step-by-step instructions, and helpful tips. You learned how to customize the bread with different flavors too. Remember, avoid overmixing for a perfect texture, and try fresh spices for a better taste. Enjoy this treat warm or at room temperature. Happy baking!

Are you ready to bake something delicious? This Pumpkin Zucchini Bread is simple and packed with flavor. You’ll love how the moist pumpkin and fresh zucchini blend perfectly, making each …

Read more

Categories Desserts

Cinnamon Sugar Zucchini Coffee Cake Delightful Recipe

June 29, 2025 by Chef Elliot
To make this delightful coffee cake, gather these fresh and simple ingredients: - 2 cups grated zucchini (packed, with excess moisture thoroughly squeezed out) - 2 cups all-purpose flour - 1 cup granulated sugar - 1/2 cup packed brown sugar - 1/2 cup unsalted butter, softened to room temperature - 3 large eggs - 1 tsp pure vanilla extract - 2 tsp baking powder - 1 tsp baking soda - 1 tsp ground cinnamon - 1/2 tsp fine salt - For the topping: - 1/4 cup granulated sugar - 1 tbsp ground cinnamon If you do not have all-purpose flour, you can use whole wheat flour. It will change the texture but still taste great. For sugar, you may try coconut sugar instead of granulated sugar. This option adds a caramel note to the cake. If you run out of eggs, you can substitute each egg with 1/4 cup of unsweetened applesauce. This works well and keeps it moist. You can enhance the flavor and texture of your cake by adding: - 1/2 cup chopped walnuts (for added crunch) - 1/2 cup chocolate chips (for a sweet twist) - Dried cranberries or raisins (for a fruity burst) These add-ins can make your coffee cake even more delicious and fun! Start by preheating your oven to 350°F (175°C). This step is key for even baking. Grease a 9x13 inch baking pan, then dust it lightly with flour. This will help the cake come out easily. Next, grab 2 cups of zucchini. Grate it finely, then squeeze out the extra moisture. This keeps the cake from being soggy. In a large bowl, combine 1/2 cup softened butter, 1 cup granulated sugar, and 1/2 cup brown sugar. Use an electric mixer on medium speed for 3-4 minutes. This makes the mixture light and fluffy. Next, add 3 large eggs one at a time. Mix well after each egg. Stir in 1 tsp pure vanilla extract for flavor. In another bowl, whisk together 2 cups flour, 2 tsp baking powder, 1 tsp baking soda, 1 tsp ground cinnamon, and 1/2 tsp salt. Gradually add this dry mix to the wet mix. Alternate with the grated zucchini. Start and end with the dry mix. Mix gently to avoid overmixing. If you like, fold in 1/2 cup chopped walnuts for a nice crunch. Pour the batter into the greased pan. Use a spatula to spread it evenly. In a small bowl, mix 1/4 cup granulated sugar with 1 tbsp ground cinnamon. Sprinkle this mixture over the batter for a sweet topping. Bake the cake for 30-35 minutes. A toothpick should come out clean when inserted in the center. Let the cake cool in the pan for about 10 minutes. Then, move it to a wire rack to cool completely before serving. This cooling time helps set the texture. For the best taste, enjoy it with a warm drink. You can find the Full Recipe within this section. To get a soft and moist cake, use fresh zucchini. Make sure to grate it finely. After grating, squeeze out as much moisture as you can. This prevents the cake from being soggy. Mix the wet and dry ingredients gently. Overmixing can make the cake tough. Aim for just combined batter for the best texture. One mistake is not measuring ingredients correctly. Use dry measuring cups for flour and sugar. Another mistake is skipping the creaming step. Cream the butter and sugars well until light. This adds air and helps the cake rise. Make sure to check your oven temperature too. An oven that is too hot can burn the cake. Serve the cake warm or at room temperature. Slice it into squares for easy serving. A dusting of powdered sugar makes it look fancy. For drinks, try pairing this cake with coffee or tea. The flavors blend well and enhance the taste. You can also enjoy it with a scoop of vanilla ice cream for a fun twist. Want the full recipe? Check it out in the Step-by-Step Instructions section! {{image_4}} You can make this cake healthier by swapping some ingredients. Use whole wheat flour instead of all-purpose flour. This change adds fiber and nutrients. You can also try sugar alternatives like honey or maple syrup. These options provide sweetness with fewer calories. To boost flavor, consider adding spices. Nutmeg or ginger pairs well with cinnamon. You can also add citrus zest. Try a teaspoon of lemon or orange zest. This addition brightens the flavors and gives a fresh taste. If you need a gluten-free cake, use a gluten-free flour blend. These blends often include rice flour and tapioca flour. They work well in baking and keep the texture nice. Remember to check that your baking powder is also gluten-free. To keep your cinnamon sugar zucchini coffee cake fresh, store it in an airtight container. This protects it from air and moisture. Place the cake at room temperature for up to three days. If you want to keep it longer, refrigeration is an option, but it might dry out. Wrap slices in plastic wrap for better moisture retention. You can freeze this delightful cake for later enjoyment. First, let it cool completely. Then, slice it into pieces. Wrap each slice in plastic wrap and place them in a freezer-safe bag. This keeps each slice separate. Label the bag with the date. The cake can freeze well for up to three months. To enjoy later, simply thaw it in the fridge overnight. When you want to enjoy a slice of the cake, reheat it for the best taste. Preheat your oven to 350°F (175°C). Place the slice on a baking sheet and cover it with foil. Heat it for about 10-15 minutes. This warms the cake without making it dry. For a quick option, use the microwave. Place a slice on a microwave-safe plate and heat for about 15-20 seconds. Enjoy your cake warm! Yes, you can use frozen zucchini. Be sure to thaw it first. After thawing, drain any extra water. This keeps your cake from being too soggy. Frozen zucchini can be a great time-saver too. To check if the coffee cake is done, use a toothpick. Insert it into the center of the cake. If it comes out clean, the cake is done. You can also look for a golden-brown top and a firm texture. This coffee cake tastes great with several drinks. Hot coffee enhances its flavors. A warm cup of tea also works well. You might even enjoy it with cold milk. Each drink adds a unique twist to your tasty treat. - Note: Full Recipe can be found within the Step-by-Step Instructions section. This article covered the essentials for making a tasty Cinnamon Sugar Zucchini Coffee Cake. We explored key ingredients, step-by-step instructions, and valuable tips for the best results. You learned about variations like healthier alternatives and gluten-free options. Remember to store extras properly and pair with your favorite drinks. Enjoy a slice of this delicious cake and share it with friends. With these tips, you'll master this recipe and impress everyone around you. Happy baking!

Are you ready to enjoy a warm slice of joy? This Cinnamon Sugar Zucchini Coffee Cake is just what you need. It blends sweet zucchini with a crisp cinnamon topping, …

Read more

Categories Desserts

Cheese Stuffed Zucchini Boats Tasty and Simple Recipe

June 29, 2025 by Chef Elliot
- 4 medium zucchinis - 1 cup fresh ricotta cheese - 1 cup shredded mozzarella cheese, divided - 1/2 cup grated Parmesan cheese - 1 cup cherry tomatoes, halved - 1 tablespoon dried Italian herbs - 2 cloves garlic, minced - 1/2 teaspoon red pepper flakes (optional) - Salt and freshly ground black pepper to taste - Extra virgin olive oil for drizzling - Fresh basil leaves for garnish (optional) To make tasty cheese stuffed zucchini boats, gather these ingredients. First, pick firm zucchinis. They hold up better when cooked. Fresh ricotta gives a creamy texture. Shredded mozzarella melts beautifully on top. Grated Parmesan adds a salty kick. Next, the cherry tomatoes bring sweetness. Dried Italian herbs enhance flavor. Minced garlic adds a punch. If you like heat, the red pepper flakes are great. Season with salt and black pepper to your taste. Drizzle olive oil to finish. Finally, fresh basil leaves can brighten up your dish. This simple mix of ingredients creates a burst of flavor. For the full recipe, check the details above. - Preheat the oven to 375°F (190°C). - Rinse and slice the zucchinis in half lengthwise. - Scoop out the center of each zucchini half. - Mix cheese and seasoning ingredients in a large bowl. To start, you must preheat your oven to 375°F (190°C). This step is key to getting your zucchini boats just right. Next, rinse the zucchinis under cold water. Then, slice each zucchini in half lengthwise. You want to create two long pieces. Now it’s time to scoop out the center of each half. Use a small spoon to do this carefully. Create a boat-like shape to hold all the tasty filling. Set the scooped-out flesh aside for later. In a large bowl, combine the filling ingredients. Add one cup of ricotta cheese, half a cup of grated Parmesan cheese, and half of the shredded mozzarella cheese. Then, drop in one cup of halved cherry tomatoes and two minced garlic cloves. Toss in one tablespoon of dried Italian herbs and half a teaspoon of red pepper flakes if you like heat. Don’t forget to add some salt and black pepper to taste. Chop the reserved zucchini flesh finely and mix it into the filling. Stir everything together until well blended. - Fill zucchinis with cheese mixture. - Bake for 25-30 minutes until tender and golden. Now, take each zucchini boat and fill it with your cheese mixture. Press down lightly to pack the filling in well. Place the stuffed zucchinis on a baking sheet lined with parchment paper. This makes cleanup easier later on. Drizzle a little extra virgin olive oil over the tops of the stuffed zucchinis for added flavor. Sprinkle the remaining mozzarella cheese on top for a delicious cheesy finish. Put the baking sheet in the preheated oven. Bake for 25-30 minutes. You’ll know they’re ready when the zucchinis are tender and the cheese is golden and bubbling. Once baked, take the zucchini boats out of the oven and let them cool for a few minutes. For a fresh touch, you can garnish with basil leaves before serving. Enjoy these tasty cheese stuffed zucchini boats! You can find the full recipe to refer back to anytime. - Choose firm zucchinis for better texture. - Don’t overfill to avoid spilling. When picking zucchinis, look for ones that feel heavy and firm. They should not have soft spots or blemishes. This gives you a nice base for stuffing. If you overfill the zucchini, the filling may spill out. Keep it just below the rim for best results. - Add fresh herbs for a pop of freshness. - Use high-quality cheese for richer flavor. Fresh herbs like basil or parsley can brighten your dish. Add them in the filling for a fresh taste. Using high-quality cheese, like aged Parmesan or fresh mozzarella, makes a big difference. It adds depth and creaminess to the dish. - Underbaking may result in crunchy zucchinis. - Overcooking can cause a mushy texture. Bake your zucchini boats until they are tender but not mushy. You want them soft enough to bite easily, but still holding their shape. Keep an eye on them in the oven. Check around the 25-minute mark to see if they are ready. {{image_4}} You can easily switch up the cheese in your zucchini boats. For a creamier bite, try using cream cheese instead of ricotta. If you want a tangy flavor, goat cheese works wonders. You can also mix in other melty cheeses. Fontina or cheddar add a rich, gooey texture. Experiment to find your favorite blend! To make your zucchini boats heartier, think about adding proteins. Cooked ground meat, like beef or turkey, gives a nice boost. For a plant-based option, lentils are great too. They add fiber and make the dish filling. You can also toss in chopped spinach or kale for extra nutrients. This adds color and flavor, making the dish even better! If you prefer a vegan version, there are tasty options too. Use cashew or tofu-based cheese for a creamy filling. These alternatives melt well and taste great. Instead of olive oil, you can use vegan butter. This keeps the dish rich and flavorful while sticking to a plant-based diet. Try these swaps for a delightful vegan treat! Store your cheese stuffed zucchini boats in an airtight container. They can last up to 3 days. When you want to enjoy them again, reheat in the oven. This keeps them crispy and delicious. For freezing, wrap each zucchini boat tightly. You can use plastic wrap or foil. This protects them from freezer burn. When you’re ready to eat, thaw them overnight in the refrigerator. This makes reheating easier. The oven is the best method to reheat these boats. It gives them a crispy texture. Preheat the oven to 375°F (190°C) and bake until hot. If you use the microwave for a quick reheat, the zucchini might soften. It’s faster, but the texture may not be as good. Enjoy your meal! Yes, you can assemble them and refrigerate before baking. This makes meal prep easy. Just pull them out when you're ready to cook. They should be tender and the cheese should be melted and bubbling. Use a fork to check if the zucchini feels soft. They pair well with a side salad or garlic bread. A fresh salad adds crunch, while garlic bread gives a nice, warm side. Yes, add more red pepper flakes or diced jalapeños. This gives a kick that makes the dish exciting and fun! Try it out if you love heat! In this post, we covered how to make cheese-stuffed zucchini boats. We explored the ingredients, step-by-step instructions, and tips for success. You learned about variations, storage, and answers to common questions. These zucchini boats are easy to prepare and deliciously satisfying. Whether you choose fresh or different ingredients, enjoy the simple process. Happy cooking!

If you’re looking for a tasty, easy dish to impress your family, try these Cheese Stuffed Zucchini Boats! This recipe transforms simple zucchinis into a cheesy delight packed with flavor. …

Read more

Categories Appetizers

Healthy & Moist Chocolate Zucchini Muffins Recipe

June 29, 2025 by Chef Elliot
- 1 cup finely grated zucchini - 1 cup whole wheat flour - 1/2 cup unsweetened cocoa powder - 1/2 cup honey or maple syrup - 1/2 cup dark chocolate chips (optional) - 1/4 cup unsweetened applesauce - 2 large eggs - 1 teaspoon vanilla extract - 1/2 teaspoon baking soda - 1/2 teaspoon baking powder - 1/4 teaspoon salt - 1/2 teaspoon ground cinnamon - 1/4 cup chopped walnuts or pecans (optional) These ingredients work together to create your healthy and moist chocolate zucchini muffins. The grated zucchini adds moisture without changing the taste. Whole wheat flour gives a nutty flavor and extra fiber. Cocoa powder brings rich chocolate taste. Honey or maple syrup adds sweetness without refined sugar. The applesauce replaces some fat and keeps the muffins moist. Eggs bind the mix, giving structure. Vanilla adds warmth and depth to the flavor. The baking soda and baking powder help muffins rise. Cinnamon offers a warm spice note, and nuts add crunch if you like. Using dark chocolate chips is optional but adds a delightful surprise. You can find the full recipe for these muffins in the provided section. Enjoy making these delicious treats! - Preheat oven to 350°F (175°C) - Line muffin tin with paper liners or grease Start by preheating your oven to 350°F (175°C). This step is very important for baking. While the oven warms up, prepare your muffin tin. You can either use paper liners or grease each cup lightly with cooking spray. This helps the muffins come out easily after baking. - Combine flour, cocoa powder, baking soda, baking powder, salt, and cinnamon In a large mixing bowl, gather your dry ingredients. You will need whole wheat flour, unsweetened cocoa powder, baking soda, baking powder, salt, and ground cinnamon. Whisk them together well. This ensures they mix evenly. Proper mixing helps your muffins rise well and taste great. - Blend honey/maple syrup, applesauce, eggs, and vanilla extract In another bowl, combine your wet ingredients. Use a whisk to blend honey or maple syrup, unsweetened applesauce, large eggs, and vanilla extract. Whisk until the mixture is smooth. This step adds sweetness and moisture to your muffins. - Stir in the grated zucchini - Fold dry ingredients into wet ingredients Next, add the finely grated zucchini to the wet mixture. Stir well to ensure it's evenly mixed in. Now, slowly add your dry ingredients into the wet mixture. Gently fold them together with a spatula. Be careful not to overmix. This keeps your muffins light and fluffy. - Fill muffin tins - Bake for 18-20 minutes Scoop the batter into the prepared muffin tin. Fill each cup about two-thirds full. This allows the muffins to rise without spilling over. Now, place the muffin tin in the oven. Bake for 18-20 minutes. Check doneness by inserting a toothpick into the center of a muffin. If it comes out clean, they are ready. - Let cool for 5 minutes in the tin - Transfer to a wire rack After baking, let the muffins cool in the tin for about 5 minutes. This helps them set. Carefully transfer them to a wire rack to cool completely. Enjoy these healthy and moist chocolate zucchini muffins fresh from the oven or at room temperature. For more details, find the Full Recipe. To get the perfect texture in your muffins, avoid overmixing the batter. Overmixing makes the muffins dense and tough. Instead, mix just until the ingredients blend. Also, use fresh zucchini for moisture. Grate it finely for the best result. Fresh zucchini adds a lot of moisture and keeps your muffins soft. You can boost flavor by adding spices like nutmeg or chocolate extract. A little nutmeg can add warmth. Chocolate extract deepens the cocoa flavor. You can also try flavored applesauce for a twist. Cinnamon or even pumpkin spice can change the taste and make your muffins more exciting. For a lovely look, dust your muffins with powdered sugar. This adds a sweet touch and looks great. You can also drizzle honey or maple syrup before serving. This extra step makes your muffins more appealing and even tastier. Enjoy your beautiful and delicious muffins! {{image_4}} You can make small changes for a healthier treat. Substitute honey with agave syrup. Agave syrup has a lower glycemic index, which is better for blood sugar. You can also use almond flour instead of whole wheat flour. Almond flour adds healthy fats and protein. It makes the muffins even more moist and fluffy. Want to make your muffins special? Try adding dried fruits like raisins or cranberries. These fruits add natural sweetness and a chewy texture. You can also add shredded coconut for a tropical twist. This gives your muffins a fun flavor and a bit of crunch. You can switch up the taste with seasonal flavors. In fall, use pumpkin spice for a cozy, warm taste. This spice mix adds warmth and depth to every bite. For a fresh twist, incorporate orange zest. The zest adds brightness and a citrusy kick that pairs well with chocolate. Store your muffins in an airtight container at room temperature for 2-3 days. This keeps them soft and fresh. You can enjoy them for breakfast or as a snack. For longer storage, freeze muffins individually wrapped. They can last for up to 3 months. This way, you can enjoy a tasty treat anytime! To reheat, use a microwave for 10-15 seconds. If you prefer, warm them in the oven. This helps restore their moist texture. Enjoy them warm for the best experience! For the full recipe, check out the Deliciously Moist Chocolate Zucchini Muffins section. It's best to finely grate for even distribution and texture. Finely grated zucchini mixes well into the batter. It keeps the muffins moist and fluffy. You avoid large chunks that may change the muffin's texture. Substitute with gluten-free flour blends for a gluten-free version. Many good options exist, such as almond flour or oat flour. Just check the blend for a good balance of ingredients. This way, you can enjoy these muffins without gluten. A toothpick inserted should come out clean when fully baked. When you see no wet batter, your muffins are ready. Checking this is important to avoid under-baking or over-baking. Perfectly baked muffins are soft and moist. Yes, you can leave them out for a lower-sugar option. The muffins will still taste great without the added sweetness. You can also swap chocolate chips for nuts or seeds if you want. This makes it easy to customize the recipe. For the full recipe, check above. You learned how to make delicious zucchini muffins from fresh ingredients. Remember to mix the wet and dry items separately for the best results. Don’t skip the tips for texture and flavor—these small details matter. Try adding spices or different fruits to customize your muffins. Enjoy your freshly baked treats in just a few days, or store them for later. Happy baking!

Craving a tasty treat that’s both healthy and delicious? Try my Healthy & Moist Chocolate Zucchini Muffins! Packed with zucchini but bursting with chocolate flavor, these muffins are perfect for …

Read more

Categories Desserts

Chicken Zucchini Casserole Comforting and Simple Meal

June 29, 2025 by Chef Elliot
To make a delightful Chicken Zucchini Casserole, gather these ingredients: - 2 large zucchinis, sliced into thin rounds - 2 cups cooked chicken, shredded or diced - 1 cup cherry tomatoes, halved - 1 cup shredded mozzarella cheese, divided - 1 cup ricotta cheese - 1 cup shredded Parmesan cheese, divided - 2 cloves garlic, minced - 1 teaspoon dried oregano - 1 teaspoon dried basil - ½ teaspoon red pepper flakes (adjust based on heat preference) - Salt and pepper to taste - 1 tablespoon olive oil - Fresh basil leaves for garnish (optional) You can easily adjust this recipe. Here are some ideas: - Use cooked turkey instead of chicken for a lighter option. - Swap zucchini for yellow squash if you prefer. - Choose dairy-free cheese for a vegan dish. - Use whole wheat pasta instead of zucchini for a heartier meal. - Replace olive oil with coconut oil for a different flavor. To create this casserole, you will need: - A large skillet for sautéing - A 9x13 inch casserole dish for baking - A mixing bowl for combining ingredients - A cutting board and knife for prepping veggies - A measuring cup and spoons for accuracy - Aluminum foil to cover the dish while baking These tools help make the cooking process smooth and fun! With the right ingredients and tools, you'll craft a meal everyone will love. You can find the [Full Recipe](#) for detailed steps to create this comforting dish. First, preheat your oven to 375°F (190°C). This step is key. A hot oven helps the casserole cook evenly. While it heats, gather your tools. You will need a large skillet, mixing bowls, and a 9x13 inch casserole dish. Make sure these are ready to go. In your skillet, pour in one tablespoon of olive oil. Heat it over medium heat. Then add two minced garlic cloves. Sauté them for about one minute. You want the garlic to smell good, not burn. Next, add two large zucchinis, sliced into thin rounds. Cook them for five to seven minutes. Stir often until they soften a bit. Season with salt, pepper, one teaspoon of dried oregano, and one teaspoon of dried basil. When done, take the skillet off the heat. Now, grab a large mixing bowl. Combine two cups of shredded chicken, the cooked zucchini, and one cup of halved cherry tomatoes. Add half a cup of shredded mozzarella and half a cup of shredded Parmesan cheese. Mix well so all flavors blend. In another bowl, take one cup of ricotta cheese. Stir in half a teaspoon of red pepper flakes and a pinch of salt. This adds creaminess and spice to your filling. Grease your casserole dish with a bit of oil or butter. Start layering by spooning half the chicken-zucchini mix into the dish. Spread half of the ricotta mixture on top. Now add half of the remaining mozzarella cheese. For the second layer, repeat with the rest of the chicken-zucchini mix, the ricotta, and finish with the remaining mozzarella and Parmesan on top. Cover with aluminum foil. Bake for 25 minutes. After that, remove the foil. Bake for another 15-20 minutes until the cheese bubbles and turns golden. Let it sit for ten minutes before serving. Enjoy this warm, cheesy delight. You can find the Full Recipe above for more details. To get that creamy texture in your Chicken Zucchini Casserole, use full-fat ricotta cheese. It blends well and adds richness. Mixing the ricotta with red pepper flakes helps enhance the flavor. You can also combine it with a bit of mozzarella for extra creaminess. Layering the cheeses is key. Use half of the mozzarella in the filling and the rest on top. This method helps create a gooey, melty top layer. To boost the flavor, add fresh herbs like thyme or parsley. These herbs add brightness and depth. You can also switch up the spices. For a bolder taste, try adding smoked paprika or cumin. If you enjoy heat, increase the red pepper flakes. Taste the mixture before layering, and adjust the salt and pepper as needed. Don't shy away from experimenting with flavors. This dish is versatile and can change with your mood. Serve your casserole warm and bubbly right from the oven. For a complete meal, pair it with a crisp side salad. A simple mix of greens with a lemon vinaigrette works well. You can also add crusty bread for dipping. If you want more veggies, roasted asparagus or steamed broccoli are great options. They add color and nutrition to your plate. Enjoy your delicious Chicken Zucchini Casserole with these tasty sides! For the full recipe, feel free to check the recipe section above. {{image_4}} If you want to change the protein in your Chicken Zucchini Casserole, you have great options. You can use turkey or even ham instead of chicken. Shredded rotisserie chicken is a time-saver too. For a lighter dish, try cooked shrimp or tofu. Just make sure to adjust cooking times based on what you choose. For a vegetarian twist, swap the chicken with extra veggies, like mushrooms or bell peppers. You can also add beans for protein. To make it vegan, replace the cheeses with plant-based alternatives. Cashew cheese or almond ricotta works well. Use vegetable broth instead of chicken broth for extra flavor. Seasonal veggies add freshness and nutrition. In summer, add eggplant or bell peppers. In fall, try butternut squash or spinach. These swaps not only taste great but also boost the health factor. You can mix and match based on what’s in season. This keeps your casserole exciting and full of flavor. For the full recipe, check out the detailed instructions above. To keep your Chicken Zucchini Casserole fresh, let it cool first. Once cool, cover it tightly with plastic wrap or foil. You can also transfer it to an airtight container. This way, it stays moist and tasty for up to three days in the fridge. When you're ready to enjoy leftovers, preheat your oven to 350°F (175°C). Place the casserole in an oven-safe dish and cover it with foil. This prevents the top from burning. Heat for about 20 minutes or until it's hot all the way through. If you want a crispy top, remove the foil for the last five minutes. If you want to save your casserole for later, freezing works great. Cut the casserole into portions and wrap each piece in plastic wrap. Then, place the wrapped pieces in a freezer bag. Squeeze out as much air as you can before sealing. You can freeze it for up to three months. When ready to eat, thaw it in the fridge overnight and reheat as described above. Enjoy your delicious Chicken Zucchini Casserole anytime! For a detailed guide, see the Full Recipe. Yes, you can use frozen zucchini. Thaw it first and drain any excess water. This prevents your casserole from becoming too watery. Frozen zucchini can work well, but fresh zucchini gives a better texture. The casserole is done when the cheese is bubbly and golden brown. You can also test it with a fork. If the fork goes through easily, it is ready. Letting it rest for ten minutes helps it firm up before serving. Several sides go well with Chicken Zucchini Casserole. A fresh garden salad adds a nice crunch. Garlic bread is great for dipping. You can also serve it with steamed broccoli or a light pasta dish. These sides complement the casserole's flavors well. For the full recipe, click here! You now have all the tools for a great Chicken Zucchini Casserole. We covered the ingredients and how to prepare them. You learned tips for a creamy texture and flavor boosts. Plus, my variations for protein and veggies let you customize the dish. Storing and reheating tips ensure nothing goes to waste. Remember, you can make this dish fit your needs with easy swaps. Enjoy your cooking adventure and share this recipe with others! It's a simple, tasty meal everyone will love.

Are you looking for a simple, heartwarming meal that’s packed with flavor? Chicken Zucchini Casserole might be just what you need! This dish brings together juicy chicken, fresh zucchini, and …

Read more

Categories Dinner

Easy Strawberry Peach Pie Bites Yummy and Simple Treat

June 29, 2025 by Chef Elliot
- 1 cup fresh strawberries, hulled and thinly sliced - 1 cup fresh peaches, pitted and diced into small pieces Fresh fruit makes these pie bites shine. I love using ripe strawberries and juicy peaches. They add natural sweetness and bright flavor. You can also mix in other fruits if you want. Just keep the total amount the same. - 1 package (8 oz) refrigerated crescent roll dough - 1 egg, beaten (for egg wash) Crescent roll dough is super easy to use. It gives you that flaky texture without all the work. The egg wash makes them golden and shiny. It's fun to see how they puff up in the oven! - 1/4 cup granulated sugar - 1 tablespoon freshly squeezed lemon juice - 1 tablespoon cornstarch - 1 teaspoon pure vanilla extract The sugar helps draw out the juice from the fruit. Lemon juice brightens the flavor. Cornstarch thickens the filling, so it won’t run out. Vanilla adds a warm and sweet note. These simple ingredients blend well to create a tasty filling. For the full recipe, check out the delightful Strawberry Peach Pie Bites section! - Preheat oven to 375°F (190°C). - Prepare baking sheet with parchment paper. - Combine strawberries, peaches, sugar, lemon juice, cornstarch, and vanilla. - Let the mixture macerate for 10 minutes. This helps the fruits mix well and get sweeter. - Unroll crescent roll dough and separate into triangles. - Spoon fruit filling onto the rolls and encase the filling. Start at the wide end and roll it up tight. - Apply egg wash and sprinkle coarse sugar on top. - Bake for 12 to 15 minutes until golden brown. Watch for that lovely golden color! Enjoy the process, and don't forget to check the full recipe for more details. To make the best pie bites, use ripe fruits. Ripe strawberries and peaches bring out the sweetest flavors. This makes each bite burst with taste. Next, you need to seal the dough well. Pinch the edges tightly. This keeps the filling inside while they bake. A good seal stops any leaks and gives a nice shape. These pie bites taste best warm or at room temperature. Serve them fresh from the oven for a treat. For an extra touch, pair them with whipped cream or vanilla ice cream. The creaminess adds a nice contrast to the fruit. Guests will love this combo! Make your pie bites look great on a platter. Choose a decorative one to draw attention. Stack them neatly for a lovely display. You can also garnish with fresh mint leaves. This adds a pop of color and freshness to your treat. These small details make your pie bites more appealing. For the full recipe, check out the instructions above! {{image_4}} You can easily switch fruits in this recipe. Swap strawberries with raspberries or blueberries for a new flavor. These berries add a nice burst of sweetness and tartness. You can also use different stone fruits like cherries or plums. Each fruit offers a unique taste and texture, making your pie bites exciting. If you want a different texture, try using puff pastry or phyllo dough. These options create a flakier bite. You can also experiment with cookie dough for a sweet twist. This change will give your pie bites a rich, dessert-like quality that kids will love. Want to make your filling pop? Incorporate spices like cinnamon or nutmeg. These spices add warmth and depth to the fruit flavor. You can also add a dollop of cream cheese for a richer flavor. The creamy texture makes each bite even more delightful. For the full recipe, check out the delightful Strawberry Peach Pie Bites ! Keep your Easy Strawberry Peach Pie Bites in an airtight container at room temperature. They stay fresh for up to 2 days. This way, you can enjoy them without worrying about spoilage. For longer storage, place the pie bites in the fridge. They stay fresh for up to 5 days. If you want to store unbaked pie bites, freeze them instead. They can last in the freezer for up to 2 months. Just make sure to wrap them tightly to avoid freezer burn. When you want to enjoy your pie bites again, reheat them in the oven. This method keeps them crispy. Preheat the oven to 350°F (175°C) and bake for about 10 minutes. If you are in a hurry, you can use the microwave. Heat them for about 15-20 seconds. Enjoy your delicious treat warm! For the full recipe, check the details above. You can make these pie bites ahead of time by preparing the filling and the dough separately. Keep the fruit filling in the fridge. When you're ready to bake, assemble the pie bites. This way, they stay fresh and tasty. Yes, you can use frozen fruit! Just make sure to thaw it first. Drain any extra moisture so the filling doesn't get too wet. This will help keep your pie bites crisp. You can get creative with fruits! Apples, pears, and citrus fruits like oranges and lemons can all be delicious alternatives. Each fruit offers a unique taste and texture, making this recipe fun to customize. In this post, I shared an easy way to make strawberry peach pie bites using fresh ingredients. We covered baking essentials and sweetening tips. You learned simple steps, from prepping to baking. I also gave tips for serving and storage, plus ideas for variations. These pie bites are fun to make and taste great. With ripe fruit, you'll impress family and friends. Enjoy exploring different flavors. I hope you create some delicious memories in your kitchen!

Looking for a quick, delicious treat? Try these Easy Strawberry Peach Pie Bites! With juicy strawberries and sweet peaches wrapped in warm, flaky dough, they’re perfect for any occasion. You …

Read more

Categories Desserts

Lemon Blueberry Zucchini Cake Tart and Tempting Treat

June 29, 2025 by Chef Elliot
To make my Lemon Blueberry Zucchini Cake, gather these essential items: - 2 cups grated zucchini (approximately 1 medium zucchini) - 1 cup fresh blueberries (plus extra for topping) - 1/2 cup unsalted butter, softened to room temperature - 1 cup granulated sugar - 2 large eggs, at room temperature - 1 teaspoon pure vanilla extract - 1 cup all-purpose flour - 1/2 teaspoon baking powder - 1/2 teaspoon baking soda - 1/4 teaspoon fine sea salt - Zest of 1 lemon - 2 tablespoons freshly squeezed lemon juice - 1/2 teaspoon ground cinnamon These ingredients work together to create a moist and flavorful cake. The zucchini adds moisture, while the blueberries give a burst of sweetness. The lemon zest and juice bring a bright, fresh flavor to the mix. You can add extra ingredients for more depth. Consider using: - 1/2 cup chopped nuts, like walnuts or pecans - 1/2 teaspoon almond extract for a nutty taste - A pinch of nutmeg for warmth These options can elevate your cake, making it even more delightful. Nuts add crunch, while almond extract gives a unique twist. If you're missing an ingredient, don't worry. Here are some swaps: - Use Greek yogurt instead of butter for a lighter option. - Substitute honey or maple syrup for sugar, but adjust the liquid in the recipe. - Replace all-purpose flour with almond or oat flour for a gluten-free version. These substitutions can fit various diets while keeping the cake delicious. Always remember to adjust cooking times and measurements where needed. For the full recipe, check out the Lemon Blueberry Zucchini Cake 🫐. First, preheat your oven to 350°F (175°C). Grab an 8-inch round cake pan. Grease it with butter and dust it with flour. This step helps the cake come out easily later. In a large mixing bowl, beat together the softened butter and granulated sugar. Use an electric mixer on medium speed. Mix until it looks light and fluffy, which takes about 3-4 minutes. Now, add the eggs one at a time. Make sure to mix well after each addition. Next, add the vanilla extract, lemon zest, and lemon juice. Mix until everything is combined. In another bowl, whisk together the all-purpose flour, baking powder, baking soda, fine sea salt, and ground cinnamon. This ensures all dry ingredients mix well. Gradually fold the dry mixture into the wet mixture using a spatula. Mix just until you don’t see any dry flour. The batter should be slightly lumpy. Now, gently fold in the grated zucchini and fresh blueberries. Be careful not to overmix! You want to keep the blueberries whole for texture. Pour the batter into your prepared cake pan. Use a spatula to smooth the top. For a pop of color, scatter extra blueberries on top before baking. Place the cake in your preheated oven. Bake for 30 to 35 minutes. You’ll know the cake is done when a toothpick inserted in the center comes out clean, with just a few moist crumbs. Once baked, let the cake cool in the pan for about 10 minutes. After that, carefully move it to a wire rack to cool completely. For a lovely finish, lightly dust the cooled cake with powdered sugar. Add more lemon zest and scatter a few fresh blueberries on top. Serve each slice with a dollop of whipped cream for a tasty treat. You can find the complete recipe [Full Recipe]. To make a moist Lemon Blueberry Zucchini Cake, use fresh zucchini. Grate it finely and do not squeeze out the moisture. This keeps the cake light and tender. Ensure your butter is soft but not melted. When mixing butter and sugar, beat until fluffy. This adds air and creates a soft texture. Incorporate eggs one at a time to help with the batter's rise. Avoid overmixing the batter. Overmixing can lead to a tough cake. Fold in the zucchini and blueberries gently. If you want a burst of blueberry flavor, use slightly crushed berries. Ensure your oven is preheated to 350°F before baking. Check your cake with a toothpick; it should come out clean. If not, bake a few more minutes. To serve your cake beautifully, dust the top with powdered sugar. Add a sprinkle of lemon zest for color. Place fresh blueberries on top for a pop of color. For a fancy touch, serve each slice with whipped cream. You can also add a mint leaf for a fresh look. These small details make your cake stand out. For the full recipe, click here: [Full Recipe]. {{image_4}} You can easily adapt this cake to be gluten-free. Use a gluten-free flour blend in place of all-purpose flour. Look for blends that contain xanthan gum. This helps mimic the texture of regular flour. The taste remains delicious, and the cake stays moist. Mixing in nuts or other fruits can enhance the flavor. Consider adding chopped walnuts or pecans for some crunch. You can also try different fruits like raspberries or strawberries. Just make sure to adjust the sugar if you use sweeter fruits. Frosting can change the whole feel of the cake. A cream cheese frosting pairs well with lemon and blueberries. For a lighter touch, use whipped cream mixed with lemon zest. You can also drizzle a simple lemon glaze over the top. This adds a nice shine and extra flavor. For the full recipe, check out the Lemon Blueberry Zucchini Cake section. To keep your Lemon Blueberry Zucchini Cake fresh, wrap it tightly. Use plastic wrap or aluminum foil. You can also place it in an airtight container. Store it at room temperature for up to three days. If you want it to last longer, refrigerate it. Just remember, the cake may dry out in the fridge. Freezing is a great way to save this cake for later. First, let the cake cool completely. Then, slice it into individual pieces. Wrap each slice in plastic wrap. After that, place the wrapped slices in a freezer bag. Press out as much air as possible before sealing. You can freeze it for up to three months. When you want a slice, just take it out and let it thaw at room temperature. If your cake feels a bit dry after storage, don't worry! You can bring it back to life. Simply microwave a slice for about 10 to 15 seconds. This will warm it up and make it soft again. You can also add a drizzle of lemon glaze or a dollop of whipped cream for extra moisture and flavor. Enjoy your cake just like it was fresh from the oven! Yes, you can use frozen blueberries. They work well but may give more juice. This can make the batter a bit wetter, so add a little extra flour if needed. To keep them from sinking, toss the frozen blueberries in a bit of flour before folding them into the batter. This simple trick helps keep your blueberries evenly distributed. Check the cake around 30 minutes of baking. Insert a toothpick into the center. If it comes out clean or with a few moist crumbs, the cake is done. The edges may also pull away from the pan slightly. If the toothpick is wet, bake for a few more minutes and check again. If you don't have zucchini, try grated carrots or apples. Both add moisture and sweetness to the cake. You can also use mashed bananas for a different flavor. Just remember to adjust sugar based on the sweetness of the substitute. For the best taste, keep the amount the same as zucchini in the recipe. In this blog post, we explored making a Lemon Blueberry Zucchini Cake. We discussed key ingredients, including essential and optional ones. I shared simple instructions for preparing, baking, and serving your cake. You learned tips for a moist cake and ways to present it beautifully. Also, we covered gluten-free variations and storage advice. Baking can be easy and fun. With this recipe, you can impress everyone. Enjoy creating this delicious cake and share it with friends and family!

Are you looking for a new dessert that dazzles in flavor and texture? Look no further than my Lemon Blueberry Zucchini Cake! This treat combines fresh zucchini, tangy lemon, and …

Read more

Categories Desserts

Oven Roasted Zucchini and Squash Flavorful Guide

June 29, 2025 by Chef Elliot
- 2 medium zucchinis - 2 medium yellow squashes - 1 red bell pepper - 1 small red onion - Extra virgin olive oil - Garlic powder - Dried oregano - Smoked paprika - Sea salt and freshly ground black pepper - Fresh basil leaves To make oven roasted zucchini and squash, you need a few key ingredients. Start with the vegetables. Zucchini and yellow squash are great choices. They both roast well and become tender. The red bell pepper and red onion add color and sweetness. Next, you need your seasonings. Extra virgin olive oil helps the veggies brown nicely. Garlic powder gives a tasty kick, while oregano adds a herby note. Smoked paprika brings a warm flavor, and salt and pepper enhance everything. For a fresh finish, consider basil leaves. They add a pop of color and a burst of flavor. You can find the full recipe to see how to bring all these ingredients together. Enjoy your cooking! Preheating your oven to 425°F (220°C) is very important. A hot oven helps the zucchini and squash roast evenly. This high heat brings out their natural sweetness. It also makes them crisp and tender, just how we want them. When you slice zucchini and squash, aim for half-moons. This shape lets them cook evenly. Use a sharp knife for clean cuts. Make sure the pieces are about the same size. This way, they roast together nicely. To coat the vegetables for even flavor, use a large bowl. Add the sliced zucchinis, squashes, red bell pepper, and red onion. Pour the olive oil on top. Then, sprinkle the garlic powder, oregano, paprika, salt, and pepper. Toss everything well to coat each piece. This step is key to tasty roasted veggies. Spread the seasoned vegetables on a large baking sheet. Make sure they’re in a single layer. This helps them roast, not steam. Place the baking sheet in the hot oven. Roast for 20-25 minutes. Halfway through, stir the mixture. This promotes even cooking and browning. When done, the vegetables should be golden and tender. Once they cool, garnish with fresh basil. For the complete process, refer to the Full Recipe. To make tasty oven-roasted zucchini and squash, you need fresh veggies. Look for zucchinis and yellow squashes that are firm, smooth, and vibrant. Pick ones that feel heavy for their size. Seasonal options are the best. Summer is when zucchinis and yellow squashes shine. You can also try colorful bell peppers. They add sweetness and crunch to your dish. Cooking time can change based on how tender you want your veggies. For crisp-tender zucchini and squash, roast for about 20 minutes. If you prefer them softer, add 5 more minutes. Keep an eye on them! Stir halfway through to help them cook evenly. You want a golden-brown color, which shows they’re perfectly done. To make your roasted veggies even more fun, add spices or herbs. Fresh garlic makes a big difference. You can also try red pepper flakes for heat. If you like herbs, fresh thyme or rosemary are great options. They add a lovely aroma and taste. Mix and match to find your favorite flavors! For the complete recipe, check the Full Recipe. {{image_4}} You can switch up the veggies for more fun! Try using: - Eggplant, cut into cubes - Asparagus, trimmed and halved - Cherry tomatoes, whole - Carrots, sliced into thin rounds - Bell peppers, any color, chopped Using seasonal veggies adds variety and freshness. You can also play with flavors. For a Mediterranean twist, add herbs like thyme and rosemary. Try an Italian vibe with balsamic vinegar and fresh parsley. For spice lovers, mix in chili flakes or cayenne pepper. Each option gives a new taste to the dish. Roasted zucchini and squash pair well with many foods. Serve them with grilled chicken for a hearty meal. They also taste great with fish or tofu. You can add them to a grain bowl with quinoa or brown rice. Mix them into pasta for a colorful dish. These ideas make your meal exciting and delicious. After you enjoy your oven roasted zucchini and squash, store leftovers in the fridge. Place the veggies in an airtight container. This keeps them fresh and tasty for up to three days. Make sure they cool to room temperature before sealing. This step helps to avoid moisture build-up, which can make them soggy. If you want to keep the flavors intact, try to avoid mixing them with other strong-smelling foods. You can freeze your roasted zucchini and squash for future meals. First, let the veggies cool completely. Next, spread them in a single layer on a baking sheet. Freeze them for about one hour until they are firm. Then, transfer the veggies to a freezer-safe bag. Be sure to remove as much air as possible before sealing. Label the bag with the date. They will last up to three months in the freezer. When it's time to enjoy your frozen or refrigerated veggies, reheating them correctly is key. For the best results, use the oven. Preheat it to 350°F (175°C). Spread the zucchini and squash on a baking sheet in a single layer. Heat for about 10-15 minutes, until they're warmed through. You can also use a microwave for quick reheating, but the oven gives better flavor and texture. Just cover the dish to keep them moist while heating. Roasting zucchini and squash takes about 20 to 25 minutes at 425°F (220°C). The time may change based on how thick you slice the veggies. Thinner slices cook faster, while thicker ones need more time. Always check for a light golden color and tenderness to know when they are done. Yes, you can use many types of squash! Summer squash, butternut squash, and acorn squash all work well. Each type adds a unique taste and texture. For a colorful dish, mix different squash types. Just keep in mind that cooking times may vary based on the type and size of the squash. Roasted zucchini and squash pair well with many dishes. Try serving them with grilled chicken or fish for a balanced meal. They also taste great with quinoa, rice, or pasta. For a vegetarian option, add them to a salad or serve with hummus. You can find the Full Recipe for more ideas! Roasting zucchini and squash can be fun and easy. We covered the key ingredients, from fresh veggies to flavorful seasonings. Preheating the oven and using proper slicing techniques are crucial for the best results. Remember to adjust cooking times based on your taste. Explore different veggies and flavors to keep meals exciting. With simple storage and reheating tips, you can enjoy leftovers easily. Now, it’s time to try these steps and create your own delicious dish. Enjoy every bite!

If you want to make a simple and tasty side dish, this guide on oven-roasted zucchini and squash is for you. I’ll show you how to choose the right veggies, …

Read more

Categories Dinner
Older posts
Newer posts
← Previous Page1 … Page22 Page23 Page24 … Page56 Next →

TOSSED TASTES

Where flavors get playful! A fresh mix of easy bites, bold spices, and everyday cravings tossed into every recipe. 🍋🍅

PAGES

Home About Contact Privacy Policy Terms & Conditions Cookie Policy GDPR Policy Copyright Policy Disclaimer

CATEGORIES

Appetizers Desserts Salads Breakfast Dinner

Contact

  • Pinterest
  • Mail
Copyright © 2025 Tossed Tastes. All rights reserved.