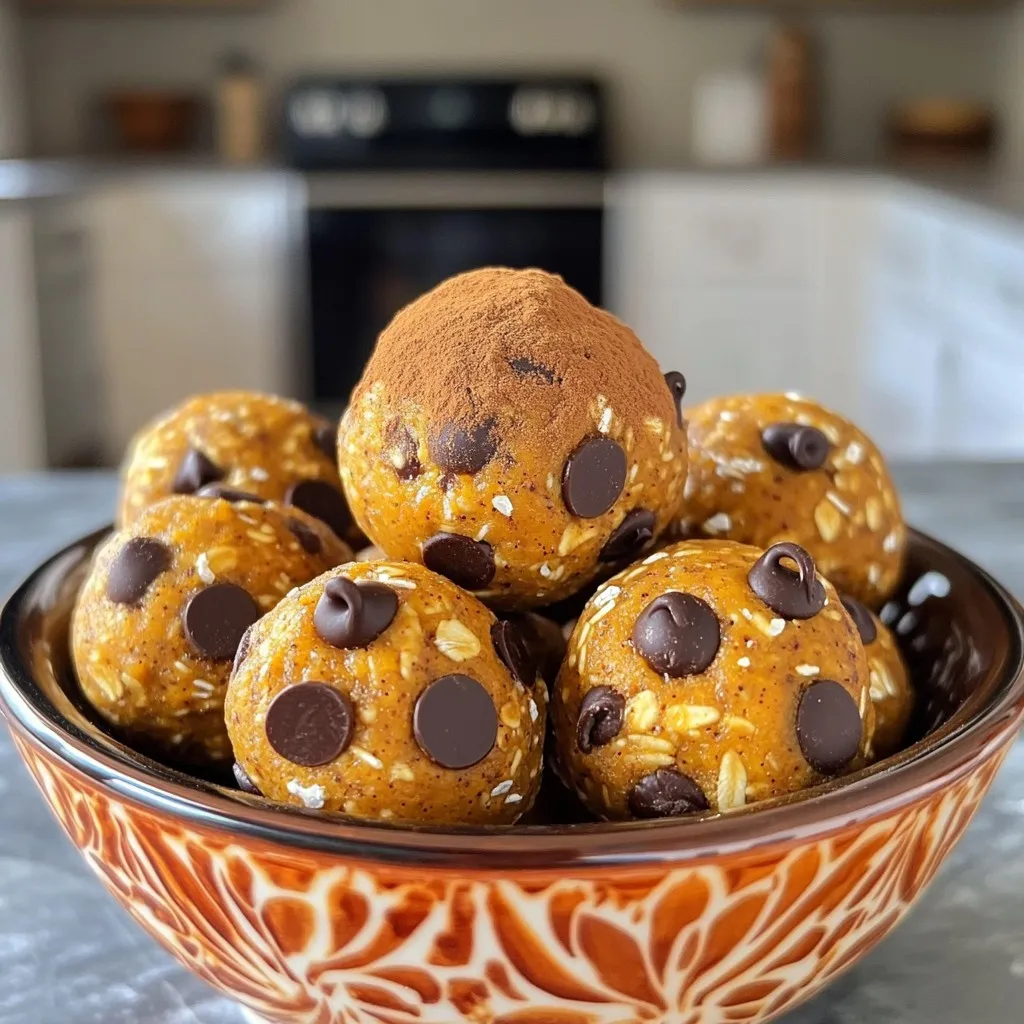
Skip to content
Tossed Tastes
  • Home
  • Appetizers
  • Desserts
  • Salads
  • Breakfast
  • Dinner
  • Privacy Policy
  • Contact
  • About

Chef Elliot

Fresh Tomato Ricotta Tart Flavorful and Simple Dish

June 24, 2025 by Chef Elliot
To make the Fresh Tomato Ricotta Tart, you will need: - 1 pre-made 9-inch tart shell - 1 ½ cups creamy ricotta cheese - 2 cups ripe tomatoes, sliced (a colorful mix of heirloom and Roma) - 1 tablespoon extra virgin olive oil (plus extra for drizzling) - 1 tablespoon fresh basil, finely chopped - 1 teaspoon freshly grated lemon zest - 1 teaspoon garlic powder - Sea salt and freshly ground black pepper to taste These ingredients combine to create a delicious dish. The tart shell gives a nice crunch. The ricotta adds creaminess. The tomatoes bring freshness and sweetness. You can also mix different tomato types for more flavor. You can enhance your tart with these optional garnishes: - Fresh basil leaves for a pop of green - Balsamic glaze for a sweet finish These add flavor and make your dish look pretty. You can serve the tart warm or at room temperature. Pair it with a simple green salad. This makes a great lunch or appetizer. Choosing the right tomatoes and ricotta is key. Look for: - Tomatoes that are firm and vibrant - Heirloom varieties for rich flavor - Roma tomatoes for their sweetness - Ricotta that is creamy and smooth Fresh ingredients make a big difference. They enhance the taste of your tart. When tomatoes are ripe, they burst with flavor. Good ricotta adds richness to the dish. Always trust your senses when selecting ingredients. This will help you create a flavorful and simple dish. For the complete recipe, check out the Full Recipe section. Start by preheating the oven to 400°F (200°C). This ensures even cooking. Next, take your pre-made 9-inch tart shell and place it on a baking sheet. This makes it easier to move in and out of the oven. Set the shell aside while you prepare the filling. In a medium bowl, mix 1 ½ cups of creamy ricotta cheese with 1 tablespoon of extra virgin olive oil. Add 1 tablespoon of finely chopped fresh basil, 1 teaspoon of freshly grated lemon zest, and 1 teaspoon of garlic powder. Sprinkle in some sea salt and freshly ground black pepper. Stir until the mixture is smooth and creamy. This blend gives the tart a rich flavor. Spread the ricotta mixture evenly across the bottom of the tart shell. Make sure it reaches the edges. Then, take 2 cups of sliced ripe tomatoes and arrange them on top. Use a colorful mix of heirloom and Roma tomatoes for a beautiful look. Drizzle a little olive oil over the tomatoes. Add another sprinkle of salt and pepper for flavor. Bake the tart for 25-30 minutes until the tomatoes soften and the crust turns golden brown. After baking, let it cool on a wire rack for about 10 minutes. Garnish with fresh basil leaves and, if you like, drizzle balsamic glaze for extra taste. For the complete recipe, check out the [Full Recipe]. To ensure your tart crust shines, start with a good quality pre-made shell. Here are my tips: - Chill the crust: Keep the tart shell in the fridge until ready to fill. This helps it hold shape. - Dock the crust: Use a fork to poke holes in the bottom. This prevents the crust from puffing up. - Pre-bake: Bake the shell for about 10 minutes before adding your filling. This gives it a nice, crisp base. Adding the right seasonings can elevate your dish. Here’s what I recommend: - Fresh herbs: Use fresh basil for a bright taste. You can also mix in thyme or oregano. - Lemon zest: It adds a fresh, zesty note that pairs well with the ricotta. - Sea salt and pepper: Always taste and adjust these seasonings for balance. They bring out the flavors of the tomatoes and cheese. This tart is versatile and great for any meal. Here are some ideas: - Warm or room temperature: Serve the tart warm or let it cool to room temp for a different experience. - Pair with salad: A simple green salad complements the tart nicely. Try a light vinaigrette. - Garnish: Add fresh basil leaves on top for a splash of color and flavor. Drizzle balsamic glaze for extra richness. For the complete recipe, check the Full Recipe section. {{image_4}} You can swap ricotta for other cheeses if you like. Cream cheese gives a rich taste. Feta adds a nice salty zing. Goat cheese brings a tangy flavor. Each cheese changes the tart’s taste. Feel free to mix cheeses for a unique blend. This tart is great for using seasonal veggies. Try spinach or zucchini in spring. Roasted bell peppers or eggplant work well in summer. In fall, add thinly sliced butternut squash. Each veggie adds color and taste to the tart. You can even use a mix of your favorites. Adding herbs and spices makes this dish special. Fresh thyme or oregano adds depth. A pinch of red pepper flakes gives a kick. You can also sprinkle some smoked paprika for a twist. Experiment with flavors to find your perfect mix. This tart is a canvas for your creativity. For more ideas, check out the Full Recipe. To keep your leftover tart fresh, wrap it tightly in plastic wrap. You can also place it in an airtight container. This helps to lock in moisture and flavor. Store it in the fridge for up to three days. If you want to enjoy it later, freezing is a great option. When you're ready to eat the tart, preheat your oven to 350°F (175°C). Place the tart on a baking sheet. Cover it loosely with aluminum foil to prevent the crust from burning. Heat for about 15-20 minutes. This will warm the tart evenly while keeping it crispy. If you choose to freeze the tart, wrap it tightly in plastic wrap and then in foil. You can freeze it for up to two months. To defrost, place it in the fridge overnight. Once thawed, reheat it in the oven for the best taste. Avoid microwaving it, as this can make the crust soggy. For the full recipe, check out the Vibrant Tomato and Ricotta Tart. Making a Fresh Tomato Ricotta Tart takes about 40 minutes. You will spend 15 minutes prepping the ingredients. Baking the tart will take around 25 to 30 minutes. This dish is quick to prepare, perfect for a weekday meal or a weekend gathering. Yes, you can use canned tomatoes, but fresh is better. Fresh tomatoes have a bright flavor that shines in this tart. Canned tomatoes may be softer and lack that crispness. If you use canned, drain them well to avoid sogginess. This tart pairs well with a simple green salad. A light vinaigrette adds a nice touch. You can also serve it with crusty bread or a glass of chilled white wine. For extra flavor, a drizzle of balsamic glaze enhances the taste. Enjoy with friends for a delightful meal. The Fresh Tomato Ricotta Tart is a simple yet tasty dish. You learned about key ingredients, from tomatoes to ricotta. We also discussed the preparation steps, ensuring your tart turns out well. Useful tips help enhance flavor and share the tart. Variations let you get creative with cheese and veggies. Proper storage keeps your leftovers fresh, and we answered common questions. Tasting this tart brings joy and satisfaction. Enjoy making it your own!

Ready for a dish that’s both tasty and easy? A Fresh Tomato Ricotta Tart is perfect for any meal. This recipe features bright tomatoes and creamy ricotta in a crispy …

Read more

Categories Appetizers

Make-Ahead Frittata Squares Easy and Delicious Meal

June 24, 2025 by Chef Elliot
- 8 large eggs - 1 cup whole milk - 1 bell pepper (diced) - 1 cup fresh spinach (chopped) - 1 cup cherry tomatoes (halved) - 1 small red onion (finely chopped) - 1 cup shredded cheese (cheddar or feta) - 1 teaspoon dried oregano - Salt and freshly ground black pepper - Olive oil (for greasing) These ingredients form the base of your frittata squares. The eggs and milk create a rich, fluffy texture. The bell pepper adds a sweet crunch, while the spinach brings a fresh flavor. Cherry tomatoes add juiciness and a pop of color. The red onion gives a nice depth of flavor. For the cheese, I recommend using sharp cheddar for a strong taste or creamy feta for a tangy twist. Dried oregano adds a warm, earthy note. Salt and pepper enhance all the flavors, making each bite delicious. Don't forget to grease your baking dish with olive oil. This step prevents sticking and ensures easy serving. You can find the full recipe within this article to guide you through the cooking process. - Preheat the oven to 375°F (190°C). - Grease a 9x13 inch baking dish with olive oil. First, you need to set your oven to 375°F (190°C). This is the perfect temperature for baking frittata squares. Next, take a 9x13 inch baking dish and grease it with olive oil. This step stops the frittata from sticking and makes cleanup easy. - Combine eggs and milk in a bowl. - Whisk until smooth and fluffy. In a large bowl, crack in eight large eggs and pour in one cup of whole milk. Now, whisk it all together until you see a smooth and fluffy mixture. This base adds nice texture to your frittata. - Add bell pepper, spinach, tomatoes, and onion. - Incorporate cheese, oregano, salt, and pepper. Next, chop and add one bell pepper, one cup of spinach, one cup of halved cherry tomatoes, and a small red onion to your egg mix. Stir gently to coat all the veggies. Then, mix in one cup of shredded cheese, one teaspoon of dried oregano, and season with salt and black pepper. This is where the flavor really builds. - Pour mixture into the baking dish. - Bake for 25-30 minutes until golden. Carefully pour your egg and veggie mix into the greased baking dish. Smooth the top to help it bake evenly. Place the dish in the oven and bake for 25-30 minutes. Your frittata will be ready when the edges turn golden and a knife inserted into the center comes out clean. - Cool for 10 minutes in the dish. - Cut into squares for serving. Once baked, take the dish out and let it cool for about 10 minutes. This cooling time helps set the frittata. After that, use a sharp knife to cut it into squares for serving. Enjoy your delicious, make-ahead frittata squares! For the full recipe, check out the details above. To make your frittata squares fluffy, whisk the eggs well. This step adds air and lightens the mix. You want a smooth and frothy mixture. Make sure to blend the milk in fully too; it helps create that soft texture. When baking, keep an eye on time. Ovens can vary in heat. Start checking at 25 minutes. The frittata is ready when the edges turn golden. A knife should come out clean from the center. For a beautiful plate, serve frittata squares on a nice platter. You can add fresh herbs like basil or parsley on top. This makes the dish pop with color. Pair these squares with a side of salsa for some zest. Slices of creamy avocado also complement the frittata well. For drinks, consider fresh juice or a light tea. They balance the meal perfectly. Store your frittata squares in the fridge. Use an airtight container to keep them fresh. They last up to five days this way. If you want to freeze them, cut squares first. Wrap each piece tightly in plastic wrap and then place them in a freezer bag. When reheating, use the oven or microwave. This keeps them tasty and warm without losing flavor. For the full recipe, check out the complete guide I created just for you! {{image_4}} You can easily switch up some ingredients. For veggies, try zucchini or mushrooms. Both add great taste and texture. If you want to change the cheese, go for goat cheese or mozzarella. Each will give your frittata a unique flavor twist. This way, you can make it your own! If you need a gluten-free version, simply check the labels on your cheese and seasonings. Most are safe, but it's best to be careful. For a vegetarian option, leave out any meats and add more veggies instead. If you want a vegan frittata, use chickpea flour mixed with water as a substitute for eggs. This works well and keeps the dish delicious. Want to spice things up? Add paprika or a few drops of hot sauce. These ingredients boost the flavor and add a kick. You can also mix in proteins like ham or sausage. This makes your frittata heartier and more filling. Experiment with different spices and proteins to find your favorite combo! For the full recipe, follow the steps I shared earlier. Enjoy making your frittata squares! You can store frittata squares in the fridge for up to five days. To keep them fresh, place the squares in an airtight container. This helps prevent moisture and odors from spoiling the taste. If you want to keep them even fresher, use parchment paper between layers. This keeps them from sticking together. Freezing frittata squares is easy. First, let the squares cool completely. Then, wrap each square in plastic wrap. Place the wrapped squares in a freezer-safe bag or container. Be sure to remove as much air as you can. This prevents freezer burn. To thaw, leave the squares in the fridge overnight. For quick reheating, use the microwave or oven. In the microwave, heat for about 1-2 minutes. In the oven, preheat to 350°F and warm for 10-15 minutes. Check for spoilage before eating. Signs include a sour smell, discoloration, or a slimy texture. If you notice any of these, throw the frittata away. To avoid sogginess, let the frittata cool fully before storage. You can also place a paper towel in the container to absorb extra moisture. Following these tips keeps your frittata squares tasty and safe! To reheat frittata squares, you have a few easy options. The best method is using the oven. Preheat it to 350°F (175°C). Place the squares on a baking sheet and cover them with foil. Heat for about 10 to 15 minutes. This method warms them evenly without drying them out. You can also use a microwave. Place a square on a microwave-safe plate. Heat for about 30 to 60 seconds, checking often to avoid overcooking. Yes, you can use egg substitutes. Common options include flaxseed meal or silken tofu. For each large egg, mix 1 tablespoon of flaxseed meal with 2.5 tablespoons of water. Let it sit for a few minutes until it thickens. Silken tofu is another good choice. Blend 1/4 cup of silken tofu until smooth to replace one egg. These substitutes make the frittata denser, which is important to note. You can store frittata squares in the fridge for up to five days. Place them in an airtight container to keep them fresh. If you want to store them longer, freeze them. Wrap each square in plastic wrap and place them in a freezer-safe bag. They can last in the freezer for about three months. Thaw them overnight in the fridge before reheating. Frittata squares are a simple and tasty dish. We covered the main ingredients, including eggs, milk, and fresh veggies. You learned the step-by-step instructions to whisk, mix, bake, and slice. I shared tips for perfect texture and serving ideas that elevate your dish. Variations let you customize flavors and dietary needs. Lastly, you now know how to store leftovers for freshness. Frittata squares are versatile and easy to make. Enjoy experimenting with this easy recipe!

Looking for a quick, tasty meal? Make-Ahead Frittata Squares are the answer! Packed with eggs, cheese, and your favorite veggies, these squares are perfect for busy mornings or easy lunches. …

Read more

Categories Breakfast

Easy and Tasty Roasted Okra Recipe for Quick Meals

June 24, 2025 by Chef Elliot
- 1 lb fresh okra, trimmed and halved - 2 tablespoons olive oil - 1 teaspoon garlic powder - 1 teaspoon smoked paprika - 1/2 teaspoon ground cumin - 1/2 teaspoon cayenne pepper (adjust to taste) - Salt and freshly ground black pepper - 1 tablespoon freshly squeezed lemon juice - Fresh cilantro leaves for garnish (optional) - Baking sheet - Mixing bowl - Parchment paper - Spatula or hands for tossing When choosing okra, look for firm pods. They should be bright green and free from blemishes. This ensures freshness and the best taste. The vibrant green color means it is ripe and ready to cook. You will need a baking sheet for roasting. A large mixing bowl helps in tossing the okra with spices. Parchment paper makes it easy to clean up afterward. Use a spatula or your hands to mix everything well. This way, each piece of okra gets coated in flavor. This recipe is not just tasty; it is also quick to prepare. You will have a delicious side dish in less than 35 minutes. Remember to check the spice levels. You can adjust the cayenne pepper based on your heat preference. This allows you to make it just right for your family. For a lovely finish, squeeze fresh lemon juice over the hot okra. This brightens the flavor and adds zest. You can also add fresh cilantro for an extra touch. The herbs add color and freshness to your meal. Check out the Full Recipe for detailed steps to make this easy and tasty roasted okra. Enjoy cooking! Set your oven temperature to 400°F (200°C). This heat helps the okra become crispy. In a large mixing bowl, toss the halved okra with olive oil and spices. Use your hands or a spatula to coat each piece well. This step ensures every bite is full of flavor. Line a baking sheet with parchment paper. This makes cleanup easy. Spread the seasoned okra in a single layer. This way, the okra roasts evenly and stays crunchy. Place the baking sheet in the oven. Roast the okra for 20-25 minutes. Stir the okra halfway through cooking. This helps it brown nicely and become tender. When done, the okra should look golden and delicious. For the complete process, check the Full Recipe. Enjoy your cooking! To make your roasted okra pop, try adding more spices or herbs. Fresh thyme, oregano, or even a hint of rosemary can add depth. You can also adjust the cayenne pepper to match your spice level. If you like heat, use more. If you prefer mild, use less. Spread the okra out in a single layer on the baking sheet. This step is crucial for achieving that perfect crunch. Avoid overcrowding the pan, as this can lead to steaming instead of roasting. Each piece needs space to get crispy and golden. Serve your okra with fun dipping sauces. Spicy yogurt or tangy ranch dressing works well. A drizzle of fresh lemon juice adds brightness. Top with cilantro for a fresh finish. This adds color and flavor, enhancing the dish even more. {{image_4}} You can change the spices to make your roasted okra special. Try adding curry powder for a warm flavor. Italian herbs like oregano and basil also work well. Just mix them in with the oil and spices. This small change can create a whole new taste! If you want a quicker method, try an air fryer. Set your air fryer to 400°F (200°C). Toss the okra with oil and spices as usual. Then, place them in the air fryer basket. Cook for about 10-15 minutes. Shake the basket halfway through. You will get that same crunchy texture in less time! This recipe is already vegan and gluten-free! Just make sure all your ingredients are suitable. The okra, oil, and spices are all safe. You can enjoy this dish without any worries about dietary needs. To save your roasted okra, transfer it to an airtight container. This keeps it fresh. Store it in the fridge for up to three days. Make sure it cools down first. This helps prevent sogginess. You can also use a glass container for better storage. When you're ready to enjoy your leftovers, reheat them in the oven. Preheat your oven to 350°F (175°C). Place the okra on a baking sheet. Heat for about 10-15 minutes. This will help keep the crunchiness. You can also use an air fryer for a quick option. Set it to 350°F and cook for 5 minutes. This keeps the texture nice and crispy. Yes, you can freeze roasted okra! First, let it cool completely. Then, place it in a freezer-safe bag. Try to remove as much air as you can. This keeps the okra from getting freezer burn. You can freeze it for up to three months. When you want to eat it, thaw it in the fridge overnight. Reheat it in the oven to bring back its crunch. For more details, check the Full Recipe. To reduce slime, you can try a few tips: - Choose fresh okra: Fresh okra has less slime than older ones. - Cut it dry: Cut the okra when it is dry. This helps keep the slime down. - Soak in vinegar: Soaking okra in vinegar for about 30 minutes can help. - Roast at high heat: Cooking okra at high heat makes it crispier and less slimy. These steps will help you enjoy your okra more. Yes, you can use frozen okra in this recipe. Here are some best practices: - Do not thaw: Use the frozen okra straight from the freezer. Thawing can add moisture. - Cook longer: You may need to roast it a bit longer. Check for crispness. - Adjust spices: Frozen okra may need a bit more seasoning, so taste as you go. Frozen okra can still be tasty and easy to use. Okra is not only tasty but also has many health benefits: - Low in calories: Great for weight loss, with only about 33 calories per cup. - High in fiber: Good for digestion, helping you feel full longer. - Rich in vitamins: It has vitamin C, vitamin K, and folate, which are all essential. - Antioxidants: Okra contains antioxidants that may protect cells from damage. Adding okra to your meals boosts both flavor and nutrition. For a tasty way to enjoy okra, check the Full Recipe. Roasting okra is simple and fun. We covered the key steps, from prep to cooking. You can tweak flavors with spices or try crispy air frying. Remember, it's best to spread okra evenly on the pan for that perfect crunch. Enjoy it fresh or store it well for later. Cooking with okra is healthy and delicious. I hope these ideas inspire you to try new meals. Enjoy your cooking journey!

Looking for a quick and tasty side dish? This Easy and Tasty Roasted Okra Recipe is just what you need! With only a few simple ingredients and easy steps, you …

Read more

Categories Appetizers

Honey Garlic Chicken Recipe Simple and Delicious Meal

June 24, 2025 by Chef Elliot
- 4 boneless, skinless chicken breasts - 1/2 cup honey - 1/4 cup low-sodium soy sauce - 4 cloves garlic, finely minced - 1 tablespoon fresh ginger, grated - 2 tablespoons olive oil - 1 tablespoon apple cider vinegar - 1 teaspoon sesame oil - Salt and freshly ground black pepper to taste - 2 green onions, finely sliced (for garnish) - 1 tablespoon sesame seeds (optional, for garnish) When making honey garlic chicken, the choice of ingredients matters. You want fresh, high-quality items to get the best taste. Start with four boneless, skinless chicken breasts. They cook evenly and stay tender. The honey gives the dish its sweet flavor. Use half a cup for the right balance. Low-sodium soy sauce adds a savory touch. Just a quarter cup helps to keep the dish from being too salty. Garlic is key! Use four cloves, finely minced. It adds depth and aroma. A tablespoon of fresh ginger brings warmth and zest. Olive oil helps in searing the chicken. It also adds a nice richness. A tablespoon of apple cider vinegar balances the sweetness. One teaspoon of sesame oil adds a nutty flavor that enhances the dish. Don't forget to season! Use salt and freshly ground black pepper to your taste. For garnish, slice two green onions finely. If you like, sprinkle sesame seeds on top for a crunchy finish. This mix of ingredients makes your honey garlic chicken shine. For the full recipe, check out the complete instructions. - First, whisk the honey, soy sauce, garlic, ginger, apple cider vinegar, and sesame oil. This creates a tasty marinade. - Next, season the chicken breasts with salt and pepper. This adds flavor to the meat. - Coat the chicken in the marinade. I like to use a zip-lock bag for easy mixing. Seal it and refrigerate for at least 30 minutes. If you have time, let it marinate for up to 2 hours for more flavor. - Preheat your oven to 400°F (200°C). This gets it ready for baking. - Heat olive oil in a large, oven-safe skillet over medium-high heat. - Remove the chicken from the marinade and let excess drip off. Carefully add the chicken to the hot skillet. Sear each side for about 3-4 minutes. You want a nice golden crust. - After searing, pour the reserved marinade over the chicken in the skillet. This will make it extra saucy and tasty. - Transfer the skillet to your preheated oven. Bake for 20-25 minutes. Check that the chicken reaches an internal temperature of 165°F (75°C). - After baking, let the chicken rest for about 5 minutes. This helps keep it juicy. - Slice the chicken and drizzle it with the honey garlic sauce from the skillet. Garnish with green onions and sesame seeds if you like. Enjoy your delicious meal! For the complete recipe, check out the [Full Recipe]. - Recommended marinating times: For best taste, marinate your chicken for at least 30 minutes. If you have more time, go for up to 2 hours. This allows the flavors to soak in well. - Importance of resting after baking: After you bake the chicken, let it rest for about 5 minutes. This helps the juices stay inside, making your chicken juicy and tender. - Tips for achieving a golden crust: To get that perfect golden crust, make sure your skillet is hot before adding the chicken. Sear it for 3-4 minutes on each side. This step adds a nice crunch and great flavor. - Suggestions for spice additions: If you like a bit of heat, add red pepper flakes to the marinade. This will give your dish a nice kick. - Altering sweetness with different honey types: You can use different honey types to change the flavor. Wildflower honey gives a floral taste, while clover honey is milder. Choose what you prefer! - Using fresh herbs for garnish: Fresh herbs like cilantro or parsley can brighten up your dish. They add color and freshness. - Best skillet type for browning: A cast-iron skillet works great for browning. It holds heat well and gives an even cook. - Recommended oven temperature checks: Always preheat your oven to 400°F (200°C). This ensures even cooking throughout. - Importance of meat thermometer for doneness: Use a meat thermometer to check if your chicken is cooked. It should reach an internal temperature of 165°F (75°C). This ensures your meal is safe and delicious. For more details, you can check the Full Recipe. {{image_4}} You can easily switch up the main protein in your honey garlic chicken. Here are some great options: - Tofu or tempeh: For a vegan version, use firm tofu or tempeh. They soak up flavors well. - Bone-in chicken: Choosing bone-in pieces adds rich flavor and moisture to your dish. - Different cuts: Try chicken thighs or drumsticks. They tend to be juicier than breasts. Mixing in new flavors can make this dish exciting: - Chili flakes: If you like heat, add chili flakes to your marinade. It gives a nice kick. - Citrus: Add lime or orange juice for a fresh twist. It brightens the taste beautifully. - Different sauces: Feel free to use teriyaki or sweet chili sauce. They’ll give a unique flair. There are many ways to cook honey garlic chicken. Here are some methods to try: - Grilling: Grilling gives a smoky flavor. Cook on medium heat for great results. - Slow cooking: Use a slow cooker for tender, fall-off-the-bone meat. It’s perfect for busy days. - Instant Pot: This method is fast and easy. It cooks the chicken quickly while keeping it juicy. For the full recipe, check out the [Full Recipe]. To keep your honey garlic chicken fresh, refrigerate it in an airtight container. This method helps the chicken stay juicy. Store it for up to four days. For the leftover sauce, pour it into a small jar. Seal it tightly and keep it in the fridge. This sauce can last for about a week. If you want to keep the chicken longer, freezing is a great option. Wrap each piece in plastic wrap or foil. Then place them in a freezer bag. This prevents freezer burn. The chicken can stay frozen for up to three months. To thaw, move it from the freezer to the fridge overnight. This slow method keeps the chicken moist and safe. When reheating, avoid using a microwave alone. Instead, use an oven or skillet to warm it up gently. This keeps the chicken from drying out. For the sauce, heat it in a small pot. Stir it while warming so it stays smooth and flavorful. Enjoy every bite of your honey garlic chicken! Honey garlic chicken is a tasty dish made with chicken, honey, and garlic. It blends sweet and savory flavors that many love. The dish comes from Asian cuisine, but it has gained popularity worldwide. The key ingredients are chicken breasts, honey, soy sauce, garlic, and ginger. These ingredients create a rich marinade that makes the chicken juicy and flavorful. To make honey garlic chicken, follow these essential steps: 1. Mix the honey, soy sauce, garlic, and ginger in a bowl. 2. Season the chicken with salt and pepper. 3. Marinate the chicken in the sauce for at least 30 minutes. 4. Preheat your oven to 400°F (200°C). 5. Sear the chicken in a hot skillet. 6. Pour the reserved marinade over the chicken and bake it for 20-25 minutes. This method ensures your chicken stays moist and full of flavor. For a detailed recipe, check the Full Recipe. Yes, you can use different meats. Turkey or pork can work well, too. If you prefer a vegetarian option, tofu or tempeh are great substitutes. Just ensure you adjust the cooking time as needed. Each type of meat will give a unique taste but will still pair beautifully with the honey garlic sauce. Honey garlic chicken can last in the fridge for about three to four days. Make sure to store it in an airtight container to keep it fresh. If you want to keep it longer, you can freeze it. Frozen honey garlic chicken can last for up to three months. Just thaw it properly before reheating. Honey garlic chicken goes well with many sides. Here are some great options: - Steamed rice or fried rice - Roasted vegetables - Green salad with a light dressing - Noodles tossed in sesame oil These dishes complement the sweet and savory taste of honey garlic chicken perfectly. In this article, we explored the simple yet flavorful honey garlic chicken. We covered key ingredients like chicken, honey, and garlic, along with cooking steps to ensure a juicy meal. We also shared helpful tips for marinating and achieving the perfect crust. Additionally, we discussed variations for different dietary needs. With these insights, you can create a delicious dish that fits any occasion. Enjoy cooking, and don't be afraid to experiment with flavors!

Looking for a meal that’s simple, delicious, and packed with flavor? In this Honey Garlic Chicken recipe, you’ll discover how to transform a few everyday ingredients into a mouthwatering dish …

Read more

Categories Dinner

Greek Vegetable Frittata Tasty and Easy Recipe

June 24, 2025 by Chef Elliot
To make this tasty Greek vegetable frittata, gather these ingredients: - 6 large eggs - 1 cup whole milk - 1 small zucchini, diced - 1 bell pepper (choose red or yellow), diced - 1 small red onion, finely chopped - 1 cup cherry tomatoes, halved - ½ cup feta cheese, crumbled - ½ cup fresh spinach, chopped - 2 tablespoons extra virgin olive oil - 1 teaspoon dried oregano - Salt and black pepper to taste - Fresh parsley, chopped, for garnish If you need to swap some ingredients, try these substitutes: - Use almond milk instead of whole milk for a dairy-free version. - Swap zucchini for mushrooms or asparagus for a different taste. - Feta cheese can be replaced with goat cheese or ricotta. - Fresh spinach can be substituted with kale or Swiss chard. - Any bell pepper color works, but green peppers give a different taste. This Greek vegetable frittata serves four and is packed with nutrients. Each serving has: - Calories: Approximately 290 - Protein: 20 grams - Fat: 20 grams - Carbohydrates: 8 grams - Fiber: 2 grams - Sugar: 3 grams Enjoy making this dish! You can find the full recipe linked above. Start by preheating your oven to 375°F (190°C). In a large bowl, whisk together 6 large eggs, 1 cup of whole milk, and 1 teaspoon of dried oregano. Add a pinch of salt and black pepper. Mix well until the eggs are smooth. This mixture will give your frittata a rich flavor. Set it aside for now. Take a large, oven-safe skillet and heat 2 tablespoons of extra virgin olive oil over medium heat. When the oil is hot, add 1 small red onion, finely chopped, and 1 diced bell pepper. Sauté for about 3-4 minutes. Stir often until the veggies are soft. Next, add 1 small diced zucchini and 1 cup of halved cherry tomatoes. Cook for another 3-4 minutes. The tomatoes should begin to soften. Finally, stir in ½ cup of chopped fresh spinach. Cook until the spinach wilts, which takes about 1-2 minutes. Now that the veggies are ready, pour your egg mixture evenly over them. Use a spatula to gently stir, making sure everything is mixed well. Crumble ½ cup of feta cheese on top. Let the frittata cook on the stovetop for 2-3 minutes. You want the edges to start setting. Then, transfer the skillet to your oven. Bake for 15-20 minutes. The frittata should be firm in the center and golden on top. Once done, remove from the oven and let it cool for a few minutes. Slice into wedges and enjoy! For the full recipe, check the complete details above. To get a great texture for your Greek vegetable frittata, focus on two things: cooking time and temperature. Use fresh eggs for best results. Whisk them well with milk until smooth. The milk keeps it creamy. When cooking, start on the stove, then finish in the oven. This method helps create a fluffy middle and a nicely browned top. Keep an eye on it in the oven; you want it firm but not dry. Many people make a few common mistakes. One is overcooking the eggs. This can make your frittata rubbery. Another mistake is not seasoning enough. The salt enhances the flavors of the vegetables and cheese. Lastly, don’t skip pre-cooking the vegetables. If you add raw veggies, they may release too much water. This can lead to a soggy frittata. Serve your frittata warm or at room temperature. Cut it into wedges for easy sharing. Garnish with fresh parsley for a pop of color. A side of Greek yogurt complements the dish well. You can also add a light drizzle of olive oil for extra flavor. Pair it with a simple salad for a complete meal. For a fun twist, try adding olives or sun-dried tomatoes. For the full recipe, check out the Mediterranean Vegetable Frittata section. {{image_4}} You can take your Greek vegetable frittata to the next level with fun Mediterranean touches. Try adding olives or artichoke hearts. These ingredients boost flavor and add a nice twist. Consider sun-dried tomatoes for a burst of sweetness. You can even add herbs like basil or dill to enhance the taste. This way, you can create a dish that’s bright and fresh! If you're watching carbs, this frittata is super easy to adapt. Skip the milk and use cream instead. This will keep it rich and creamy. You can also swap out the zucchini for cauliflower rice. It’s a great low-carb substitute. Using just egg whites is another option for fewer carbs. This makes the frittata lighter and still delicious. Want to make it vegetarian-friendly? You can easily switch up the veggies. Swap the zucchini for mushrooms or add some broccoli. You can even use asparagus for a spring twist. If you want more protein, add chickpeas or lentils. These will make your frittata filling and nutritious. The key is to have fun with flavors and textures! For more details on the full process, check the Full Recipe. Storing leftover frittata is simple. First, let it cool completely. Then, cover it tightly with plastic wrap or transfer it to an airtight container. This helps keep the frittata fresh. You can store it in the fridge for up to four days. If you want to keep it longer, consider freezing it. Reheating your frittata is quick and easy. Preheat your oven to 350°F (175°C). Place the frittata in an oven-safe dish. Cover it with foil to prevent it from drying out. Heat for about 10-15 minutes, or until warm. You can also reheat slices in the microwave. Heat each slice for about 30-60 seconds, checking it often. Freezing frittata is a great option for meal prep. After it cools, cut it into slices. Wrap each slice in plastic wrap, then place them in a freezer bag. Make sure to remove as much air as possible. Label the bag with the date. The frittata can be stored in the freezer for up to three months. When ready to eat, thaw it in the fridge overnight before reheating. For the best taste, enjoy it within a month. Try this method for easy meals later! You can find the Full Recipe [here](#). A frittata is an Italian egg dish. It is similar to an omelet but thicker. You cook it slowly on the stove and finish it in the oven. The dish can hold many ingredients like vegetables, cheese, and herbs. It is a great way to use up leftovers. Frittatas are simple to make and very tasty. Yes, you can make this frittata ahead of time. Cook it fully, then let it cool. Store it in an airtight container in the fridge. It will last for about three days. When you are ready to eat, you can reheat it in the oven. This saves time on busy mornings. You can use many veggies in a frittata. Here are some ideas: - Broccoli florets - Mushrooms, sliced - Asparagus, chopped - Spinach, if you want more - Carrots, grated - Kale, chopped Feel free to mix and match based on what you have. Using seasonal vegetables adds fresh taste. This blog post gave you a clear guide to making a Greek vegetable frittata. You learned about the key ingredients, tips for great texture, and how to store leftovers. Remember, you can mix in other veggies or try different diets. A frittata is easy to make ahead, perfect for busy days. With these steps, you can create a tasty meal that everyone will enjoy. Keep experimenting and have fun in the kitchen!

Are you ready to whip up a delicious Greek Vegetable Frittata? This tasty and easy recipe brings fresh flavors and healthy ingredients straight to your kitchen. With a few simple …

Read more

Categories Breakfast

Oven Fried Chicken Crispy and Easy Meal Guide

June 24, 2025 by Chef Elliot
- 4 chicken thighs, skin-on (bone-in for flavor or boneless for easy eating) - 1 cup buttermilk - 1 cup all-purpose flour - 1 tablespoon garlic powder - 1 tablespoon onion powder - 1 teaspoon smoked paprika - 1 teaspoon dried thyme - 1 teaspoon dried rosemary - 1 teaspoon freshly ground black pepper - 1 teaspoon salt - ½ teaspoon cayenne pepper (optional, for heat) - 2 tablespoons extra virgin olive oil - Fresh herbs like parsley or chives for garnish - Lemon zest for a bright touch - Hot sauce in the marinade for extra kick - Medium-sized mixing bowl - Shallow dish for coating - Whisk or fork for mixing - Baking sheet - Aluminum foil for easy cleanup - Wire rack to elevate chicken - Tongs for handling chicken - Meat thermometer to check doneness This list of ingredients sets the stage for a flavorful, crispy dish. Each ingredient plays a key role in building taste and texture. You'll enjoy the process of bringing it all together. You can find the full recipe [here]. First, gather your chicken thighs. You can use bone-in for flavor or boneless for ease. In a medium bowl, mix 1 cup of buttermilk with 1 teaspoon of salt. Whisk it well. Now, place the chicken thighs in the buttermilk, ensuring they are fully covered. Cover your bowl with plastic wrap. Refrigerate for at least 2 hours or overnight for the best flavor. This marinating step makes the chicken juicy and tender. Next, let’s prepare the coating. In a shallow dish, mix 1 cup of all-purpose flour with garlic powder, onion powder, smoked paprika, thyme, rosemary, black pepper, and cayenne pepper. Use a fork to blend these well. After marinating, take the chicken out of the buttermilk. Let the excess drip off. Dredge each piece in the flour mix. Press gently for an even coat and shake off any extra flour. This step is key for a crispy finish. Preheat your oven to 425°F (220°C). Line a baking sheet with aluminum foil. Place a wire rack on top to allow air to flow. This helps the chicken crisp up. Arrange the coated chicken on the rack. Drizzle 2 tablespoons of olive oil over each piece. This adds flavor and crunch. Bake for 30-35 minutes until golden brown and juices run clear. Use a meat thermometer to check that the chicken reaches 165°F (75°C). After baking, let the chicken rest for 5 minutes before serving. This makes every bite juicy and tasty! For the full recipe, you can refer to the detailed instructions above. To get the crispiest oven fried chicken, follow these tips: - Use a Wire Rack: Place the chicken on a wire rack above the baking sheet. This lets hot air circulate around the chicken, making it crispier. - Pat Dry Before Coating: After marinating, pat the chicken dry with paper towels. This removes excess moisture, helping the coating stick better. - Use Olive Oil Generously: Drizzle enough olive oil on the chicken. The oil helps the coating turn golden and crispy while baking. Here are some common mistakes that can lead to less-than-perfect chicken: - Skipping the Marinade: Don’t skip the buttermilk marinade. It adds flavor and keeps the chicken juicy. - Overcrowding the Pan: Avoid placing too many pieces of chicken together. This can trap steam and make chicken soggy. - Not Preheating the Oven: Always preheat your oven. This ensures even cooking and better browning. Want to amp up the flavor of your chicken? Here are some ideas: - Add Fresh Herbs: Mix fresh herbs like parsley or dill into the flour mixture for extra flavor. - Try Different Spices: Experiment with spices like cumin or coriander for new tastes. Just remember to keep balance. - Use Flavored Salt: Swap regular salt for garlic or herb-infused salt for a tasty twist. For the full recipe, check out the Crispy Herb-Infused Oven Fried Chicken! {{image_4}} You can play with flavors in your oven fried chicken. Instead of the herbs I used, try a mix of chili powder and cumin for a spicy kick. You could also use lemon zest and dill for a fresh twist. If you love Italian flavors, add oregano, basil, and Parmesan cheese to the coating. Each mix will give you a new taste experience. You don’t have to stick to thighs. Drumsticks or chicken breasts work great, too. Drumsticks keep their moisture well, while breasts cook faster. If you want to go for something different, try using chicken wings. They crisp up nicely and make great finger food. Adjust the cooking time based on the cut you choose. If you’re gluten-free, swap all-purpose flour for a gluten-free blend. You can also use almond flour for a nutty flavor. For dairy-free options, substitute buttermilk with a plant-based milk mixed with lemon juice. This will give you a similar tang without the dairy. Adjust the seasonings as needed to fit your dietary needs. For more details on the full recipe, you can check the [Full Recipe]. After enjoying your oven fried chicken, let it cool completely. Place the chicken in an airtight container. You can keep it in the fridge for up to 4 days. This storage method helps retain its flavor and texture. To reheat your chicken, use the oven for the best taste. Preheat your oven to 350°F (175°C). Place the chicken on a baking sheet. Heat it for about 15-20 minutes or until warm. This will help restore its crispiness. If you prefer the microwave, use a lower power setting. Heat in short bursts to avoid sogginess. You can freeze leftover chicken if you want to save it for later. Wrap each piece tightly in plastic wrap, then place it in a freezer bag. Label the bag with the date. It will stay good for up to 3 months. To thaw, move it to the fridge overnight before reheating. Enjoy your crispy herb-infused oven fried chicken anytime! For the full recipe, check out the recipe link above. Yes, you can use skinless chicken. However, the skin adds flavor and crispiness. Without it, your chicken may not be as juicy. If you prefer skinless chicken, consider using more oil in the coating. This will help with moisture and crunch. To ensure your chicken is cooked through, use a meat thermometer. It should read 165°F (75°C) in the thickest part of the meat. This guarantees safety and juicy results. Also, let the chicken rest after baking. This will help keep the juices inside. To make this recipe gluten-free, swap all-purpose flour for a gluten-free flour blend. There are many options available, like almond flour or rice flour. Just be sure to check the labels for hidden gluten. The seasoning mix will still work great with gluten-free flour. You learned about making oven-fried chicken, from the ingredients to storage. Knowing how to prepare, coat, and bake gives you tasty results. Remember the tips to get it crispy and avoid common mistakes. You can also explore flavor variations and substitutes. Enjoy your delicious chicken now, and feel free to store or reheat leftovers for later. Cooking can be fun, and with these steps, you’ll impress everyone at the table!

Are you ready to make juicy, crispy oven fried chicken? This simple guide gives you all the tips you need. You’ll find easy steps to prepare tasty chicken with a …

Read more

Categories Dinner

38 Desserts Perfect for a Summer Picnic Feast

June 24, 2025 by Chef Elliot
When I think about summer picnics, I picture bright colors and fresh flavors. Desserts should be light and fun. Here are some ideas for your picnic: - Chilled Lemon Basil Sorbet - Strawberry Coconut Popsicles - Raspberry Lemonade Cupcakes These desserts are not just tasty; they are easy to make too. Each one brings a touch of summer to your picnic. You can make them ahead of time, so you can relax and enjoy the day. Summer is about fun, not stress. Easy recipes let you enjoy your time outside. You want to spend more time with friends and family and less time in the kitchen. Simple recipes are quick and need few steps. For example, the Chilled Lemon Basil Sorbet takes only 15 minutes to prep. You only need to freeze it afterward. This way, you can prepare dessert while making other picnic plans. Choosing the right desserts for a picnic is key. Here are some tips to help you decide: - Think about the weather: Choose desserts that won't melt or spoil easily. Popsicles are great for hot days. - Make it portable: Cupcakes and sorbets can travel well in containers. - Keep it small: Bite-sized treats are fun and easy to share. Remember, you want desserts that are easy to pack and serve. Keep these tips in mind, and your picnic will be a hit! When planning your summer picnic, you need some key ingredients for tasty desserts. Here’s a list for three delightful recipes: Chilled Lemon Basil Sorbet - 2 cups water - 1 cup granulated sugar - Zest of 2 medium lemons - 1 cup freshly squeezed lemon juice - 10 fresh basil leaves, finely chopped - Pinch of sea salt Strawberry Coconut Popsicles - 2 cups fresh strawberries, hulled and sliced - 1 cup creamy coconut milk - 2 tablespoons honey or agave syrup - 1 teaspoon pure vanilla extract - Optional: shredded coconut for garnish Raspberry Lemonade Cupcakes - 1 1/2 cups all-purpose flour - 1 cup granulated sugar - 1 teaspoon baking powder - 1/2 teaspoon baking soda - 1/4 teaspoon fine sea salt - 1/2 cup unsalted butter, softened - 2 large eggs - 1/2 cup buttermilk - Zest of 1 medium lemon - 1/4 cup freshly squeezed lemon juice - 1 cup fresh raspberries, lightly mashed You can easily swap out some ingredients. For those who need gluten-free options, try using almond or coconut flour instead of all-purpose flour in cupcakes. Use maple syrup instead of honey for a vegan option in popsicles. If you have a dairy allergy, coconut milk works great in the sorbet too! Always check labels to stay safe. Fresh ingredients make a big difference. Visit local farmers' markets for vibrant strawberries, lemons, and fresh herbs. Look for organic options when possible. Fresh produce not only tastes better but also supports local farmers. Enjoy the season’s best by choosing what’s ripe and ready. You’ll notice the flavor in every bite of your picnic desserts! 1. In a medium saucepan, mix 2 cups of water, 1 cup of sugar, and the zest of 2 lemons. 2. Heat over medium, stirring until the sugar dissolves and it starts to simmer. 3. Remove from heat and let it cool to room temperature. 4. Stir in 1 cup of lemon juice, 10 chopped basil leaves, and a pinch of salt. 5. Pour the mixture into a shallow dish and freeze it. 6. After 1 hour, stir with a fork to break up ice crystals. 7. Repeat stirring every 30 minutes for about 3-4 hours. 8. Once fluffy, scoop into bowls and top with a basil leaf, if desired. [Full Recipe] 1. Blend 2 cups of hulled strawberries, 2 tablespoons of honey, and 1 teaspoon of vanilla until smooth. 2. Pour the mixture into a bowl and set aside. 3. Blend 1 cup of coconut milk until smooth. 4. In popsicle molds, layer the strawberry mix halfway, then add coconut milk on top. 5. Insert sticks and freeze for at least 4 hours. 6. To remove the popsicles, run warm water over the molds for a few seconds. 7. Enjoy with shredded coconut for a fun touch! 1. Preheat your oven to 350°F and line a cupcake tray with liners. 2. In a bowl, whisk together 1.5 cups flour, 1 cup sugar, 1 teaspoon baking powder, 0.5 teaspoon baking soda, and 0.25 teaspoon salt. 3. In another bowl, cream 0.5 cup butter until fluffy. 4. Mix in 2 eggs, 0.5 cup buttermilk, the zest from 1 lemon, and 0.25 cup lemon juice. 5. Slowly add the dry mix and stir until just combined. 6. Gently fold in 1 cup of lightly mashed raspberries. 7. Fill cupcake liners 2/3 full and bake for 18-20 minutes. 8. Cool on a rack and top with whipped cream or whole raspberries for a treat! {{image_4}} Packing desserts for a picnic needs some thought. Keep things simple and safe. Use airtight containers to prevent spills. Choose sturdy, lightweight options. This makes carrying easier. Here are some tips: - Use small jars for layered desserts. They look great and are easy to serve. - Pack cupcakes in a cupcake carrier. It keeps them safe and neat. - For popsicles, use insulated bags. This helps keep them frozen longer. Serve desserts with style. Make each bite special. Here are some ideas: - Bring small plates and forks. This makes sharing fun. - Use colorful napkins for a cheerful touch. They brighten up any picnic. - Add fresh mint or basil to desserts. It gives a pop of color and flavor. Keeping desserts fresh is key. Here are ways to ensure they stay tasty: - Use ice packs in your cooler. This keeps everything cold. - Avoid direct sunlight. Find a shaded spot for your dessert table. - Keep whipped cream and frostings in separate containers. Add them just before serving. For a refreshing choice, try the chilled lemon basil sorbet. It’s bright and perfect for hot days. Check the full recipe for details! You can change the flavors of sorbet to fit your taste. Instead of lemon, try using fresh berries, like strawberries or blueberries. Combine watermelon and mint for a refreshing twist. For a tropical flavor, mix mango with lime. Each of these options brings a new zest to your picnic. Popsicles are fun and easy to make. Besides strawberries and coconut, you can use other fruits. Blend ripe peaches with yogurt for a creamy treat. Mix kiwi and pineapple for a sweet and tangy flavor. For a refreshing option, use cucumber and mint. These fruity combinations will keep everyone cool on a hot day. Cupcakes are perfect for summer. Change the frosting to match your cupcake flavor. For raspberry lemonade cupcakes, try lemon cream cheese frosting. If you make chocolate cupcakes, a light vanilla frosting pairs well. For a fun touch, add sprinkles or fresh fruit on top. Each frosting option can make your cupcakes look and taste amazing. Try these variations to make your picnic desserts stand out. You can find the full recipe for Chilled Lemon Basil Sorbet, Strawberry Coconut Popsicles, and Raspberry Lemonade Cupcakes in the previous sections. These desserts usually last about 2 to 3 days. If you store them in the fridge, they stay fresh. For the sorbet, keep it in the freezer. It can last up to a week when well-covered. Yes, making these desserts ahead is a great idea! Most of them taste better after a day in the fridge. You can whip up the strawberry coconut popsicles the night before. Just freeze them overnight for the best results. Use airtight containers for the best results. For cupcakes, a cupcake carrier works great. For sorbets or popsicles, a cooler with ice packs keeps them frozen longer. Make sure the lids fit snugly to avoid spills. Check out the Full Recipe to learn how to make these delicious desserts! As we wrap up, remember these 38 desserts make your summer picnic special. Easy-to-prepare recipes keep it simple, and tips help you choose and pack the best treats. Fresh summer ingredients boost flavor, and the step-by-step guide ensures success. Variations let you customize your favorites. Enjoy these sweet moments with friends and family. Keep dessert delicious and fun, and your picnic will surely be a hit.

Summer picnics call for tasty bites that cool us down and bring joy. I’ve gathered 38 delicious desserts perfect for your next outdoor feast. From chilled sorbets to fruity popsicles, …

Read more

Categories Desserts

Peach Crumble Recipe Simple and Flavorful Dish

June 24, 2025 by Chef Elliot
For a tasty peach crumble, you will need: - 6 ripe peaches, pitted and sliced - 1/4 cup granulated sugar - 1 tablespoon fresh lemon juice - 1 teaspoon pure vanilla extract - 1 teaspoon ground cinnamon - 1 cup rolled oats - 1/2 cup all-purpose flour - 1/2 cup packed brown sugar - 1/4 teaspoon sea salt - 1/2 cup unsalted butter, melted - 1/2 teaspoon ground nutmeg Each ingredient plays a key role in your peach crumble: - Peaches bring sweetness and juiciness. - Granulated sugar adds sweetness and helps caramelize the fruit. - Lemon juice balances the sweetness with a bit of tartness. - Vanilla extract adds depth to the flavor. - Cinnamon gives warmth and spice. - Rolled oats create a hearty crumble topping. - All-purpose flour helps bind the topping together. - Brown sugar adds moisture and richness. - Sea salt enhances all the flavors. - Unsalted butter creates a rich and crumbly texture. - Nutmeg adds a hint of warmth and depth. You can easily swap some ingredients for different flavors: - Use nectarines instead of peaches for a similar taste. - Replace granulated sugar with honey or maple syrup for a unique sweetness. - If you don't have lemon juice, try lime juice for a different zing. - For a nutty flavor, use almond extract instead of vanilla. - Substitute rolled oats with quick oats if that's what you have. - For a gluten-free option, use almond flour or a gluten-free flour blend. - You can also use coconut oil instead of butter for a dairy-free version. With these ingredients, you can create a simple yet delicious peach crumble. Check out the Full Recipe for more details on how to put it all together. Start by washing your peaches. Use ripe peaches for the best flavor. Cut them in half, remove the pit, and slice them. You need about six peaches. In a large bowl, mix the sliced peaches with 1/4 cup of granulated sugar. Add one tablespoon of fresh lemon juice and one teaspoon of pure vanilla extract. Sprinkle in one teaspoon of ground cinnamon. Gently stir until all the peaches are coated. Pour this mixture into a greased 9x9 inch baking dish. In another bowl, mix together one cup of rolled oats, 1/2 cup of all-purpose flour, 1/2 cup of packed brown sugar, and 1/4 teaspoon of sea salt. Add 1/2 teaspoon of ground nutmeg for extra flavor. Then, pour in 1/2 cup of melted unsalted butter. Use a fork or your hands to mix until it becomes crumbly. This is your topping. Now, sprinkle the crumble topping over the peaches in the baking dish. Make sure to cover all the fruit. Preheat your oven to 350°F (175°C). Place the baking dish in the oven and bake for 35 to 40 minutes. Look for a golden-brown topping and bubbling juices as signs that it’s ready. Once done, take it out and let it cool for 10 minutes before serving. For a treat, serve it warm with vanilla ice cream. You can find the full recipe to guide you through this delicious dish. When picking peaches, look for ones that feel heavy for their size. They should have a slight give when you press them gently. A sweet aroma means they are ripe and ready to eat. Avoid peaches with green spots, as they are not ripe yet. The best peaches will have a rich color, often a golden yellow or deep red. Adding spices can take your peach crumble to the next level. Cinnamon adds warmth and sweetness. Nutmeg offers a nutty, sweet flavor that pairs well with peaches. You can also try cardamom for a floral note or ginger for a hint of spice. Just a pinch can make a big difference in taste. Serve your peach crumble warm for the best experience. A scoop of vanilla ice cream on top adds creaminess and balances the warmth. You can also sprinkle some chopped nuts for extra crunch. For a fresh touch, garnish with mint leaves. Enjoy it with family or friends for a cozy dessert night. For the complete recipe, check out the full recipe section. {{image_4}} You can make your peach crumble even better. Add a cup of fresh berries. Blueberries or raspberries work great. Mix them in with the peaches before you bake. This extra fruit gives a burst of flavor. It also adds nice color to your dish. If you need a gluten-free version, it's simple! Swap the all-purpose flour with gluten-free flour. Use oats that are certified gluten-free as well. The rest of the recipe stays the same. You’ll still get that crunchy topping and sweet peaches. This option lets everyone enjoy the crumble. To make a vegan peach crumble, just change a few things. Use coconut oil instead of butter. Replace granulated sugar with coconut sugar or maple syrup. Ensure your oats are vegan-friendly. This way, you keep all the yummy flavors without any animal products. Enjoy a guilt-free dessert that tastes amazing! For the full recipe, check out the Peach Paradise Crumble! After enjoying your peach crumble, let it cool completely. Place any leftovers in an airtight container. Store it in the fridge for up to three days. If you want to keep it longer, freezing is a great option. To reheat your peach crumble, preheat your oven to 350°F (175°C). Place the crumble in an oven-safe dish. Cover it with foil to keep it moist. Bake for about 15-20 minutes. Check if it's heated through. You can also use a microwave for a quicker option. Heat in short bursts, stirring in between. To freeze your peach crumble, make sure it’s completely cool. Wrap it tightly in plastic wrap and then aluminum foil. Label it with the date. It can last in the freezer for up to three months. When you’re ready to enjoy it, thaw overnight in the fridge before reheating. This way, you savor that fresh flavor all over again! For the Full Recipe, check the details above! Yes, you can use frozen peaches! Just let them thaw first. Drain any extra juice to keep the crumble from being too watery. This change keeps the dish tasty and easy. Fresh peaches give the best flavor, but frozen works well too. Peach crumble lasts about three to four days in the fridge. Store it in an airtight container to keep it fresh. You can reheat it in the oven or microwave when you want a warm treat. You can serve peach crumble with vanilla ice cream or whipped cream. Both add creaminess to the warm, sweet crumble. Fresh mint leaves also make a nice touch. You can even add a drizzle of caramel sauce for extra flavor. For the full recipe, check out Peach Paradise Crumble. You now have all the tips to make a delightful peach crumble. We covered ingredients, step-by-step actions, and smart storage ideas. Plus, we explored fun variations and flavors to boost your dish. Remember, choosing ripe peaches makes a huge difference. Don't hesitate to get creative with spices and toppings. This recipe is easy and allows for lots of personal touch. Enjoy your baking, and share your tasty results with friends and family!

Are you ready to enjoy a delicious Peach Crumble? This simple and flavorful dish is perfect for any occasion. With juicy peaches and a crunchy topping, you’ll love every bite. …

Read more

Categories Desserts

Authentic Mexican Pickled Carrots Tangy and Crunchy Dish

June 24, 2025 by Chef Elliot
- 4 medium-sized carrots, peeled and sliced - 1 small white onion, thinly sliced - 1-2 jalapeños, sliced - 1 cup apple cider vinegar - 1 cup water - 1 tablespoon granulated sugar - 1 teaspoon sea salt - 2 cloves garlic, peeled and smashed - 1 teaspoon dried oregano - 1/2 teaspoon cumin seeds - 1-2 bay leaves (optional) To make authentic Mexican pickled carrots, you start with fresh, bright vegetables. Carrots are the star here, and their crunch is key. I like to use medium-sized carrots, as they hold up well when pickled. Slice them into thin rounds for that perfect bite. Next, add a small white onion for a touch of sweetness. The onion complements the carrots nicely. If you like heat, toss in 1-2 sliced jalapeños. You can remove the seeds if you want less spice. Now, let’s talk about the pickling liquid. The base of this dish is a simple mixture of apple cider vinegar and water. The vinegar gives the carrots that tangy kick. You’ll want equal parts of vinegar and water. This balance makes the flavor bright but not overpowering. Add 1 tablespoon of granulated sugar to bring out the flavors. The sweetness balances the acidity of the vinegar. Then, stir in 1 teaspoon of sea salt. Salt enhances the taste and helps with preservation. Don’t forget the spices! Smash 2 cloves of garlic. The garlic adds depth and warmth. One teaspoon of dried oregano gives a nice herby note. Finally, if you want, add 1-2 bay leaves for extra flavor. This combination of fresh veggies, tangy liquid, and spices makes a delightful dish. For the full recipe, check the Zesty Authentic Mexican Pickled Carrots section. It’s a great way to brighten up any meal! Start by making the pickling liquid. In a medium saucepan, combine: - 1 cup apple cider vinegar - 1 cup water - 1 tablespoon granulated sugar - 1 teaspoon sea salt - 2 cloves garlic, peeled and smashed - 1 teaspoon dried oregano - 1/2 teaspoon cumin seeds - 1-2 bay leaves (optional) Set the saucepan over medium heat. Heat the mixture until it gently boils. Stir occasionally until the sugar and salt dissolve completely. This process takes about 5 minutes. While the pickling liquid cools, prepare a clean jar or container. Layer the sliced vegetables tightly inside. Start with: - 4 medium-sized carrots, peeled and sliced into thin rounds - 1 small white onion, thinly sliced - 1-2 jalapeños, sliced (remove seeds for less heat) Pack them in without mashing. This helps keep the crunch. Once the pickling liquid cools for about 10 minutes, pour it over the layered vegetables. Ensure they are fully submerged. If they are not fully covered, add equal parts water and vinegar until they are. Seal the jar tightly. Allow it to cool to room temperature. After that, place the jar in the refrigerator. Let it marinate for at least 24 hours. For the best flavor, wait 3-5 days. Enjoy these tangy and crunchy carrots! For the complete recipe, check the Full Recipe section. - Always pick fresh, firm carrots for the best crunch. - Colorful carrots add a fun touch to your dish. Choosing the right vegetables is key. Fresh carrots give your pickled dish that perfect snap. I love using a mix of colors. Purple, orange, and yellow carrots not only taste great but also look amazing on the plate. - Change the amount of jalapeños for your heat level. - Remove seeds for a milder taste. If you like spice, add more jalapeños. For a milder flavor, take out the seeds. This simple trick helps you control the heat. You want a nice balance, not something too fiery. - Try other spices like black pepper or coriander. - Fresh herbs like cilantro make a great garnish. Adding spices can make your dish unique. Black pepper or coriander can give a new twist. And don’t forget to use fresh herbs! A sprinkle of cilantro on top adds color and a fresh taste. For the full recipe, check the earlier sections. {{image_4}} You can make your pickled carrots even better by adding more veggies. Consider incorporating radishes or cauliflower for extra crunch. These additions not only enhance the texture but also add more flavor. You might also try adding bell peppers. They bring a sweet taste that contrasts nicely with the tangy carrots. The type of vinegar you use can change the whole flavor. You can experiment with white or rice vinegar for a lighter taste. These options keep the bright flavors but are less strong. If you want something unique, try flavored vinegars. They can add a fun twist to the classic recipe. You can play around with the sweetness and heat of your pickled carrots. If you like a sweeter taste, just increase the sugar a bit. This balance can be delightful. For those who enjoy some heat, add red pepper flakes. They give a nice kick that pairs well with the tanginess of the carrots. For the complete recipe, check out the [Full Recipe](#). To keep your pickled carrots fresh, store them in a sealed jar in the refrigerator. This helps maintain their crunchiness and flavor. Also, keep the jar away from direct sunlight. Sunlight can cause the carrots to lose their vibrant color and taste. These tangy carrots typically last 2-3 months when stored in the fridge. Before using, always check for signs of spoilage. If you see any mold or off smells, it’s best to toss them out. You can reuse the pickling liquid for new batches of carrots. This is a great way to save time and add even more flavor. You can also use the liquid to marinate other vegetables or proteins. It adds a nice tang to everything! For more details on making these pickled carrots, check out the [Full Recipe]. Authentic Mexican pickled carrots are vibrant, tangy slices of carrots. They often come with sliced onions and jalapeños. This dish is an essential part of Mexican cuisine. You’ll find them on tacos, sandwiches, and as a side dish. Their bright flavors balance rich and savory meals. The pickling process adds crunch and zest. They are not just a condiment; they enhance your dining experience. For the best flavor, I recommend marinating pickled carrots for at least 24 hours. This time allows the flavors to blend well. However, leaving them for 3-5 days gives an even better taste. The longer they sit, the more intense the flavors become. So, if you can wait, let them marinate longer! Yes, you can make pickled carrots without sugar. If you want a sugar-free version, try using a sugar substitute like honey or agave syrup. You can also skip the sweetener altogether. The vinegar will still provide a delicious tang. Just remember, the sugar helps balance the acidity, so adjust to your taste. Pickled carrots offer several health benefits. They are low in calories and high in vitamins. Carrots are rich in vitamin A, which is good for your eyes. The fermentation process can boost gut health too. Plus, they provide a unique way to enjoy your vegetables. Adding them to meals can increase your veggie intake easily. To make pickled carrots, focus on fresh veggies and a simple brine. We discussed choosing the best carrots, layering them in a jar, and creating a tangy pickling liquid. Remember, you can adjust spice levels and try different vegetables. Store your pickled carrots properly for long shelf life. These pickled treats are not only tasty but also add character to many dishes. Enjoy your pickling journey, and get creative with flavors!

If you crave a burst of flavor that adds crunch to your meals, you need to try Authentic Mexican Pickled Carrots. This simple dish combines fresh carrots, spicy jalapeños, and …

Read more

Categories Appetizers

Raspberry Lemon Cookies Simple and Tasty Treats

June 23, 2025 by Chef Elliot
- 1 cup unsalted butter, softened - 1 cup granulated sugar - 1 large egg - Zest of 1 large lemon - 2 cups all-purpose flour - 1 teaspoon baking powder - ½ teaspoon baking soda - ½ teaspoon fine sea salt - 1 cup fresh raspberries - ½ cup powdered sugar for icing - 2 tablespoons fresh lemon juice for icing To make Raspberry Lemon Cookies, you'll need a few key ingredients. Each item plays a role in creating that perfect balance of sweet and tart. - Unsalted butter: You can use coconut oil or a plant-based butter. Both will keep the cookies moist. - Granulated sugar: Coconut sugar is a great alternative. It adds a hint of caramel flavor. - Egg substitutes: Use a flax egg or applesauce for a vegan option. One tablespoon of flaxseed mixed with three tablespoons of water works well. Using these substitutes can help you enjoy these cookies without missing out on flavor or texture. You can find the full recipe for Raspberry Lemon Cookies in the article. 1. Preheat the oven to 350°F (175°C). Line a baking sheet with parchment paper. This keeps the cookies from sticking. 2. Mix the butter and sugar. In a large bowl, cream the softened butter and sugar. Use an electric mixer on medium speed. Mix until light and fluffy, about 3-4 minutes. 3. Incorporate the wet and dry ingredients. Add the egg, vanilla, and lemon zest to the bowl. Beat until smooth. In another bowl, whisk together the flour, baking powder, baking soda, and salt. Slowly add this to the butter mix. Mix on low speed until just combined. Be careful not to overmix. 1. Fold in the raspberries. Use a spatula to gently mix in the fresh raspberries. This keeps them whole for bursts of flavor. The dough should feel thick yet easy to handle. 2. Shape the cookies. Use a tablespoon to scoop mounds of dough. Place them on the baking sheet, leaving 2 inches between each cookie. This gives them room to spread. 3. Bake and check for doneness. Bake for 12-15 minutes. Look for golden edges and set centers. They may seem soft but will firm up as they cool. For the full recipe, check the section above. Enjoy the fun of baking these delightful raspberry lemon cookies! To make the best raspberry lemon cookies, avoid overmixing the dough. Mixing too much makes cookies tough. Mix just until blended for a soft texture. To get a golden edge without drying out the cookie, watch the baking time closely. Remove them when the edges look golden but the middle seems soft. They will firm up as they cool. Decorating with icing adds a lovely touch. Drizzle the icing over the cooled cookies for a sweet finish. You can use a spoon or piping bag for fun shapes. For garnishing, add fresh raspberries and a sprinkle of lemon zest. This makes your cookies look bright and inviting. A stack of cookies on a decorative plate makes a beautiful display. {{image_4}} You can make raspberry lemon cookies even more exciting by changing the flavors. Here are a few ideas: - Different Citrus Zest: Try adding orange or lime zest. Each zest gives a unique twist. Orange adds sweetness, while lime gives a zesty kick. - Other Berries: Swap raspberries for blueberries or strawberries. Blueberries bring a juicy burst, and strawberries add a sweet touch. Both will make your cookies colorful and fun! If you have specific dietary needs, you can still enjoy these treats. Here’s how: - Gluten-Free Flour: Use a gluten-free flour blend. This way, you can still enjoy cookies without gluten. Look for blends that include xanthan gum for the best texture. - Vegan Version: Substitute butter with coconut oil or vegan butter. Replace the egg with flaxseed meal mixed with water or a store-bought egg replacer. These changes keep the cookies delicious and plant-based. Feel free to explore these variations to make your raspberry lemon cookies just how you like them! For the full recipe, check out the detailed instructions above. To keep your raspberry lemon cookies fresh, store them in an airtight container. This will prevent them from becoming dry or stale. I recommend using a cookie jar or a sealable plastic bag. If you use a container, add a piece of bread inside. This helps keep the cookies soft. For the best taste, enjoy them within a week. You can freeze the raw cookie dough for later use. To do this, scoop the dough onto a baking sheet. Place it in the freezer for about an hour. Once firm, transfer the dough balls to a freezer bag. Label the bag with the date and type of cookie. When you're ready to bake, just take out how many you need. For baked cookies, let them cool completely first. Then, wrap each cookie in plastic wrap. Put them in a freezer-safe bag. To thaw, simply leave the cookies on the counter for a few hours. You can also warm them in the oven at 350°F for about 5 minutes. Enjoy a fresh-tasting cookie anytime! For the full recipe, check out the earlier section. How do I know when the cookies are done baking? You can tell the cookies are done when the edges turn golden brown. The centers should look set but may appear slightly soft. They will firm up as they cool. Can I use frozen raspberries instead of fresh? Yes, you can use frozen raspberries! Just make sure to thaw them and drain any excess liquid. This way, they won't make your dough too wet. How long do these cookies last? These cookies can last up to a week if stored in an airtight container. Keep them in a cool, dry place for the best freshness. What can I serve with raspberry lemon cookies? These cookies pair well with a cup of tea or coffee. You can also serve them with a scoop of vanilla ice cream for a tasty dessert. Are raspberry lemon cookies healthy? While they are a treat, raspberry lemon cookies do contain sugar and butter. However, they have fresh fruit, which adds some vitamins. Enjoy them in moderation for a balanced diet. What's the best way to incorporate fruit into cookie recipes? The best way to add fruit is to gently fold it into the dough. This keeps the fruit intact and adds bursts of flavor in every bite. Can I make these cookies without baking powder? You can make these cookies without baking powder, but they may not rise as much. You could use baking soda or another leavening agent as a substitute. In this article, we covered how to make delicious raspberry lemon cookies. You learned about the key ingredients, substitutes for different diets, and step-by-step baking instructions. We shared tips for perfect texture and presentation ideas. I also included different flavor and dietary variations, plus storage and freezing methods. Try these cookies for a fresh twist on your dessert. They are easy to make and fun to enjoy. Happy baking!

Are you ready to bake some joy? Raspberry lemon cookies are a perfect blend of sweet and tangy. In just a few simple steps, you can whip up these delightful …

Read more

Categories Desserts
Older posts
Newer posts
← Previous Page1 … Page25 Page26 Page27 … Page55 Next →

TOSSED TASTES

Where flavors get playful! A fresh mix of easy bites, bold spices, and everyday cravings tossed into every recipe. 🍋🍅

PAGES

Home About Contact Privacy Policy Terms & Conditions Cookie Policy GDPR Policy Copyright Policy Disclaimer

CATEGORIES

Appetizers Desserts Salads Breakfast Dinner

Contact

  • Pinterest
  • Mail
Copyright © 2025 Tossed Tastes. All rights reserved.