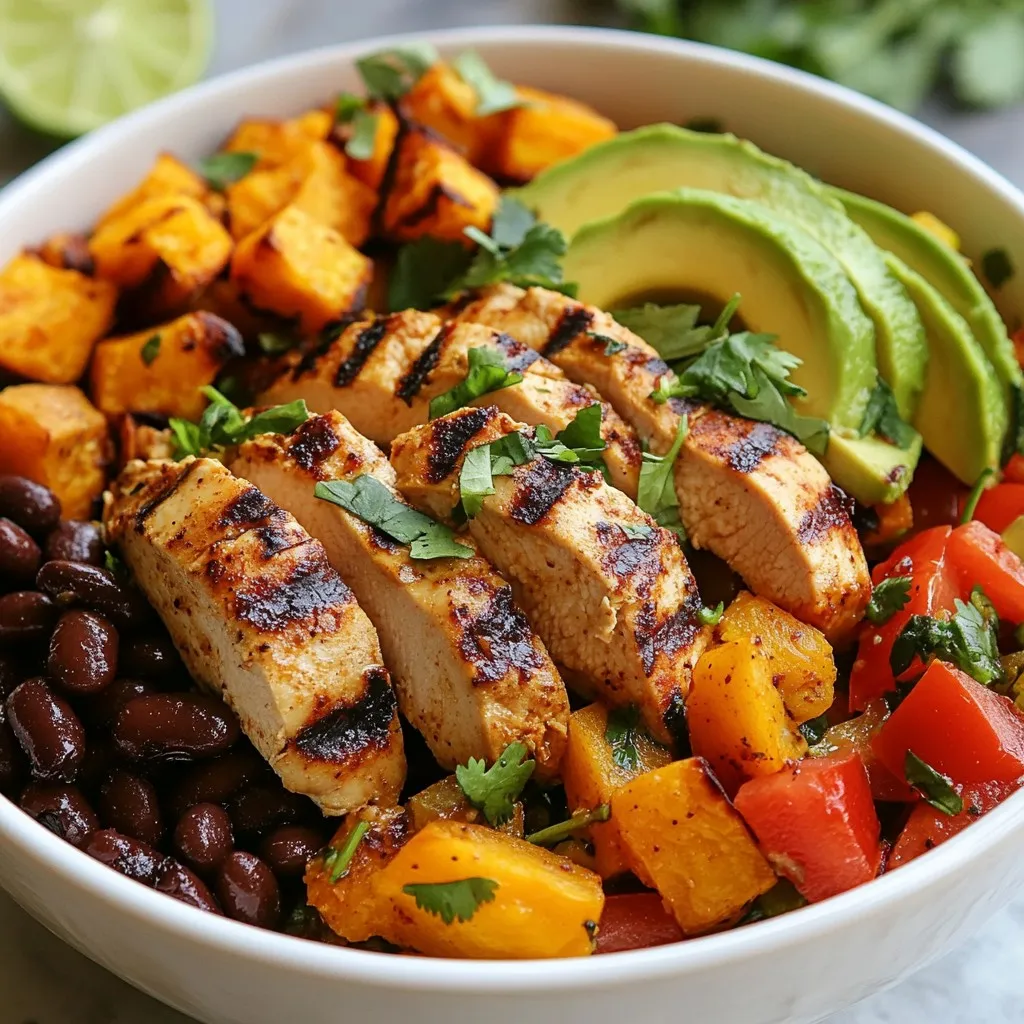
Skip to content
Tossed Tastes
  • Home
  • Appetizers
  • Desserts
  • Salads
  • Breakfast
  • Dinner
  • Privacy Policy
  • Contact
  • About

Chef Elliot

Mahi Mahi in Lemon Garlic Cream Sauce Flavor Boost

June 13, 2025 by Chef Elliot
- 4 fresh Mahi Mahi fillets - 2 tablespoons extra virgin olive oil - Sea salt and freshly cracked black pepper, to taste - 2 tablespoons unsalted butter - 4 cloves garlic, finely minced - 1 cup heavy whipping cream - Zest of 1 large lemon - 2 tablespoons freshly squeezed lemon juice - 1 tablespoon fresh parsley, finely chopped - Lemon wedges, for garnish Mahi Mahi is a firm and tasty fish. It works great with many flavors. This recipe shines with lemon and garlic. Together, they create a rich and creamy sauce. To start, I recommend using fresh Mahi Mahi fillets. Fresh fish has better flavor and texture. You can find it at local fish markets or grocery stores. Look for fillets that are moist and smell fresh. Next, you need good olive oil. Extra virgin olive oil adds richness. It also helps to cook the fish evenly. Always choose a quality brand. Sea salt and black pepper are key. They enhance the fish's natural flavors. Use them generously for best results. Unsalted butter adds a creamy texture to the sauce. It also helps to balance the acidity of the lemon. Always melt it slowly to prevent burning. Garlic brings a punch of flavor. The more minced, the better it blends into the sauce. Fresh garlic is always best for this dish. Heavy whipping cream is the star of the sauce. It makes the sauce rich and velvety. Be sure to use full-fat cream for a creamy consistency. Lemon zest and juice brighten the dish. They add a fresh and zesty kick. Always use fresh lemons for optimal flavor. Fresh parsley adds a pop of color. It also enhances the taste with its light, herbal notes. Chop it finely for a beautiful garnish. Finally, lemon wedges are perfect for serving. They allow you to add extra lemon flavor right before eating. For the full recipe, check out the Mahi Mahi Delight in Lemon Garlic Cream Sauce! Enjoy cooking! Seasoning the fillets Start by seasoning both sides of the Mahi Mahi fillets. Use sea salt and freshly cracked black pepper. This simple step adds a burst of flavor. Make sure the fillets are evenly coated. This helps every bite taste great. Cooking the fillets to perfection Next, heat the extra virgin olive oil in a large skillet. Set it over medium-high heat until it shimmers. Carefully place the seasoned fillets in the skillet. Cook them for about 4-5 minutes on each side. You want them golden brown and fully cooked through. Once done, transfer the fillets to a warm plate. Melting butter and sautéing garlic In the same skillet, lower the heat to medium. Add unsalted butter and let it melt completely. Once melted, add the minced garlic. Sauté the garlic for about 1 minute. Stir often to avoid browning it. You want the garlic fragrant but not burnt. Incorporating cream and citrus flavors Gradually pour in the heavy whipping cream. Stir continuously to mix the garlic and cream well. Bring this mixture to a gentle simmer. Then, add the lemon zest and freshly squeezed lemon juice. Stir well to mix the flavors. Taste and adjust seasoning if needed. Reintroducing Mahi Mahi to the sauce Gently place the cooked Mahi Mahi fillets back into the skillet. Spoon the lemon garlic cream sauce over them. This helps the flavors blend beautifully. Final cooking steps for flavor infusion Let everything cook together for an additional 2-3 minutes. This final step allows the dish to absorb all the delicious flavors. When ready, remove from heat. Sprinkle with fresh parsley for color and taste. For the full recipe, check out the detailed instructions above. - Achieving the right cooking temperature: Cook Mahi Mahi over medium-high heat. This helps create a nice crust. Aim for an internal temperature of 145°F. Use a food thermometer for best results. - Ensuring fillets remain moist: Do not overcook the fish. Cook each side for about 4-5 minutes. The fish should flake easily with a fork. Keep a close eye on it. - Adjusting sauce thickness: If your sauce is too thin, let it simmer longer to thicken. Stir frequently to prevent sticking. You can also add a bit more cream if needed. - Balancing flavors with seasoning: Taste your sauce as you cook. Add more salt or pepper to fit your liking. A pinch of sugar can balance acidity if the lemon is too strong. - Plating suggestions for an appetizing look: Serve the Mahi Mahi fillets on a warm plate. Drizzle the lemon garlic cream sauce generously over the top. - Garnishing techniques for visual appeal: Add fresh parsley on top for color. Place a lemon wedge on the side for a bright touch. This makes the dish pop and look inviting. For more details, check the Full Recipe to get started on your tasty dish! {{image_4}} You can swap Mahi Mahi for other fish if needed. Cod, halibut, or tilapia work well. Each option gives a different taste but stays light and flaky. If you want a dairy-free version, try coconut cream or cashew cream. These alternatives add a unique flavor while keeping it creamy. To boost flavors, consider adding fresh herbs like basil or dill. These herbs pair well with lemon and garlic. You can also use spices like paprika or cayenne for a kick. For a citrus twist, try lime or orange juice instead of lemon. Each brings a new layer of flavor that brightens the dish. For a complete meal, serve Mahi Mahi with sides like rice or quinoa. These grains soak up the sauce nicely. Roasted vegetables like asparagus or broccoli add crunch and color. A fresh salad can also brighten your plate. Combine greens with a light vinaigrette for balance and freshness. For the full recipe, check out the Mahi Mahi Delight in Lemon Garlic Cream Sauce. Store leftovers in an airtight container. Keep them in the fridge. Mahi Mahi in lemon garlic cream sauce stays good for 2 to 3 days. Always cool the dish before sealing it. This helps keep moisture in and prevents spoilage. To freeze the dish, let it cool completely. Place the Mahi Mahi and sauce in a freezer-safe container. Seal tightly to avoid freezer burn. It will last for about 2 months in the freezer. When you’re ready to enjoy it again, thaw it overnight in the fridge. Reheat slowly to avoid drying out the fish. You can use a skillet over low heat. Add a splash of cream or broth to keep it moist. Cover the skillet while reheating. This helps trap steam and warmth, ensuring juicy fish. Alternatively, you can use a microwave. Place the dish in a microwave-safe container. Heat it in short bursts, stirring in between. This method works well for keeping the sauce creamy. For the full recipe, check out the rest of the article! Mahi Mahi cooks quickly, so watch it closely. The fish should be opaque and flake easily with a fork. If it looks translucent, it's not done. Cook it until the internal temperature reaches 145°F. This ensures it is safe to eat and perfectly tender. Yes, you can! If you want a lighter option, use half-and-half or whole milk. Coconut cream works great for a dairy-free version. You can also try using cashew cream for a nutty flavor. Each option brings a unique taste to the dish. Mahi Mahi pairs well with many sides. Try serving it with garlic mashed potatoes or quinoa for a hearty meal. Fresh salads, like a citrus or spinach salad, add brightness. Steamed veggies, such as asparagus or broccoli, balance the richness of the cream sauce. Yes, you can prepare the Mahi Mahi ahead. Cook the fish and sauce, then cool them down. Store them separately in the fridge for up to two days. When you're ready to eat, simply reheat the fish in a skillet and warm the sauce on low heat. Look for fresh Mahi Mahi at local fish markets or grocery stores with good seafood sections. Ask the fishmonger for the catch of the day. You can also find it frozen, which is a great option if fresh isn’t available. Always check for bright eyes and clean smell. You learned how to cook delicious Mahi Mahi with a tasty lemon garlic cream sauce. We covered essential tips for prepping, cooking, and serving your fish. Remember, using quality ingredients makes a big difference. Don’t hesitate to try variations or new sides for a fresh meal. Enjoying this dish can impress anyone at your table. Follow these steps, and you’ll create a flavorful meal everyone loves! Happy cooking!

Are you ready to treat your taste buds? Mahi Mahi in Lemon Garlic Cream Sauce brings a burst of flavor that’s hard to resist. With just a few simple ingredients, …

Read more

Categories Dinner

Protein Waffles Packed with Flavor and Nutrition

June 13, 2025 by Chef Elliot
For tasty protein waffles, you need a few key items. Here’s what you should gather: - 1 cup rolled oats - 1 scoop protein powder (flavor of your choice: vanilla or chocolate) - 1 ripe banana, thoroughly mashed - 2 large eggs - 1/4 cup plain Greek yogurt - 1/2 cup almond milk (or your preferred milk variety) - 1 tablespoon baking powder - 1 teaspoon vanilla extract - 1/2 teaspoon ground cinnamon - A pinch of salt - Olive oil or cooking spray for greasing the waffle iron These ingredients work together to create waffles that are not only delicious but also full of protein. Want to jazz up your protein waffles? Here are some fun options to consider: - Chopped nuts (like walnuts or almonds) for crunch - Dark chocolate chips for sweetness - Fresh or frozen berries for a fruity twist - Protein-packed yogurt or nut butter as toppings Adding these extras can enhance the flavor and make your meal even more satisfying. Let's look at what makes these waffles nutritious: - Rolled oats: Great for fiber and energy. They keep you full longer. - Protein powder: Boosts muscle repair and growth. It helps you feel strong! - Bananas: Offer natural sweetness and potassium. They are great for energy. - Greek yogurt: Adds protein and creaminess. It’s also good for your gut. - Eggs: Provide protein and healthy fats. They help make waffles fluffy. - Almond milk: A lower-calorie milk option. It’s great for lactose-free diets. - Baking powder: Makes the waffles rise and become light. - Cinnamon: Adds flavor and can help regulate blood sugar levels. This mix of ingredients ensures you enjoy a tasty, healthy meal. For the full recipe, check out the details above. First, get your waffle iron ready. Preheat it according to the manufacturer's guidelines. This step is key for cooking perfect, crispy waffles. A well-heated iron ensures even cooking. While your iron heats up, you can prepare your batter. In a large bowl, add the rolled oats and protein powder. Stir them well to mix evenly. Next, add in the mashed banana. This will add sweetness and moisture. Crack in the eggs and add the Greek yogurt. Pour in the almond milk, and add baking powder, vanilla extract, ground cinnamon, and a pinch of salt. Now, mix everything with a whisk or an electric mixer. Aim for a smooth, creamy batter. Let this batter rest for about five minutes. This resting time helps it become thicker, which makes fluffier waffles. Once your batter is ready, it’s time to cook. Lightly grease the preheated waffle iron with olive oil or cooking spray. Pour about 1/2 cup of batter onto the hot iron. Close the lid and follow the manufacturer's cooking time, usually around 4-5 minutes. Check if the waffles are golden brown and crisp. Carefully open the iron and take the waffle out. Place it on a plate to keep warm. Repeat this process with the remaining batter. For a tasty twist, serve your waffles warm with fresh berries, Greek yogurt, and a sweet drizzle of honey or maple syrup. Enjoy your delicious, protein-packed meal! You can find the full recipe in the previous section. To get the best waffle texture, use the right mix. Start with rolled oats and protein powder. These ingredients give a nice base. The ripe banana adds moisture and sweetness. It also helps bind the mix together. Make sure your batter is smooth but not too thin. Let it rest for five minutes. This allows the oats to soak up the liquid. You will notice a fluffier waffle when you do this. One big mistake is overmixing the batter. Mix just until combined; lumps are okay. Another common error is not preheating the waffle iron. A hot iron helps the waffles cook evenly. If your iron isn’t hot enough, they may turn out soggy. Also, be careful with the amount of batter you use. Too much can make a mess and lead to uneven cooking. Presentation matters! Serve your waffles warm for the best taste. Add fresh berries on top for color and flavor. A dollop of Greek yogurt gives creaminess and protein. Drizzle honey or maple syrup for sweetness. Arrange them nicely on a plate. You can stack them or keep them apart. This makes the meal look inviting and delicious. For more detailed steps, check the Full Recipe. {{image_4}} You can make these waffles vegan by swapping a few ingredients. Use flaxseed meal instead of eggs. Mix one tablespoon of flaxseed meal with three tablespoons of water. Let it sit for five minutes until it gets thick. For yogurt, use a plant-based option, like almond or coconut yogurt. Replace Greek yogurt with one-fourth cup of applesauce. Use your favorite non-dairy milk in place of almond milk. The rest of the recipe stays the same. This gives you light and fluffy waffles that are still high in protein. To make gluten-free protein waffles, choose gluten-free oats. Ensure your protein powder is also gluten-free. Follow the same steps from the full recipe. This version keeps all the great flavors while being safe for those avoiding gluten. Your family and friends won’t even notice the difference! You can enhance your protein waffles with various flavors. Consider adding: - 1/4 cup of chocolate chips for a sweet twist - 1/4 cup of chopped nuts for crunch - 1/2 cup of shredded coconut for a tropical touch - Fresh fruit, like blueberries or diced apples, mixed into the batter You can also adjust spices to your taste. Try adding nutmeg, cardamom, or even a little cocoa powder. Each change can give your waffles a unique flavor. These customizations not only add fun but also increase the nutrition. Enjoy experimenting with different flavors! Store leftover protein waffles in an airtight container. They stay fresh in the fridge for up to three days. Make sure they cool completely before sealing them. This helps keep them from getting soggy. To freeze protein waffles, place them in a single layer on a baking sheet. Freeze them for about two hours. Once they are solid, transfer them to a freezer bag. Label the bag with the date. They last for up to three months in the freezer. When you’re ready to eat your frozen waffles, reheat them in a toaster or oven. For the toaster, set it to medium heat. For the oven, preheat it to 350°F. Bake for about 10 minutes. You can also use a microwave, but it may make them a bit soggy. Enjoy your protein-packed waffles warm for the best taste! For the full recipe, check the earlier section. These protein waffles contain about 20 grams of protein per serving. This amount comes mainly from the protein powder and Greek yogurt. If you use a different protein powder, the total may change. However, they are still a great source of protein. This makes them perfect for breakfast or post-workout meals. Yes, you can use different protein powders. Whether it's whey, soy, or pea protein, they all work well. Just choose a flavor that you enjoy, like chocolate or vanilla. Keep in mind that some powders have different sweetness levels. You may need to adjust the other sweeteners in the recipe. Homemade protein waffles are fresher and often more nutritious. You control the ingredients, so you can avoid added sugars and preservatives. Store-bought options may taste good, but they often have fewer nutrients. Making them at home also allows you to customize flavors. Plus, they are fun to prepare! Try the Full Recipe for a delicious treat. Protein waffles are a fun and tasty way to boost your nutrition. We explored the essential and optional ingredients that make them delicious. I shared step-by-step instructions to help you cook the perfect waffles. We discussed tips for great texture, avoiding common mistakes, and serving ideas. You can make variations like vegan or gluten-free waffles. Finally, I explained how to store and reheat leftover waffles. With these tips, you can enjoy protein waffles any time, knowing they're easy to make and good for you. Get excited and start your waffle journey today!

Are you ready to boost your breakfast with a delicious twist? In this post, I will show you how to make protein waffles that are both tasty and packed with …

Read more

Categories Breakfast

Mini Breakfast Omelets Simple and Tasty Delight

June 13, 2025 by Chef Elliot
To create the perfect mini breakfast omelets, you need simple and fresh ingredients. Here’s a list of what you’ll need: - 6 large eggs - 1/4 cup milk - 1/2 cup bell peppers, finely chopped (a mix of red, green, and yellow) - 1/4 cup red onion, finely chopped - 1/2 cup spinach, chopped - 1/2 cup shredded cheese (cheddar or mozzarella) - 1/4 cup cooked and crumbled turkey sausage or plant-based sausage - Salt and pepper to taste - Fresh herbs (like chives or parsley) for garnish These ingredients work together to create a tasty and colorful dish. The eggs and milk form a light base. The vegetables add crunch and flavor, while the cheese gives a creamy texture. You can customize the mix to your liking. If you’re curious about more details, you can check the full recipe. Enjoying these mini omelets is easy and fun! First, preheat your oven to 350°F (175°C). This step is key for even cooking. While the oven heats, grab your muffin tin and grease it well. You can use cooking spray or a little butter. This will help the omelets come out easily later. Next, crack 6 large eggs into a big bowl. Add 1/4 cup of milk. Whisk them together until they blend well. Season with salt and pepper to taste. Now it’s time to add in your chopped veggies. Use 1/2 cup of bell peppers, 1/4 cup of red onion, and 1/2 cup of spinach. For extra flavor, mix in 1/2 cup of cheese and 1/4 cup of cooked turkey sausage or a plant-based option. Stir everything until it’s well combined. Carefully pour the egg mixture into each muffin tin cup. Fill them about 3/4 full. This will give them room to rise without spilling over. Place the muffin tin in your preheated oven. Bake for 18 to 20 minutes. Keep an eye on them. When they puff up and look set, they are almost done. To check if they are ready, take a toothpick and poke the center of an omelet. If it comes out clean, they are done. If not, give them a few more minutes. Once baked, take the muffin tin out of the oven. Let it cool for a minute. Use a butter knife to gently loosen the edges. Then, lift out the mini omelets. Serve warm and enjoy your tasty creation! For the full recipe, visit the recipe section. To make the best mini breakfast omelets, start with the egg mixture. Here’s how: - Beating eggs: Use a whisk to mix the eggs and milk well. This adds air, making the omelets fluffy. - Seasoning: Add salt and pepper to taste. You can also try garlic powder or paprika for extra flavor. For fluffy omelets, follow these tips: - Don’t overbeat: Mixing too much can make the eggs tough. Just blend until combined. - Bake at the right temperature: A steady 350°F helps them rise nicely. Using non-stick options is key: - Choose the right muffin tin: A good non-stick muffin tin helps with easy removal. Spray it with cooking spray or butter to prevent sticking. - Be gentle when removing: After baking, let them cool for a few minutes. Use a butter knife to ease them out without breaking. Garnishing your mini breakfast omelets adds charm: - Fresh herbs: Sprinkle chopped chives or parsley on top. It brightens the dish and adds flavor. - Pairing ideas: Serve with fresh fruit, toast, or a side of yogurt. You can also enjoy them with coffee or fresh juice. These tips will turn your mini breakfast omelets into a delightful dish that everyone will love. If you want to make them, check out the Full Recipe for more details! {{image_4}} You can easily swap ingredients to make the mini breakfast omelets fit your taste. If you want a meat alternative, try using plant-based sausage. This option gives you the same hearty flavor without the meat. For those who prefer dairy-free meals, use almond milk instead of regular milk. You can also choose vegan cheese to keep it dairy-free while adding creaminess. Seasonal veggies can bring a fresh twist to these omelets. Try using zucchini in summer or mushrooms in fall. Mixing different vegetables keeps every bite interesting. To enhance the flavor of your mini breakfast omelets, experiment with spices and herbs. Adding a pinch of paprika or a dash of cumin can elevate your dish. Fresh herbs like basil or thyme can also brighten up the taste. Cheese lovers can have fun selecting different cheeses. Instead of cheddar or mozzarella, try goat cheese for a tangy flavor or feta for something unique. Mixing cheeses can also create a blend of flavors that surprises your taste buds. For the full recipe, check out the details above and start creating your delicious mini breakfast omelets! To keep your mini breakfast omelets fresh, store them in the fridge. Place them in an airtight container. They will stay good for about three to four days. If you want to keep them longer, freezing is great. Just wrap each omelet in plastic wrap. Then, place them in a freezer bag. This way, they can last for up to two months. When it's time to eat, you can reheat the omelets easily. The microwave works well. Just place one omelet on a plate and cover it with a damp paper towel. Heat it for about 30 seconds. Check if it's warm enough; if not, heat it for another 10 seconds. If you prefer the oven, preheat it to 350°F (175°C). Place the omelets on a baking sheet. Cover them with foil to keep them moist. Reheat for about 10-15 minutes. This method helps keep the texture nice and fluffy. Mini breakfast omelets last about 3 to 4 days in the fridge. Store them in an airtight container. This keeps them fresh and tasty. If you want to enjoy them longer, consider freezing them. They can last up to 2 months in the freezer. Just make sure to wrap them well to prevent freezer burn. Yes, you can make mini breakfast omelets ahead of time. They are great for meal prepping. You can bake them on a Sunday and enjoy them throughout the week. Just store the cooked omelets in the fridge. Heat them up in the microwave for a quick breakfast. You can also freeze them for future meals. This way, you always have a tasty option ready to go. Mini breakfast omelets pair well with many sides. Here are a few ideas: - Fresh fruit salad for sweetness - Toast or bagels for crunch - A simple green salad for freshness - Yogurt for a creamy touch These options enhance your meal and add color to your plate. You can mix and match to suit your taste. Enjoy the full recipe to get started on this delightful dish! Mini breakfast omelets are a tasty, easy dish to enjoy. We discussed the main ingredients like eggs, veggies, cheese, and meats that make them great. I provided step-by-step instructions to prepare and bake these omelets. You also learned tips for perfecting them and ideas for storage. In summary, you can mix and match ingredients to suit your taste. Enjoy these omelets fresh or store them for later. Share your own variations and enjoy this simple, healthy meal!

Start your day right with my Mini Breakfast Omelets, the perfect blend of taste and ease! Packed with eggs, vibrant veggies, and your choice of cheese or meat, these mini …

Read more

Categories Breakfast

Chocolate Strawberry Cluster Pops Delightful Treat Recipe

June 13, 2025 by Chef Elliot
- 1 pound fresh strawberries, thoroughly washed and dried - 1 cup semi-sweet chocolate chips - 1 cup white chocolate chips - 1 cup crushed nuts (choose from almonds, hazelnuts, or walnuts) - 1 cup unsweetened shredded coconut - 1 tablespoon coconut oil (for melting the chocolate) - Skewers or lollipop sticks You need fresh strawberries for this delightful treat. Make sure they are clean and dry. The chocolate chips, both semi-sweet and white, give a great mix of flavors. Choose nuts that you like. Almonds, hazelnuts, or walnuts all work well here. The shredded coconut adds a nice touch, too. Coconut oil helps the chocolate melt smoothly. Finally, don’t forget your skewers or lollipop sticks. They hold everything together. This list gives you all you need to create delicious Chocolate Strawberry Cluster Pops. Check out the Full Recipe for more details on how to make these tasty treats! - Prepare the Strawberries: Line a baking sheet with parchment paper. Make sure your strawberries are dry. Water can stop the chocolate from sticking. - Melt the Dark Chocolate: In a microwave-safe bowl, mix semi-sweet chocolate chips and coconut oil. Heat in 30-second bursts. Stir after each burst until smooth. - Chocolate Dipping: Dip each strawberry into the melted dark chocolate. Make sure each one is fully coated. Let any extra chocolate drip back into the bowl before placing them on the sheet. - Add Toppings: While the chocolate is still wet, sprinkle half of the strawberries with crushed nuts. Use the other half for shredded coconut. This adds nice flavors and textures. - Melt the White Chocolate: In another bowl, melt the white chocolate chips. Use the same 30-second method, stirring until it is smooth. - Drizzle White Chocolate: Grab a fork and drizzle the melted white chocolate over the strawberries. Make a zig-zag pattern to make them look pretty. - Insert Skewers: Before the chocolate sets, stick a skewer or lollipop stick into each strawberry. This makes them easy to hold. - Chill: Place the baking sheet in the fridge. Chill for about 30 minutes until the chocolate hardens. - Serve: Once the chocolate is set, lift the pops off the parchment paper. Place them on a nice platter for a great look. For the full recipe, check out the details above. Enjoy making these sweet treats! - Ensure strawberries are completely dry Start with clean, dry strawberries. Water can make the chocolate slide off. Use a paper towel to pat them dry. - Use quality chocolate for best flavor Good chocolate makes all the difference. Choose high-quality semi-sweet and white chocolate chips. They create a rich taste that pairs well with strawberries. - Suggestions for even topping distribution When adding toppings, do it right after dipping in chocolate. This way, nuts and coconut stick better. You can even rotate the strawberry for more coverage. - Presentation tips for serving For a beautiful display, arrange the pops on a nice platter. Drizzle some melted chocolate over the top for flair. Adding fresh mint leaves gives color and a nice touch. For more details, check out the Full Recipe. {{image_4}} You can make your Chocolate Strawberry Cluster Pops fun and unique. Here are some ideas to try: - Different toppings: Instead of just nuts and coconut, think about other toppings. You can use mini marshmallows, colorful sprinkles, or even a drizzle of caramel. Each topping adds a new twist to your pops. - Utilizing different types of chocolate: You don't have to stick with just semi-sweet and white chocolate. Try dark chocolate for a richer taste, milk chocolate for sweetness, or even vegan chocolate for a dairy-free option. Each chocolate brings its own flavor. - Making it a chocolate fondue experience: You can turn this into a fun fondue night. Melt your favorite chocolate in a pot. Then, let everyone dip their strawberries in the warm chocolate. It's interactive and delicious! Experimenting with these variations makes the treat even more enjoyable. You can find the full recipe above to get started on your tasty creations! To keep your Chocolate Strawberry Cluster Pops fresh, store them in the refrigerator. Place them in an airtight container. This method preserves their taste and texture well. - Best storage methods for freshness: Use an airtight container in the fridge. - Recommended storage duration: Enjoy your pops within 3 to 5 days for the best taste. - How to freeze for later enjoyment: You can freeze the pops. Lay them on a baking sheet first. Once frozen, transfer them to a freezer-safe bag. They can last up to 3 months in the freezer. Remember to let them thaw in the fridge before you eat them. This way, you can enjoy your delightful treat any time! How to make the chocolate stick to the strawberries? To make the chocolate stick well, ensure your strawberries are dry. Any moisture will cause the chocolate to slide off. After washing, gently pat them with a paper towel. This simple step makes a big difference. Can I use frozen strawberries instead of fresh? I recommend using fresh strawberries. Frozen strawberries have more water. When they thaw, they can become mushy. If fresh strawberries are not available, you can use frozen ones, but they may change the texture. What are some potential allergens to be aware of? Common allergens in this recipe include chocolate, nuts, and coconut. If you have nut allergies, skip the nuts or use seeds. Always check the labels for any cross-contamination warnings. Where to buy pre-made chocolate strawberry cluster pops? You can find pre-made chocolate strawberry cluster pops at local grocery stores or specialty candy shops. Online retailers also offer them, but check reviews for quality. Making them at home is fun and allows for personal touches. Can these pops be made in advance? Yes, you can make these pops in advance. After they set, store them in an airtight container in the fridge. They stay fresh for about two days. If you want to keep them longer, wrap them tightly and freeze. You learned how to make delicious chocolate strawberry cluster pops. We covered all the key steps, from gathering fresh ingredients to perfecting your presentation. Using quality chocolate and your favorite toppings, you can easily customize these treats. Remember to store them properly for the best taste. Enjoying these sweet snacks is a great way to celebrate any occasion. Now, grab your ingredients and start creating your own tasty pops!

Looking for a sweet and fun treat? Let’s make Chocolate Strawberry Cluster Pops! This easy recipe features juicy strawberries covered in melting chocolate and topped with your favorite goodies. Perfect …

Read more

Categories Desserts

Crispy Parmesan Zucchini Potato Muffins Delightful Treat

June 11, 2025 by Chef Elliot
- 2 medium zucchinis, coarsely grated - 2 large potatoes, peeled and coarsely grated - 1 cup all-purpose flour - 1 cup freshly grated Parmesan cheese - 2 large eggs - 1/4 cup milk - 1 teaspoon garlic powder - 1 teaspoon onion powder - 1/2 teaspoon salt - 1/4 teaspoon black pepper - 1/2 teaspoon baking powder - Olive oil spray for greasing the muffin tin To make these tasty muffins, you need specific amounts. Each ingredient plays a key role: - Zucchinis: 2 medium gives a fresh taste. - Potatoes: 2 large add heartiness. - Flour: 1 cup helps bind everything. - Parmesan cheese: 1 cup brings a rich flavor. - Eggs: 2 large add moisture and structure. - Milk: 1/4 cup keeps the batter smooth. - Garlic powder and onion powder: Each adds 1 teaspoon for savory depth. - Salt: 1/2 teaspoon balances flavors. - Black pepper: 1/4 teaspoon adds a slight kick. - Baking powder: 1/2 teaspoon helps muffins rise. - Olive oil spray: Lightly coat the muffin tin. Choosing the best zucchinis and potatoes is key for this recipe. Here’s how: - Zucchinis: Look for firm, shiny ones. Avoid soft spots or blemishes. - Potatoes: Choose ones that are smooth and free of sprouts. - Freshness: Buy them from a local market if possible. Seasonal produce tastes better. - Storage: Keep zucchinis in the fridge and potatoes in a cool, dark place. For the complete recipe, check out [Full Recipe]. First, set your oven to 350°F (175°C). This is the perfect temperature for baking. While the oven warms up, take your muffin tin and spray each cup with olive oil. This step helps the muffins come out easily after baking. You want to make sure you coat every cup so there are no stuck muffins! Next, grab your grated zucchini and potatoes. Place them in a large bowl. To avoid soggy muffins, you need to remove extra moisture. Take a clean kitchen towel and scoop some of the mixture into it. Twist the towel to squeeze out the liquid. Do this until the mixture feels dry. This is a key step for crispy muffins! Now it’s time to mix your dry and wet ingredients. In your bowl, add the flour, Parmesan cheese, garlic powder, onion powder, salt, black pepper, and baking powder. Stir these together until well combined. In a separate bowl, whisk the eggs and milk together until they blend smoothly. Pour this egg mixture over the dry ingredients. Mix gently with a spatula until just combined. Be careful not to over-mix; you want a thick batter without dry flour spots. For the full recipe, follow the steps carefully to ensure delicious results! To make sure your muffins get that perfect crisp, the moisture from the zucchinis and potatoes must go. After grating them, use a clean kitchen towel to squeeze out excess water. This step is key. More moisture means sogginess. Also, use freshly grated Parmesan cheese instead of pre-grated. It melts better and adds more flavor. A light spray of olive oil on top before baking helps with browning. For even cooking, fill each muffin cup only three-quarters full. This allows hot air to circulate, cooking them uniformly. Place the muffin tin in the center of the oven for the best heat exposure. Don't forget to rotate the tin halfway through baking. This small action ensures every muffin bakes evenly and becomes golden brown. A common mistake is over-mixing the batter. Mix just until you no longer see dry flour. Over-mixing makes the muffins dense. Another pitfall is not greasing the muffin tin well enough. This can lead to muffins sticking, making them hard to remove. Lastly, avoid opening the oven too soon. This can drop the temperature, affecting the final texture. For the full recipe and more details, check out the Crispy Parmesan Zucchini Potato Muffins section. {{image_4}} To enhance the flavor of your crispy Parmesan zucchini potato muffins, try adding herbs and spices. Fresh herbs like basil, thyme, or dill can bring a nice touch. Dried herbs work great too. A teaspoon of Italian seasoning can add depth and warmth. You can also spice things up with a pinch of red pepper flakes for a kick. Mix these in with the dry ingredients for even flavor distribution. Experiment to find your favorite combo! While Parmesan cheese shines in these muffins, you can swap it out for other cheeses. Cheddar adds a rich, sharp flavor. Feta cheese gives a creamy, tangy twist. For a milder option, try mozzarella. Just use the same amount as the recipe calls for. Mixing different cheeses can create a delightful blend. Each option provides a unique taste that keeps things fresh and exciting. You can easily make these muffins vegetarian or vegan. For a vegetarian twist, simply replace the eggs with a flaxseed mixture. To make them vegan, use plant-based milk and a vegan cheese option. There are many great vegan cheeses available today. You can also add nutritional yeast for a cheesy flavor without the dairy. These changes let everyone enjoy this delicious treat! For the complete recipe, check [Full Recipe]. To keep your muffins fresh, place them in an airtight container. Store them at room temperature for up to three days. You can also put them in the fridge for a week. If you want to keep them longer, freezing is a great option. To freeze your muffins, first let them cool completely. Wrap each muffin in plastic wrap. Then, place them in a freezer-safe bag or container. This method helps keep them moist and tasty. You can freeze them for up to three months. When you're ready to eat, simply thaw them overnight in the fridge. For the best texture, reheat your muffins in the oven. Preheat your oven to 350°F (175°C). Place the muffins on a baking sheet. Heat for about 10 minutes or until warm. You can also use a microwave, but this may make them a bit soft. If using a microwave, heat for 20-30 seconds. For a crispy outer layer, the oven is best. Enjoy your crispy Parmesan zucchini potato muffins! Yes, you can use frozen zucchini or potato. However, thaw them first and drain excess water. Frozen veggies often have more moisture, which can make your muffins soggy. For best results, use fresh zucchinis and potatoes. To make these muffins gluten-free, swap all-purpose flour with a gluten-free blend. Look for a blend that includes xanthan gum for better texture. This will help keep your muffins light and fluffy without gluten. These muffins shine when served warm. Pair them with a tangy dipping sauce like garlic aioli or marinara. You can also enjoy them as a side dish with soups or salads. For a fun twist, top them with a dollop of sour cream or Greek yogurt. For the full recipe, check out the details above. We explored how to make delicious crispy parmesan zucchini potato muffins. I shared key ingredients, measurements, and tips for picking fresh produce. Then, I guided you through easy steps for prepping, mixing, and cooking. You learned helpful tips for that perfect crisp and common mistakes to avoid. We also discussed fun variations, storage ideas, and answered common questions. Now, you’re ready to make these tasty muffins your own for any meal!

Are you ready to elevate your snacking game? These Crispy Parmesan Zucchini Potato Muffins are delicious and easy to make! Packed with fresh veggies and rich cheese, they make a …

Read more

Categories Appetizers

Cinnamon Roll Overnight Oats Tasty and Quick Recipe

June 11, 2025 by Chef Elliot
- 1 cup rolled oats - 1 cup almond milk (or your preferred milk) - 1 tablespoon maple syrup - 1 tablespoon chia seeds - 1 teaspoon vanilla extract - 1 teaspoon ground cinnamon Cinnamon roll overnight oats need some key ingredients. First, you will need rolled oats. They are the base of this dish and give it a hearty texture. Almond milk adds creaminess and flavor. You can use any milk you prefer. Maple syrup brings sweetness. It makes the oats taste like a treat. Chia seeds help thicken the mix and add healthy fiber. Vanilla extract enhances the flavor, while ground cinnamon gives that classic cinnamon roll taste. - 2 tablespoons Greek yogurt (for creaminess) - 2 tablespoons raisins or chopped walnuts (for crunch) - Fresh apple or banana slices (for topping) While the base ingredients are great, you can add a few more for fun. Greek yogurt adds creaminess and protein. Raisins or walnuts give a nice crunch and texture. Fresh fruit like apple or banana slices will brighten your dish. These toppings make your oats even more delicious and appealing. If you want to jazz it up, feel free to mix and match these options! For the full recipe, check out the details above. - In a medium mixing bowl, combine: - 1 cup rolled oats - 1 cup almond milk - 1 tablespoon maple syrup - 1 tablespoon chia seeds - 1 teaspoon vanilla extract - 1 teaspoon ground cinnamon Stir well until everything blends smoothly. If you want a creamier texture, fold in 2 tablespoons Greek yogurt. This step is optional but adds a nice touch. If you like, stir in 2 tablespoons of raisins or chopped walnuts for extra crunch. Next, transfer the mixture into an airtight container. You can also divide it into jars for easy serving. Seal the container or jars tightly and place them in the fridge overnight. This soaking time lets the oats absorb all those yummy flavors. When you wake up, take the oats out and stir them well. If they seem too thick, add a splash of almond milk. This will help you reach the perfect creamy consistency. Top your oats with fresh apple slices or banana slices. To mimic that classic cinnamon roll taste, sprinkle a little more cinnamon on top. Enjoy your delicious creation! To make your cinnamon roll overnight oats truly shine, I recommend mixing all ingredients well. A good mix ensures every bite has that delicious cinnamon flavor. Use high-quality rolled oats for a better texture. They help achieve that perfect chewiness. One mistake is using too little liquid. This can make your oats dry and tough. Always stick to the recipe for the right amount of almond milk. Another common error is not letting the oats soak for long enough. Give them at least six hours in the fridge to absorb all the flavors. Pair your oats with a cup of coffee for a complete breakfast. The warm drink enhances the sweet, spiced flavors. For a chic look, serve your oats in jars. This makes for an easy grab-and-go option and looks appealing on your table. Remember, presentation matters! {{image_4}} You can switch up the flavor of your cinnamon roll overnight oats easily. Here are two fun ideas: - Chocolate Chip Cinnamon Roll Overnight Oats: Add a handful of chocolate chips to the mix. They melt slightly and create a sweet surprise. - Pumpkin Spice Version for Fall: Swap in pumpkin puree and pumpkin spice instead of cinnamon. This gives your oats a cozy autumn vibe. You can make this recipe fit your diet needs without losing flavor. Here’s how: - Dairy-Free Alternatives: Use almond milk, coconut milk, or oat milk instead of regular milk. This keeps it creamy and dairy-free. - Adjusting Sweetness: If you want less sugar, try using agave syrup or stevia. These options can help you control the sweetness without sacrificing taste. Toppings make your oats more fun and tasty! Here are some great choices: - Nut Butter Swirls: Add a spoonful of almond or peanut butter on top. This adds richness and protein to your meal. - Coconut Flakes: Sprinkle some coconut flakes for a tropical flair. They add a nice crunch and extra flavor. For the complete preparation, you can refer to the Full Recipe. Enjoy experimenting with these fun variations! Store your leftover overnight oats in the fridge. Use a clean, airtight container. This helps keep the oats fresh. If you made a big batch, divide them into single servings. This way, you grab one easily each morning. You should eat your oats within 3 to 5 days. Look for changes in smell or texture. If they smell sour or feel slimy, they are spoiled. Always trust your senses when it comes to food safety. Enjoy your cinnamon roll overnight oats fresh for the best taste! For the full recipe, check out the earlier section. Overnight oats are a simple way to prepare oatmeal. You mix oats with liquid and let them soak overnight. The next morning, they are soft and ready to eat. They save time and are very healthy. You can add fruits, nuts, or sweeteners to make them tasty. They are also high in fiber and keep you full longer. Yes, you can meal prep overnight oats easily. Here are some tips: - Make a big batch: Use a larger container or several jars. This helps you have breakfast ready for days. - Prepare in jars: Divide the oats into individual jars. This makes it easy to grab and go. - Use different flavors: Each jar can have different toppings. This keeps things fun and fresh. You can personalize your overnight oats in many ways. Here are some ideas: - Add fruits: Sliced bananas or berries work great. - Mix in nuts or seeds: Walnuts or chia seeds add crunch. - Try different liquids: Use coconut milk or oat milk for a twist. - Spice it up: Add cocoa powder or nutmeg for new flavors. For the full recipe, check out the Cinnamon Roll Overnight Oats. Cinnamon roll overnight oats are simple and tasty. We covered the ingredients, including oats and almond milk. I shared preparation steps for easy mixing and soaking. Tips for perfecting your oats helped avoid common mistakes. You can enjoy various flavors and add fun toppings. Remember to store leftovers properly. These oats are a flexible and healthy breakfast option. Experiment with different ingredients to find your favorite. Enjoy the process and the delicious outcome!

Start your day right with my delicious Cinnamon Roll Overnight Oats! This easy recipe combines rolled oats with creamy almond milk and warm cinnamon for a sweet breakfast treat. You …

Read more

Categories Breakfast

Chicken Burrito Bowl Flavorful and Satisfying Meal

June 11, 2025 by Chef Elliot
- 2 boneless, skinless chicken breasts - 1 cup brown rice, rinsed and drained - 1 can black beans, rinsed and drained - 1 cup corn (fresh or frozen will work) Chicken is the star of this dish. I recommend using boneless, skinless chicken breasts for a lean and tasty option. Brown rice serves as a hearty base that fills you up and adds fiber to your meal. Black beans bring protein and a rich flavor that complements the chicken well. Corn adds a touch of sweetness and crunch, making the bowl more enjoyable. - 1 tablespoon olive oil - 1 teaspoon chili powder - 1 teaspoon ground cumin - 1 teaspoon smoked paprika A good marinade makes all the difference. I use olive oil to help the spices stick to the chicken and add healthy fats. Chili powder brings heat, while ground cumin adds earthiness. Smoked paprika gives a nice smoky flavor that enhances the chicken. Mix these together for a simple yet bold coating. - 1 bell pepper, diced (any color) - 1 ripe avocado, diced - 1 cup cherry tomatoes, halved - 1/4 cup fresh cilantro, loosely packed and chopped - Juice of 1 lime Fresh toppings elevate the flavor. I like using bell peppers for crunch and color. Avocado adds creaminess, making each bite richer. Cherry tomatoes provide juiciness, while cilantro gives a fresh kick. Finally, a squeeze of lime juice brightens everything up, adding a zesty touch. For the full recipe, check out the details above. To start, you need to marinate the chicken breasts. In a medium bowl, mix together olive oil, chili powder, ground cumin, smoked paprika, garlic powder, salt, and black pepper. This spice mix gives the chicken great flavor. Make sure each chicken breast is well coated in the spices. Cover the bowl and let it sit for at least 30 minutes. This helps the chicken absorb all the tasty flavors. Next, it’s time to cook the chicken. Preheat your grill pan or a large skillet over medium-high heat. Once it’s hot, place the marinated chicken breasts on the pan. Cook them for about 6-7 minutes on each side. You want the chicken to reach an internal temperature of 165°F (75°C). After cooking, let the chicken rest for a few minutes before slicing it into strips. For the rice, you first need to prepare either chicken broth or water. In a medium saucepan, bring the broth or water to a rolling boil. Once boiling, add in your rinsed brown rice. Lower the heat to a simmer and cover the pot. Cook for about 40-45 minutes or until the rice is tender and all the liquid is absorbed. After that, remove the pot from heat and let it sit covered for an additional 5 minutes. This step makes the rice fluffy. While the chicken cooks, it’s time to prepare the veggies. Start by heating a small amount of olive oil in another skillet over medium heat. Add the diced bell pepper and sauté for about 5 minutes. You want them to be tender and slightly caramelized. For the corn, you can use fresh or frozen. If using frozen corn, just add it to the pan for the last few minutes of cooking. This warms the corn without overcooking it. The sweetness from the corn adds a nice touch to your burrito bowl! Now, you are ready to assemble your flavorful and satisfying meal. Don’t forget to check out the Full Recipe for more details! To make your chicken burrito bowl shine, use a mix of spices. I recommend chili powder, cumin, and smoked paprika. These spices add depth and warmth to your chicken. Don't forget garlic powder for a punch of flavor. Marinating for at least 30 minutes is key. The longer you let the chicken soak up those spices, the more tasty it becomes. For the best chicken, grill it or use a skillet. Both methods give great flavor. Cook the chicken for about 6 to 7 minutes on each side. Always check the internal temperature. It should reach 165°F (75°C). This way, your chicken stays juicy. To avoid overcooked rice, bring the broth to a boil before adding the rice. Then, lower the heat and cover it. Let it cook for 40 to 45 minutes. This helps the rice stay soft and fluffy. When it's time to assemble your bowl, start with a scoop of brown rice. Layer in sautéed bell peppers, black beans, and corn. Add the sliced chicken on top. For freshness, sprinkle diced avocado and cherry tomatoes. For a great presentation, use colorful bowls. Garnish with fresh cilantro and a squeeze of lime juice. A dollop of salsa or Greek yogurt adds creaminess. This makes your chicken burrito bowl not just tasty but beautiful too! For a full recipe, check out the [Full Recipe]. {{image_4}} If you want to switch things up, you can use beef or tofu. Beef adds a rich flavor that many love. Just season it the same way as the chicken. For a plant-based option, tofu works great. Cube the tofu and marinate it just like the chicken. Cook until it’s golden and crispy. You can change the grain base for a new taste. Quinoa makes a healthy swap; it’s full of protein. Cauliflower rice is another option if you want something low-carb. You can also try different types of rice, like jasmine or basmati, for a fragrant twist. Each grain brings its flavor to the bowl. Toppings can really spice up your bowl. Try adding different sauces like chipotle mayo or avocado crema. They add creaminess and extra flavor. You can also get creative with toppings. Jalapeños add heat, while shredded cheese gives richness. Experiment with your favorite toppings to make it your own. For the full recipe, check out the detailed instructions above. To keep your chicken burrito bowl fresh, follow these steps for refrigerating. First, let the bowl cool to room temperature. Then, place it in an airtight container. This method helps prevent moisture loss. Store leftovers in the fridge. They stay good for about three to four days. When it’s time to enjoy your leftovers, you want to keep them tasty. To reheat without losing texture, use the stovetop if you can. Place the bowl in a skillet over low heat. Stir often until it’s warm. If you use a microwave, cover the bowl with a damp paper towel. This keeps moisture in, but be careful not to overcook. For long-term storage, freezing is a great option. Freeze the chicken, rice, beans, and veggies separately. This helps keep the flavors fresh. Use freezer-safe bags or containers. When you’re ready to eat, thaw the components in the fridge overnight. Reheat everything together on the stovetop. This way, your chicken burrito bowl tastes just as good as fresh. For the full recipe, check out the instructions above. To make Chicken Burrito Bowls from scratch, follow these simple steps: 1. Marinate the Chicken: Mix olive oil, chili powder, cumin, paprika, garlic powder, salt, and pepper. Coat the chicken breasts and let them sit for at least 30 minutes. 2. Cook the Rice: Boil chicken broth or water, then add rinsed brown rice. Cover and simmer for about 40-45 minutes until the rice is tender. 3. Cook the Chicken: Grill or pan-cook marinated chicken for about 6-7 minutes on each side until done. 4. Prepare the Veggies: Sauté diced bell pepper in olive oil for about 5 minutes until tender. 5. Assemble the Bowl: Start with rice, then layer in bell pepper, black beans, corn, chicken, avocado, and tomatoes. 6. Garnish: Finish with lime juice, cilantro, salsa, and Greek yogurt or sour cream. This takes about 1 hour and 15 minutes in total. If you want to swap brown rice, here are some tasty options: - Quinoa: This grain is light and packed with protein. - Cauliflower Rice: Great for a low-carb choice, it adds a nice texture. - White Rice: It’s softer and cooks faster than brown rice. - Barley or Farro: These grains bring a chewy texture and nutty flavor. Each alternative keeps the meal flavorful and satisfying. Yes, the chicken burrito bowl can be healthy! Here’s a quick breakdown: - Calories: Each serving has about 500-600 calories, depending on toppings. - Protein: The chicken and beans provide a solid protein boost. - Fiber: Black beans and corn are high in fiber, which aids digestion. - Healthy Fats: Avocado adds healthy fats, which are good for your heart. This meal balances protein, fats, and carbs well. You can find chicken burrito bowls at many places: - Local Mexican Restaurants: Many offer delicious, fresh options. - Fast-Casual Chains: Look for places like Chipotle or Qdoba. - Online Meal Services: Check platforms like Uber Eats or DoorDash. - Grocery Stores: Some stores have ready-to-eat meals in the deli section. You’ll find plenty of choices nearby or online. Yes, you can make this recipe ahead of time. Here are some tips: - Cook the Chicken and Rice: Prepare these and store them in the fridge for up to 3 days. - Chop Veggies: You can chop bell peppers and other toppings in advance. - Assemble Just Before Eating: Keep all components separate until you are ready to eat. This keeps everything fresh and crisp. Meal prep makes it easy for busy days! You can create a tasty chicken burrito bowl with simple ingredients and steps. We covered the key components like chicken, brown rice, and fresh toppings. You learned easy cooking tips and flavorful variations. Storing and reheating your leftovers is simple, ensuring great taste for later. Enjoy experimenting with different proteins and grains to make it your own. Try it out and enjoy delicious homemade meals that fit your style and taste!

Looking for a colorful, tasty meal? My Chicken Burrito Bowl is packed with flavor and nutrients. With juicy chicken, hearty brown rice, and vibrant veggies, this dish is quick and …

Read more

Categories Dinner

Strawberry Cheesecake Overnight Oats Delightful Treat

June 11, 2025 by Chef Elliot
To make this tasty dish, you need: - 1 cup rolled oats - 1 cup milk (dairy or non-dairy) - ½ cup Greek yogurt - 1 tablespoon cream cheese, softened - 2 tablespoons maple syrup or honey - ½ teaspoon pure vanilla extract - ½ cup fresh strawberries, hulled and sliced - Pinch of salt These ingredients create a creamy texture with a sweet strawberry flavor. You can add twists to your oats! Try these optional ingredients: - 2 tablespoons crushed graham crackers (for a crunchy topping) - A sprinkle of cinnamon (for warmth) - Chia seeds (for added nutrition) - Nut butter (for extra creaminess) These options let you personalize your oats to match your taste. Choosing the best ingredients makes a difference. Here are some tips: - Oats: Look for rolled oats, as they cook well and stay chewy. - Milk: Choose a milk type you enjoy, like almond or oat milk. - Yogurt: Use thick Greek yogurt for creaminess and protein. - Strawberries: Pick fresh, ripe strawberries for the best flavor. Quality ingredients lead to a delicious breakfast you will love. For the full recipe, check out the complete details. To start, grab a big mixing bowl. Combine one cup of rolled oats, one cup of milk, and half a cup of Greek yogurt. Then, add one tablespoon of softened cream cheese. This gives the oats a rich taste. Next, stir in two tablespoons of maple syrup or honey for sweetness. Don't forget half a teaspoon of pure vanilla extract. Finally, add a pinch of salt to enhance the flavors. Mix it well until everything is creamy and smooth. Now, take half a cup of fresh strawberries. Make sure to hull and slice them nicely. Gently fold the sliced strawberries into the oat mixture. This step is key for making sure each bite has a burst of strawberry flavor. You want the strawberries to be evenly spread throughout the mixture. Once your mixture is ready, it's time to store it. Portion the oat mix into two or three jars. Seal them tightly with their lids. This keeps the oats fresh. Place the jars in the refrigerator. Let them rest overnight, or for at least six hours. This soaking time helps the oats absorb the liquid and become soft. When morning comes, give the oats a good stir. Top with more sliced strawberries and some crushed graham crackers if you like. Enjoy your delicious breakfast straight from the jar! For the full recipe, check the earlier section. To get that smooth and creamy texture in your overnight oats, use Greek yogurt. It adds thickness and creaminess. Mixing softened cream cheese into the oats also helps. This step makes the oats rich and indulgent. Stir all the ingredients well. If you notice lumps, blend them out. The oats will soak up liquid and soften overnight, creating a delightful treat. Strawberries shine in this recipe, but you can mix in other flavors. Try adding a dash of cinnamon for warmth. A bit of lemon zest can lift the taste too. Pairing strawberries with vanilla extract enhances their sweetness. If you like a touch of tartness, add some fresh raspberries. These combinations keep breakfast exciting and flavorful. For a healthier version of your overnight oats, use almond milk or oat milk instead of regular milk. You can reduce maple syrup or honey to lower sugar. Use a natural sweetener like mashed banana for added flavor. Add chia seeds for extra fiber and omega-3s. They will also thicken the mixture and boost nutrition. These changes make your breakfast tasty and nourishing without losing the joy of this delightful treat. {{image_4}} To make vegan strawberry cheesecake overnight oats, swap the Greek yogurt and cream cheese for plant-based options. Use coconut yogurt for creaminess and cashew cream for a rich taste. Replace dairy milk with almond milk or oat milk. This keeps the flavor and texture deliciously creamy without any dairy. Feel free to mix in other fruits to change the taste. Blueberries, raspberries, or peaches work well. You can also try banana slices for added sweetness. Just remember to adjust the amount of sweetener if you pick fruits that are naturally sweet. While maple syrup and honey are great choices, there are other options. You can use agave nectar or stevia if you want a lower-calorie option. Each sweetener adds a unique flavor. Taste your mixture as you go to find your perfect sweetness level. For the complete recipe, check the Full Recipe section. You can keep your strawberry cheesecake overnight oats in the fridge for up to five days. The oats will stay delicious and safe to eat. As they sit, the flavors blend even more. I love making a batch and enjoying them throughout the week. If you want to save your oats longer, freezing is a great option. Portion your oats into airtight containers or freezer bags. They can last up to three months in the freezer. To enjoy, thaw them in the fridge overnight. You can also heat them in the microwave if you prefer warm oats. Use glass jars or BPA-free plastic containers for storage. Glass jars are great because they don’t stain and are easy to clean. Make sure the containers have tight-fitting lids. This helps keep your oats fresh and prevents spills. I recommend using mason jars for a fun touch, plus they’re perfect for serving! Yes, you can make these overnight oats the night before! It’s one of the best parts. Just mix everything together, and let them sit overnight. This way, the oats soak up the milk and yogurt. By morning, you get a creamy and flavorful breakfast. It saves time and gives you a tasty start to your day. If you need a substitute for Greek yogurt, try using regular yogurt. You can also use plant-based yogurt if you want a dairy-free option. Silken tofu blended until smooth works well too. Each option will keep the oats creamy and tasty. Just remember to choose a flavor you enjoy, so your oats stay delicious. To make your oats gluten-free, simply select gluten-free rolled oats. Many brands offer this now. Always check the package to ensure they are certified gluten-free. This step makes your breakfast safe and enjoyable for those with gluten sensitivities. You can still enjoy the same great taste with these oats! Strawberry cheesecake overnight oats offer a simple, tasty breakfast. We covered key ingredients, tips for selecting quality items, and how to prepare the mixture. You learned how to customize and achieve a creamy texture while exploring tasty variations. Don't forget about storage options to keep your oats fresh. Enjoy this healthy treat with joy! Making it your own is easy, and you'll love every bite.

Looking for a quick, tasty breakfast? Strawberry Cheesecake Overnight Oats are your answer! They are easy to make and delicious. This treat combines the creamy goodness of cheesecake with fresh, …

Read more

Categories Breakfast

Cheesy Broccoli Chicken and Rice Casserole Delight

June 11, 2025 by Chef Elliot
This recipe is simple and full of flavor. Here’s what you need: - 2 cups cooked chicken, shredded - 2 cups cooked rice (white or brown) - 1 cup broccoli florets (fresh or frozen) - 1 cup cheddar cheese, shredded (save some for later) - 1 cup cream of mushroom soup - 1/2 cup milk (whole or low-fat) - 1 teaspoon garlic powder - 1 teaspoon onion powder - Salt and pepper, to taste - 1/2 cup breadcrumbs (optional for a crispy top) - 2 tablespoons olive oil (if using fresh broccoli) Gather these ingredients before you start cooking. Each item plays a key role in making this dish rich and tasty. The chicken and rice form the base while the broccoli adds color and nutrition. Cheese gives it that creamy, comforting feel. The soup and seasonings tie everything together for a delightful meal. For the full recipe, refer to the complete instructions above. 1. Preheat your oven to 350°F (175°C). This step warms up your cooking space. 2. If using fresh broccoli, bring a pot of water to boil. Blanch the florets for 2-3 minutes. This keeps them bright and tender. Drain them and set aside. If you have frozen broccoli, ensure it’s thawed and ready to go. 3. In a large bowl, mix together the shredded chicken, cooked rice, drained broccoli, cream of mushroom soup, milk, garlic powder, and onion powder. Stir until everything is combined well. 4. Add salt and pepper to taste. Gently fold in half of the shredded cheddar cheese for a creamy texture. 5. Pour your mixture into a greased 9x13-inch baking dish. Spread it evenly for even cooking. 6. Cover the dish with aluminum foil. This helps avoid browning too fast. Place it in the preheated oven and bake for 25 minutes. 7. After 25 minutes, remove the foil. This allows the cheese to brown nicely. Bake for another 10-15 minutes. Watch for bubbling cheese and a light golden color. 8. Once baked, let the casserole cool for a few minutes. This helps it set and makes serving easier. 9. For serving, you can present it right from the baking dish. This gives a warm and homey feel. Pair it with a side of mixed greens to add some color. For a finishing touch, sprinkle a bit more cheese or fresh herbs like parsley or chives on top before serving. Enjoy your Cheesy Broccoli Chicken and Rice Casserole Delight! Choosing the right chicken For the best flavor, I suggest using cooked chicken. You can shred or chop rotisserie chicken. It saves time and brings great taste. If you have leftover chicken, that works too. Just ensure it is moist. Dry chicken can make your casserole less tasty. Cooking rice perfectly When cooking rice, follow the package instructions closely. Use a 2:1 water-to-rice ratio for white rice. For brown rice, a 2.5:1 ratio works best. Make sure to let it rest after cooking. This helps the grains become fluffy and not sticky. Recommended seasoning adjustments To make your casserole pop, add more seasoning. Try using paprika for a smoky flavor. A pinch of cayenne can add heat. If you love herbs, consider adding dried thyme or basil. Fresh herbs also work well. Just chop them finely and mix them in. Ideas for adding more veggies You can easily boost the veggie content. Try adding peas, carrots, or bell peppers. Spinach or kale can also be great options. Just sauté them briefly before mixing into the casserole. This helps them retain their color and nutrients. {{image_4}} You can make this dish even more fun by swapping some ingredients. If you want a different protein, try using turkey or tofu instead of chicken. Both options taste great and keep it healthy. Turkey gives a nice flavor, while tofu is perfect for a vegan choice. If you're looking for dairy-free options, you can use non-dairy cheese or almond milk. These swaps help everyone enjoy the dish, no matter their diet. To change up the flavors, consider an Italian-style variation. Add Italian herbs like basil and oregano for a fresh twist. You can even mix in some diced tomatoes for extra flavor. This gives the casserole a rich taste that reminds you of Italy. For a spicy southwestern twist, add some diced jalapeños or chili powder. This will give your casserole a nice kick. You can also mix in black beans or corn to add more texture. Both options make the dish exciting and tasty. These variations let you customize your casserole. You can enjoy it in many ways! For the full recipe, check out our detailed guide. To keep your Cheesy Broccoli Chicken and Rice Casserole fresh, use airtight containers. Glass or plastic containers work well. Make sure they are clean and dry before adding the casserole. Store it in the fridge for up to three days. For longer storage, consider freezing it. If you freeze it, use freezer-safe bags. Remove as much air as possible to prevent freezer burn. When reheating, you have two main options: oven or microwave. The oven keeps the casserole crispy. Preheat it to 350°F (175°C). Place the casserole in an oven-safe dish. Cover it with foil to avoid drying out. Heat for about 20-25 minutes, or until hot. The microwave is faster but may not keep the texture. Place portions in a microwave-safe dish. Cover with a microwave-safe lid or wrap. Heat in short bursts, stirring in between. This helps keep the cheese melty and the rice fluffy. Always check the temperature to ensure it is hot all the way through. Enjoy your leftovers just as much as the first time! Can I make this casserole ahead of time? Yes, you can prepare it a day before. Just mix all the ingredients and store them in the fridge. When ready, bake it as directed. What can I substitute for cream of mushroom soup? You can use cream of chicken soup or a homemade white sauce. A mix of sour cream and broth works too. This helps keep the dish creamy. How do I prevent the casserole from getting soggy? Make sure to drain any excess liquid from the broccoli. Also, avoid using too much milk. Properly cooked rice helps keep the texture just right. Can I freeze Cheesy Broccoli Chicken and Rice Casserole? Yes, you can freeze it. Just cover it tightly with foil or plastic wrap. This keeps it fresh for up to three months. How long does it take to bake from frozen? Baking from frozen takes about 60-75 minutes. Cover it with foil for the first half of the baking time to avoid burning. What sides pair well with this dish? This casserole goes great with a side salad or steamed veggies. Garlic bread or a light soup can also complement it nicely. This blog post detailed how to make a Cheesy Broccoli Chicken and Rice Casserole. We covered ingredients, step-by-step baking instructions, and tips to perfect your dish. You can swap ingredients for new tastes or add vegetables for flavor. Storing and reheating tips ensure your leftovers are great too. Whether you’re a beginner or an expert, this dish is easy and fun to make! Enjoy your casserole adventure!

Looking for a dish that combines comfort and flavor? You’ve found it! This Cheesy Broccoli Chicken and Rice Casserole is a family favorite. It’s simple to make and packed with …

Read more

Categories Dinner

One-Pot Garlic Parmesan Pasta Creamy Dinner Delight

June 11, 2025 by Chef Elliot
Gather these simple items for a delicious meal. This list makes it easy to prepare your One-Pot Garlic Parmesan Pasta. - 12 oz fettuccine or spaghetti - 4 tablespoons unsalted butter - 4 cloves garlic, finely minced - 4 cups vegetable broth - 1 cup heavy cream - 1 cup freshly grated Parmesan cheese - 1 teaspoon garlic powder - 1 teaspoon Italian seasoning - Salt and freshly ground black pepper, to taste - Fresh parsley, finely chopped (for garnish) These ingredients blend well together, creating a rich, creamy sauce. I love how the garlic and Parmesan work together. You can adjust the seasoning to fit your taste. Fresh parsley on top adds a nice touch. For the full recipe, check out the details provided above. Start by heating a large pot or deep skillet over medium heat. You want it hot but not smoking. Once the pot is ready, add 4 tablespoons of unsalted butter. Let it melt fully. Next, add 4 cloves of finely minced garlic to the melted butter. Sauté them for about 1-2 minutes. Stir constantly to keep the garlic from burning. You want it to smell amazing, not bitter. After the garlic is fragrant, pour in 4 cups of vegetable broth. Bring the mixture to a gentle simmer. Then, add 12 oz of fettuccine or spaghetti. Stir it well to prevent sticking. Cook according to the package instructions until it reaches al dente. This means it should be firm to the bite. Stir occasionally for even cooking. Once the pasta is cooked, reduce the heat to low. Gradually mix in 1 cup of heavy cream. Then, add 1 cup of freshly grated Parmesan cheese. Also, sprinkle in 1 teaspoon of garlic powder and 1 teaspoon of Italian seasoning. Stir well to combine. The cheese should melt completely, making the sauce creamy. Taste it and adjust with salt and freshly ground black pepper as you like. If the pasta absorbs too much sauce, add a splash of vegetable broth to get the right consistency. Plate your creamy pasta while it’s hot. Garnish with fresh parsley and more grated Parmesan if you wish. This dish will surely impress! For the full recipe, check the details above. To make the best creamy garlic Parmesan sauce, follow these simple steps: - Ensure creaminess and consistency: Start with heavy cream. It gives the sauce a rich, smooth texture. When you add it, stir gently but thoroughly. This helps the cream blend in well with the cheese. If the sauce feels too thick, add a splash of vegetable broth. - Avoiding overcooked pasta: Cook the pasta until al dente. This means it should still have a slight bite. Stir the pasta often while it cooks. This keeps it from sticking. If the pasta cooks too long, it will become mushy. How you serve this dish can make it even more special. Here are some ideas: - Serving suggestions: Use warm bowls to keep the pasta nice and hot. Spoon the creamy pasta generously into each bowl. This dish looks great when served family-style, too. Just place the pot in the center of the table. - Garnishing ideas: Fresh parsley adds a nice pop of color and flavor. Chop it finely and sprinkle it on top. You can also add more grated Parmesan for a cheesy finish. For fun, place a few whole garlic cloves on the side. They look nice and hint at the dish’s flavor. For the complete recipe, check the Full Recipe section. Enjoy your cooking! {{image_4}} If you need gluten-free pasta options, you can use rice noodles or quinoa pasta. Both options work well and keep the dish tasty. For dairy-free alternatives, try using coconut cream instead of heavy cream. You can also opt for a dairy-free cheese. These swaps help keep the flavor while making it suitable for different diets. You can easily add vegetables to your One-Pot Garlic Parmesan Pasta. Try spinach, peas, or sun-dried tomatoes. They add color and nutrients. You can toss them in during the last few minutes of cooking. Incorporating proteins can make this dish even heartier. You can add grilled chicken, shrimp, or cooked sausage. Simply mix them in with the pasta for a filling meal. For the complete cooking experience, check out the Full Recipe. To keep your One-Pot Garlic Parmesan Pasta fresh, store it in the fridge. Use an airtight container to prevent air exposure. This pasta stays good for up to three days. If you want to keep it longer, freeze it. Portion it into freezer-safe bags. Make sure to squeeze out all the air before sealing. This will help prevent freezer burn. When it’s time to eat leftovers, reheat the pasta gently. The best method is using the stove. Add a splash of water or broth to the pot. Heat it slowly over low to medium heat. Stir often to keep it from sticking. This helps to restore its creaminess. If you prefer the microwave, use a microwave-safe dish. Add a little liquid to it. Cover the dish with a lid or microwave-safe wrap. Heat in short bursts, stirring in between. This keeps the pasta moist and creamy. Enjoy your delicious pasta again! Making One-Pot Garlic Parmesan Pasta is quick and easy. It takes about 10 minutes to prep and 15 minutes to cook. In total, you will need about 25 minutes from start to finish. This makes it a perfect choice for a busy weeknight dinner. Yes, you can use different types of pasta! Fettuccine and spaghetti are great choices. You can also try penne, farfalle, or even gluten-free pasta. Just make sure to adjust the cooking time based on the pasta type you choose. Each kind will add its own twist to the dish. Leftovers from this pasta dish can be fun to use! Try making a pasta bake by adding some cheese and baking it in the oven. You can also mix it into a salad for a tasty cold dish. Another option is to add protein, like chicken or shrimp, to make it a full meal. Enjoy getting creative with your leftovers! This blog post covered a simple and tasty one-pot garlic Parmesan pasta recipe. We listed key ingredients, detailed step-by-step cooking instructions, and offered helpful tips. You learned about variations and storage methods to keep your dish fresh. With these insights, you can create a creamy pasta meal that suits your taste. Enjoy experimenting with flavors and make the dish your own. Cooking should be fun and tasty!

Welcome to the world of easy cooking! If you crave a creamy, rich dinner without the fuss, this One-Pot Garlic Parmesan Pasta recipe is your answer. With just a handful …

Read more

Categories Dinner
Older posts
Newer posts
← Previous Page1 … Page33 Page34 Page35 … Page53 Next →

TOSSED TASTES

Where flavors get playful! A fresh mix of easy bites, bold spices, and everyday cravings tossed into every recipe. 🍋🍅

PAGES

Home About Contact Privacy Policy Terms & Conditions Cookie Policy GDPR Policy Copyright Policy Disclaimer

CATEGORIES

Appetizers Desserts Salads Breakfast Dinner

Contact

  • Pinterest
  • Mail
Copyright © 2025 Tossed Tastes. All rights reserved.