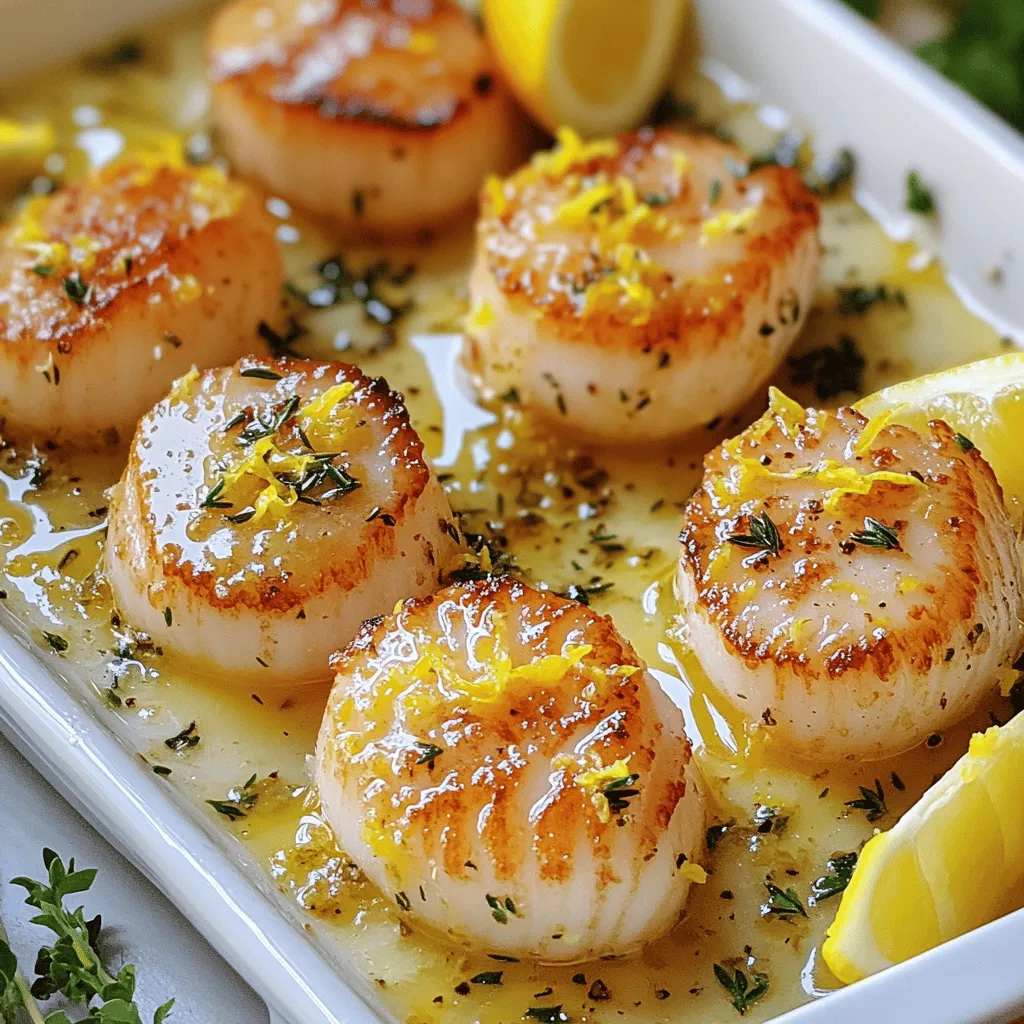
Skip to content
Tossed Tastes
  • Home
  • Appetizers
  • Desserts
  • Salads
  • Breakfast
  • Dinner
  • Privacy Policy
  • Contact
  • About

Chef Elliot

Cajun Garlic Butter Steak Bites Flavorful Cooking Delight

May 29, 2025 by Chef Elliot
- 1 pound sirloin steak, cut into cubes - 2 tablespoons Cajun seasoning blend - 4 tablespoons unsalted butter, divided - 4 cloves garlic, minced - 1 tablespoon fresh parsley, for garnish - Juice of 1/2 lemon - 1 teaspoon olive oil (optional for extra richness) - Salt and pepper to taste When I cook Cajun Garlic Butter Steak Bites, I focus on simple yet bold flavors. The main ingredient is sirloin steak. I cut it into bite-sized cubes to ensure quick cooking. The Cajun seasoning adds a great kick. I like to use a blend that has paprika, garlic powder, and cayenne. This mix gives the steak its signature taste. Next, I use unsalted butter for richness. I divide it into parts: one for searing the meat and the rest for the sauce. Fresh garlic is key. I always mince it myself to get the best flavor. For garnish, I use fresh parsley. It adds color and freshness to the dish. A squeeze of lemon juice brightens the flavors. If you want a richer taste, a little olive oil works well too. Finally, I always season with salt and pepper. This step is important to enhance all the flavors. You can find the full recipe linked above. To start, you need to coat the steak with Cajun seasoning. Take 1 pound of sirloin steak cut into bite-sized cubes. In a mixing bowl, add 2 tablespoons of Cajun seasoning, along with salt and pepper. Toss the steak until every piece is well coated. This seasoning gives the steak that bold Cajun flavor. Next, set the cooking environment by heating the skillet. Use a large skillet and put it over medium-high heat. Add 1 tablespoon of unsalted butter. Wait until the butter melts and bubbles but does not brown. This is the perfect time to add your steak. Now, let’s sear the steak bites. Carefully add the seasoned steak cubes to the hot skillet in a single layer. Avoid overcrowding the pan. Sear them for about 2-3 minutes on each side. Look for a golden crust. Check for your preferred doneness—medium-rare is often the best choice. Once done, transfer the steak bites to a plate. While the steak rests, it’s time to make the garlic butter sauce. Lower the skillet heat to medium. Add the remaining 3 tablespoons of butter to the skillet. Allow it to melt completely. Then, sauté the garlic. Stir in 4 cloves of minced garlic. Cook for about 30 seconds until fragrant. Be careful not to let it brown, as burnt garlic can spoil the sauce. Now, combine the steak with the garlic butter. Return the cooked steak bites to the skillet, tossing them in the garlic butter. For a zesty twist, squeeze the juice of 1/2 lemon over the top. Sprinkle in 1 tablespoon of finely chopped fresh parsley. Mix well to coat the steak in that delicious sauce. For a final touch, cook everything together for one more minute. This helps the flavors blend beautifully. Now, your Cajun Garlic Butter Steak Bites are ready to serve. For the full recipe, check the details above. Enjoy every bite! For the best Cajun Garlic Butter Steak Bites, know your steak doneness levels. Medium-rare is your friend. It keeps the steak juicy and tender. Aim for an internal temperature of 130°F to 135°F. If you prefer it medium, go for 140°F to 145°F. To avoid overcooking, use a meat thermometer. Insert it into the thickest part of the steak. Also, let the meat rest for a few minutes after cooking. This helps the juices redistribute, making each bite flavorful. Plating matters! Arrange your steak bites on a rustic wooden board or a clean white plate. This makes the dish look inviting. Garnish with fresh parsley for color. Lemon wedges add a nice touch too. They brighten up the dish. Consider serving with a side of garlic bread or a fresh salad. These add color and balance to your plate. Your guests will love the look and taste of your meal. Want to boost the flavor? Try different seasonings. Smoked paprika can add a nice depth. A pinch of cayenne pepper gives heat without overwhelming the dish. Don't forget herbs! Fresh thyme or oregano can elevate the taste. Add them to the garlic butter for extra flavor. You can also mix in some fresh basil for a twist. For the full recipe, check out the details and enjoy making these delicious bites! {{image_4}} You can switch up the steak cut for your Cajun Garlic Butter Steak Bites. Sirloin is great, but ribeye or tenderloin works too. Each cut gives a different taste and texture. Butter is key in this recipe, but you can use ghee or coconut oil instead. Ghee offers a rich, nutty flavor. Coconut oil adds a hint of sweetness. Both options keep the dish delicious. Want extra heat? Add cayenne pepper or a splash of hot sauce. A little goes a long way, so adjust to your taste. This kick enhances the Cajun spices. You can also mix in vegetables for added nutrition. Bell peppers and mushrooms complement the steak well. Just sauté them in the garlic butter before adding the steak. This gives you a colorful and tasty dish. Cajun flavors can blend well with other cuisines. Try adding Italian herbs like oregano or basil for a twist. This adds a fresh layer to the dish. You can also fuse Cajun with Mexican flair. Adding cumin or chili powder brings warmth and depth. Each fusion creates a unique dish that surprises your taste buds. For the full recipe, check out the [Full Recipe]. Store leftover Cajun Garlic Butter Steak Bites in the fridge. Place them in an airtight container. This keeps the flavors fresh and tasty. It’s best to eat them within three days. To reheat, use a skillet over low heat. Add a splash of water or broth to keep them moist. Heat for about five minutes. You want them warm but not dry. Avoid the microwave if you can; it can make them tough. You can freeze Cajun Garlic Butter Steak Bites for later. Put them in a freezer-safe container. Try to remove as much air as possible. They can stay fresh for up to three months. When ready to eat, thaw them overnight in the fridge before reheating. For the full recipe, check out the Cajun Garlic Butter Steak Bites 🥩🧄 section earlier in this article. The best steak for steak bites is sirloin. It is tender and flavorful. Ribeye is also a good choice. It has more fat, making it juicy. Tenderloin is another option. It is very tender but can be pricey. Choose the cut that fits your taste and budget. Yes, you can make this dish ahead. Cook the steak bites and store them in the fridge. To reheat, use a skillet to warm them gently. This keeps the steak juicy. Avoid using the microwave, as it can dry out the meat. These steak bites pair well with many sides. Try serving them with rice or mashed potatoes. They also go nicely with grilled vegetables or a fresh salad. For a fun twist, serve them on skewers with bell peppers and onions. The spice level can vary. Cajun seasoning has a kick, but you can adjust it. If you like it mild, use less seasoning. For more heat, add cayenne pepper or hot sauce. This way, you can make it perfect for your taste. Cajun Garlic Butter Steak Bites are easy to make and packed with flavor. We looked at the main ingredients, including sirloin steak and Cajun seasoning. You learned step-by-step how to prepare, cook, and present these tasty bites. Tips on doneness and garnishing enhance your cooking skills. Feel free to experiment with variations and flavors. Store extras safely and reheat them well. Enjoy cooking, and make this dish your own!

Are you ready to elevate your cooking game? Cajun Garlic Butter Steak Bites are a quick and savory dish that bursts with flavor. Made with tender sirloin, zesty Cajun seasoning, …

Read more

Categories Dinner

Carrot Apple Salad Flavorful and Fresh Choice

May 29, 2025 by Chef Elliot
- 2 large carrots - 1 large sweet apple (e.g., Honeycrisp or Fuji) - 1/2 cup raisins or dried cranberries - 1/4 cup walnuts - 1/4 cup Greek yogurt or dairy-free alternative - 1 tablespoon honey or maple syrup - 1 tablespoon fresh lemon juice - 1 teaspoon ground cinnamon - Salt to taste - Extra chopped walnuts - Ground cinnamon for dusting The main ingredients in this salad make it vibrant and full of flavor. The carrots add a crunchy texture, while the sweet apple brings a nice balance. I love using Honeycrisp or Fuji apples. They are sweet, juicy, and perfect for this dish. Raisins or dried cranberries add a chewy sweetness. They pair well with the crunch of walnuts, which provide healthy fats. The walnuts also give a nutty flavor that enhances the salad. For the dressing, Greek yogurt gives creaminess. You can use a dairy-free option if needed. Honey or maple syrup adds natural sweetness. Fresh lemon juice brightens the flavors and makes the salad refreshing. Ground cinnamon adds warmth and spice, making it even more enjoyable. I like to sprinkle extra walnuts and a little cinnamon on top for a nice finish. This salad is full of flavor and good for you, too! For the full recipe, check out the Crunchy Carrot Apple Delight. - Grate the carrots and dice the apple. - Combine the grated carrots and diced apple in a large mixing bowl. Start by grating two large carrots. Use a box grater or food processor for speed. Next, take one large sweet apple, like a Honeycrisp or Fuji. Core and dice it into small pieces. These steps are simple but key to a tasty salad. - Stir in raisins or dried cranberries and chopped walnuts. Now, add in 1/2 cup of raisins or dried cranberries. These give the salad a sweet touch. Then, toss in 1/4 cup of roughly chopped walnuts. This adds a nice crunch and nutty flavor. Mixing these ingredients helps create layers of taste. - Whisk together yogurt, honey (or maple syrup), lemon juice, cinnamon, and salt. In a small bowl, whisk together 1/4 cup of Greek yogurt. You can also use a dairy-free option if you prefer. Add in 1 tablespoon of honey or maple syrup. This brings natural sweetness. Then, mix in 1 tablespoon of fresh lemon juice and 1 teaspoon of ground cinnamon. A pinch of salt will enhance the flavors too. Whisk until smooth and creamy. - Pour the dressing over the carrot and apple mixture. - Toss ingredients until well-coated. Once your dressing is ready, pour it over the carrot and apple mix. Use a spatula or wooden spoon to toss everything together. Make sure every piece is coated in the creamy dressing. This helps the flavors blend well. - Allow the salad to sit for 10 minutes at room temperature. Letting the salad sit for 10 minutes allows the flavors to meld beautifully. This small step makes a big difference in taste. You will enjoy a fresher, more vibrant salad. For the full recipe, check out the Crunchy Carrot Apple Delight. - Choose firm apples to prevent sogginess. Firm apples stay crisp and add crunch. - Grate carrots just before use for maximum freshness. Freshly grated carrots taste better. - Experiment with spices like nutmeg or ginger. These spices add warmth and depth. - Add a pinch of black pepper for a kick. This small touch can elevate the flavors. - Use clear serving dishes to showcase the salad's colors. Bright colors draw the eye and make it appealing. - Garnish with a sprinkle of extra nuts or herbs. It adds texture and a pop of flavor. For the full recipe, see the section above. {{image_4}} You can easily change the nuts in this salad. If you want a different flavor, try pecans or almonds instead of walnuts. Both nuts add a nice crunch and unique taste. Pecans are sweeter, while almonds give a slight almond flavor. You can even mix them for a fun twist! To make the salad even more exciting, think about adding other fruits. Diced celery or pears can give extra crunch. They also add a fresh taste that pairs well with carrots and apples. If you want a burst of flavor, try adding citrus segments. Oranges or grapefruits can brighten the salad and add zest. The dressing can change the whole vibe of the salad. For a simple yet tasty option, try a vinaigrette with olive oil and apple cider vinegar. This mix is light and tangy. If you prefer something creamy, use tahini. It gives a nutty flavor and smooth texture that blends beautifully with the salad. For the full recipe, you can check the Crunchy Carrot Apple Delight. Store your carrot apple salad in an airtight container in the refrigerator. This keeps it fresh and crisp. Make sure the lid seals tightly to avoid air exposure. Consume your salad within 3 days for optimal freshness. After that, the flavors may fade, and the texture could change. Always check for any signs of spoilage before eating. You can prep the ingredients ahead of time. Grate the carrots and dice the apple early in the day. However, mix everything just before serving. This way, the salad stays crunchy and tasty. For the full recipe, check out the Crunchy Carrot Apple Delight. Yes, but it's best to add dressing right before serving for optimal texture. If you prepare the salad earlier, the carrots and apples may lose their crunch. Keep the salad fresh by storing the mix and dressing separately. When ready to eat, combine them for a crisp bite. Yes, it’s rich in vitamins from the carrots and apples and has healthy fats from walnuts. Carrots are high in beta-carotene, which helps your eyes. Apples provide fiber and antioxidants. Walnuts add omega-3 fatty acids, good for heart health. Together, they create a balanced and nutritious dish. Absolutely! Experiment with various fruits, such as berries or dried fruits. Berries like blueberries or strawberries add a nice pop of color and flavor. Dried fruits, like apricots or figs, offer a sweet twist. Mixing fruits keeps the salad exciting and fun. You can create your own version every time! Carrot apple salad is a tasty and healthy dish. You need simple main ingredients like carrots, sweet apples, and walnuts. Adding a zesty dressing makes it even better. Remember to store leftovers correctly to keep them fresh. Try different nuts and fruits to find your favorite mix. This salad is easy to make and fun to customize. Enjoy creating your version of this bright, vibrant dish!

Are you looking for a fresh, crunchy salad that’s packed with flavor? This Carrot Apple Salad is a vibrant mix of sweet apples, crisp carrots, and tangy dressing. It’s easy …

Read more

Categories Salads

Easy Egg Roll in a Bowl Quick and Tasty Recipe

May 29, 2025 by Chef Elliot
- 1 lb ground turkey or ground chicken - 4 cups coleslaw mix (a blend of cabbage and carrots) - 2 green onions, finely chopped - 3 cloves garlic, minced - 1 tablespoon fresh ginger, finely grated - 3 tablespoons soy sauce (or tamari if you prefer gluten-free) - 1 tablespoon sesame oil - 1 tablespoon rice vinegar - 1 teaspoon sriracha sauce (adjust to your heat preference) - Salt and pepper, to taste - Optional garnishes: sesame seeds, extra chopped green onions If you want to switch up the meat, use ground pork or beef. For a vegetarian option, try crumbled tofu or lentils. You can swap the coleslaw mix for any stir-fry veggie blend. Coconut aminos can replace soy sauce for a sweeter taste. If you dislike sriracha, use chili paste or hot sauce to add heat. Fresh herbs like cilantro can replace green onions for extra flavor. This dish is packed with protein and fiber, making it filling and healthy. A serving has about: - Calories: 350 - Protein: 30g - Carbohydrates: 15g - Fat: 20g - Fiber: 4g This makes it a great choice for a quick, nutritious meal. For the full recipe, check out the details above! To start, warm the sesame oil in a large skillet over medium-high heat. When the oil shimmers, add 1 lb of ground turkey or chicken. Cook it for about 5-7 minutes. Break the meat apart with a spatula as it browns evenly. Once it cooks through, stir in 3 cloves of minced garlic and 1 tablespoon of grated ginger. Sauté for another minute until you smell their amazing aroma. Next, add 4 cups of coleslaw mix to the skillet. Stir well to mix the veggies with the meat. Sauté for about 3-4 minutes until the cabbage is tender. After that, drizzle in 3 tablespoons of soy sauce, 1 tablespoon of rice vinegar, and 1 teaspoon of sriracha sauce. Mix everything well to coat all the ingredients. Taste and add salt and pepper as needed. Let it cook together for an extra 2-3 minutes. This step lets the flavors blend nicely. Finally, remove the skillet from heat and fold in 2 chopped green onions for a fresh touch. To enhance the flavor, use fresh ingredients like ginger and garlic. Fresh ingredients make a big difference. If you want more heat, add extra sriracha. You can also try adding a splash of lime juice for a zesty kick. Mixing the soy sauce and rice vinegar before adding them helps spread the flavor evenly. For a deeper taste, let the dish sit for a few minutes before serving. This resting time allows all the flavors to mingle. Also, remember to taste often and adjust seasonings as needed. - Warming sesame oil: 1 minute - Cooking meat: 5-7 minutes - Cooking garlic and ginger: 1 minute - Sautéing coleslaw mix: 3-4 minutes - Mixing sauces and final cooking: 2-3 minutes In total, you can whip up this quick meal in about 20 minutes. Enjoy this Easy Egg Roll in a Bowl! For the complete recipe, check out the Full Recipe section. You can easily change this dish to fit your taste. Want more veggies? Add bell peppers, snap peas, or mushrooms. Love heat? Toss in some diced jalapeños or use more sriracha. For extra crunch, top with chopped nuts like peanuts or cashews. You can even switch the meat. Try ground beef, pork, or a plant-based option. Many people forget to cook the meat fully. This can lead to a chewy texture. Make sure you break it apart and cook until it’s no longer pink. Another mistake is not seasoning enough. Taste your dish as you cook. Adjust salt and pepper to your liking. Finally, don’t skip the fresh ingredients. Green onions and sesame seeds add flavor and color. Serving makes a big difference! Use deep bowls to hold all the flavors well. Garnish with extra green onions and sesame seeds for a bright look. You can also serve it with rice or noodles to make it more filling. Consider adding a side of pickled vegetables for a tangy bite. Enjoy this meal hot for the best taste! For the complete recipe, check out the Full Recipe. {{image_4}} You can easily make this dish vegetarian or vegan. Replace the ground turkey or chicken with crumbled tofu or tempeh. Both options bring great texture and protein. Use soy sauce or tamari for flavor. Toss in some mushrooms for an umami boost. You can also add extra veggies like bell peppers or zucchini. This will make your bowl colorful and nutritious. If you love heat, change up the sauces. Sriracha is a great start, but you can try chili paste or hot sesame oil. For a sweet and spicy kick, add hoisin sauce. This will give your dish a nice twist. You can also mix in some red pepper flakes while cooking. Adjust the spice to match your taste. To make this dish low-carb, skip the coleslaw mix. Instead, use shredded cabbage or zucchini noodles. This keeps the crunch without the carbs. You can also add in some cauliflower rice for more volume. This keeps your meal filling and light. Adjust the sauces as needed to keep it tasty and low-carb. For the full recipe, you can check the detailed cooking guide. You can store leftover egg roll in a bowl in an airtight container. Keep it in the fridge. It stays fresh for up to three days. Let it cool before sealing. This helps avoid extra moisture. To reheat, use a skillet over medium heat. Add a splash of water for moisture. Stir often to heat evenly. This method keeps the veggies crisp. You can also use the microwave. Heat in short bursts, stirring in between. You can freeze this dish, but some ingredients may change. Let it cool completely before placing in a freezer-safe container. It can last for up to two months. For best results, freeze without toppings. Thaw overnight in the fridge before reheating. Enjoy your meal even later! You can use tamari for a gluten-free option. Coconut aminos offer a sweet flavor. You could also try homemade soy sauce substitutes. Mix vegetable broth with a splash of vinegar and a pinch of salt. This mix gives a nice umami taste. Yes, you can prepare Egg Roll in a Bowl ahead of time. Cook the dish and let it cool. Store it in an airtight container in the fridge. It stays fresh for up to three days. Just reheat it in a skillet or the microwave when ready to eat. Absolutely! This recipe is perfect for meal prep. It’s easy to portion into containers. Each serving reheats well, keeping its flavor and texture. You can enjoy a quick and tasty meal throughout the week. Check the Full Recipe for details on how to make it. This blog post covered how to make a tasty egg roll in a bowl. We looked at ingredients, cooking steps, variations, and storage tips. Remember, customizing is key to make it your own. Avoid common mistakes for the best taste. You can enjoy this dish for lunch or dinner. Whether you prefer spicy or vegetarian, this recipe fits all. Now, you have the tools to create something delicious and fun. Get cooking and enjoy every bite!

Looking for a quick and tasty meal? Try my Easy Egg Roll in a Bowl! This dish packs all the great flavors of traditional egg rolls without the fuss. With …

Read more

Categories Dinner

Juicy Air Fryer Chicken Breasts Flavorful and Tender

May 29, 2025 by Chef Elliot
To make juicy air fryer chicken breasts, you need the right ingredients. Here’s what you’ll need: - 4 boneless, skinless chicken breasts - 2 tablespoons extra virgin olive oil - 1 teaspoon garlic powder - 1 teaspoon onion powder - 1 teaspoon smoked paprika - 1 teaspoon dried thyme - 1 teaspoon sea salt - 1/2 teaspoon freshly cracked black pepper - Juice of 1 fresh lemon - Fresh parsley, finely chopped, for garnish These ingredients work together to give the chicken great flavor. The olive oil adds richness, while the spices bring warmth and depth. Fresh lemon juice brightens the dish, making it zingy and fresh. Using fresh parsley as a garnish adds a pop of color and freshness. When you combine these elements, you create a marinade that not only coats the chicken but also keeps it tender. This helps the chicken stay juicy during cooking. You can find the full recipe at [Full Recipe]. Set your air fryer to 375°F (190°C). Allow it to preheat for about 5 minutes. This step helps cook the chicken evenly. In a large bowl, mix together the following: - 2 tablespoons extra virgin olive oil - 1 teaspoon garlic powder - 1 teaspoon onion powder - 1 teaspoon smoked paprika - 1 teaspoon dried thyme - 1 teaspoon sea salt - 1/2 teaspoon freshly cracked black pepper - Juice of 1 fresh lemon Whisk these ingredients well. This mixture will give your chicken great flavor. Add the 4 chicken breasts to the marinade. Make sure each piece is coated well. Cover the bowl with plastic wrap. Let it sit for at least 15-30 minutes. This allows the chicken to soak up those tasty flavors. After marinating, place the chicken breasts in the air fryer basket. Arrange them in a single layer without overlapping. This helps them cook evenly. Cook the chicken for 15-18 minutes. Flip the chicken halfway through cooking. Use a meat thermometer to check doneness. The chicken should reach 165°F (74°C) and look golden brown. Once cooked, move the chicken to a plate. Let it rest for about 5 minutes. This step is key. It allows the juices to settle back into the meat. Before serving, sprinkle fresh parsley over the chicken. This adds color and freshness. Serve the chicken on a rustic cutting board with a vibrant salad or roasted veggies for a beautiful presentation. For the full recipe, check out the details above. To keep your chicken juicy, start with brining. Soak the chicken in a saltwater mix for 30 minutes. This helps the meat absorb water, making it tender. Choose a good marinade with oil and acid. The oil locks in moisture, while the acid enhances flavor. After marinating, let the chicken rest before cooking. This step allows juices to settle, making each bite succulent. Avoid cooking chicken straight from the fridge. Cold chicken takes longer to cook, leading to dryness. Do not skip the resting step after cooking. This is key for juicy meat. Keep an eye on cooking time. Overcooking leads to tough chicken. Use a meat thermometer to check doneness. Aim for an internal temperature of 165°F (74°C). Try adding new spices for extra flavor. Consider using cumin, coriander, or lemon zest to brighten the dish. You can also mix in fresh herbs like rosemary or basil. For a sweet touch, add honey or maple syrup to your marinade. Looking for a kick? Include a dash of cayenne pepper or hot sauce. Each twist will excite your taste buds! For the full recipe, check out Juicy Air Fryer Chicken Breasts. {{image_4}} You can switch up the flavor with different marinades. Here are some tasty options: - Lemon Herb Marinade: Use lemon juice, rosemary, and oregano. - Honey Mustard Marinade: Mix honey, Dijon mustard, and apple cider vinegar. - Teriyaki Marinade: Combine soy sauce, ginger, and garlic for an Asian twist. - BBQ Marinade: Use your favorite barbecue sauce for a smoky flavor. These options can change the taste and make each meal unique. Cooking time changes based on chicken breast thickness. Here’s a simple guide: - Thin Breasts (about 1 inch thick): Cook for 12-15 minutes. - Medium Breasts (1 to 1.5 inches thick): Cook for 15-18 minutes. - Thick Breasts (over 1.5 inches thick): Cook for 18-20 minutes. Always check the internal temperature. It should reach 165°F for safe eating. Pair your juicy chicken breasts with great sides. Here are some ideas: - Roasted Vegetables: Carrots, zucchini, and bell peppers add color and nutrition. - Fresh Salad: A green salad with lemon vinaigrette brightens the meal. - Quinoa or Rice: These grains make a filling and healthy side. - Dipping Sauces: Try ranch, honey mustard, or chimichurri for extra flavor. These pairings enhance the dish and make it even more enjoyable. After you enjoy your juicy air fryer chicken breasts, store the leftovers properly. First, let the chicken cool down to room temperature. Place the chicken in an airtight container. This helps keep the chicken moist. You can also wrap the chicken tightly in plastic wrap. Refrigerate the chicken if you plan to eat it within 3-4 days. For longer storage, freeze the chicken. Wrap each piece in foil or freezer-safe bags. This prevents freezer burn. Reheating chicken can be tricky. To keep it juicy, use low heat. You can use your air fryer again. Set it to 300°F (150°C) and heat for about 5-7 minutes. This warms the chicken without drying it out. Another option is to use the microwave. Place the chicken on a microwave-safe plate. Cover it with a damp paper towel. Heat in short bursts, checking often. This method keeps moisture in. Cooked chicken breasts can last in the fridge for about 3-4 days. If you freeze them, they can last up to 4 months. Always check for signs of spoilage before eating. If the chicken looks or smells off, it’s best to discard it. Proper storage helps maintain quality and flavor. For the full recipe, check the earlier sections of this article. You can check if the chicken is cooked by using a meat thermometer. The chicken should reach an internal temperature of 165°F (74°C). Insert the thermometer into the thickest part of the breast. If it reads 165°F, you are good to go! This ensures the chicken is safe to eat and moist. Always check the temperature to be sure. Yes, you can use frozen chicken breasts. However, cooking from frozen takes longer. Add about 5-10 extra minutes to the cooking time. Make sure to check the internal temperature of 165°F before serving. If you can, thaw the chicken in the fridge for better results. This helps the chicken cook evenly and stay juicy. Many sauces pair well with air fryer chicken. Here are some popular options: - Honey mustard - BBQ sauce - Ranch dressing - Buffalo sauce - Homemade garlic aioli You can also mix mayo with your favorite spices for a quick dip. Try out different flavors to find your favorite! To make this recipe healthier, consider these substitutions: - Use less olive oil or swap it for cooking spray. - Replace regular salt with a salt substitute for lower sodium. - Add more herbs and spices for flavor without extra calories. - Serve with a side of steamed vegetables or a light salad. These simple changes can keep the dish tasty while cutting down on calories. Enjoy your healthy, juicy chicken! In this post, we explored the steps to cook juicy air fryer chicken breasts. You learned about the ingredients needed and how to prepare them. We discussed marinating, cooking times, and cooling. I shared tips to keep the chicken moist and gave extra ideas for flavors. Remember to store leftovers properly and get creative with sauces. This method ensures a tasty meal every time. Follow these steps for great results. Cook smart, and enjoy your delicious chicken!

Are you tired of dry chicken? Let me show you how to make juicy air fryer chicken breasts that are both flavorful and tender! With just a handful of ingredients …

Read more

Categories Dinner

Mediterranean Chickpea Salad Fresh and Simple Delight

May 29, 2025 by Chef Elliot
In this Mediterranean Chickpea Salad, fresh ingredients shine. Each bite bursts with flavor and color. Here’s what you need: - 1 can (15 oz) chickpeas, thoroughly rinsed and drained - 1 medium cucumber, diced into bite-sized pieces - 1 cup cherry tomatoes, halved for freshness - 1/2 red onion, finely chopped for a sweet crunch - 1 red bell pepper, diced to add color and sweetness - 1/2 cup Kalamata olives, pitted and halved to enhance the briny flavor - 1/4 cup fresh parsley, finely chopped for a burst of freshness - 1/4 cup feta cheese, crumbled (optional, for extra creaminess) - 3 tablespoons extra virgin olive oil for richness - 2 tablespoons freshly squeezed lemon juice for acidity - 1 teaspoon dried oregano to infuse Mediterranean essence - Salt and freshly cracked pepper to taste Each ingredient plays a role in this vibrant dish. The chickpeas provide protein and texture. The cucumber adds a refreshing crunch, while the tomatoes bring juiciness. Red onion and bell pepper give sweetness and color. Kalamata olives add a briny bite, making the salad unique. Fresh parsley brightens the dish, and feta cheese adds creaminess. The olive oil and lemon juice create a rich dressing that ties everything together. This recipe is simple, yet each ingredient matters. It’s a fast and healthy option for lunch or a side dish. You can find the full recipe to guide you through the steps. Enjoy the flavors of the Mediterranean with each delicious bite! Step 1: Preparing the Base Start with a large mixing bowl. Add the rinsed chickpeas. Next, toss in the diced cucumber, halved cherry tomatoes, finely chopped red onion, and diced red bell pepper. Then, mix in the halved Kalamata olives and chopped parsley. You create a colorful medley that looks inviting and fresh. Step 2: Making the Dressing In a separate small bowl, pour in the extra virgin olive oil. Add the freshly squeezed lemon juice next. Then, sprinkle in the dried oregano and a pinch of salt and pepper. Whisk everything together until it blends well. This dressing adds a zesty touch to your salad. Step 3: Combining Ingredients Drizzle the dressing over your chickpea mixture. With gentle motions, toss everything together. Make sure each ingredient gets coated in that tasty dressing. If you choose to add feta, sprinkle it on top right before you toss again. This keeps the cheese intact while blending the flavors. Step 4: Allowing Flavors to Meld Let the salad rest for at least 10 minutes. You can also refrigerate it for up to 30 minutes. This time helps all the flavors blend together. The longer you wait, the better it tastes. You will enjoy a salad full of vibrant flavors. For the full recipe with detailed instructions, check out the link provided. How to Serve and Present When serving your Mediterranean Chickpea Salad, choose a wide bowl or individual plates. This helps showcase the bright colors of the salad. For a finishing touch, sprinkle extra parsley on top. You can also add a lemon wedge for a zesty look. Presenting the salad this way makes it more inviting. Best Accompaniments for the Salad This salad pairs well with many dishes. Serve it with grilled chicken or fish for protein. You can also enjoy it with pita bread or hummus for a full meal. It makes a great side for any Mediterranean dish. Pair it with a light white wine to enhance the flavors. Nutritional Value of Chickpeas Chickpeas are packed with protein and fiber. They help keep you full and satisfied. A 15 oz can provides about 30 grams of protein. Plus, they have essential vitamins and minerals, such as iron and magnesium. This makes them a great choice for a healthy diet. Why Include Fresh Ingredients Fresh ingredients boost the salad's flavor and nutrition. Getting fresh veggies adds vitamins and antioxidants. They also make the dish colorful and appealing. Using fresh herbs like parsley gives a burst of flavor that dried herbs cannot match. Fresh lemon juice brightens the salad and adds a tangy taste. {{image_4}} You can easily change this Mediterranean chickpea salad to fit your taste. Here are some ideas: - Vegan Adaptations: To make it vegan, skip the feta cheese. You can add avocado for creaminess. Nutritional yeast works well too, adding a cheesy flavor. - Adding Protein: If you want to add protein, grilled chicken or canned tuna works great. Both options boost the salad's heartiness and keep it satisfying. Sometimes, you may not have all the ingredients. Here are some swaps you can try: - Alternatives for Feta Cheese: If you don’t have feta, use goat cheese or a dairy-free cheese. They add a similar tangy taste. - Different Olive Options: Kalamata olives add a great briny flavor. If you can’t find them, green olives or black olives are good substitutes. Each brings its own unique taste to the salad. For the full recipe, check out the Mediterranean Chickpea Salad Delight! How do you store leftovers? To keep your Mediterranean Chickpea Salad fresh, place it in an airtight container. This helps to keep out air and moisture. Always refrigerate leftovers right away. They stay crisp and tasty this way. What container should you use? Use a glass or BPA-free plastic container. Both options are safe and easy to clean. If you want to take the salad to a picnic, use a cooler bag with ice packs. This keeps it fresh and cool. When should you eat it for best freshness? Enjoy the salad within three days for the best taste. After three days, the veggies may lose their crunch. The flavors may not be as bright, either. If you see any signs of spoilage, throw it away. Always trust your nose and eyes! Can I make this salad ahead of time? Yes, you can make this salad ahead of time. It tastes even better after the flavors mix. Store it in the fridge for up to a day. Just toss it again before serving. What can I substitute for chickpeas? If you can't find chickpeas, try black beans or white beans. Both add protein and taste great. You can also use lentils for a different texture. How do I adjust the recipe for larger servings? To make more servings, just double or triple the ingredients. Keep the ratios the same. This way, everyone can enjoy a plate. Is this salad gluten-free? Yes, this salad is gluten-free! All the ingredients are safe for those who avoid gluten. Enjoy it without worry. What are the best herbs to add? For extra flavor, add fresh herbs like basil or mint. They bring a fresh taste to the salad. You could also try dill for a unique twist. Can this salad be frozen? I don't recommend freezing this salad. The fresh veggies lose their crunch and flavor when thawed. It's best enjoyed fresh. How to make it spicier? To add some heat, mix in diced jalapeños or red pepper flakes. Start with a little, then taste it. You can always add more if you like it spicier. This salad combines simple, healthy ingredients for a fresh meal. We used chickpeas, fresh veggies, and a tasty dressing. Remember, you can customize it and change ingredients to suit your taste. Make it vegan or add protein like chicken. Store leftovers well for later enjoyment. Overall, this salad is not just easy to make; it also packs flavor and nutrition. Enjoy it alone or with friends. Try these tips, and you'll impress everyone at your table.

Welcome to a fresh and simple delight! Mediterranean Chickpea Salad is a vibrant dish packed with flavor and nutrients. In just a few easy steps, you can create a colorful, …

Read more

Categories Salads

Shrimp Boil Foil Packs Flavorful and Easy Cooking Guide

May 29, 2025 by Chef Elliot
For a tasty shrimp boil, gather these key ingredients: - 1 pound large shrimp, peeled and deveined - 2 cups baby potatoes, halved - 2 ears of corn, cut into thirds - 4 cloves garlic, minced - 1 tablespoon Old Bay seasoning - 1 teaspoon smoked paprika - 4 tablespoons olive oil - 1 lemon, juiced - Salt and pepper to taste - Fresh parsley, chopped for garnish These ingredients create a vibrant mix of flavors. The shrimp adds sweetness, while the potatoes and corn provide a nice balance. You can boost the flavor with these optional ingredients: - Red pepper flakes for heat - Bay leaves for added depth - A splash of hot sauce for kick - Chopped green onions for freshness Feel free to mix and match these options. They can add a unique twist to your dish. To make your shrimp boil foil packs, you will need: - Aluminum foil (about 12 inches in length) - A large mixing bowl - A spatula or spoon for mixing - A baking sheet (if using the oven) or a grill These simple tools make cooking easy. You can prepare delicious meals without a lot of fuss. For the full recipe, check out the detailed steps. First, gather all your ingredients. You will need shrimp, baby potatoes, corn, garlic, and spices. Preheat your oven to 400°F or get your grill ready at medium-high heat. This step helps cook the shrimp properly. Take four large pieces of aluminum foil, about 12 inches each. In a bowl, combine shrimp, halved potatoes, corn, minced garlic, Old Bay seasoning, smoked paprika, olive oil, and lemon juice. Mix it well so everything gets coated. Season with salt and pepper to taste. Divide this mixture into four parts. Place each part in the center of a foil piece. Fold the foil edges up and seal them tightly. This keeps all the tasty juices inside. You can cook these packs in the oven or on the grill. If using the oven, place the packs on a baking sheet. For grilling, set the packs directly on the grill grates. Cook for about 15 to 20 minutes. The steam inside cooks the shrimp and softens the potatoes. When done, take the packs off the heat. Let them cool for a few minutes before opening. Enjoy the amazing smells and the fun of sharing this dish! For the complete recipe, check out the Full Recipe section. Start with fresh shrimp. It gives the best taste. Use Old Bay seasoning for a classic flavor. Smoked paprika adds a nice touch, too. Don't forget the salt and pepper. Mix all the seasonings well with the shrimp. I like to use my hands to make sure everything is coated. A squeeze of lemon juice adds brightness. It balances the rich flavors nicely. Use heavy-duty aluminum foil to avoid tears. Make sure to fold the foil tightly. This keeps all the juices inside. You can also spray the foil lightly with oil. This can help prevent sticking. Place your mixture in the center of the foil. This gives you room to fold the sides up. Keep an eye on the seals; they should be tight. Cook shrimp until they turn pink and opaque. This usually takes 15 to 20 minutes. If you're using a grill, check for smoke. This means the cooking is on track. For oven cooking, preheat to 400°F (200°C). If you are unsure, cut one shrimp to check doneness. The potatoes should be tender, too. If they are undercooked, give the packs a few more minutes. Enjoy the process and savor each bite! {{image_4}} You can create a vegetarian version of shrimp boil foil packs. Replace the shrimp with large mushrooms or firm tofu. These alternatives soak up flavors well. Keep the potatoes and corn in the mix for texture. Add bell peppers, zucchini, or asparagus for color and taste. Use vegetable broth instead of the lemon juice for a richer base. For those who love heat, spice up your shrimp boil foil packs. Add diced jalapeños or crushed red pepper flakes to the mix. You can also swap the Old Bay seasoning for a Cajun spice blend. If you want a smoky flavor, try chipotle powder. These changes will give your dish a fiery kick that warms the soul. Don't hesitate to mix things up with your ingredients. If you prefer different veggies, use carrots or green beans. For a different protein, try crab or scallops. You can even add sausage for a heartier meal. Swap out the olive oil for garlic-infused oil for extra flavor. These substitutions can make each meal feel new and exciting. For a full recipe, check out the main instructions above. When you have leftover shrimp boil foil packs, let them cool first. Then, transfer them to an airtight container. You can also keep them in the original foil, but make sure to wrap them tightly. Store them in the fridge for up to three days. This way, you keep the flavors fresh and tasty. To reheat your shrimp boil, preheat your oven to 350°F (175°C). Place the foil pack on a baking sheet. Heat for about 10-15 minutes until warmed through. If you want, you can also use a microwave. Just place the pack in a microwave-safe dish. Heat for 2-3 minutes, checking to avoid overcooking the shrimp. If you want to save shrimp boil packs for later, freezing is a great option. Wrap each pack tightly in plastic wrap, then in aluminum foil. You can store them in the freezer for up to three months. When ready to eat, thaw them in the fridge overnight before reheating. This makes for an easy meal when you need it! You can serve many sides with shrimp boil foil packs. Here are some great options: - Coleslaw: This side is crunchy and refreshing. - Garlic Bread: It adds a nice touch to your meal. - Cornbread: Sweet and soft, it complements the spices well. - Green Salad: A light salad can balance out the rich flavors. These sides make your meal more varied and fun! Yes, you can use frozen shrimp for shrimp boil foil packs. Just remember to thaw them first. Place them in the fridge overnight or run them under cold water for a quicker thaw. This step helps keep the shrimp juicy. Frozen shrimp may take a little longer to cook, so check them to ensure they turn pink and opaque. You can store shrimp boil foil packs in the fridge for up to three days. Make sure to place them in an airtight container. This keeps them fresh and prevents odors. When you’re ready to eat, just reheat them gently in the oven or microwave. Enjoy the flavors again without much fuss! In this post, we explored how to make delicious shrimp boil foil packs. We covered essential and optional ingredients, cooking methods, and the right equipment. I shared tips for seasoning and avoiding mess. We also discussed variations to suit different tastes and how to store leftovers. Now, you have the tools to create tasty meals easily. I'm excited for you to try it out and enjoy every bite!

Are you ready for a quick, tasty meal? Shrimp Boil Foil Packs are the answer! They are packed with juicy shrimp, veggies, and spices. Plus, you can cook them in …

Read more

Categories Dinner

Cheesy Pepperoni Pizza Roll-Ups Tasty Snack Idea

May 28, 2025 by Chef Elliot
To make Cheesy Pepperoni Pizza Roll-Ups, gather these key ingredients: - 1 package of refrigerated pizza dough - 1 cup shredded mozzarella cheese - 1 cup pepperoni slices - 1/2 cup marinara sauce for dipping - 1 tablespoon Italian seasoning - 1 garlic clove, minced - 1 tablespoon olive oil - Cornmeal for dusting (optional) - Fresh basil leaves for garnish (optional) These ingredients come together to create a tasty snack. You can find most of them at your local grocery store. I love using fresh mozzarella for a creamier texture, but shredded works great too. The pepperoni adds a nice kick, but feel free to swap it out for turkey or a veggie option. When gathering your ingredients, remember to enjoy the process. Cooking should be fun! Plus, these roll-ups are perfect for sharing, making them a great choice for game night or a quick lunch. If you're curious about the full recipe, check out the link for detailed steps. First, preheat your oven to 400°F (200°C). This helps the roll-ups bake well. Line a baking sheet with parchment paper. If you want, sprinkle a bit of cornmeal on the parchment. This adds a nice texture to the roll-ups. Next, take your refrigerated pizza dough. On a lightly floured surface, roll it out gently. Aim for a rectangle about 1/4 inch thick. Now, let’s make the filling. Grab a pastry brush and apply olive oil all over the dough. This adds flavor and helps the garlic stick. Mince one garlic clove and sprinkle it over the oil evenly. Then, it’s time for the cheese! Spread 1 cup of shredded mozzarella cheese across the dough. Leave a little space at the edges. Now, layer 1 cup of pepperoni slices on top of the cheese. Finish with 1 tablespoon of Italian seasoning for extra taste. Once your filling is ready, it’s time to roll. Starting at one end, tightly roll the dough into a log. Make sure the cheese and pepperoni stay inside. Use a sharp knife to slice the log into pieces about 1.5 inches thick. You should get around 12 to 16 roll-ups. Place the sliced roll-ups on the prepared baking sheet. Make sure there is space between each piece. This helps them cook evenly. Now, bake the roll-ups in the oven for 15 to 20 minutes. They should turn golden brown, and the cheese will be melted and bubbling. Once they are done, take them out and let them cool for a few minutes before serving. Enjoy warm with marinara sauce for dipping. If you like, garnish with fresh basil leaves for a nice touch. For the full recipe, check out the ingredients and steps above. To make the best roll-ups, focus on your rolling technique. When rolling, start at one edge and apply steady pressure. This helps to create a uniform shape. If the dough resists, let it rest for a few minutes. This will make it easier to roll. For a golden crust, preheat your oven to 400°F. Place the roll-ups on a baking sheet lined with parchment. If you like, add a light dusting of cornmeal. This gives the crust a nice texture. Bake until they turn golden brown, about 15-20 minutes. To boost the taste, consider adding spices. A sprinkle of crushed red pepper or some oregano can add a kick. You can also mix in some chopped olives or bell peppers for extra flavor. If you want to swap out the marinara sauce, try ranch or garlic sauce. You can even use pesto for a twist. These options add a new layer to your dip! Enjoy experimenting with different flavors to find your favorite. {{image_4}} You can switch up the cheese for fun flavors. Try cheddar or pepper jack for a kick. These cheeses melt well and add new tastes. If you want a lighter option, use ricotta. It gives a creamy texture that pairs nicely with pepperoni. For a healthier choice, consider using turkey or vegetarian pepperoni. Turkey pepperoni has less fat but still packs a punch. Vegetarian pepperoni mimics the flavor and can please everyone. Both options keep the roll-ups tasty and exciting. Get creative by adding veggies or other fillings. Spinach, bell peppers, or mushrooms work well. Just chop them small and spread them with the cheese. You can also mix in some olives for a briny surprise. For dipping sauces, try more than just marinara. Ranch or garlic aioli can elevate your roll-ups. A spicy sriracha sauce adds a fun heat. Each dip can change the whole meal. Enjoy mixing and matching to find your favorite pairings! To keep your leftover roll-ups fresh, store them in an airtight container. This helps keep them soft and tasty. Place a paper towel inside the container to absorb moisture. You can store these in the fridge for up to three days. For long-term storage, freezing is your best bet. Wrap each roll-up in plastic wrap and then place them in a freezer bag. This keeps them safe from freezer burn. They will last in the freezer for about two months. When you are ready to eat, you can thaw them in the fridge overnight. When reheating, you have two main options: the oven or the microwave. The oven is the best choice if you want that crunchy texture. Preheat your oven to 350°F (175°C). Place the roll-ups on a baking sheet and heat for about 10-15 minutes. This will make them warm and crispy again. If you choose to use the microwave, place a damp paper towel over the roll-ups. This will help keep them moist but may make them a bit softer. Heat for about 30 seconds to 1 minute. Check to make sure they are heated through. Enjoy your Cheesy Pepperoni Pizza Roll-Ups! For the full recipe, check above. How can I make these roll-ups ahead of time? You can prepare the roll-ups the day before. After rolling and cutting them, store them in the fridge. Cover the baking sheet with plastic wrap to keep them fresh. Bake them when you're ready to serve. Can I use homemade dough instead of refrigerated? Yes, you can use homemade dough! Just make sure it is rolled out to the same thickness. This way, it will bake evenly and hold the fillings well. What is the best way to customize this recipe? You can add your favorite toppings! Try different cheeses or veggies. You can also switch out the pepperoni for turkey or veggie options. This makes it fun and unique for every taste. How do I know when the roll-ups are done baking? Look for a golden brown color on the outside. The cheese should be melted and bubbling. If you see that, your roll-ups are ready! Enjoy them warm with marinara sauce for a tasty treat. For complete instructions, check out the Full Recipe. Cheesy Pepperoni Pizza Roll-Ups are fun to make and eat. You need simple ingredients like pizza dough, cheese, and pepperoni. We detailed the steps to prep, fill, and bake them. I shared tips for perfect shapes and golden crusts. You can even customize these roll-ups with different fillings. Enjoy trying out these ideas in your kitchen. Each bite brings joy, and the process is easy and rewarding. Happy cooking!

Looking for a fun snack that’s easy to make and full of flavor? You’ve come to the right place! These Cheesy Pepperoni Pizza Roll-Ups are perfect for movie nights or …

Read more

Categories Appetizers

Crispy Parmesan Chicken with Garlic Sauce Delight

May 28, 2025 by Chef Elliot
- 4 boneless, skinless chicken breasts - 1 cup all-purpose flour, seasoned with salt and pepper - 2 large eggs, beaten until frothy - 1 cup breadcrumbs - 1 cup grated Parmesan cheese - 1 teaspoon garlic powder - 1 teaspoon Italian seasoning - 4 cloves garlic, finely minced - 1/2 cup chicken broth - 1 tablespoon fresh lemon juice - 1/2 cup olive oil, for frying To create the best Crispy Parmesan Chicken, you need to gather fresh and quality ingredients. Start with boneless, skinless chicken breasts. They are easy to work with and cook evenly. Seasoned all-purpose flour gives the chicken a great base. You’ll also need eggs, which help the coating stick. The next step is to focus on the coating. Breadcrumbs add crunch and texture. Grated Parmesan cheese brings rich flavor. Adding garlic powder and Italian seasoning will enhance the taste and aroma. Finally, let’s not forget the garlic sauce. Fresh minced garlic is key, as it packs a ton of flavor. Chicken broth adds depth, while fresh lemon juice brightens it all up. Olive oil is essential for frying the chicken to golden perfection. For the full recipe, see the earlier section. Start by pounding the chicken. Place each breast between two sheets of plastic wrap. Use a meat mallet or a rolling pin to pound the chicken until it is about 1/2 inch thick. This step helps the chicken cook evenly. Next, set up your breading station. You need three shallow bowls for this. In the first bowl, add the seasoned flour. In the second bowl, pour in the beaten eggs. The third bowl needs a mix of breadcrumbs, Parmesan cheese, garlic powder, and Italian seasoning. Now, it's time to bread the chicken. Take one breast and dredge it in the flour first. Make sure you coat all sides well. Shake off any extra flour. Next, dip the chicken into the beaten eggs. Let any excess egg drip off. Finally, roll the chicken in the breadcrumb mix. Press gently to make a thick coat. Heat olive oil in a large skillet over medium-high heat. Once the oil shimmers, carefully add the breaded chicken breasts. Cook them in batches so they don’t overcrowd. Each piece needs about 5-6 minutes on each side. You want them golden brown and crispy. After cooking, transfer the chicken to a plate lined with paper towels. This helps absorb any extra oil. For the complete recipe, check out the Full Recipe. To get a crispy texture on your chicken, dry the meat first. Pat each chicken breast with paper towels. Removing moisture helps the coating stick better and fry up crispier. Next, heat your oil to the right temperature. You want it to shimmer but not smoke. A medium-high heat works best. If the oil is too cool, the chicken will soak up oil and become greasy. Timing is key when adding garlic to your sauce. Add it after frying the chicken and let it cook for only 30 seconds. This quick sauté brings out the garlic's flavor without burning it. Simmer the sauce for a few minutes. This helps the flavors blend together. The chicken broth and lemon juice will mix to create a rich sauce that enhances the chicken. Serve your crispy chicken on a white platter. This contrast makes the dish pop. You can also add a lemon wedge on the side for a fresh touch. For garnishing, sprinkle fresh parsley on top. This adds color and a hint of flavor. It makes the dish look fancy and appetizing. For the full recipe, check out the complete guide! {{image_4}} You can change the flavor of crispy Parmesan chicken easily. Add spices like paprika or cayenne for heat. Fresh herbs like basil or thyme can enhance the dish too. Consider mixing different cheeses into the breadcrumbs. Mozzarella or cheddar can add a new cheesy twist. You can also try a spicy cheese blend for a kick. You can bake or air fry the chicken for a healthier option. Baking gives the chicken a nice crunch without much oil. Set your oven to 400°F and bake for about 20-25 minutes. The chicken will be golden and crisp. Air frying works well too. It cooks quickly while keeping the chicken juicy inside. Cook at 380°F for 15-20 minutes, flipping halfway through. If you need gluten-free options, use gluten-free breadcrumbs. They work just as well for a crispy coating. For vegetarians, swap chicken for eggplant. Cut eggplant into thick slices, bread, and cook the same way. You'll get a delightful dish that everyone can enjoy. Try these swaps to make the recipe fit your needs. For the full recipe, check the details above. To keep your crispy Parmesan chicken fresh, follow these steps. First, let the chicken cool to room temperature. Then, place it in airtight containers. This keeps moisture out and helps it last longer. Store the leftovers in the fridge. They will stay good for about three days. For best taste, eat them within two days. When you're ready to enjoy leftovers, you have a few options for reheating. The oven works best. Preheat it to 375°F (190°C). Place the chicken on a baking sheet. Heat for about 10 to 15 minutes. This method keeps the chicken crispy. You can also use a skillet. Heat it over medium heat and add a little oil. Cook the chicken for about 5 minutes on each side. Make sure it gets hot all the way through. You can freeze this chicken too! You can freeze it before or after cooking. If you freeze it raw, wrap each piece tightly in plastic wrap. Then, place them in a freezer bag. If you cook it first, let it cool completely. Then, store it in an airtight container. Frozen chicken lasts about three months. To thaw, place the chicken in the fridge overnight. You can also use the microwave. Just be careful to thaw it evenly. For the full recipe, check out the detailed instructions above! Cook the chicken for about 5-6 minutes on each side. This gives a nice golden color. Make sure the chicken reaches 165°F (74°C) inside. Use a meat thermometer for accuracy. Cooking time may vary based on thickness, so check carefully. Yes, you can! Use gluten-free breadcrumbs instead of regular ones. You may also use rice flour instead of all-purpose flour. This keeps the crispy texture while being gluten-free. Always check labels to ensure all ingredients are safe for your diet. A few delicious sides include: - Garlic mashed potatoes - Steamed broccoli - Caesar salad - Roasted carrots These sides pair well and balance the flavors of the chicken. Each dish adds a nice touch to your meal. To add heat, try these tips: - Add red pepper flakes to the breadcrumb mixture. - Mix in cayenne pepper with the garlic sauce. - Serve with a spicy dipping sauce, like sriracha. These options will give your chicken a nice kick without overpowering the dish. Adjust the spice level to your taste! For the detailed cooking process, check the Full Recipe. You now have all the steps for making Crispy Parmesan Chicken. We covered ingredients, cooking methods, and even tips to improve your dish. Don’t forget that storing and reheating correctly maintains that delicious crunch. With these insights, you can customize the flavors or try different cooking methods. Enjoy your cooking journey and the tasty meals ahead! Cooking is fun, so embrace your creativity in the kitchen.

If you crave a dinner that’s crispy, cheesy, and full of flavor, you’re in for a treat! My Crispy Parmesan Chicken with Garlic Sauce will steal the show on any …

Read more

Categories Dinner

Chocolate Sugar Cookies Delightful and Simple Recipe

May 28, 2025 by Chef Elliot
- 2 ½ cups all-purpose flour - ½ cup unsweetened cocoa powder - 1 teaspoon baking powder - ½ teaspoon baking soda - ¼ teaspoon salt - 1 cup unsalted butter, softened - 1 ½ cups granulated sugar - 1 large egg - 2 teaspoons pure vanilla extract - ½ cup semi-sweet chocolate chips (optional) - Powdered sugar for dusting (optional) For this recipe, each ingredient plays a key role. The flour gives the cookies structure, while cocoa powder adds rich chocolate flavor. Baking powder and baking soda help the cookies rise just right. Salt enhances all the flavors. Butter adds creaminess, and sugar brings sweetness. The egg binds the dough together, while vanilla adds depth. If you like extra chocolate, toss in some chocolate chips. Dust with powdered sugar if you want a pretty finish. You can swap unsalted butter for coconut oil if you want a dairy-free option. For sugar, try brown sugar for a deeper flavor. If you need gluten-free cookies, use a gluten-free flour blend. Always choose high-quality chocolate for the best taste. Store leftover ingredients in cool, dry places. Keep cookies in an airtight container to stay fresh. If you have extra dough, wrap it tightly and freeze it. This way, you can bake more cookies later! 1. Preheat the Oven and Prepare Baking Sheets Start by preheating your oven to 350°F (175°C). This step is key for even baking. While the oven heats, line your baking sheets with parchment paper. This will keep your cookies from sticking. 2. Sifting Dry Ingredients In a medium bowl, sift together the flour, cocoa powder, baking powder, baking soda, and salt. Sifting keeps the dry mix light and helps blend the ingredients well. Set this bowl aside for later. 3. Creaming Butter and Sugar In a large bowl, beat the softened butter and granulated sugar. Use a mixer to blend them on medium speed. Mix until the mixture is light and fluffy, which takes about 3-4 minutes. This step helps to create a nice texture. 4. Incorporating Egg and Vanilla Crack the egg into the butter mixture. Pour in the vanilla extract. Continue mixing until everything is smooth and well combined. You want the egg fully blended in for the best flavor. 5. Forming Cookies and Spacing on Sheets Using a tablespoon or cookie scoop, drop rounded balls of dough onto the baking sheets. Leave about 2 inches between each cookie. This space allows them to spread while baking. 6. Baking Time and Technique for Chewiness Place the baking sheets in the oven and bake for 10-12 minutes. Look for edges that are set and centers that are soft. This helps achieve that perfect chewy texture. Once done, let them cool for 5 minutes before moving them to a wire rack. Enjoy your delicious chocolate sugar cookies! For the full recipe, refer back to the main article. - Ensuring proper dough consistency: The right dough should feel soft but not sticky. If it’s too sticky, add a bit more flour. If it’s dry, mix in a little milk. This balance helps your cookies bake perfectly. - How to achieve a chewy texture: To get that chewy bite, you want to bake the cookies just until the edges set. The centers should look a bit under-baked. This keeps them soft inside. - Best accompaniments for chocolate sugar cookies: Pair your cookies with a glass of cold milk or a warm cup of coffee. The flavors blend well and make a satisfying treat. - Presentation tips for serving: To impress, place your cookies on a nice plate. You can sprinkle powdered sugar on top for a beautiful finish. Add a few chocolate chips on top for extra flair. - Fixing dry or crumbly dough: If your dough is crumbly, it may need more moisture. Try adding a teaspoon of water or milk. Mix well until the dough holds together. - Adjusting for altitude effects: If you live at a higher altitude, you might need to tweak the recipe. Increase the flour slightly and reduce the sugar. This helps the cookies hold their shape while baking. For complete guidance, be sure to check the Full Recipe for chocolate sugar cookies! {{image_4}} You can switch up your chocolate sugar cookies by adding nuts or dried fruits. Chopped walnuts or pecans can give a nice crunch. Dried cherries or cranberries add a chewy, sweet twist. These additions bring extra layers of flavor and texture to your cookies. You can also try different flavorings. A bit of mint extract gives a fresh taste. Orange zest brings a bright, citrusy note. These simple changes can make your cookies stand out and delight your taste buds. Exploring different types of chocolate can elevate your cookies. Dark chocolate adds a rich, bold flavor. White chocolate provides a sweeter, creamier profile. You can even swap in flavored chocolate chips, like raspberry or caramel, to surprise your guests. The options are endless! If you want to make vegan chocolate sugar cookies, use plant-based butter and a flax egg instead of a regular egg. This keeps the texture rich and soft while being kinder to animals. For those watching their sugar intake, consider low-sugar or keto-friendly sweeteners. Erythritol or monk fruit can replace sugar without sacrificing taste. These options let everyone enjoy these cookies without the guilt. To keep your cookies fresh, use an airtight container. This helps prevent them from getting hard or stale. You can stack the cookies with parchment paper in between to avoid sticking. At room temperature, these cookies stay fresh for about 5 days. Store them in a cool, dry place for best results. You can freeze both dough and baked cookies. For dough, scoop the balls onto a baking sheet. Freeze them until solid, then move them to a zip-top bag. This way, you can bake fresh cookies anytime! For baked cookies, let them cool completely first. Wrap them tightly in plastic wrap, then place them in a freezer bag. They can last up to 3 months in the freezer. When ready to enjoy, thaw the dough overnight in the fridge. For baked cookies, leave them at room temperature for about 30 minutes. You can also warm them in the oven at 350°F for 5-10 minutes for a fresh-baked taste. To reheat cookies, preheat your oven to 350°F. Place the cookies on a baking sheet and heat for about 5 minutes. This warms them and keeps them soft. Always check to avoid over-baking. You want to keep that fresh taste! To check if your cookies are done, look at the edges. They should be firm and set, while the middle stays soft. You can also lightly press the center with your finger. If it springs back, the cookie is ready. Remember, they will continue to cook a bit after you take them out. Yes, you can make the dough ahead of time. Wrap it tightly in plastic wrap and place it in the fridge. It will stay fresh for up to three days. When ready to bake, let the dough sit at room temp for about 15 minutes. This makes it easier to scoop and shape. Chewy cookies come from a few key ingredients and steps. The butter should be softened, not melted. This helps trap air, making them rise. Using more brown sugar than white sugar also adds moisture. Lastly, avoid over-mixing the dough. This keeps the cookies tender and soft. To boost the chocolate flavor, use high-quality cocoa powder. You can also add more chocolate chips or chunks to the dough. Another fun idea is to drizzle melted chocolate on top after baking. This adds an extra layer of flavor and looks stunning. Yes, you can use cocoa powder instead of chocolate bars. However, the texture will change a bit. Cocoa powder is dry and won't add the same richness. If you choose this option, consider adding a touch more butter or sugar to balance the dryness. This blog post covered ingredients, preparation, and baking tips for chocolate sugar cookies. You learned about ingredient substitutes, freshness tips, and different variations. Keep your cookies chewy with the right techniques and serve them with great flair. Remember, storage methods can keep your cookies fresh longer. With this know-how, you can bake delicious cookies that impress everyone. Enjoy baking and don’t forget to have fun while you create!

If you crave cookies that are both rich and easy to make, you’ve found the right recipe. These Chocolate Sugar Cookies combine the sweetness of sugar with deep cocoa flavor. …

Read more

Categories Desserts

Raspberry Cookies Delightful and Easy Recipe Guide

May 28, 2025 by Chef Elliot
To make delicious raspberry cookies, you need the following ingredients: - 1 cup unsalted butter, softened to room temperature - 1 cup granulated sugar - 1 large egg, at room temperature - 2 teaspoons pure vanilla extract - 2 cups all-purpose flour - 1 teaspoon baking powder - 1/2 teaspoon baking soda - 1/4 teaspoon fine salt - 1 cup fresh raspberries (or thawed frozen raspberries) - 1/2 cup white chocolate chips (optional but recommended) - Powdered sugar for dusting (optional) Each ingredient plays a key role. The butter gives the cookies a rich flavor. Sugar adds sweetness and helps with texture. Raspberries bring a tartness that balances the sweetness. You can swap out some ingredients if needed: - Use coconut oil instead of butter for a dairy-free option. - Brown sugar can replace granulated sugar for a deeper flavor. - Applesauce can work in place of the egg for a vegan choice. - Whole wheat flour can replace all-purpose flour for added nutrition. These substitutes can change the taste and texture but will still yield tasty cookies. You can customize your cookies with extras: - Add nuts like walnuts or pecans for crunch. - Include lemon zest for a citrus twist. - Try almond extract instead of vanilla for a different flavor. - A sprinkle of sea salt on top enhances sweetness. These fun additions can make your raspberry cookies unique and exciting. For the full recipe, check out my detailed guide! First, preheat your oven to 350°F (175°C). This step is key for even baking. While the oven warms up, gather your ingredients. You'll need unsalted butter, sugar, an egg, vanilla, flour, baking powder, baking soda, salt, fresh raspberries, and white chocolate chips if you want. Line two baking sheets with parchment paper to keep cookies from sticking. In a large bowl, mix the softened butter and sugar together. Use an electric mixer on medium speed. Beat them for about 3 to 5 minutes. Your goal is to make the mix light and fluffy. This process adds air, which helps your cookies rise. Next, add the egg and vanilla extract to your butter-sugar mix. Mix until everything is smooth. In another bowl, sift the flour, baking powder, baking soda, and salt together. This helps the leavening agents spread evenly. Gradually add the dry mix to the wet mix. Use a spatula or wooden spoon. Be gentle, so you don’t overmix. Overmixing can make cookies tough. Now comes the fun part! Carefully fold in the fresh raspberries. Go slow to keep the berries intact. You want those tasty bursts of flavor. If you like, fold in white chocolate chips for extra sweetness. This adds a nice touch to your cookies. Scoop about one tablespoon of dough for each cookie. Place them on the prepared baking sheets, leaving about 2 inches of space between them. This space is important for spreading. Bake in the preheated oven for 12 to 15 minutes. Watch them closely; the edges should turn lightly golden. After baking, let the cookies cool on the sheets for 5 minutes. This helps them set. Then, move them to a wire rack to cool completely. If you want, dust cooled cookies with powdered sugar for a lovely finish. For the full recipe, check out Raspberry Bliss Cookies. Enjoy your baking adventure! To get the best texture, use softened butter. This helps mix air into the dough. Cream the butter and sugar well. Aim for a light and fluffy mix. Don't rush this step. It makes a big difference! Avoid overmixing after adding the flour. Overmixing can make cookies tough. You want them soft and chewy with a slight crunch. To stop cookies from spreading too much, chill the dough before baking. After scooping the dough, place it in the fridge for 30 minutes. This helps firm up the butter. Also, use parchment paper on your baking sheets. It keeps cookies from sticking and helps them hold shape. Be sure to space them well on the sheet, about two inches apart. Let cookies cool on the baking sheets for five minutes first. Then, move them to a wire rack. This step lets air circulate around the cookies, preventing sogginess. Store cooled cookies in an airtight container. They stay fresh for about a week at room temperature. For longer storage, freeze them. Just place them in a freezer bag, and they can last up to three months. {{image_4}} You can use both fresh and frozen raspberries in your cookies. Fresh raspberries have a juicy taste and a nice texture. They create bursts of flavor in each bite. Frozen raspberries are great for convenience. They are often picked at peak ripeness, so they taste good, too. Just remember to thaw them first and drain excess water before mixing them into the dough. Raspberry cookies can be more than just sweet. Try adding lemon zest for a bright twist. The tartness of lemon pairs well with the sweetness of raspberries. You can also add almond extract for a nutty flavor. This adds depth and richness to your cookie. For a fun mix, consider adding coconut or even a pinch of cinnamon. Each of these flavors enhances the cookie without overpowering the raspberries. If you want a vegan version, swap the butter for coconut oil or vegan butter. Use a flax egg instead of a regular egg. Just mix one tablespoon of ground flaxseed with three tablespoons of water, let it sit, and use it in your recipe. For gluten-free cookies, replace all-purpose flour with a gluten-free blend. Make sure it has xanthan gum to help with texture. These options keep the cookies tasty while meeting dietary needs. Check the Full Recipe for all the details! To keep your raspberry cookies fresh, store them in an airtight container. This helps keep them soft and tasty. Place parchment paper between layers to avoid sticking. Keep the cookies at room temperature for up to five days. If you want to enjoy them longer, consider freezing. To freeze raspberry cookies, first let them cool completely. Once cool, place them in a single layer on a baking sheet. Freeze for about one hour. Then, transfer the cookies to a freezer-safe bag or container. Remove as much air as possible. They will stay fresh for up to three months. When you want to eat them, thaw them in the fridge overnight. To enjoy your cookies warm, preheat your oven to 350°F (175°C). Place the cookies on a baking sheet. Heat for about 5-10 minutes. This will bring back their soft texture. You can also use the microwave for a quick fix. Heat a single cookie for about 10-15 seconds. Enjoy the warm, gooey goodness! Yes, you can use frozen raspberries! Just thaw them first. This helps prevent the cookies from becoming too wet. Gently pat them dry with a paper towel to remove excess moisture. Using frozen raspberries gives you that lovely burst of flavor, just like fresh ones. To make your raspberry cookies chewier, try a few tricks. First, add an extra egg yolk. This adds moisture and fat, making cookies softer. Second, reduce the baking time slightly. Cookies will keep cooking after you take them out, so take them out when they are just set. Lastly, use brown sugar instead of white sugar for added moisture. Raspberries offer many health benefits. They are low in calories and high in fiber. This helps with digestion and keeps you feeling full. Raspberries also contain vitamins C and K, which support your immune system and bone health. Adding raspberries to cookies makes them a more nutritious treat! Raspberry cookies stay fresh for about a week when stored properly. Place them in an airtight container at room temperature. If you want them to last longer, you can freeze them. They can stay good in the freezer for up to three months. Just let them thaw at room temperature before enjoying them again. For the full recipe, check out the details above! Raspberry cookies are a simple and fun treat to make. We covered essential ingredients and some tasty substitutes. I shared easy steps to prep, mix, and bake your cookies. Plus, I gave tips to get the right texture and how to store them. You learned about different raspberry types and flavor mixes, too. Now it’s time to get baking! Enjoy your cookies fresh or saved for later.

Get ready to bake something special with my delightful raspberry cookie recipe! These cookies are easy and packed with flavor, making them perfect for any occasion. In this guide, I’ll …

Read more

Categories Desserts
Older posts
Newer posts
← Previous Page1 … Page44 Page45 Page46 … Page49 Next →

TOSSED TASTES

Where flavors get playful! A fresh mix of easy bites, bold spices, and everyday cravings tossed into every recipe. 🍋🍅

PAGES

Home About Contact Privacy Policy Terms & Conditions Cookie Policy GDPR Policy Copyright Policy Disclaimer

CATEGORIES

Appetizers Desserts Salads Breakfast Dinner

Contact

  • Pinterest
  • Mail
Copyright © 2025 Tossed Tastes. All rights reserved.