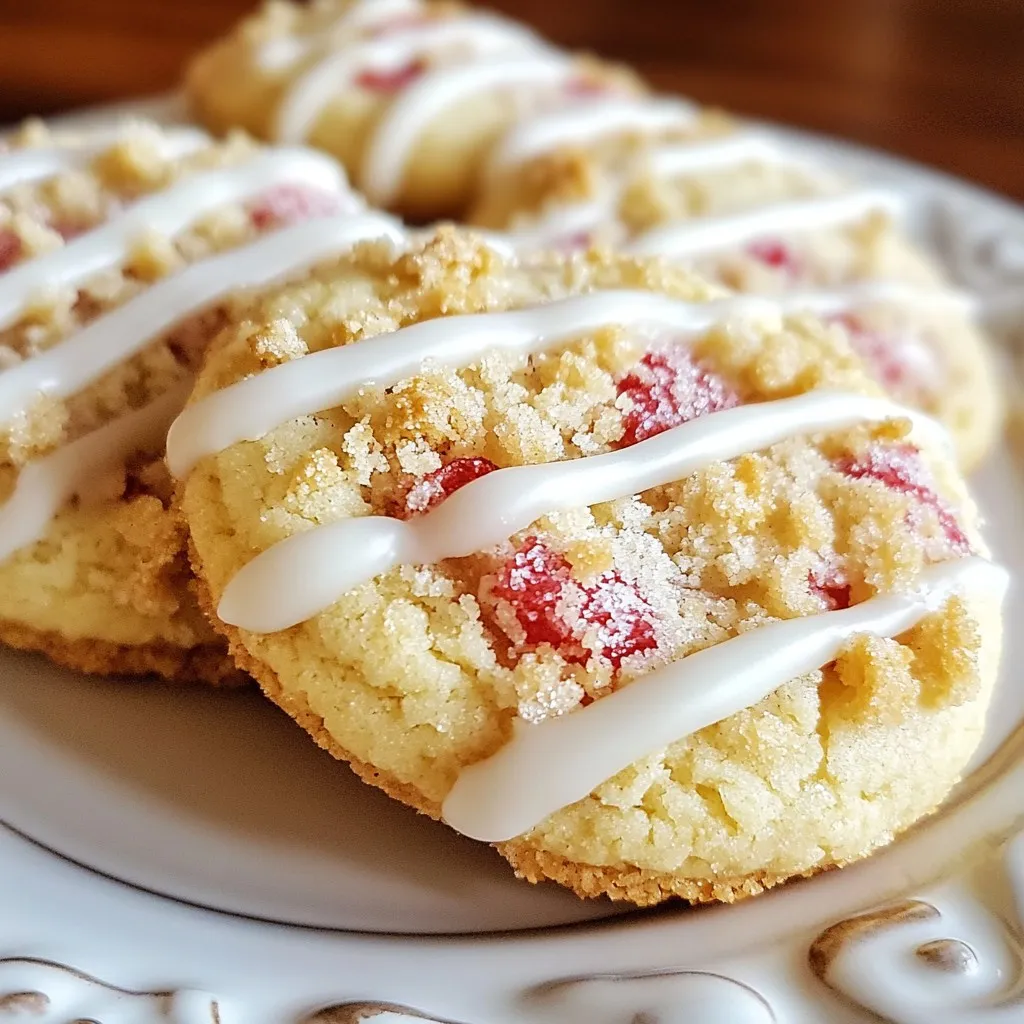
Skip to content
Tossed Tastes
  • Home
  • Appetizers
  • Desserts
  • Salads
  • Breakfast
  • Dinner
  • Privacy Policy
  • Contact
  • About

Chef Elliot

Summer Fruit Salad Refreshing and Healthy Delight

May 30, 2025 by Chef Elliot
- Watermelon - Strawberries - Blueberries - Kiwi - Ripe Peaches Fresh fruits are key in a summer fruit salad. Each fruit brings its own taste and color. Watermelon offers a juicy base. Strawberries add sweetness and bright red color. Blueberries provide small bursts of flavor. Kiwi adds a tangy twist with its green hue. Lastly, ripe peaches bring a fragrant touch. Together, these fruits create a refreshing and colorful mix. - Honey - Fresh Mint Leaves - Lime Juice - Sea Salt Adding flavor enhancers makes the salad even better. Honey brings natural sweetness to the mix. Fresh mint leaves add a cool aroma and flavor. Lime juice gives a zesty kick that brightens everything. A pinch of sea salt enhances the taste of all the fruits. These ingredients balance each other, making each bite delightful. For the full recipe, check out Summer Bliss Fruit Salad. Start by washing your fruits. Dicing watermelon into bite-sized cubes is fun and easy. Hull the strawberries and cut them in half. Rinse the blueberries under cool water. Peel the kiwi and slice it into thick rounds. Dice ripe peaches for a sweet touch. Now, mix all these colorful fruits in a large bowl. The bright colors will make your salad look so appealing. This colorful fruit base is not just pretty; it adds a variety of flavors and textures. In a small bowl, whisk together honey, lime juice, and sea salt. Make sure to mix well until the honey fully dissolves. The lime juice adds a nice zing. The sea salt enhances the fruit's natural sweetness. This dressing is simple yet packed with flavor. Once your dressing is ready, drizzle it over the fruit mixture. Use a large spoon to gently toss everything together. Be careful not to break the fruit pieces. This step ensures every piece is coated in the tasty dressing. Next, fold in finely chopped mint leaves for a fresh aroma and flavor boost. Refrigerate your salad for at least 30 minutes. Chilling is key; it allows the flavors to meld together. This time lets the salad become even more delicious. It’s best to cover the bowl with plastic wrap or a lid to keep it fresh. Enjoy the refreshing taste of your Summer Bliss Fruit Salad when ready to serve! To make the best summer fruit salad, choose ripe, seasonal fruits. Ripe fruits taste sweet and juicy. Look for bright colors and firm textures. For example, a watermelon should feel heavy for its size. Strawberries should be bright red and fragrant. Understanding flavor pairings is also key. Watermelon pairs well with mint and lime. Blueberries add a sweet burst to the mix. Peaches bring a soft, juicy texture. Kiwi adds a tangy twist. Mixing these flavors makes your salad exciting. Use clear glass bowls to show off the colors. A large platter works well for parties. For individual servings, try small cups or jars. They add a fun touch. Garnishing ideas can elevate your salad. Add a few mint leaves on top for a fresh look. You can also sprinkle some toasted nuts for crunch. A drizzle of honey can add a nice shine. To make your salad even healthier, add nuts or seeds. Almonds or sunflower seeds provide protein and healthy fats. They also add a nice crunch. Incorporating yogurt can add creaminess. A dollop of Greek yogurt pairs well with the fruits. It makes the salad more filling and nutritious. {{image_4}} You can easily adapt this fruit salad to fit different diets. For a vegan option, simply use maple syrup instead of honey. It works great and still tastes sweet. This salad is also gluten-free. Just check that your honey is pure and doesn’t have any additives. If you need a nut-free option, this salad is perfect. It does not contain any nuts, making it safe for those with allergies. Summer is a great time to explore other fruits. Think about adding mango, pineapple, or cherries. These fruits bring extra flavor and color. You can also try tropical fruits like dragon fruit or passion fruit for a fun twist. They add a unique taste and brighten your salad even more. The honey-lime dressing is delicious, but you can try other options. A yogurt-based dressing can add creaminess. You can mix yogurt with a bit of lime juice for a tangy flavor. To make it citrusy, add orange juice or zest. For a spicy kick, sprinkle in some chili powder or jalapeño. These changes keep the salad exciting and give it new flavors. Check out the Full Recipe to create your own version of this delightful summer salad! To keep your summer fruit salad fresh, use airtight containers. Glass or plastic containers work well. They prevent air and moisture from spoiling the salad. Make sure to store your salad in the fridge. The cold keeps the fruits crisp and tasty. Summer fruit salad stays good for about 2 to 3 days in the fridge. You might notice the fruit softening over time. Signs of spoilage include a mushy texture or off smell. If you see these signs, it’s best to toss the salad. Yes, you can make the salad ahead of time! Just remember to add the dressing right before serving. This keeps the fruit from getting soggy. For best results, store the fruit and dressing separately. This way, your salad stays fresh until you're ready to eat. If you want, you can also store chopped fruits in the fridge for a quick mix later. Yes, you can use frozen fruits. However, frozen fruits may change the salad's texture. They can become mushy after thawing. This can affect the look and feel of your salad. If you do use frozen fruit, let them thaw in the fridge. This way, they hold their shape better. To make your Summer Fruit Salad more filling, add extra ingredients. Here are some ideas: - Chopped nuts like almonds or walnuts - Creamy yogurt, like Greek yogurt - Granola for a crunchy texture - Cottage cheese for added protein These additions will boost nutrition and flavor while keeping it refreshing. You can serve Summer Fruit Salad with various dishes. Here are some great pairing ideas: - Grilled chicken or fish for protein - A light sandwich or wrap - Yogurt parfaits for a sweet touch - Fresh bread or rolls for a nice contrast These options enhance your meal and please your guests. Yes, Summer Fruit Salad is very healthy. Here are some benefits of the fruits used: - Watermelon hydrates and is low in calories - Strawberries are high in vitamins and fiber - Blueberries are rich in antioxidants - Kiwi helps digestion and boosts vitamin C - Peaches add vitamins A and C, plus fiber This salad is a tasty way to get your daily nutrients! This blog post covered how to make a tasty summer fruit salad. We discussed choosing fresh fruits and flavor boosters like honey and mint. You learned step-by-step how to prepare the salad, make the dressing, and chill it for the best taste. Tips on selecting fruits and serving ideas added value. You can even try different variations and store it properly. Keep these ideas in mind to impress your friends and family. Enjoy your colorful, healthy treat all summer long!

Looking for a bright, tasty treat this summer? My Summer Fruit Salad is a refreshing and healthy delight that bursts with flavor. Picture juicy watermelon, sweet strawberries, and tangy kiwi …

Read more

Categories Salads

Boat Dip Rotel Ranch Dip for Parties and Gatherings

May 30, 2025 by Chef Elliot
- 1 can (10 oz) diced tomatoes with green chilies (Rotel), drained - 1 cup sour cream - 1 cup cream cheese, softened to room temperature - 1 packet ranch seasoning mix - 1 cup shredded sharp cheddar cheese - 1/2 cup green onions, finely diced - 1/2 cup bell pepper, diced The main ingredients make this dip creamy and tasty. Diced tomatoes with green chilies add a nice kick. Sour cream and cream cheese create a smooth base. The ranch seasoning brings in bold flavor. Shredded cheese adds richness and texture. Fresh veggies like green onions and bell peppers brighten the dip. - 1/4 cup black olives, sliced (optional for garnish) - Tortilla chips or crunchy veggie sticks (like carrots and cucumbers) for serving Optional ingredients let you customize your dip. Black olives add a salty touch on top. Serving with tortilla chips or veggie sticks makes it fun. You can also try different dippers to match your taste. For a gathering, these choices keep it exciting and fresh. For the full recipe, check out the details above. 1. Blending the creamy base: Start with a large mixing bowl. Add the softened cream cheese, sour cream, and ranch seasoning mix. Use an electric mixer or a whisk. Mix until smooth and creamy. Make sure there are no lumps. 2. Adding Rotel and mixing: Take your can of diced tomatoes with green chilies. Drain it well to avoid extra liquid. Carefully fold the drained Rotel into your creamy mixture. Stir gently until the tomatoes are evenly spread throughout the dip. 1. Folding in cheese and veggies: Gradually add in the shredded sharp cheddar cheese. Next, include the diced green onions and bell peppers. If you like, fold in sliced black olives. Mix everything until well combined while keeping the dip creamy. 2. Adjusting seasonings for flavor: Now, taste your dip. If you want it spicier, add hot sauce or diced jalapeños. Adjust the flavor to your liking. This is your chance to make it just right! 1. Transfer to a serving bowl: Once your dip is mixed well and tastes great, it's time to serve. Transfer the dip to a nice bowl. 2. Refrigeration time and serving suggestions: Cover the bowl and chill it in the fridge. Let it sit for at least 30 minutes to an hour. This chilling time helps the flavors blend better. Serve the dip with crispy tortilla chips or colorful veggie sticks. Enjoy every scoop! To make your Boat Dip even better, consider adding hot sauce or diced jalapeños. These ingredients bring heat and zest. If you like it mild, skip the spice. For a unique twist, try adding different seasoning blends. You can use taco seasoning or even some smoked paprika for a smoky taste. Always taste as you go. Adjust the seasonings to match your flavor preference. A creamy dip is key for Boat Dip. To achieve this, mix the cream cheese and sour cream well. Use an electric mixer or a whisk for a smooth blend. If you notice any lumps, keep mixing until smooth. This step is crucial for a perfect dip. Remember, a well-blended dip holds its shape and is easy to scoop with chips. Presentation matters when serving your dip. Use a fun and colorful bowl to draw attention. You could even use a small cast-iron skillet for a rustic look. Add garnishes like diced green onions or olives on top. These add color and a pop of flavor. Arrange tortilla chips or veggie sticks around the bowl for a beautiful display. This makes your Boat Dip ready for any party or gathering. For the complete recipe, check the [Full Recipe]. {{image_4}} You can make Boat Dip more fun with some easy swaps. If you want a dairy-free option, use plant-based cream cheese instead of regular cream cheese. This keeps the dip creamy while making it suitable for those avoiding dairy. You can find many good brands at the store. If you like things hot, try adding diced jalapeños or even fresh habaneros. These peppers give the dip a nice kick. You can also swap out the diced tomatoes for spicier ones, like chipotle-flavored Rotel. This adds a smoky taste and extra heat. Pairing your Boat Dip with different dippers can make it even more exciting. While tortilla chips are classic, you can use crunchy veggie sticks like carrots, celery, or bell peppers. These add color and a healthy crunch, making it fun for everyone. You can also transform this dip into a layered dip. Start with a base of Boat Dip, then add layers of guacamole, salsa, and sour cream on top. Finish with shredded cheese and diced olives for a beautiful look. This will impress your guests and make serving easier since they can scoop from the top layer. After your guests have enjoyed the boat dip, store any leftovers in the fridge. Use an airtight container to keep it fresh. Make sure the dip cools down to room temperature before sealing. This helps prevent condensation inside the container, which can change the dip's texture. For longer storage, you can freeze the boat dip. Just place it in a freezer-safe container. Leave some space at the top, as the dip will expand when frozen. When you want to eat it, thaw it in the fridge overnight before serving. So, how long does boat dip last? When stored properly in the fridge, it can last up to four days. If you freeze it, it will keep for about three months. Watch for signs of spoilage. If the dip starts to smell off or changes color, it’s best to toss it. Mold or a watery layer on top are other signs that the dip is no longer safe to eat. Always trust your senses! Can I make Boat Dip ahead of time? Yes, you can make Boat Dip a day in advance. This allows the flavors to blend well. Just store it in the fridge in an airtight container. When you’re ready to serve, give it a stir and enjoy! What can I substitute for ranch seasoning? If you don’t have ranch seasoning, you can use a mix of dried herbs. Try using equal parts of garlic powder, onion powder, and dried dill. This will give you a similar flavor and work nicely in the dip. What drinks pair well with Boat Dip? Boat Dip goes great with a variety of drinks. Try pairing it with cold beer or a refreshing lemonade. If you prefer something non-alcoholic, iced tea or sparkling water are perfect options. Can I use Boat Dip as a spread for sandwiches? Absolutely! Boat Dip makes a tasty spread for sandwiches. Just spread it on your favorite bread or wrap. Add some fresh veggies or deli meats for a delicious treat. Is Boat Dip gluten-free? Yes, Boat Dip is gluten-free if you use gluten-free ranch seasoning. Always check the labels on your ingredients to be sure. How many calories are in Boat Dip? On average, a serving of Boat Dip has about 200 calories. This can change based on the specific brands and amounts you use. If you want a lighter dip, consider using low-fat sour cream and cheese. We explored how to make delicious Boat Dip, from the main to optional ingredients. You learned how to blend and serve this tasty dip. I shared tips for enhancing flavor and perfecting texture. Remember, variations and storage tips keep this dip fresh and fun. Now, you can enjoy Boat Dip at your next gathering. It's easy, tasty, and sure to impress your friends. Dig in and enjoy the flavors!

Looking for the perfect party dip? I’ve got you covered with Boat Dip, or Rotel Ranch Dip! This creamy delight is quick to make and loaded with flavor. With just …

Read more

Categories Appetizers

Easy Mexican Coleslaw Fresh and Flavorful Dish

May 30, 2025 by Chef Elliot
To make easy Mexican coleslaw, you need fresh vegetables and dressing components. Here’s what you’ll need: - 4 cups green cabbage, finely shredded - 1 cup red cabbage, finely shredded - 1 cup carrots, grated - 1/2 cup red onion, thinly sliced - 1 cup corn kernels (fresh or canned, drained) - 1/2 cup fresh cilantro, finely chopped - 1 jalapeño, minced (seeds removed for less heat) - 1/4 cup mayonnaise - 2 tablespoons fresh lime juice - 1 tablespoon honey - 1 teaspoon ground cumin - Salt and black pepper, to taste You can make your dish pop with bright colors. Serve the coleslaw in a large bowl. This showcases the vibrant ingredients. Add lime wedges on the side. They give a nice zing and are perfect for squeezing over the dish. For the full recipe, check the link provided. This dish is not just easy; it’s also fresh and flavorful! Start by shredding the green and red cabbage. Use a sharp knife or a box grater for this task. Aim for thin, even pieces. Next, grate the carrot and slice the red onion thinly. If you use fresh corn, cut it off the cob. If using canned corn, make sure to drain it well. In a large bowl, add all these veggies together. Toss them gently until they mix well. In a separate bowl, add mayonnaise, fresh lime juice, honey, and ground cumin. Use a whisk to mix these ingredients. Keep whisking until the dressing is smooth and creamy. This step is key to a tasty coleslaw. Now, drizzle the dressing over the mixed vegetables. Use a spatula to toss everything together. Make sure each piece of vegetable gets coated. This will enhance the flavor of your coleslaw. Take a small taste of the coleslaw. If it needs more flavor, add a pinch of salt, black pepper, or lime juice. This is your chance to make it just right for your palate. Cover the bowl with plastic wrap or a lid. Place it in the fridge for at least 30 minutes. This chilling time lets the flavors blend and improves the taste. Don’t skip this step! Before you serve, give the coleslaw a gentle stir. This redistributes the dressing and veggies nicely. If you want, add a sprinkle of fresh cilantro on top for garnish. It adds a nice touch and extra flavor. For the full recipe, check [Full Recipe]. You can change the heat by adding jalapeño. For less spice, remove the seeds. Not a fan of heat? Use bell pepper instead. You can also try different dressings. Swap mayonnaise for yogurt for a lighter option. A splash of vinegar can add a nice tang too. Prep your vegetables ahead of time. You can chop them the night before. Just keep them in an airtight container in the fridge. This saves time and keeps them fresh. Want to beef up your coleslaw? Add some protein! Grilled chicken or shrimp works great. You might also toss in black beans for extra fiber. Crumbled cheese or avocado can add richness too. For a crunch, sprinkle some pumpkin seeds on top. {{image_4}} For a vegan twist, use plant-based mayonnaise. This keeps the creaminess while making it dairy-free. You can also add a splash of apple cider vinegar for extra zing. Try adding a tablespoon of nutritional yeast for a cheesy flavor. To give your coleslaw a Southwest flair, mix in black beans. They add protein and a hearty texture. You can also incorporate diced avocado for creaminess. This will make your coleslaw more filling and satisfying. If you love heat, add more jalapeño. Mince an extra one or two, depending on your spice level. Hot sauce is another great option. A few dashes will give your coleslaw a bold kick. You can also try using smoked paprika for a different kind of spice. For the full recipe, check out the detailed instructions. To keep your coleslaw fresh, store it in an airtight container. Make sure the lid is secure. Place the container in the fridge. This will help keep the flavors bright and the texture crisp. Avoid leaving coleslaw out at room temperature for long. It can spoil quickly. You can freeze coleslaw, but it may change texture. To freeze, place it in a freezer-safe bag. Remove as much air as possible before sealing. When you thaw it, the cabbage may become soft. It still tastes great, but the crunch might be lost. For best results, only freeze coleslaw without dressing. Dress it after thawing for better texture. Coleslaw lasts about 3 to 5 days in the fridge. After that, it may start to lose flavor and freshness. Always check for signs of spoilage, like a sour smell or slimy texture. If you see these signs, it’s best to throw it away. Enjoy your zesty Mexican coleslaw fresh for the best taste! For the full recipe, check the section above. You can use vegan mayonnaise or plain yogurt. Both options give a nice creamy texture. Vegan mayo works well for a dairy-free option. Yogurt adds a tangy flavor and keeps it light. Yes, you can make coleslaw a day in advance. This helps the flavors blend together better. Just keep it covered in the fridge. It stays fresh for up to two days. Great side dishes include grilled chicken or fish. Tacos or burritos also pair nicely. You can try it with beans or rice for a complete meal. Add more veggies like bell peppers or radishes. Red, yellow, or orange bell peppers add bright colors. You can also sprinkle in some purple carrots for extra flair. In this blog post, I covered how to make a delicious coleslaw using fresh veggies and a zesty dressing. You learned how to prepare, mix, and customize your coleslaw. I also shared tips for storage and even added fun variations. Whether you stick to the classic or explore new flavors, coleslaw is a versatile dish. Enjoy experimenting and sharing it with friends and family. Your culinary skills will shine through every crunchy bite.

If you’re craving a fresh and zesty side dish, you’ll love this Easy Mexican Coleslaw. This vibrant recipe combines crunchy vegetables with a creamy, tangy dressing, perfect for any meal. …

Read more

Categories Salads

Grinder Pasta Salad Simple and Fresh Delight

May 30, 2025 by Chef Elliot
- 2 cups rotini pasta - 1/2 cup salami, diced - 1/2 cup provolone cheese, diced - 1/2 cup cherry tomatoes, halved - 1/2 cup black olives, sliced - 1/4 cup red onion, minced - 1/4 cup pepperoncini peppers, sliced - 2 tablespoons fresh parsley, chopped - 1/4 cup extra virgin olive oil - 2 tablespoons red wine vinegar - 1 teaspoon dried Italian herb blend - Salt and freshly ground black pepper to taste - Choosing high-quality pasta: Look for pasta made from durum wheat for the best texture. - Freshness of vegetables: Use bright, crisp vegetables for a vibrant salad. - Substituting ingredients based on dietary preferences: Feel free to swap salami for turkey or omit cheese for a vegan option. The right ingredients make all the difference in this recipe. Fresh flavors shine in every bite. For the complete recipe, check the section on step-by-step instructions. - Start by boiling water in a large pot. - Add a good amount of salt to the water. - Once boiling, add the rotini pasta. - Cook it according to the package instructions until it is al dente. - Drain the pasta in a colander. - Rinse it under cool water to stop the cooking. - Set the pasta aside to cool completely. - In a big mixing bowl, combine diced salami and provolone cheese. - Add halved cherry tomatoes and sliced black olives. - Mix in minced red onion and sliced pepperoncini peppers. - Don’t forget the finely chopped parsley! - Stir the mixture gently for an even distribution. - Take a small bowl and whisk together olive oil and vinegar. - Add dried Italian herbs, salt, and black pepper. - Mix until well combined for a balanced flavor. - Add the cooled pasta to the bowl with the salami and veggies. - Drizzle the dressing over the pasta salad. - Toss everything together to coat well. - Taste and adjust seasoning with salt, pepper, or vinegar. - Cover the bowl and refrigerate for at least 30 minutes. - This helps all the flavors blend nicely. Enjoy this vibrant and delicious Grinder Pasta Salad! For the complete recipe, check out the Full Recipe section. To make your grinder pasta salad stand out, think about how you serve it. Here are some fun ideas: - Use chilled bowls or a colorful platter for serving. - Add extra fresh parsley for a bright touch. - Place whole pepperoncini peppers on top for color. These small details will impress your guests and make the dish more appealing. Want to kick up the flavor? Here are some ideas: - Add diced bell peppers for crunch and color. - Toss in some fresh basil or oregano for extra aroma. - A sprinkle of red pepper flakes can add a nice kick. Play around with seasonings to find your favorite mix. Remember, the more you experiment, the more you learn what you love. Making pasta salad is easy, but there are a few things to watch for: - Overcooking the pasta: This can lead to mushy pasta. Cook until al dente for the best texture. - Under-mixing the ingredients: Make sure everything is well combined. This ensures each bite is full of flavor. Avoid these mistakes, and you'll create a tasty salad every time. For the full recipe, check out the detailed instructions above. {{image_4}} You can enjoy this salad without meat. Replace salami with diced tofu or chickpeas. For cheese, try using mozzarella or a vegan cheese option. Adding extra vegetables brightens the salad. Think bell peppers, cucumbers, or spinach. These add color and crunch, making the dish fun to eat. To make this salad gluten-free, swap rotini pasta for gluten-free pasta. Look for options made from rice or quinoa. You can still enjoy the dressing by using gluten-free vinegar. Make sure to check labels to avoid gluten. This way, everyone can savor the salad without worries. To add an Italian flair, mix in fresh basil or oregano. These herbs boost the flavor, making it more aromatic. For a Mediterranean twist, consider adding feta cheese or artichoke hearts. You can also drizzle some lemon juice for a zesty kick. These small changes can elevate your grinder pasta salad. To keep your grinder pasta salad fresh, store it in the fridge. Use an airtight container. This helps keep the flavors and textures intact. Your salad will stay fresh for about three days. After that, it may start to lose its crunch and flavor. Can you freeze grinder pasta salad? I recommend against freezing it. The pasta and vegetables can become mushy when thawed. If you must freeze it, place it in a freezer-safe container. Use it within a month for the best taste. To thaw, move it to the fridge overnight. You can serve grinder pasta salad chilled or reheated. Chilled is best for keeping the fresh flavors. If you want to reheat, do so gently in the microwave. Heat in short bursts to avoid overcooking. This way, you maintain the taste and texture. Enjoy this dish however you like! For the full recipe, check out the recipe section above. To keep your pasta salad fresh, dress it just before serving. If you prepare it ahead of time, store the dressing and salad separately. This keeps the pasta from soaking up too much liquid. Use a good quality olive oil and vinegar. An oil-based dressing works best. Yes, you can make grinder pasta salad a day ahead! Just follow these steps for best results. Prepare the salad but leave out the dressing. Store the salad in an airtight container in the fridge. Add the dressing right before serving. This way, the flavors stay bright and fresh. If you need a substitute for provolone cheese, try mozzarella or fontina. Both have a mild flavor and good melting qualities. You can also use a sharp cheddar for a bolder taste. Just be sure to cut it into small pieces for balance in the salad. For the full recipe, check out the detailed preparation steps! This grinder pasta salad combines pasta, meats, cheese, and veggies for a tasty dish. We covered each ingredient, from rotini to olives, and didn't forget the dressing. I shared tips for choosing fresh items and avoiding common mistakes. You can adapt this salad for different diets or flavors, too. In the end, this salad is easy to make and fun to enjoy. Whether for a potluck or a family meal, it will please everyone. Enjoy your creation!

Ready to savor a burst of flavor in every bite? My Grinder Pasta Salad is a simple and fresh delight, perfect for any occasion. Packed with rotini, salami, olives, and …

Read more

Categories Salads

Crispy Cinnamon-Sugar Air Fryer Banana Chips Delight

May 30, 2025 by Chef Elliot
- 3 ripe bananas - 1 tablespoon ground cinnamon - 2 tablespoons granulated sugar - 1 tablespoon fresh lemon juice - A pinch of sea salt Nutritional value of bananas Bananas are packed with potassium. They help your heart and muscles. They also provide fiber, which aids digestion. Role of cinnamon in flavor and health Cinnamon adds a warm, sweet flavor. It can also help lower blood sugar levels. This spice is full of antioxidants that fight inflammation. Importance of lemon juice for freshness Lemon juice brightens the taste of bananas. It prevents them from browning. This keeps your chips looking and tasting fresh. 1. Peeling and slicing bananas: First, take your ripe bananas. Peel them gently and slice them into thin rounds, about 1/8 inch thick. This thickness helps them cook evenly and get that perfect crunch. 2. Mixing cinnamon-sugar blend: In a small bowl, mix 1 tablespoon of ground cinnamon, 2 tablespoons of granulated sugar, and a pinch of sea salt. Stir well until blended. This blend gives your chips that sweet and spicy kick. 1. Preheating the air fryer: Preheat your air fryer to 350°F (175°C) for three minutes. This step ensures your banana chips fry perfectly right from the start. 2. Arranging banana slices in the basket: Place the banana slices in a single layer in the air fryer basket. Make sure to leave space between each slice for proper air circulation. If needed, work in batches. 3. Time and shake technique for air frying: Air fry the banana slices for 10 to 12 minutes. Halfway through, shake the basket gently. This helps them fry evenly. Keep an eye on them toward the end to avoid burning. 1. Importance of wire rack cooling: After cooking, carefully take out the chips and place them on a wire rack. This cooling method helps them crisp up even more. 2. Storing tips for freshness: Once cooled, store your banana chips in an airtight container at room temperature. This keeps them fresh and crispy for longer. For the full recipe, you can refer to the detailed instructions above. Enjoy your tasty snack! To make crispy banana chips, slicing is key. Slice the bananas into thin rounds, about 1/8 inch thick. This helps them cook evenly. If your slices are too thick, they may end up chewy instead of crunchy. Banana ripeness affects cooking time. Ripe bananas will take less time to cook than firmer ones. Start checking your chips after 8 minutes. If they look golden, they are ready. If not, give them a couple more minutes. Want to change the taste? Try using different sweeteners. You can replace granulated sugar with honey or maple syrup. Each option brings a unique flavor. For extra warmth, add a pinch of nutmeg. Vanilla extract can also enhance sweetness. Just a few drops will make a big difference. Feel free to experiment and find your favorite mix. For the full recipe, check out the details above! {{image_4}} You can take your crispy cinnamon-sugar air fryer banana chips to new heights. One fun option is to drizzle melted chocolate over the finished chips. This adds a rich and sweet layer that pairs perfectly with the cinnamon flavor. Simply melt your favorite chocolate and let it cool slightly before drizzling. Another great idea is to add nutty flavors. Try dipping the chips in almond or peanut butter. This adds creaminess and extra protein. You can also mix crushed nuts into the cinnamon-sugar blend for a crunchier texture. Bananas are fantastic, but you can swap them out for other fruits too. Apples and pears work well in the air fryer. Slice them thinly and follow the same steps. They will be just as crunchy and delicious. You can also create a fruit mix snack. Use a combination of bananas, apples, and pears. This gives you a colorful and tasty treat. Each fruit brings its own flavor, making it even more enjoyable. Try different mixes to find your favorite combination! For the full recipe, check out the details above. To keep your cinnamon-sugar air fryer banana chips fresh, use an airtight container. This helps prevent moisture from ruining their crunch. You can choose a glass jar or a plastic container with a tight seal. Make sure the chips are completely cool before sealing them. This step keeps the chips crispy longer. Store them at room temperature, away from direct sunlight. Avoid placing them in a humid area, like a kitchen near the stove. The right spot ensures they stay tasty and crunchy. These delicious banana chips can last up to two weeks if stored properly. Check for signs of spoilage before eating. If they feel soft or have an off smell, it’s best to toss them. Also, look for any discoloration. If the chips start to look dull or change color, they may not be fresh anymore. Keeping an eye on these details helps ensure you enjoy your snack at its best. For the full recipe, refer back to the main section. Yes, you can make banana chips in the oven. Slice the bananas thinly as before. Then, place them on a baking sheet lined with parchment paper. Set your oven to 200°F (93°C). Bake the banana slices for about 2 hours. Flip them halfway for even cooking. This method gives you crispy chips, but it takes longer than the air fryer. These banana chips are a healthier snack option. A serving contains about 150 calories. Bananas provide potassium and vitamins. The cinnamon adds flavor without extra calories. Just be mindful of the sugar added. You can reduce the sugar for a lighter version. To stop browning, use fresh lemon juice. After slicing, toss the banana pieces in the lemon juice. This helps keep their bright color and fresh taste. The acidity in lemon juice slows down oxidation. You can also use lime juice for a different flavor. Yes, you can freeze banana chips. First, let them cool completely. Then, place them in a single layer on a baking sheet. Freeze until solid, about 1-2 hours. After that, transfer them to an airtight bag. They’ll last for up to 3 months. To enjoy, thaw them at room temperature. This blog post explored how to make delicious banana chips. We covered key ingredients like ripe bananas and cinnamon, highlighting their health benefits. I shared easy steps for preparation and cooking, with tips for a crunchy texture. You learned how to store your chips for long-lasting freshness and explored flavor variations. Lastly, I answered common questions about alternative methods and storage. In making these banana chips, you gain a tasty snack and nutritious boost. Enjoy experimenting with flavors and sharing your crunchy treats!

Are you craving a crunchy snack that’s both tasty and healthy? Look no further! In this post, I’ll share my simple recipe for Crispy Cinnamon-Sugar Air Fryer Banana Chips. With …

Read more

Categories Desserts

Strawberry Brownies Recipe Simple and Delicious Treat

May 30, 2025 by Chef Elliot
To make these tasty strawberry brownies, you will need: - 1 cup unsalted butter, melted - 1 cup granulated sugar - 3 large eggs - 1 teaspoon vanilla extract - 1 cup all-purpose flour - 1/2 cup unsweetened cocoa powder - 1/2 teaspoon baking powder - 1/4 teaspoon salt - 1 cup fresh strawberries, pureed - 1/2 cup fresh strawberries, diced (for topping) - 1/2 cup dark chocolate chips (optional) You can add a few fun ingredients to boost flavor: - A pinch of cinnamon for warmth - A splash of almond extract for a nutty twist - Chopped nuts for crunch If you need to swap out any ingredients, here are some ideas: - Use coconut oil instead of butter for a dairy-free option. - Replace granulated sugar with brown sugar for a richer taste. - Use whole wheat flour instead of all-purpose flour for a healthier option. - If you don’t have fresh strawberries, frozen strawberries work too, just thaw and drain them first. These simple swaps can help you customize the recipe to fit your needs! For the full recipe, check out the detailed instructions. Start by prepping your oven and pan. Preheat your oven to 350°F (175°C). Take a 9x9-inch baking pan and grease it well. You can also line it with parchment paper for easy removal later. In a large bowl, mix the melted butter and granulated sugar. Stir until it's smooth. Add three large eggs, one at a time, mixing well after each. Then, pour in one teaspoon of vanilla extract. In a separate bowl, whisk together one cup of flour, half a cup of cocoa powder, half a teaspoon of baking powder, and a quarter teaspoon of salt. Slowly add this dry mix to the wet mix. Stir gently until just combined. Don't overmix; this keeps the brownies fudgy. Gently fold in one cup of pureed strawberries. If you want, you can add half a cup of dark chocolate chips for extra richness. Pour the batter into the prepared pan, spreading it evenly. Top with half a cup of diced strawberries, swirling them into the mix with a knife. Place the pan in the oven and bake for 25 to 30 minutes. Check for doneness by inserting a toothpick into the center; it should come out mostly clean. Once done, let the brownies cool before cutting them into squares. Enjoy this simple and delicious treat! For more details, see the Full Recipe. To get that rich, fudgy texture, follow a few key steps. First, use melted butter. The warm butter keeps your brownies moist. Next, combine the wet and dry ingredients gently. Overmixing can make them tough. Aim for a smooth batter, but don’t worry about lumps. The chocolate chips also add to the fudgy feel. Bake just until a toothpick shows some moist crumbs. This ensures your brownies stay soft and gooey. Swirling strawberries into your brownie mix creates a stunning effect. Start with pureed strawberries. Gently fold in the puree to avoid overmixing. After pouring the batter into the pan, add diced strawberries on top. Use a knife to swirl them in lightly. This method keeps the strawberries from sinking and gives a beautiful look. Having the right tools makes baking easier. Here’s what you’ll need: - 9x9-inch baking pan - Parchment paper (for easy removal) - Mixing bowls (one large, one small) - Whisk for dry ingredients - Spatula to spread the batter - Toothpick for testing doneness These tools will help you create perfect strawberry brownies every time! For the full recipe, check out the details above. {{image_4}} You can easily make vegan strawberry brownies. Just swap out the eggs and butter. Use flaxseed meal instead of eggs. Mix 1 tablespoon of flaxseed with 2.5 tablespoons of water. Let it sit for a few minutes until it thickens. For butter, use coconut oil or any plant-based butter. This keeps the brownies rich and moist. To make these brownies gluten-free, use almond flour or a gluten-free flour blend. Replace the all-purpose flour with the same amount of your chosen flour. Check the baking powder to ensure it’s gluten-free as well. The result is just as fudgy and delicious as the original recipe. You can mix in other fruits for fun flavors. Try adding raspberries or blueberries along with strawberries. They add color and a burst of taste. You can also include nuts like walnuts or pecans for crunch. For a twist, consider adding a hint of mint or orange zest. This can brighten the flavor and surprise your taste buds. Feel free to explore these variations and make the recipe your own. You can find the full recipe above to get started. To keep your brownies fresh, place them in an airtight container. You can layer the brownies with parchment paper to prevent sticking. Store them at room temperature for up to three days. For longer storage, consider refrigeration. This keeps them tasty for about a week. Remember to let them cool completely before storing. If you want to save some for later, freezing is a great option. Wrap each brownie in plastic wrap, then place them in a freezer-safe bag. This helps keep them moist and delicious. They can freeze well for up to three months. When you’re ready to enjoy, simply thaw them overnight in the fridge or at room temperature. To reheat brownies, I suggest using the microwave. Place a brownie on a plate and cover it with a damp paper towel. Heat it for about 10-15 seconds. This warms it up without drying it out. You can also use the oven; just preheat it to 350°F (175°C) and warm the brownies for about 5-10 minutes. Serve them warm for the best taste. If you’d like to elevate your treat, top them with whipped cream or ice cream. Enjoy your strawberry brownies from the [Full Recipe]! Yes, you can use frozen strawberries. Just make sure to thaw and drain them first. This keeps the batter from getting too wet. Frozen strawberries can add great flavor, but fresh ones offer better texture and color. To check if your brownies are done, insert a toothpick in the center. If it comes out mostly clean with a few moist crumbs, they are ready. This means the brownies have a fudgy texture, which is perfect. If the toothpick comes out wet, bake them a few more minutes. There are many tasty options! You can serve your brownies warm with whipped cream or a scoop of vanilla ice cream. Fresh strawberry slices on top add a nice touch. You can even drizzle chocolate sauce over them for extra indulgence. For a fun twist, try pairing them with a fresh fruit salad. You learned about the best ingredients for strawberry brownies. We covered how to mix them well and bake them right. You also discovered tips for perfect texture, storage, and fun variations like vegan and gluten-free options. Remember, making brownies can be fun and tasty. Use fresh ingredients for the best flavor. Don’t be afraid to try new things. Enjoy your baking and share your delicious brownies with others!

Craving something sweet and fruity? Try my easy strawberry brownies recipe that blends rich chocolate with fresh strawberries! This simple treat will impress dessert lovers and satisfy your taste buds. …

Read more

Categories Desserts

Sweet Chili Air Fryer Brussels Sprouts Crispy Treat

May 30, 2025 by Chef Elliot
- 1 pound Brussels sprouts, trimmed and halved - 2 tablespoons olive oil - 3 tablespoons sweet chili sauce - 1 tablespoon soy sauce (or tamari for gluten-free) - 1 teaspoon garlic powder - 1 teaspoon onion powder - Salt and pepper to taste - 1 tablespoon sesame seeds (optional for garnish) - Fresh cilantro, chopped (for garnish) I love using fresh Brussels sprouts for this recipe. They give a nice crunch and flavor. When selecting them, look for bright green and firm sprouts. Avoid any that are yellow or soft. The olive oil helps the sauce stick and gives a lovely richness. Sweet chili sauce adds a sweet and spicy kick that balances well with the earthy Brussels sprouts. For extra flavor, we use soy sauce, garlic powder, and onion powder. These ingredients enhance the taste without overpowering the dish. If you want to add a personal touch, consider using tamari for a gluten-free option. Finally, don’t skip the garnishes! Sesame seeds and fresh cilantro add a beautiful finish. The seeds bring a nutty crunch, while cilantro adds freshness. These ingredients elevate the dish and make it even more appealing. You can find the full recipe above to see how easy it is to make these crispy treats! First, preheat your air fryer to 375°F (190°C). This step is key for getting a nice crisp on the Brussels sprouts. In a large bowl, mix the halved Brussels sprouts with olive oil, sweet chili sauce, soy sauce, garlic powder, onion powder, and a pinch of salt and pepper. Use your hands or a spatula to toss them well. You want every sprout to shine with sauce. Next, place the seasoned Brussels sprouts in your air fryer basket. Make sure they are in a single layer. If your basket is small, work in batches. This helps them cook evenly and become perfectly crispy. Air fry the Brussels sprouts for 15-18 minutes. Halfway through, shake the basket gently. This movement helps them fry evenly. Look for a golden brown color; that’s your sign they are ready! Once cooked, carefully remove the basket from the air fryer. Transfer the Brussels sprouts to a serving dish. Enjoy the wonderful aroma as they cool slightly. For an extra burst of flavor, drizzle more sweet chili sauce on top. Sprinkle sesame seeds and fresh chopped cilantro for a colorful finish. Serve these bites warm and watch them disappear! For the full recipe details, check out the [Full Recipe]. To cook Brussels sprouts evenly, cut them in half. This helps them cook faster. Toss them well in the sauce. Make sure each sprout is coated. When placing them in the air fryer, avoid stacking. A single layer cooks best. If your air fryer is small, cook in batches. This keeps the heat consistent and gives the best results. For crispy Brussels sprouts, preheat your air fryer to 375°F (190°C). The right temperature is key! Use a little olive oil to coat the sprouts. This adds flavor and helps them crisp up. Halfway through cooking, shake the basket gently. This ensures they fry on all sides. Cook for 15-18 minutes until golden brown. If you want them crispier, add a few extra minutes. These sweet chili Brussels sprouts go well with many meals. They pair nicely with grilled chicken or shrimp. Try them with rice or quinoa for a healthy side. They also complement Asian-inspired dishes like stir-fries. You can even serve them as a snack with extra sweet chili sauce on the side. They are versatile and delicious! For the full recipe, check the details above. {{image_4}} You can switch up the sweet chili sauce for a new flavor. Try teriyaki sauce for a sweet and savory twist. Another option is garlic butter sauce for a rich taste. If you like tang, use balsamic glaze. Each sauce changes the dish, making it fun to explore new tastes! Brussels sprouts are great, but adding more veggies can make it even better. Try adding sliced bell peppers for color and crunch. You can also toss in some carrots or zucchini for added nutrition. Mixing these veggies will give you a colorful plate and a variety of flavors. If you love spice, add some heat to your Brussels sprouts! Mix in a teaspoon of red pepper flakes for a kick. You can also drizzle sriracha or hot sauce on top after cooking. This extra heat will take your dish to the next level and excite your taste buds! For the full recipe, check out the Sweet Chili Air Fryer Brussels Sprouts 🥦 section above. To keep your Sweet Chili Air Fryer Brussels Sprouts fresh, place them in an airtight container. Make sure they cool completely before sealing. Store them in the fridge for up to three days. If you want to save them longer, you can freeze them. When you're ready to enjoy leftovers, there are a few great ways to reheat them. You can use the air fryer again to keep them crispy. Preheat your air fryer to 375°F (190°C). Cook for about 5 minutes. You can also use the oven. Spread them on a baking sheet and heat at 350°F (175°C) for 10-12 minutes. For a quick option, you can microwave them for one to two minutes, but they won't be as crispy. If you choose to freeze your Brussels sprouts, let them cool first. Spread them out on a baking sheet to freeze individually. Once frozen, transfer them to a freezer bag. They can last for up to three months. To defrost, simply move them to the fridge overnight before reheating. This will help keep their texture nice. Yes, you can use frozen Brussels sprouts. Just remember to thaw and drain them first. This helps remove extra moisture. Drying them ensures they crisp up nicely in the air fryer. To make these Brussels sprouts vegan, simply swap the sweet chili sauce. Look for a vegan-friendly brand. You can also check your soy sauce for any animal products. This small change keeps your dish tasty and plant-based. Brussels sprouts are packed with nutrients. They are high in vitamins C and K. These tiny veggies also offer fiber, which aids digestion. Eating them can support your immune system and bone health, making them a smart choice for meals. To create a low-carb version, focus on the sauce. Use a low-sugar sweet chili sauce or make your own using natural sweeteners. Cut back on the soy sauce as well. This keeps the carbs down while still giving you great flavor. These Brussels sprouts pair well with many dishes. Serve them with grilled chicken or fish for a balanced meal. You can also enjoy them alongside rice or quinoa for extra texture. They are great as a side to any main dish, adding crunch and flavor. Check out the full recipe for more ideas! This blog post covers how to create delicious Sweet Chili Air Fryer Brussels Sprouts. You learned about key ingredients, like Brussels sprouts and sweet chili sauce. I showed you step-by-step instructions for cooking them to crispy perfection. We also discussed tips for even cooking and variations to suit your taste. You can store leftovers or reheat them easily. In summary, these sprouts are a tasty dish that can fit many meals. Enjoy making this recipe and explore different flavors!

Looking for a quick, tasty side dish that packs a punch? You’ve come to the right place! These Sweet Chili Air Fryer Brussels Sprouts are simple to make, full of …

Read more

Categories Appetizers

Cheesecake Fruit Salad Delightful and Refreshing Treat

May 30, 2025 by Chef Elliot
- 1 cup cream cheese, softened - 1/2 cup thick Greek yogurt - 1/4 cup powdered sugar - 1 tablespoon pure vanilla extract - 2 cups mixed berries (strawberries, blueberries, raspberries) - 1 ripe banana, sliced - 1 cup fresh pineapple, diced - 1 cup kiwi, chopped - 1/4 cup crushed graham crackers - Fresh mint leaves for garnish To craft a delightful cheesecake fruit salad, you need specific key ingredients. First, the cream cheese gives that rich, creamy base. It needs to be softened, so it mixes well. Next, thick Greek yogurt adds a nice tang and smooth texture. The powdered sugar sweetens the mix just enough. Pure vanilla extract brings in a lovely aroma. Then, you have the fruits! A mix of berries makes it colorful and fresh. Strawberries, blueberries, and raspberries work great together. A ripe banana adds sweetness and creaminess. Fresh pineapple gives a burst of tropical flavor, while kiwi adds a pop of color and zing. Finally, crushed graham crackers mimic the cheesecake crust, adding a delightful crunch. Fresh mint leaves not only look pretty but also give a refreshing taste. You can find the full recipe at the beginning of the article to guide you through the process of making this tasty treat! - Beat cream cheese until smooth. - Add Greek yogurt, powdered sugar, and vanilla. First, grab a large bowl. Use an electric mixer to beat the cream cheese. Make sure it gets very smooth for the best texture. Then, add the Greek yogurt. This will give your salad a nice creaminess. Next, sift in the powdered sugar and pour in the vanilla. Mix everything well until you have a smooth and creamy blend. - Slice the banana and chop the kiwi. - Portion out mixed berries and pineapple. Now it's time for the fruit! Take a ripe banana and slice it into thin rounds. The banana adds a lovely sweetness. Next, peel and chop the kiwi into small pieces. It adds a fresh, tangy flavor. Don’t forget to grab your mixed berries and diced pineapple. These fruits bring color and taste. Use ripe fruit for the best flavor! - Fold fruit into cream cheese mixture. - Portion into serving bowls. Gently fold the fruit into the cream cheese mixture. Use a spatula and be careful not to crush the berries. You want them whole for a juicy bite. Once everything is mixed, use a spoon to serve the fruit salad into individual bowls. This makes it look pretty and inviting. - Sprinkle crushed graham crackers on top. - Garnish with mint leaves. To finish, sprinkle a layer of crushed graham crackers over each serving. This adds a nice crunch, just like a cheesecake crust. For the final touch, add fresh mint leaves on top. They give a pop of color and a fresh smell. It's all about making your dessert look appealing and taste amazing! To achieve the best texture, always use room temperature cream cheese. Cold cream cheese can give your salad lumps. Mix it well until it’s smooth and creamy. If you want a lighter touch, adjust the amount of Greek yogurt. A bit more yogurt will make it creamier, while less will keep it thick. Fresh fruits are key to great flavor. Always pick ripe fruits for your salad. Ripe fruits taste sweeter and add a nice burst to each bite. Be sure to wash your berries thoroughly before use. This step removes dirt and ensures that your fruit salad is clean and safe to eat. Presentation counts! Use clear glass bowls to display the colorful layers of your salad. The vibrant fruits will stand out beautifully. For an elegant finish, add some decorative garnishes. Fresh mint leaves or a sprinkle of edible flowers can elevate your dish. It makes your cheesecake fruit salad look as good as it tastes. {{image_4}} You can easily change up the fruits in your cheesecake fruit salad. Try using mango, apple, or peaches for a twist. These fruits add unique flavors that make each bite special. If you want a little zing, add a splash of citrus juice. Lemon or lime juice will brighten the whole dish and make the flavors pop. If you need gluten-free options, use crushed nuts instead of graham crackers. Almonds or pecans work well and add a nice crunch. For a vegan version, swap in dairy-free cream cheese. This way, everyone can enjoy this tasty treat, no matter their dietary needs. When winter comes, think about adding pomegranate seeds. They give a lovely color and burst of flavor. In summer, incorporate stone fruits like peaches or cherries. These fruits will make your salad bright and refreshing on hot days. Enjoying seasonal fruits makes this salad even better! To keep your cheesecake fruit salad fresh, store leftovers in airtight containers. This helps maintain the creamy texture and fruity flavor. I recommend enjoying it within two days for the best taste. After that, the fruit may become mushy, and the mixture can lose its appeal. Can cheesecake fruit salad be frozen? No, I do not recommend freezing it. The cream cheese mixture and fruit do not hold up well in the freezer. If you want to freeze components, consider freezing only the fruit. Slice the bananas, chop the kiwi, and prepare mixed berries. Store them in airtight bags, removing as much air as possible. This way, you can enjoy fresh fruit later, but make sure to thaw them before mixing them back into the salad. Cheesecake fruit salad is a fun twist on classic cheesecake. It combines creamy cheesecake flavors with fresh fruit. This dish is colorful and appealing, making it perfect for any gathering. You get the rich taste of cheesecake without the crust. It’s light, refreshing, and just right for warm days. The mix of fruits adds natural sweetness. This recipe is simple and quick to make, too. You can enjoy it as a dessert or snack! Yes, you can prepare cheesecake fruit salad in advance. I suggest making it a few hours before your event. This allows the flavors to blend nicely. However, do not add the crushed graham crackers until right before serving. This keeps them crunchy and tasty. Store the salad in the fridge covered with plastic wrap. It will stay fresh and ready to impress your guests! Cheesecake fruit salad lasts about two days in the fridge. After that, the fruit may start to lose its freshness. To keep it tasty, always store it in an airtight container. If you notice any browning on the banana or kiwi, it’s time to toss it out. Freshness is key for the best flavor and texture! You can use many fruits in cheesecake fruit salad! Some of my top picks include: - Strawberries - Blueberries - Raspberries - Bananas - Pineapples - Kiwis Feel free to mix and match based on what you like. You can also try seasonal fruits like peaches or mangoes. The goal is to have a mix of sweet and tart flavors for a balanced taste. This cheesecake fruit salad combines creamy goodness with fresh fruit for a treat. We covered key ingredients, step-by-step instructions, and helpful tips to make it shine. Remember to use fresh, ripe fruits for the best flavor and store any leftovers well. Variations can keep your salad exciting, allowing for seasonal fruits or dietary needs. Enjoy creating a delightful dish that everyone will love! Your efforts will surely impress at any gathering!

Looking for a sweet and refreshing treat that’s easy to make? You’ll love this Cheesecake Fruit Salad! It combines cream cheese, fresh fruit, and a little crunch from graham crackers. …

Read more

Categories Desserts

Mexican Macaroni Salad Flavorful and Simple Recipe

May 30, 2025 by Chef Elliot
To make a tasty Mexican macaroni salad, you need some key ingredients. Here’s what you will need: - 2 cups elbow macaroni - 1 cup cherry tomatoes, halved - 1 cup corn (fresh, frozen, or canned) - 1/2 cup red bell pepper, diced - 1/2 cup red onion, finely chopped - 1/2 cup black olives, sliced - 1 cup shredded cheese (sharp cheddar or a Mexican cheese blend) - 1/4 cup fresh cilantro, chopped - 1/2 cup mayonnaise - 1 tablespoon lime juice - 1 tablespoon taco seasoning - Salt and pepper to taste These ingredients give the salad great taste and texture. The combination of creamy, crunchy, and fresh elements makes it special. Want to add more flavor? You can try these optional ingredients: - Diced jalapeños for some heat - Avocado for creaminess - Chopped green onions for extra freshness Adding any of these will enhance the taste and make it your own. Choosing the right brands can make a difference. Here are some recommendations: - Elbow macaroni: Barilla or Ronzoni - Mayonnaise: Hellmann's or Duke's - Cheese: Tillamook sharp cheddar or a Mexican cheese blend from Sargento These brands offer good quality and taste. Using them helps make your Mexican macaroni salad delicious. For the full recipe, check the details above! To start, bring a large pot of salted water to a boil. Add 2 cups of elbow macaroni. Cook for about 7 to 9 minutes. You want the pasta to be al dente, which means it should be firm to the bite. Once cooked, drain the macaroni. Rinse it under cold water to stop the cooking. This step keeps the pasta from getting mushy. In a large bowl, mix the cooled macaroni with the vegetables. Add 1 cup of halved cherry tomatoes, 1 cup of corn, 1/2 cup of diced red bell pepper, and 1/2 cup of finely chopped red onion. Then, toss in 1/2 cup of sliced black olives and 1 cup of shredded cheese. Make sure everything is well mixed. This helps the flavors blend nicely. In a small bowl, whisk together 1/2 cup of mayonnaise, 1 tablespoon of lime juice, and 1 tablespoon of taco seasoning. Add a pinch of salt and pepper to taste. Mix until the dressing is smooth and creamy. This dressing is key to making your salad rich and flavorful. Pour the dressing over the pasta and veggies. Use a spatula to gently mix everything together. Finally, fold in 1/4 cup of chopped cilantro for that fresh taste. For the full recipe, check out the details above. To get the best texture, cook the pasta until it's al dente. This means it should be firm but not hard. After cooking, rinse it in cold water. This stops the cooking and cools it down. For flavor, use fresh ingredients. Fresh cilantro adds brightness. Also, lime juice gives a zesty kick that pairs well with the other flavors. Don't forget to taste while mixing. Adjust salt and pepper according to your liking. You can add your favorite ingredients to make this salad your own. Want more crunch? Add diced cucumber or chopped radishes. Like it spicy? Toss in some diced jalapeños. For a smoky flavor, consider adding cooked bacon bits. You can also switch the corn for black beans for a protein boost. The key is to keep the balance of flavors. Mix and match until you find your perfect blend! The cheese you choose can change the whole dish. I love sharp cheddar because it adds a nice bite. A Mexican cheese blend brings a creamy texture and more flavor. Make sure the cheese is shredded for easy mixing. If you want a twist, try crumbled queso fresco. It adds a delightful creaminess. Whichever cheese you select, let it be fresh and flavorful for the best result. For the full recipe, check out the detailed instructions above. {{image_4}} Adding avocado to your Mexican macaroni salad gives a rich, creamy touch. The smooth texture of ripe avocado blends perfectly with the other ingredients. Simply dice one or two avocados and fold them in gently before serving. This addition not only boosts flavor but also adds healthy fats. Plus, it makes the salad even more filling! Black beans are a great way to add protein and fiber to your salad. They bring a nice contrast in color and texture, making your dish even more appealing. Just rinse one can of black beans and mix them into the salad. This small change makes your meal more nutritious and satisfying. You’ll love how it enhances the overall taste! While the creamy dressing is delicious, you can switch it up for fun! Try a lime vinaigrette or a spicy yogurt dressing for a lighter option. For a zesty twist, mix Greek yogurt with lime juice and a touch of cumin. Experimenting with dressings lets you tailor the flavor to your liking. Feel free to get creative and find what excites your taste buds! For the full recipe, check out the detailed instructions mentioned earlier. To store leftover Mexican macaroni salad, place it in an airtight container. Make sure the lid seals tightly. This keeps the salad fresh for up to three days. Always cool the salad in the fridge before sealing. Avoid letting it sit out at room temperature for too long. This helps prevent bacteria growth. When prepping this salad, consider making a larger batch. Store it in separate containers for easy grab-and-go meals. You can keep the dressing separate until you're ready to eat. This keeps the pasta from getting soggy. Prepare the salad a day before serving for the best flavor. Freezing this salad is not ideal. The texture of the pasta and veggies may change after thawing. If you need to freeze it, try freezing just the pasta. Store it in a freezer bag. When you’re ready, cook fresh veggies and mix them with the thawed pasta. This way, you’ll maintain a nice crunch and fresh taste. For the full recipe, check the previous section. Yes, you can easily make this salad vegan. Just swap the mayonnaise for a vegan mayo. Use vegan cheese or leave it out entirely. You can also add extra veggies for flavor and texture. Try using avocado for creaminess. Mexican macaroni salad can last about 3 to 5 days in the fridge. Store it in an airtight container. The flavors will meld over time, making it taste even better. Just check for any off smells or changes in texture before serving. Absolutely! You can use any pasta you like. Try penne, rotini, or even whole wheat pasta. Just make sure to cook it according to the package directions. Each type will bring a unique flavor and texture to your salad. In this blog post, we explored the key ingredients for Mexican macaroni salad and how to cook the pasta just right. We discussed ways to combine flavors, create a creamy dressing, and customize your salad with extra ingredients. I shared tips for perfect texture and storage options to enjoy later. Mexican macaroni salad is versatile and easy to make. Whether you stick to the basics or try new variations, your salad will shine. Enjoy creating your own delicious version!

Are you ready to spice up your picnic or potluck? This Mexican Macaroni Salad recipe is vibrant, easy to make, and packed with flavor. You’ll find bold ingredients that turn …

Read more

Categories Salads

Marinated Cucumbers, Onions, and Tomatoes Delight

May 30, 2025 by Chef Elliot
When I make marinated cucumbers, onions, and tomatoes, I focus on fresh and vibrant ingredients. Each element plays a key role in creating a delightful dish. Here’s what you need: - 2 large cucumbers, thinly sliced - 2 medium ripe tomatoes, diced - 1 large red onion, thinly sliced - 1/4 cup apple cider vinegar - 2 tablespoons extra-virgin olive oil - 1 tablespoon honey (or agave syrup for a vegan option) - 1 teaspoon granulated garlic - 1 teaspoon dried oregano - Sea salt - Freshly cracked black pepper - Fresh parsley for garnish These ingredients are not just tasty; they are also simple to find. The fresh produce gives the dish its crunch and sweetness. The flavor enhancers bring a zesty kick that makes the salad special. Each seasoning item adds depth, making every bite a joy. For the full recipe, check out the details above. First, grab your fresh produce. You will need two large cucumbers. Slice them thinly. This helps them soak up the marinade. Next, take one large red onion. Slice it thin, just like the cucumbers. Then, take two medium ripe tomatoes. Dice them into small pieces. Keep the sizes even for a great bite. Now, let’s make the dressing. In a small bowl, add 1/4 cup of apple cider vinegar. Then, pour in 2 tablespoons of extra-virgin olive oil. Next, add 1 tablespoon of honey or agave syrup. This gives it a sweet touch. Add 1 teaspoon of granulated garlic and 1 teaspoon of dried oregano. Finally, sprinkle in some sea salt and freshly cracked black pepper. Whisk all these together until they blend well. This makes a nice, smooth dressing. In a large bowl, toss the sliced cucumbers, tomatoes, and onions. Drizzle the dressing over the veggies. With a pair of salad tongs, gently toss everything together. Make sure every piece gets coated in the dressing. Cover the bowl with plastic wrap or transfer it to an airtight container. Refrigerate for at least 30 minutes. This chilling time lets the flavors blend beautifully. When you're ready to serve, give it another gentle toss. Add some freshly chopped parsley on top for color. For the complete recipe, check the Full Recipe section. To adjust the acidity, you can add more apple cider vinegar. If you want it sweeter, just add a bit more honey. For spice, try adding red pepper flakes or diced jalapeños. A hint of fresh ginger can also add a nice kick. These small changes can make your dish unique and tasty. Even slicing is key for this salad. When you slice your cucumbers and onions evenly, every bite tastes the same. This makes a big difference. Chilling your salad for at least 30 minutes allows the flavors to blend well. It also makes the veggies crisp and refreshing. A large, shallow dish is perfect for serving this salad. It shows off the bright colors of the veggies. You can also use individual bowls for a nice touch. For garnishing, sprinkle fresh parsley on top. This adds color and makes the dish look fancy. {{image_4}} If you want to switch things up, try different veggies. For example, zucchini can replace cucumbers. You can also use cherry tomatoes instead of ripe tomatoes. They add a sweet burst of flavor. Bell peppers add crunch and color. Avocado brings creaminess, making the dish richer. You can make this dish vegan-friendly by swapping honey for agave syrup. This keeps the sweet taste while keeping it plant-based. If you're watching your sodium, use low-sodium soy sauce instead of salt. This will help keep the flavor without too much salt. Change the flavor profile with herbs from Italy. Add basil and thyme for a fresh twist. For a Mediterranean touch, use fresh dill and lemon juice. These changes will brighten the dish and add new layers of flavor. Don’t hesitate to experiment; that’s where the fun begins! To keep your marinated cucumbers, onions, and tomatoes fresh, use an airtight container. This helps keep air out and flavors in. I recommend glass containers. They don't stain and keep the food crisp. Always place the marinated veggies in the fridge right after preparing them. This cool temperature slows down spoilage. When stored properly in the fridge, your dish lasts about 3 to 5 days. Check for signs before eating. If the vegetables look mushy or smell sour, it's time to toss them. Fresh veggies should stay bright and crisp, so keep an eye on them. You can prepare these marinated veggies a day ahead. Just store them as mentioned above. The flavors get better as they sit. You can also reuse marinated veggies in salads, sandwiches, or wraps. They add a nice crunch and flavor boost to many dishes. For a quick meal, toss them into a grain bowl or serve them as a side. Marinate cucumbers, onions, and tomatoes for at least 30 minutes. This chilling time is key. It allows the flavors to blend and develop. If you can, let them sit longer. An hour or more will enhance the taste even more. The cold also makes the dish refreshing. Yes, you can use other kinds of vinegar. Each type adds its own flavor twist. For a milder taste, try rice vinegar. For a tangy kick, use balsamic vinegar. Experiment with white wine vinegar for a more subtle note. Adjust the amount to suit your taste. These marinated veggies pair well with many dishes. Serve them with grilled chicken, fish, or tofu for protein. They also make a great side with sandwiches or burgers. You can add them to a salad for more crunch. Enjoy them any way you like! In this blog post, we explored how to create a tasty marinated veggie dish. We covered fresh produce, flavor enhancers, and seasoning items. You learned how to prepare the vegetables, make the marinade, and combine everything for the best taste. Be sure to try the tips for flavor and texture. Remember, you can swap ingredients or adjust for dietary needs. With proper storage, your dish will stay fresh. Enjoy mastering this simple recipe that adds great flavor to any meal!

Looking for a vibrant and refreshing dish that brightens your meals? Marinated Cucumbers, Onions, and Tomatoes Delight is just what you need! With crisp cucumbers, juicy tomatoes, and sharp red …

Read more

Categories Salads
Older posts
Newer posts
← Previous Page1 … Page5 Page6 Page7 … Page15 Next →

TOSSED TASTES

Where flavors get playful! A fresh mix of easy bites, bold spices, and everyday cravings tossed into every recipe. 🍋🍅

PAGES

Home About Contact Privacy Policy Terms & Conditions Cookie Policy GDPR Policy Copyright Policy Disclaimer

CATEGORIES

Appetizers Desserts Salads Breakfast Dinner

Contact

  • Pinterest
  • Mail
Copyright © 2025 Tossed Tastes. All rights reserved.