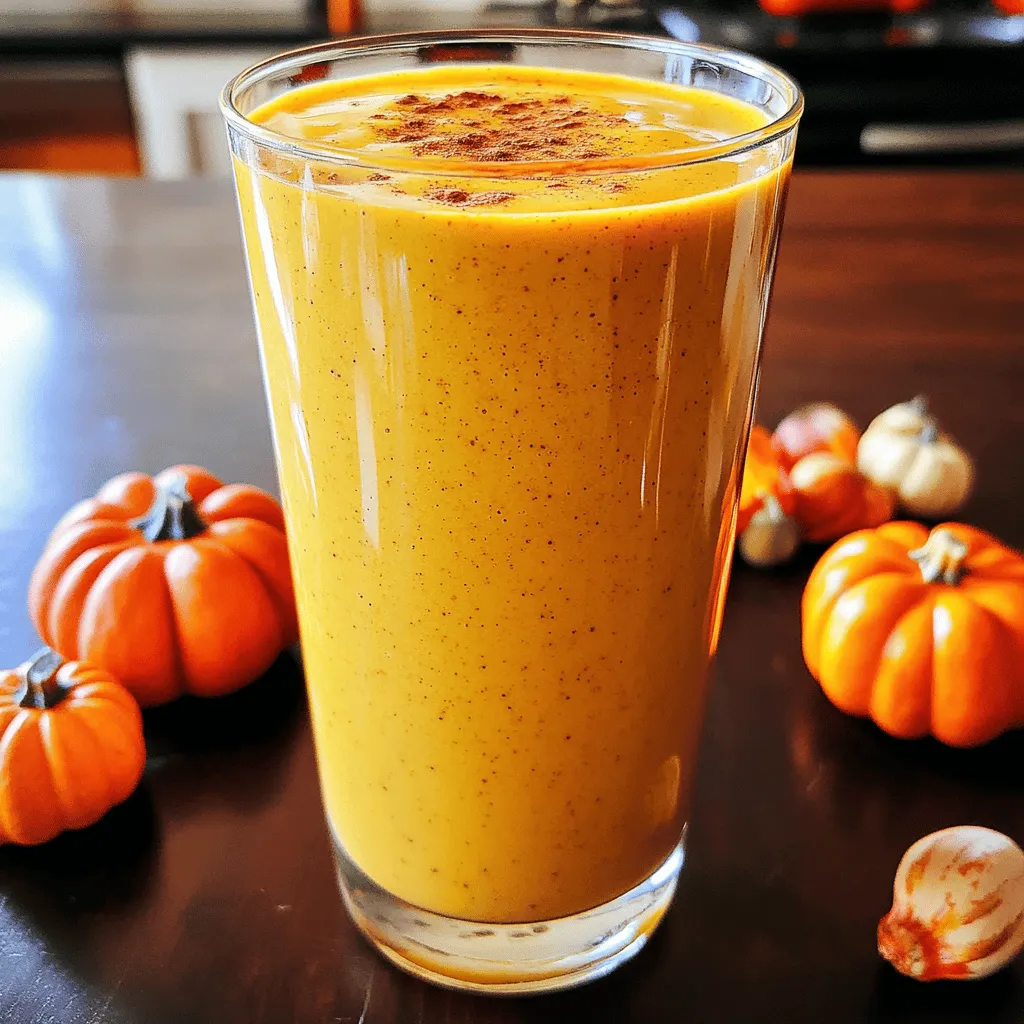
Skip to content
Tossed Tastes
  • Home
  • Appetizers
  • Desserts
  • Salads
  • Breakfast
  • Dinner
  • Privacy Policy
  • Contact
  • About

Chef Elliot

Grilled Shrimp Bowl with Asparagus & Creamy Garlic Sauce

May 28, 2025 by Chef Elliot
To make the Grilled Shrimp Bowl with Asparagus & Creamy Garlic Sauce, you will need some fresh and simple ingredients. Here’s what you will gather: - 1 lb large shrimp, peeled and deveined - 1 bunch asparagus, trimmed and cut into thirds - 2 tablespoons olive oil - 1 teaspoon smoked paprika - 1 teaspoon garlic powder - Salt and pepper to taste - 1/2 cup Greek yogurt - 2 cloves garlic, finely minced - 1 tablespoon fresh lemon juice - 1 tablespoon freshly chopped parsley Each ingredient plays an important role in this dish. The large shrimp give the bowl a nice protein boost. Asparagus adds a fresh crunch and color. Olive oil helps to enhance the flavors while grilling. The seasonings, such as smoked paprika and garlic powder, bring warmth and depth to the dish. The creamy garlic sauce, made from Greek yogurt, minced garlic, lemon juice, and parsley, adds a rich and zesty finish. It is a perfect complement to the grilled shrimp and asparagus. By using fresh ingredients, you make this meal not only delicious but also healthy. You can find the full recipe for detailed steps on how to prepare this bowl. Enjoy the vibrant flavors as you create this delightful dish! To start, you need to marinate the shrimp. In a medium bowl, mix together the shrimp, olive oil, smoked paprika, garlic powder, salt, and pepper. Toss the shrimp gently to coat them well. Let them sit for 15 minutes. This lets the flavors soak in. While the shrimp marinates, it’s time to prepare the asparagus. Boil a large pot of water. Add the asparagus pieces and blanch them for 2-3 minutes. They should be tender but still a bit crunchy. Once done, drain the asparagus. Quickly put them in a bowl of ice water. This stops the cooking and keeps their bright green color. Now, let's make the creamy garlic sauce. In a small bowl, mix Greek yogurt, minced garlic, lemon juice, a pinch of salt, and chopped parsley. Stir until smooth. Taste it and adjust the flavors if needed. Set the sauce aside for later. Next, preheat your grill or grill pan to medium-high heat. Thread the marinated shrimp onto skewers. Make sure they are close but not too crowded. Grill the shrimp for about 2-3 minutes on each side. They should turn pink and opaque when done. If you want to boost the flavor, sauté the asparagus. Heat a little olive oil in a pan over medium heat. Add the blanched asparagus and sauté for 2-3 minutes. This will add a nice char and sweetness. Finally, it’s time to assemble your bowl. In a large serving bowl, arrange a generous portion of grilled shrimp next to or on top of the asparagus. Drizzle the creamy garlic sauce over the shrimp or serve it in a small bowl on the side. For a beautiful finish, garnish with extra chopped parsley and a slice of lemon. For the full recipe, check out the detailed instructions above. Enjoy your delicious Grilled Shrimp Bowl with Asparagus & Creamy Garlic Sauce! When choosing shrimp, you have two main options: fresh or frozen. Fresh shrimp often tastes better but can be hard to find. Frozen shrimp is usually just as good if you buy high-quality brands. Look for large shrimp, around 16 to 20 per pound, as they grill nicely. Always check the label for any additives. Wild-caught shrimp often has a better flavor than farmed. To make the creamy garlic sauce just right, start with Greek yogurt. It gives that rich texture. Add minced garlic and lemon juice for a fresh kick. Taste the sauce as you mix it. If it needs more flavor, add a pinch of salt or more garlic. If it’s too thick, mix in a little water or extra lemon juice for a smoother consistency. When serving your grilled shrimp bowl, think about sides or drinks that pair well. A light salad or some crusty bread complements the dish nicely. For drinks, try a crisp white wine or sparkling water with lemon. You can also serve the creamy garlic sauce on the side for dipping. This lets everyone enjoy as much sauce as they want. For the full recipe, refer to the detailed steps above. {{image_4}} You can change the protein in this dish. Try using chicken or tofu instead of shrimp. Both options work well with the creamy garlic sauce. If you want more veggies, swap asparagus for bell peppers or zucchini. These choices add different flavors and textures, making your bowl unique. If you need gluten-free options, this recipe is already safe! The shrimp and veggies are naturally gluten-free. For a dairy-free version, use coconut yogurt instead of Greek yogurt. This keeps the creamy texture while making it suitable for lactose-free diets. Boost the flavor with spices or herbs. Add a pinch of cayenne for heat or fresh basil for a different taste. Try using lemon zest for a bright twist. These small changes can elevate your dish and make it even more enjoyable. Feel free to explore these variations to keep your grilled shrimp bowl exciting. Check out the Full Recipe for more details on how to make this dish! Store leftover shrimp and sauce in separate airtight containers. This keeps the shrimp juicy and the sauce creamy. Place them in the fridge within two hours of cooking. Use them within three days for the best taste. If you want to enjoy them longer, consider freezing. When reheating, use the stovetop or microwave. For the shrimp, warm them gently on low heat. This helps maintain their texture. Heat the creamy garlic sauce separately in a small pan over low heat. Stir often to keep the sauce smooth. If using a microwave, heat in short bursts to avoid overheating. Freezing is great for long-term storage. Wrap the shrimp tightly in plastic wrap and place them in a freezer bag. You can freeze the creamy garlic sauce too, but it might change texture. Use frozen shrimp within three months for the best quality. When ready to use, thaw in the fridge overnight before reheating. You can tell when shrimp is done by its color. Cooked shrimp turns a bright pink. The flesh also becomes opaque. This usually takes about 2-3 minutes per side on the grill. If the shrimp curls into a tight "C" shape, it's likely overcooked. Aim for a gentle curve instead. Yes, you can use frozen shrimp. To get the best results, thaw them first. Place them in the fridge overnight or run them under cold water for a quick thaw. Once thawed, pat them dry before marinating. This helps the marinade stick better and prevents excess water from making the shrimp soggy. If you need a substitute for Greek yogurt, try sour cream or plain yogurt. Both options give a creamy texture. You can also use cashew cream for a dairy-free option. Just make sure to adjust the seasoning, as flavors might vary slightly. This blog post guides you through making a delicious shrimp and asparagus dish. You learned about the key ingredients, marinating techniques, and how to prepare a creamy garlic sauce. I shared tips for choosing fresh shrimp and suggestions for variations, so you can tailor it to your taste. Remember, leftovers need proper storage to keep flavors intact. Enjoy crafting your meal! Simple steps lead to great flavor and fun in the kitchen.

Looking for a simple yet delicious meal? This Grilled Shrimp Bowl with Asparagus and Creamy Garlic Sauce is perfect for you! With juicy shrimp, crisp asparagus, and a smooth garlic …

Read more

Categories Dinner

Cookies and Cream Cake Jar Delightfully Simple Treat

May 27, 2025 by Chef Elliot
- 1 cup chocolate cake crumbs - 1 cup crushed chocolate sandwich cookies (such as Oreos) - 1 cup heavy whipping cream - 1/2 cup powdered sugar - 1 teaspoon vanilla extract - 1/4 cup cream cheese, softened - 1/2 cup mini chocolate chips - Extra crushed cookies for garnish - You can use coconut cream instead of heavy whipping cream. It gives a nice flavor. - For gluten-free options, choose gluten-free cookies and a gluten-free cake mix. - If you want lower sugar, try using a sugar substitute in the whipped cream. These ingredient options make it easy for everyone to enjoy the cookies and cream cake jar. You can pick what suits your needs best. Remember, the key is to keep the layers balanced and delicious. Enjoy making this sweet treat! To start, you need chocolate cake crumbs. You can bake a cake from scratch or use a mix. If you bake your cake, let it cool completely first. This step is key for a moist cake. Once cool, crumble the cake into fine pieces. Aim for about 1 cup of crumbs. This will give you a great base for your jar. Next, it’s time to make the whipped cream. In a medium bowl, mix heavy cream, powdered sugar, and vanilla extract. Use a hand mixer or stand mixer on medium speed. Beat the mixture until soft peaks form, which takes about 3-5 minutes. Now, gently fold in the softened cream cheese. This step is important as it adds a rich flavor. Be careful not to overmix; you want to keep that light and airy texture. Now for the fun part: layering your cake jar. Choose clear glass jars or cups. Start with a layer of chocolate cake crumbs at the bottom. This gives a solid base. Next, spoon a layer of whipped cream over the crumbs. Use the back of a spoon to smooth it out evenly. Aim to fill about 1/4 of the jar with this layer. Then, sprinkle a generous amount of crushed cookies on top. This adds great flavor and texture. Repeat these layers until the jars are full. Make sure the last layer is whipped cream for a clean finish. Garnish the top with mini chocolate chips and extra crushed cookies. This adds a nice touch and makes your dessert look appealing. Finally, cover the jars and refrigerate for at least 2 hours. This chill time helps the flavors mix well together. For the full recipe, check the earlier section. To get smooth whipped cream, use chilled heavy cream. Chill your mixing bowl too. Start mixing slowly, then increase speed. Stop when you see soft peaks. This takes about 3 to 5 minutes. To avoid soggy cake layers, use only the recommended amount of whipped cream. Make sure the cake crumbs are dry. Layer carefully, letting each layer rest before adding the next. This keeps everything light and fluffy. Cookies and cream cake jars are great for parties and birthdays. They work well for picnics too. You can enjoy them at family gatherings or movie nights. For drinks, pair these jars with milk or coffee. Chocolate milk complements the cookies well. Lemonade offers a nice contrast for a summer treat. Garnishing makes your cake jars pop. Use mini chocolate chips and crushed cookies on top. A sprig of mint can add color too. For special events, choose themed jars. Use festive colors for holidays. Label each jar with a cute tag for guests. This adds a personal touch and makes your dessert stand out. {{image_4}} You can easily change the cookies and cream cake jar's flavor. Try adding mint extract for a fresh twist. Just a few drops will make a big difference. You can also layer in some fruit. Berries add a sweet and tart flavor that pairs well with the creamy layers. Strawberries or raspberries work best. If you want a vegan version, swap the cream and cheese for plant-based choices. Use coconut cream instead of heavy cream. Look for vegan cream cheese to keep the texture. For nut allergies, ensure the cookies are nut-free. You can use graham crackers instead of chocolate cookies. This makes a safe and tasty treat for everyone. While jars are fun, you can get creative with serving. Use clear cups or bowls for a change. This lets you show off the pretty layers. You can also use small glasses for a more elegant look. Another idea is to layer the mix in a large dish. Guests can scoop their servings. This way, everyone enjoys the treat in their own way. To keep your Cookies and Cream Cake Jars fresh, store them in the fridge. Here are my best practices: - Use airtight containers or lids on your jars. This prevents drying out. - Keep the jars away from strong-smelling foods to avoid flavor transfer. - Layering the ingredients properly helps keep them fresh longer. The shelf life of prepared jars is about 3-5 days in the fridge. However, the texture may change over time. I recommend enjoying them within this window for the best taste. If you want to save some jars for later, freezing is a great option. Here’s how to freeze and thaw them successfully: - Freeze the jars without the whipped cream layer for better texture. The cake can get soggy if frozen with the cream. - Wrap the jars tightly with plastic wrap or foil. This prevents freezer burn. When you’re ready to enjoy them, thaw the jars in the fridge overnight. This keeps the texture nice and smooth. Here are tips for maintaining texture after freezing: - Avoid refreezing once thawed. This can change the quality. - If the whipped cream seems a bit runny after thawing, give it a gentle whip to restore its fluffiness. With these storage tips, you can always have a delightful Cookies and Cream Cake Jar ready! You can keep Cookies and Cream Cake Jars in the fridge for up to four days. Make sure to cover them well. If you want to store them longer, you can freeze them. In the freezer, they stay good for about two months. Just make sure to let them thaw in the fridge before you enjoy them. Yes, you can make these jars ahead of time! I recommend preparing them the day before your event. This allows the flavors to blend nicely. Just remember to chill them for at least two hours before serving. If you make them in advance, they will taste even better! If you need a non-dairy option, you can use coconut cream. It has a rich flavor and works well. You can also try almond milk cream or soy cream. Both can be whipped to create a nice texture. These substitutes will still give you that creamy layer in the cake jar. You learned how to create delicious Cookies and Cream Cake Jars. I shared the main ingredients, like chocolate cake crumbs and cream cheese. We explored substitutes for different diets and gave you step-by-step instructions for preparing and layering. Remember to garnish your jars for a fun touch. With these tips, you can impress anyone with your tasty treats. Now, get ready to enjoy your cake jars at your next event!

Craving a simple yet delightful dessert? Let’s dive into the world of Cookies and Cream Cake Jars! This treat layers rich chocolate cake, creamy filling, and crunchy cookie goodness, all …

Read more

Categories Desserts

Chipotle Ranch Grilled Chicken Burrito Flavor Boost

May 27, 2025 by Chef Elliot
- 2 boneless, skinless chicken breasts - 1 tablespoon chipotle seasoning - 1 tablespoon olive oil - Salt and black pepper, to taste - 1 cup cooked brown rice - 1 cup black beans, drained and rinsed - 1 cup corn kernels (fresh or frozen) - 1 ripe avocado, sliced - 1 cup shredded lettuce - 1 cup diced tomatoes - 1/2 cup shredded cheese (cheddar or Monterey Jack) - 1/2 cup creamy ranch dressing - 4 large flour tortillas - Fresh cilantro, chopped (optional, for garnish) The secret to a great Chipotle Ranch Grilled Chicken Burrito lies in the ingredients. Each one plays a vital role in creating a burst of flavor. The chicken is your star. I love using boneless, skinless chicken breasts. They grill up nice and juicy. The chipotle seasoning adds a smoky kick that elevates the chicken. Don't skip the olive oil; it helps the spices stick and keeps the chicken moist. Next, let's talk about the base. Brown rice gives a hearty feel, while black beans pack in protein. Corn adds a sweet crunch that balances everything. The creamy avocado slices bring a cool creaminess that contrasts with the spicy chicken. Now, for the toppings. Shredded lettuce and diced tomatoes add freshness and texture. Cheese adds that gooey, melty goodness. And, the creamy ranch dressing ties it all together. When you combine all these elements in a warm tortilla, you create a flavor explosion. Each bite should be a perfect mix of spice, creaminess, and crunch. Don't forget, you can find the full recipe to guide you through the steps of making this delicious burrito! - Combine olive oil, chipotle seasoning, salt, and pepper. - Coat chicken breasts and refrigerate for 20 minutes. Marinating is key. It helps the chicken soak up all those tasty flavors. This mix of olive oil and chipotle seasoning adds depth. The salt and pepper enhance the taste, making every bite delicious. - Preheat grill to medium-high heat. - Cook chicken for 6-7 minutes on each side. Grilling adds a smoky flavor. Make sure your grill is hot before adding the chicken. Cook until the juices run clear. This shows the chicken is done. Always check for an internal temperature of 165°F (74°C). - Mix cooked brown rice, black beans, and corn in a bowl. - Stir gently to combine. The filling is where you can get creative. Brown rice gives a nutty taste. Black beans add protein, while corn brings sweetness. Mix well to get all the flavors working together. - Lay out tortillas and spoon filling into the center. - Layer with grilled chicken, avocado, toppings, and ranch dressing. Assembling is fun! Spread the filling in the middle of the tortilla. Then, add your grilled chicken and fresh avocado. Don’t forget the ranch dressing! It ties everything together with creamy goodness. - Fold and roll the burrito tightly. - Optionally toast for a golden finish. Folding a burrito can be tricky. Start by folding the sides inward. Then roll it from the bottom up. For a crispy touch, toast it in a skillet. This adds a nice crunch to the outside. For the full recipe, check the [Full Recipe]. Enjoy your flavorful Chipotle Ranch Grilled Chicken Burrito! To make your burrito shine, ensure the chicken is fully cooked. The safe internal temperature is 165°F (74°C). Use a meat thermometer for the best results. This step keeps your chicken juicy and safe to eat. Fresh, quality ingredients make a big difference in flavor. Choose ripe avocados, crisp lettuce, and flavorful tomatoes. The taste of your burrito will improve with fresh items. I love serving my burritos with extra ranch dressing on the side. This adds a creamy touch when you dip. You can also pair them with crispy chips or a simple side salad. This adds crunch and balances the meal. If grilling is not an option, you can cook the chicken in the oven or on the stovetop. For the oven, preheat to 375°F (190°C) and bake for 25-30 minutes. For stovetop, heat a pan over medium heat and cook for about 6-7 minutes per side. Both methods will yield tasty chicken for your burrito. For the full recipe, check the earlier sections. {{image_4}} You can easily change up the main ingredients in your burrito. Try using quinoa or cauliflower rice instead of brown rice. These swaps add unique flavors and nutrients. If you want a vegetarian option, substitute grilled veggies for the beans. This keeps the burrito filling and tasty. To give your burrito a kick, spice it up with jalapeños or taco seasoning. Both options add heat and flavor. You can also experiment with different dressings or salsas. For instance, a zesty salsa verde can give a fresh twist. Mixing flavors keeps your meals exciting. When it comes to tortillas, you have options. Whole wheat or corn tortillas work great as alternatives. They add their own taste and texture. If you want fun-sized bites, try using smaller tortillas. These are perfect for snacks or parties. You can enjoy the same delicious filling in a smaller package. For the full recipe, check out the details above! To keep your burritos fresh, store them in the fridge for up to 2 days. Wrap each burrito in plastic wrap or foil. This will stop them from drying out. When you’re ready to eat, simply unwrap and enjoy! You can freeze your burritos too! For best results, freeze unassembled or cooked burritos. This way, you have a tasty meal ready for busy days. When you want to eat one, reheat it evenly from frozen. You can also thaw it in the fridge overnight for easy reheating. For the best texture, reheat your burritos in an oven or skillet. This method keeps the outside nice and crispy. If you're short on time, you can use a microwave. Just be sure to keep an eye on it, so it doesn’t get too hot. Enjoy your delicious Chipotle Ranch Grilled Chicken Burrito anytime! The best chipotle seasoning blends smoky and spicy flavors. Look for one with chili powder, garlic, and cumin. You can find many good options at local stores or online. I like using a blend that has no added sugar. This keeps the taste pure and strong. Yes, you can make these burritos in advance. Prepare them and store them in the fridge for up to two days. You can also freeze them for longer storage. Just wrap each burrito in foil or plastic wrap before freezing. To change the spice level, adjust the chipotle seasoning. Use less for a milder flavor. Add jalapeños or hot sauce for more heat. You can also try using a spicier ranch dressing. It adds a nice kick without overwhelming the burrito. You can find Chipotle Ranch Grilled Chicken Burritos at many restaurants, especially those that focus on Tex-Mex cuisine. If you want to try them at home, check out the Full Recipe. It’s easy to make and tastes great! Yes, this recipe is perfect for meal prepping. You can cook everything in advance and assemble the burritos when ready to eat. Just store the filling and tortillas separately to keep them fresh. This way, you have a healthy meal ready to go! This recipe for Chipotle Ranch Grilled Chicken Burritos is easy and fun to make. You learned about the main ingredients, how to marinate and grill the chicken, and assemble the dish. Don't forget the tasty toppings. Feel free to switch up ingredients or flavors to suit your taste. These burritos keep well in the fridge and freeze nicely, too. Enjoy making this meal for family or friends. Your culinary skills will impress everyone!

Looking for a flavor boost in your burrito game? The Chipotle Ranch Grilled Chicken Burrito is a mouthwatering treat that combines tender grilled chicken with zesty ranch and smoky chipotle. …

Read more

Categories Dinner

Strawberry Lemonade Layer Cake Rich and Flavorful Treat

May 27, 2025 by Chef Elliot
- 2 ½ cups all-purpose flour - 1 ½ cups granulated sugar - ½ cup unsalted butter, softened - 1 cup buttermilk, at room temperature - 3 large eggs, at room temperature - 1 tablespoon baking powder - 1 teaspoon baking soda - ½ teaspoon salt - Zest of 1 lemon - ½ cup fresh lemon juice - 2 cups fresh strawberries, hulled and diced - ½ cup granulated sugar - 1 tablespoon lemon juice - 2 tablespoons cornstarch - 2 tablespoons water - 1 cup unsalted butter, softened - 4 cups powdered sugar, sifted - 2 tablespoons fresh lemon juice - 1 teaspoon lemon zest - Pinch of salt The ingredients for this Strawberry Lemonade Layer Cake are simple yet essential for a vibrant flavor. The cake itself will be soft and airy, thanks to the buttermilk and whipped butter. The fresh lemon juice and zest bring a zesty brightness. The strawberry filling adds a sweet, fruity layer that pairs perfectly with the lemon frosting. When choosing your strawberries, look for ripe, juicy ones. They should smell sweet and feel firm. This ensures a bright flavor and nice texture in your filling. For the cake, using room-temperature eggs and buttermilk helps create an even batter. The lemon frosting is the crown jewel of this cake. The unsalted butter, paired with powdered sugar, makes it creamy and sweet. The zest and juice add a fresh kick, balancing the sweetness. When you combine all these ingredients, you create a cake that is rich and flavorful, perfect for any gathering. For the complete guide to making this delightful cake, refer to the Full Recipe. - Preheat your oven to 350°F (175°C). - Prepare three 8-inch round cake pans by greasing them with butter and dusting them with flour. This step helps the cakes come out easily after baking. - In a large bowl, cream together ½ cup of softened butter and 1 ½ cups of granulated sugar until the mix is light and fluffy. - Add 3 large eggs one at a time, mixing well after each. Next, mix in 1 tablespoon of lemon zest and ½ cup of fresh lemon juice. Keep blending until everything is smooth. - In another bowl, whisk together 2 ½ cups of all-purpose flour, 1 tablespoon of baking powder, 1 teaspoon of baking soda, and ½ teaspoon of salt. This helps to mix the leavening agents evenly. - Slowly add the dry mixture to the wet mix, alternating with 1 cup of buttermilk. Start and finish with the dry ingredients. Mix only until just combined to avoid making the cake dense. - Divide the batter evenly among the three prepared pans. Bake in the preheated oven for 25-30 minutes. A toothpick inserted in the center should come out clean when the cakes are done. - Let the cakes cool in the pans for 10 minutes. Then, transfer them to wire racks to cool completely. This step is important for the best texture. For the complete process, check the Full Recipe of Strawberry Lemonade Layer Cake. To make a light and fluffy cake, avoid overmixing the batter. Mix just until the dry and wet ingredients combine. Overmixing can make the cake tough. Always use room-temperature ingredients. This helps the batter mix evenly and rise well. Use ripe strawberries for the best flavor in your filling. Fresh, sweet berries make a big difference. After cooking the filling, let it cool completely. This step is key for a firm filling that won’t ooze out when you slice the cake. Adjust the sugar in your frosting to get the thickness you want. If the frosting feels too soft, chill it briefly. This will help it set up better for easy spreading. A good frosting should hold its shape on the cake. For the Full Recipe and more detailed steps, check out the rest of this article. {{image_4}} You can switch up the filling for this cake. Raspberries or blueberries work great in place of strawberries. These fruits add their own unique flavors. You can also create a mixed berry filling. This will give you a burst of various tastes in each bite. Just mash the berries with some sugar, and you are set. If you want a twist, try cream cheese frosting. It adds a tangy flavor that pairs well with the cake. You can also use whipped cream for a lighter touch. This will give your cake a fluffy and airy feel. Each option can change the cake's taste and make it special. For those needing gluten-free options, there's an easy fix. You can substitute all-purpose flour with a gluten-free blend. Make sure to choose a blend that works well for baking. This way, everyone can enjoy a slice of your tasty cake. Enjoying dessert should always be an option for everyone! To keep your cake fresh, cover it at room temperature. It will stay good for up to three days. If you want it to last longer, refrigerate it. This helps maintain its rich flavor and moist texture. If you want to store the cake for a while, you can freeze the layers. Wrap each layer tightly in plastic wrap and then in foil. This helps prevent freezer burn. You can freeze unassembled layers for up to three months. When you're ready to enjoy it, just thaw the layers. To serve the cake, thaw it overnight in the fridge. This way, it will warm up slowly and keep its taste. You can serve it chilled or at room temperature, depending on your preference. Enjoy the rich and flavorful treat! You can make the cake less sweet by reducing the sugar in the cake batter or frosting. Start with a quarter cup less sugar. Taste the batter as you go. This way, you can find the right level of sweetness for your liking. Yes, you can bake the cake in advance. Once cooled, wrap each layer in plastic wrap. Store them in the freezer for up to a month. This saves time for special occasions. If you don’t have buttermilk, you can use regular milk. Just add a splash of vinegar or lemon juice. Let it sit for about five minutes. This will mimic the acidity of buttermilk. To check if the cake is done, insert a toothpick into the center. If it comes out clean, the cake is ready. Keep an eye on the baking time to avoid overcooking. Absolutely! Using store-bought strawberry filling can save you time. Just layer it between the cake bits as you would with homemade filling. This makes the process quicker and easier. To layer the cake best, ensure each layer is level. Use a serrated knife to trim them if needed. This helps the layers stack nicely and prevents sliding. For detailed instructions on making this delightful cake, refer to the Full Recipe. In this post, we explored how to create a delicious Strawberry Lemonade Layer Cake. We covered essential ingredients, detailed steps for baking, and offered tips for success. Whether you choose fresh strawberries or opt for a gluten-free version, this cake suits any occasion. Remember to store it well for lasting freshness. Enjoy making this tasty treat and share it with friends and family. Happy baking!

If you love vibrant flavors and sweet treats, you’re in for a treat! This Strawberry Lemonade Layer Cake combines juicy strawberries and zesty lemons to create a cake that’s bursting …

Read more

Categories Desserts

Flavorful Grits Breakfast Bowl Easy and Satisfying Meal

May 27, 2025 by Chef Elliot
For a tasty Grits Breakfast Bowl, you need: - 1 cup white or yellow grits - 4 cups water or vegetable broth - 1 cup shredded sharp cheddar cheese - 2 tablespoons unsalted butter - 4 large eggs - ½ cup cooked turkey sausage, crumbled (or plant-based sausage for a vegetarian option) - 1 ripe avocado, sliced - ¼ cup green onions, finely chopped - Salt and black pepper, to taste - Hot sauce, for drizzling (optional) These ingredients work together to create a creamy and hearty meal. The grits form a rich base, while the cheese adds a nice sharpness. You can customize your bowl with fun add-ins. Here are some options: - Cooked bacon or ham - Sautéed spinach or kale - Diced tomatoes - Roasted red peppers - Fresh herbs like cilantro or parsley - A dollop of sour cream or Greek yogurt These extras let you mix and match flavors, making each bowl unique. To make this dish, gather these tools: - Medium saucepan for cooking grits - Non-stick skillet for frying eggs and sausage - Whisk for mixing grits - Serving bowls for the final dish Having the right tools helps you cook better and faster. With these, you can easily whip up a delicious breakfast. To start, grab a medium saucepan. Pour in 4 cups of water or vegetable broth. Turn the heat to high and bring it to a boil. Once it bubbles, lower the heat to medium. Gradually whisk in 1 cup of grits. Keep stirring so there are no lumps. After that, reduce the heat to low. Let the grits simmer uncovered for 20 to 25 minutes. Stir now and then until they look creamy. When they are almost done, add 2 tablespoons of unsalted butter and 1 cup of shredded sharp cheddar cheese. Mix until the cheese melts. Season with salt and black pepper to taste. While the grits cook, take a non-stick skillet and heat it over medium heat. Crack 4 large eggs into the skillet. Cook them sunny-side up or over-easy, as you like. In the same skillet, add ½ cup of cooked turkey sausage, crumbled. Cook it for a few minutes until it’s warm and has crispy edges. Now it’s time to build your bowl. Start by spooning a big scoop of creamy grits into each bowl. Next, add the cooked sausage on top. Then, place a fried egg right in the center. Finish with slices of 1 ripe avocado. Sprinkle ¼ cup of finely chopped green onions over the top. If you want some heat, drizzle hot sauce on your bowl. Enjoy your flavorful grits breakfast bowl! For the full recipe, check out the details above. To get smooth, creamy grits, use good broth or water. Start with a strong boil. Slowly whisk in the grits to prevent lumps. After they start to simmer, lower the heat. Let them cook while stirring often. This helps them become fluffy and soft. You want them to cling together but stay creamy. Cooking eggs can change your bowl's vibe. For sunny-side up eggs, cook them on medium heat. This gives you a runny yolk and a nice white. If you prefer your eggs cooked through, go for over-easy. Flip them carefully to keep the yolk intact. You can also scramble the eggs for a different texture. Just whisk them in a bowl before cooking. Spice things up to make your grits pop. Add salt and black pepper for basic flavor. If you want a kick, drizzle some hot sauce on top. Other great options include smoked paprika or garlic powder. Fresh herbs like chives or parsley can brighten the dish, too. For a richer taste, consider mixing in some cheese. Cheddar works well, but you can experiment with others. There’s a lot of room for creativity here. Check out the Full Recipe for more ideas! {{image_4}} For a vegetarian twist, skip the sausage. You can use plant-based sausage instead. This option keeps the bowl hearty and full of flavor. Consider adding sautéed mushrooms and spinach for extra nutrition. They add a nice earthy taste that pairs well with grits. You can top with fresh herbs like parsley or basil for a pop of color. To make a Southern-style bowl, focus on the basics. Use rich, creamy grits as your base. Top them with crispy bacon or fried chicken for protein. A drizzle of gravy can enhance the flavors, making it truly Southern. Add pickled jalapeños for a spicy kick. This version is sure to fill you up and keep you satisfied. Use seasonal vegetables to brighten your bowl. In spring, add asparagus and peas for freshness. In fall, roasted butternut squash and kale work beautifully. These veggies not only taste great but also add color and texture. Toss in some cherry tomatoes for sweetness. This variation makes your meal more vibrant and nutritious. Try these variations based on your taste and what you have at home. Each option keeps the spirit of the Grits Breakfast Bowl while adding your unique touch. You can find the full recipe to get started on your own delicious creation. To store leftovers, let the grits cool down first. Then, place them in an airtight container. You can keep them in the fridge for up to four days. Make sure to cover them well to keep them fresh. If you have toppings, store them separately to keep everything from getting soggy. When you want to reheat the grits, add a splash of water or broth. This will help them regain their creamy texture. Heat them in a saucepan over low heat. Stir often and check if they are warm enough. You can also use the microwave. Just heat in short bursts, stirring in between. You can freeze grits for later use. Place them in freezer-safe bags or containers. Make sure to squeeze out as much air as possible. They can last up to three months in the freezer. For best taste, freeze toppings like sausage and cheese separately. Thaw them in the fridge before reheating. This way, you can enjoy a quick and tasty meal from your Grits Breakfast Bowl later! To make grits from scratch, start with water or broth. Boil 4 cups in a pot. Slowly whisk in 1 cup of grits. Stir well to avoid lumps. Reduce heat and let them simmer. Cook for 20-25 minutes until creamy. Add butter, cheese, salt, and pepper to taste. This method gives you rich, flavorful grits. Yes, you can use instant grits. They cook faster and are easy to prepare. Just follow the package instructions. Instant grits can save time, but they may lack some texture. For a more traditional flavor, I recommend using regular grits. You have many tasty protein choices! Here are a few: - Cooked turkey sausage - Plant-based sausage for a vegetarian option - Crispy bacon or pancetta - Scrambled eggs - Grilled chicken or shrimp These proteins pair well with the creamy grits. Mix and match to find your favorite! For the full recipe, check out the Grits Breakfast Bowl Delight. You learned how to make a tasty grits breakfast bowl. We covered main ingredients, optional add-ins, and the best tools. I shared how to prepare the grits, cook the eggs and sausage, and assemble your dish. We explored tips to get the right texture and enhance flavors, plus fun variations and storage advice. Now, it’s time to enjoy your creation. With simple steps and fresh ingredients, you can make this breakfast both fun and delicious. Happy cooking!

Start your day right with a Flavorful Grits Breakfast Bowl! This meal is easy to make and packed with comforting taste. I’ll guide you through each step, from choosing the …

Read more

Categories Breakfast

Hearty Meat Lovers Pizza Casserole Delight

May 27, 2025 by Chef Elliot
- 1 lb ground beef - 1 lb Italian sausage, casings removed - 1 cup pepperoni slices - 1 cup diced ham - 1 red bell pepper, diced - 1 medium onion, diced - 3 cups marinara sauce - 12 oz pasta (cavatappi or penne) - 2 cups shredded mozzarella cheese - 1 cup shredded cheddar cheese - 1 tablespoon Italian seasoning - Salt and pepper to taste - Olive oil for sautéing To create a hearty Meat Lovers Pizza Casserole, you need key ingredients. Start with meats like ground beef, Italian sausage, pepperoni, and ham. These add rich flavors and textures. Fresh veggies like red bell pepper and onion bring color and crunch. Marinara sauce serves as the base, binding everything together with its savory taste. Choose pasta, like cavatappi or penne, to hold the sauce well. The melted mozzarella and cheddar cheeses create a gooey, cheesy topping that everyone loves. Italian seasoning adds depth, while salt and pepper enhance all the flavors. Olive oil is crucial for sautéing your veggies and meats. Each ingredient plays a role in making this dish both tasty and filling. For the full recipe, check out the details in the [Full Recipe]. - Set your oven to 375°F (190°C). - Cook and drain the pasta. Start by preheating your oven. This step is crucial for cooking the casserole evenly. Next, boil water for your pasta. Cook it until it's firm but not too soft. Drain it well and set it aside. - Brown ground beef and Italian sausage. - Add diced onion and bell pepper. In a large skillet, heat a splash of olive oil. Add your ground beef and Italian sausage. Break them up with a spoon as they cook. You want them brown and cooked through. After about 5 minutes, toss in the diced onion and bell pepper. Cook these until they soften and smell great. - Mix in pepperoni, ham, and marinara sauce. - Combine with pasta and layer cheeses. - Bake for 25-30 minutes. Add the pepperoni and diced ham to the skillet. Stir for a minute, then pour in the marinara sauce. Mix it all well and let it simmer for 5 minutes. In a big bowl, combine the meat sauce with the cooked pasta. Stir in half of the mozzarella and cheddar. Pour this mixture into a greased baking dish. Top it with the rest of the cheese. Bake for 25-30 minutes. You will know it’s done when the cheese is melted and bubbly. For the full recipe, check out the details above. Enjoy making this hearty meal! To make your casserole shine, choose high-quality meat and cheese. This choice adds rich flavor and makes every bite enjoyable. Also, avoid overcooking your pasta. If you cook it too long, it may turn mushy. Aim for al dente; this texture holds up better in the casserole. Make your dish visually appealing. Garnish each serving with fresh herbs like basil or parsley. This adds a pop of color and freshness. Before serving, drizzle a little olive oil on top. It enhances the flavor and gives a nice shine. Pair your casserole with a side salad or some garlic bread. This adds crunch and freshness to your meal. For drinks, consider a robust red wine. It complements the rich flavors of the casserole. Enjoy your hearty dish! {{image_4}} You can switch things up by using turkey or chicken. These meats are lighter but still tasty. If you want a fun twist, add bacon. Bacon brings a nice crispy flavor to the casserole. For those who prefer no meat, try plant-based sausage. It gives you the same great taste without the meat. You can also add veggies like mushrooms or spinach. They add nutrition and flavor to your dish. If you like heat, add crushed red pepper flakes. They give your casserole a spicy kick. You can also use spicy marinara sauce. This makes the dish even more exciting. After you enjoy your casserole, let it cool down first. This step is key to keeping it fresh. Place the leftover casserole in an airtight container. This helps prevent moisture loss and keeps flavors intact. When you want to enjoy it again, the oven is the best choice. Preheat your oven to about 350°F (175°C). Put the casserole in a baking dish and cover it with foil. Heat for about 20 minutes. This keeps the texture nice and cheesy. If you're in a hurry, the microwave works too. Just place a portion on a plate and heat for 1-2 minutes. If you want to save some for later, freezing is a great option. You can freeze individual portions for easy meals. Use freezer-safe containers or bags to store them. When you’re ready to eat, thaw overnight in the fridge. This makes it easier to bake later. Then, simply reheat it in the oven for a warm, hearty meal. Yes, you can prepare the casserole and refrigerate it before baking. This saves time on busy days. When you are ready, just pop it in the oven. It will taste fresh and delicious. If cooking from frozen, it takes about 40-50 minutes. Just make sure to cover it with foil for the first half. This helps it heat evenly. After that, remove the foil to brown the top. Absolutely! Gluten-free pasta works well in this recipe. It holds up nicely with all the meats and sauce. Just follow the package directions for cooking time. You can serve salads, garlic bread, or roasted vegetables. These sides balance the rich flavors of the casserole. They add freshness and crunch to your meal. This Meat Lovers Pizza Casserole is a tasty, hearty dish. You learned about essential ingredients and step-by-step instructions to make it. Tips for perfect cooking and presentation help elevate your meal. Don’t forget the fun variations! You can make it your own. Store leftovers properly and enjoy easy meals later. This casserole is perfect for any gathering or cozy night in. Try it today and impress your guests!

Are you ready for a hearty dish that satisfies your meat cravings? My Hearty Meat Lovers Pizza Casserole brings the best of pizza and comfort food together! Packed with ground …

Read more

Categories Dinner

Cajun Chicken Sloppy Joes Flavorful Dinner Recipe

May 27, 2025 by Chef Elliot
To make Cajun Chicken Sloppy Joes, gather these ingredients: - 1 lb ground chicken - 1 small onion, finely diced - 1 green bell pepper, finely diced - 2 cloves garlic, minced - 1 tablespoon Cajun seasoning - 1 tablespoon Worcestershire sauce - 1 can (8 oz) tomato sauce - 1 tablespoon brown sugar - Salt and freshly cracked pepper to taste - 4 soft hamburger buns - Fresh parsley, chopped (for garnish) These ingredients can add even more flavor to your dish: - 1 tablespoon hot sauce for heat - 1 teaspoon smoked paprika for depth - Sliced jalapeños for a spicy kick - Cheddar cheese for creaminess To complete your meal, consider these tasty sides: - Crispy potato chips - Dill pickles for crunch - A light salad for freshness - Iced tea or soda for a refreshing drink This recipe is simple and fun. You can also find the Full Recipe to guide you through the cooking steps. To start, gather the ingredients for Cajun Chicken Sloppy Joes. You will need: - 1 lb ground chicken - 1 small onion, finely diced - 1 green bell pepper, finely diced - 2 cloves garlic, minced - 1 tablespoon Cajun seasoning - 1 tablespoon Worcestershire sauce - 1 can (8 oz) tomato sauce - 1 tablespoon brown sugar - Salt and freshly cracked pepper to taste - 4 soft hamburger buns - Fresh parsley, chopped (for garnish) Next, finely chop the onion and bell pepper. Mince the garlic too. This prep helps the flavors blend well. Now, heat a large skillet over medium heat. Add the ground chicken. Break it apart with a spatula as it cooks. It should take about 5-7 minutes until it's no longer pink. Once the chicken is cooked, add the diced onion, bell pepper, and minced garlic. Sauté these for about 3-4 minutes. The veggies should soften and the onion will turn translucent. Sprinkle the Cajun seasoning and pour in the Worcestershire sauce. Stir everything well to coat the chicken and veggies. Next, pour in the tomato sauce and add the brown sugar. Mix it all together. Season with salt and freshly cracked pepper to your taste. Reduce the heat to low and let the mixture simmer for around 10 minutes. Stir it occasionally. This lets the flavors meld and the sauce thicken. While your mixture simmers, toast the hamburger buns. You can do this in a separate skillet or under a broiler. Aim for a golden brown and crispy texture. Once the chicken mixture is ready, scoop it onto the toasted buns. Let the filling overflow a bit for that messy, Sloppy Joe look. For a nice presentation, serve the Sloppy Joes on a rustic wooden board. Add pickles and chips on the side. This makes for a fun and casual meal. Don't forget to garnish each Sloppy Joe with chopped fresh parsley. It adds color and a fresh touch. If you want more details, check the Full Recipe for additional insights and tips. Happy cooking! One common mistake is overcooking the chicken. Cook it just until it's no longer pink. Another mistake is not seasoning enough. Cajun seasoning gives flavor, so use it generously. Don't skip the Worcestershire sauce; it adds depth. Lastly, avoid soggy buns. Toast them well to keep them from getting mushy. To enhance the Cajun flavor, start with fresh spices. If you can, use a blend that includes paprika, cayenne, and thyme. You can even make your own mix! Add a splash of hot sauce for extra heat. For a smoky taste, consider adding a bit of smoked paprika. Let the mixture simmer long enough to let the flavors meld together. This is key for a rich taste. To save time, prep your ingredients beforehand. Chop the onion and bell pepper the night before. You can also use pre-minced garlic to cut down on prep work. While the chicken cooks, toast the buns at the same time. This way, everything is ready to serve together. You can also double the recipe and freeze half for another day. This makes for an easy meal later on. For the Full Recipe, refer to the earlier section. {{image_4}} To make a vegetarian version, swap the ground chicken for lentils or mushrooms. Lentils provide a nice texture and soak up flavors well. Mushrooms add a savory taste that mimics meat. Use the same Cajun seasoning and sauce for a bold flavor. Cook the lentils separately, or sauté the mushrooms until they are soft. Combine them with the veggies and sauce just like in the original recipe. This will give you a hearty meal that everyone can enjoy. If you crave heat, add diced jalapeños or hot sauce to the mix. You can also include crushed red pepper flakes for an extra kick. Mixing in spicy sausage can enhance the flavor while keeping the dish meaty. Just remember to adjust the Cajun seasoning to balance the heat. Always taste as you go so you can find the right level of spice for your liking. The bun choice can change your Sloppy Joe experience. While soft hamburger buns are great, consider using brioche or ciabatta for a twist. Brioche adds a rich flavor, while ciabatta has a nice crunch. You can even use lettuce wraps for a low-carb option. Each type of bun can make your meal unique, so feel free to experiment. To store leftover Cajun Chicken Sloppy Joes, first, let them cool. Once cooled, place the filling in an airtight container. You can keep it in the fridge for up to three days. If you store the buns, keep them separate. This way, they stay fresh and do not get soggy. When it's time to reheat, you have a few options. The best way is to use a skillet. Heat it over medium heat. Add the chicken filling and cook until hot, about 5 minutes. You can also use the microwave. Place the filling in a bowl and cover it. Heat for 1-2 minutes, stirring halfway. If you reheating the buns, toast them lightly in a skillet or toaster. If you want to keep Cajun Chicken Sloppy Joes longer, freezing is a great choice. First, cool the filling completely. Then, put it in a freezer-safe container or bag. Make sure to remove as much air as possible. Label it with the date. You can freeze the filling for up to three months. When ready to eat, thaw it overnight in the fridge. Reheat it as mentioned above before serving. For the complete recipe, check the [Full Recipe]. You can use ground turkey or ground beef. Both will work well. They add their own flavor. If you like a vegetarian option, try lentils or black beans. They give a nice texture and taste. Just ensure you cook them well for the best results. Cajun Chicken Sloppy Joes can be mildly spicy. The heat comes from the Cajun seasoning. You can adjust the spice level by using less seasoning. If you like more heat, add hot sauce or red pepper flakes. Taste as you go to find your perfect balance. Yes, you can make this recipe in advance. Cook the mixture and let it cool. Store it in an airtight container in the fridge. It will last for about three days. You can also freeze it for up to three months. Just reheat before serving. For the best flavor, make it fresh and enjoy! For the full recipe, see above. Cajun Chicken Sloppy Joes are tasty and easy to make. I shared the ingredients and prep steps to guide you. Remember to avoid common mistakes to keep flavors bold. Plus, you can try fun variations like vegetarian options or spicy extras. Store leftovers safely for future meals. With this recipe, you can impress friends and family every time. Enjoy your cooking adventures and create the perfect dish tailored to your taste!

Looking for a tasty twist on a classic? Let me introduce you to my Cajun Chicken Sloppy Joes! This recipe packs bold flavors that will make your taste buds dance. …

Read more

Categories Dinner

20 Minute Honey Garlic Shrimp & Rice Bowl Delight

May 27, 2025 by Chef Elliot
- 1 lb shrimp, peeled and deveined - 2 cups cooked jasmine rice - 4 cloves garlic, minced - 1/4 cup honey - 2 tablespoons soy sauce - 1 tablespoon olive oil - 1 tablespoon fresh ginger, minced - Salt and pepper to taste - Broccoli florets, steamed until tender - Green onions and sesame seeds for garnish Gather these ingredients to create a delightful meal. The shrimp are the star of the dish. They cook up sweet and tender, thanks to the honey and soy sauce. The garlic adds a nice kick that you will love. Cooked jasmine rice makes a perfect base for this bowl. You can add optional items for extra flavor. Olive oil adds richness. Fresh ginger gives a zesty note. Using steamed broccoli makes the dish colorful and healthy. Green onions and sesame seeds add a nice crunch and visual appeal. This dish is quick and fun to prepare. You will enjoy each step as you create your meal. For the full recipe, check out the detailed instructions. First, grab a medium bowl. Add the peeled and deveined shrimp. Next, pour in the honey, soy sauce, minced garlic, and minced ginger. Mix everything gently. You want the shrimp to be coated well. Let this sit for 5 minutes. This helps the shrimp soak up all that yummy flavor. While the shrimp marinates, take a skillet and heat some olive oil over medium heat. You want the oil to shimmer. Then, add the marinated shrimp to the skillet. Cook them for about 2-3 minutes on each side. You will know they are done when they turn pink and opaque. Once the shrimp are cooked, season them with salt and pepper. If you have leftover marinade, pour it over the shrimp and let it cook for one more minute. This helps thicken the sauce. If you have not cooked your jasmine rice yet, do that now. You want it hot and fluffy. Now, it’s time to serve! In each bowl, place a layer of jasmine rice. Top it with the cooked shrimp. Add a scoop of steamed broccoli for some color and nutrition. Finally, sprinkle sliced green onions and sesame seeds on top for a nice finish. Enjoy your meal! For the full recipe, check out the details above. To get the best taste from your shrimp, marinate them just right. Mix honey, soy sauce, garlic, and ginger in a bowl. Let the shrimp sit in this mix for about 5 minutes. This helps the shrimp absorb all the yummy flavors. For more flavor, try adding a pinch of red pepper flakes or a dash of lime juice. You can also use fresh herbs like cilantro or basil for a fresh twist. Cooking shrimp just right is key to a great dish. Cook the shrimp for only 2-3 minutes on each side. Look for a pink color, which means they are done. Do not rush this step. If you cook them too long, they will turn rubbery. The shrimp should be tender and juicy. Garnishing makes your dish look fun and tasty. Sprinkle sliced green onions and sesame seeds on top for color and crunch. Serve the shrimp over a bed of jasmine rice with broccoli on the side. You can also add a wedge of lime for a pop of color and flavor. This makes your meal look as good as it tastes. Enjoy making your 20 Minute Honey Garlic Shrimp & Rice Bowl! For the full recipe, check out the previous sections. {{image_4}} You can change the main protein in this dish. If you don’t have shrimp, try chicken or tofu. Both options cook up well with the honey garlic sauce. Chicken will take a bit longer to cook, so cut it into small pieces. Tofu soaks up flavor nicely and adds great texture. If you want to swap the rice, brown rice or quinoa works great. Brown rice has a nutty taste and is more filling. Quinoa is light and packed with protein. Just remember to adjust cooking times as needed. Want a sweeter sauce? Add more honey to the mix. Start with an extra tablespoon and taste it. You can always add more, but it’s hard to take away sweetness. If you like heat, sprinkle in some chili flakes or drizzle chili sauce over the shrimp. This adds a fun kick. You can also mix in a bit of sriracha for a spicy twist. Make this dish your own by adding seasonal veggies. In spring, toss in snap peas or asparagus. In the fall, try roasted squash or Brussels sprouts. Mixing in these vegetables makes the meal colorful and nutritious. You can also change the style of the dish. For a Mexican twist, add black beans and corn. For an Italian flair, mix in diced tomatoes and fresh basil. The options are endless, and you can make it fit your taste and the season. For the full recipe of this delicious meal, refer to the [Full Recipe]. To store your leftovers, let the dish cool first. Place it in an airtight container. This keeps it fresh and tasty. The shrimp will stay good in the fridge for up to three days. Be sure to eat it before then for the best flavor. You can freeze the assembled bowl for later meals. Make sure it is fully cooled. Use a freezer-safe container or a heavy-duty freezer bag. Remove as much air as possible to avoid freezer burn. It can last up to three months in the freezer. When you're ready to eat it, thaw it overnight in the fridge. To reheat, use the microwave or a skillet on low heat. If using a microwave, heat in short bursts to avoid overcooking. Stir the bowl halfway through to warm it evenly. If using a skillet, add a splash of water to keep it moist. This helps prevent the shrimp from becoming rubbery. How to make sure the shrimp are cooked perfectly? To cook shrimp well, watch their color. They should turn pink. When they are opaque, they are ready. Cook for 2-3 minutes on each side. Avoid overcooking, or they will become tough. Can I prepare this dish ahead of time? Yes, you can prep this dish in advance. Marinate the shrimp a few hours before cooking. Cook the rice and broccoli ahead too. Store them in the fridge and heat when ready to serve. What can I serve with the Honey Garlic Shrimp & Rice Bowl? You can serve this dish with a side salad. Steamed vegetables work well too. Try adding some crispy spring rolls for extra crunch. Is this recipe gluten-free? This recipe is not gluten-free due to soy sauce. You can use a gluten-free soy sauce. That way, you can enjoy this dish without worry. What are the nutritional details for this dish? The Honey Garlic Shrimp & Rice Bowl is high in protein. Shrimp provides lean protein. The dish has healthy carbs from rice. Broccoli adds fiber and vitamins. What is the total preparation and cooking time? The total time is just 20 minutes. You need 10 minutes to prep. Cooking takes another 10 minutes. How many servings does this recipe yield? This recipe serves 2-3 people. Perfect for a quick family meal or a date night. Enjoy your cooking! You now have all you need to make a delicious Honey Garlic Shrimp and Rice Bowl. Remember the key steps: marinating the shrimp, cooking it just right, and enhancing flavors with your favorite spices. Experiment with different ingredients to suit your taste. Whether you adjust the recipe or store leftovers, you’re set for a tasty meal. Enjoy your cooking and impress with this easy yet flavorful dish. Your dinner time will never be the same!

Looking for a quick and tasty meal? This 20 Minute Honey Garlic Shrimp & Rice Bowl is your answer! With juicy shrimp, fragrant garlic, and sweet honey, it packs a …

Read more

Categories Dinner

Spicy Shrimp Tacos with Mango Salsa Fresh and Flavorful

May 27, 2025 by Chef Elliot
- 1 lb fresh shrimp, peeled and deveined - 2 teaspoons extra virgin olive oil - 8 small corn tortillas - 1 ripe mango, diced - 1 ripe avocado, diced - ½ medium red onion, finely chopped - 1 teaspoon smoked paprika - 1 teaspoon ground cumin - ½ teaspoon cayenne pepper For these spicy shrimp tacos, start with high-quality shrimp. Fresh shrimp makes all the difference. You want shrimp that is firm and smells like the sea. The olive oil adds a nice richness to the shrimp. It helps the spices stick and gives great flavor. Next, the corn tortillas are key. I prefer small corn tortillas because they hold the shrimp and toppings well. They also add a nice texture. The mango salsa brings a burst of sweetness. Ripe mango enhances the dish and balances the spice. The avocado adds creaminess, while the red onion gives a mild crunch. You can dice everything ahead of time for easy assembly. Spices are essential for flavor. Smoked paprika gives a warm, earthy taste. Cumin adds depth, while cayenne brings the heat. Adjust the cayenne to suit your taste. You can always add more if you love spice. For the full recipe, check out the complete instructions to make these tasty tacos. Enjoy! To start, gather your shrimp and a medium bowl. Combine the shrimp with 2 teaspoons of olive oil. Add 1 teaspoon of smoked paprika, 1 teaspoon of ground cumin, and ½ teaspoon of cayenne pepper. You can adjust the cayenne for more or less heat. Next, squeeze in 1 tablespoon of lime juice. Add sea salt and freshly cracked black pepper to taste. Gently toss the shrimp until they are fully coated in the spices. Let them marinate for 10 minutes to really soak in those flavors. While the shrimp marinates, we can make the mango salsa. In a separate bowl, mix 1 ripe diced mango, 1 diced avocado, and ½ medium finely chopped red onion. Add 1 minced jalapeño pepper, but remember to remove the seeds if you want a milder taste. Toss in 2 tablespoons of finely chopped cilantro as well. Finally, fold in 1 tablespoon of lime juice. This adds freshness to the salsa. Set it aside to let the flavors develop while you cook the shrimp. Now it’s time to cook the shrimp. Preheat a non-stick skillet over medium-high heat. Once hot, add the marinated shrimp in a single layer. Cook them for 2-3 minutes on each side. They should turn pink and opaque when done. Be careful not to overcrowd the pan, as this helps them sear properly. You want that nice, tasty crust! For the complete recipe, check out the Full Recipe. To make tasty shrimp, avoid overcrowding the pan. If you add too many shrimp, they will steam instead of sear. This makes them less flavorful. Cook in batches if needed. Adjust the cayenne pepper to fit your heat level. If you want a milder taco, use less cayenne. For more heat, add extra. Taste as you go to find your perfect balance. Warm your tortillas without making them crispy. You can use a dry skillet over low heat. Heat them for about 15-30 seconds on each side. This keeps them soft and pliable, perfect for filling. I recommend using fresh corn tortillas. They have a sweet flavor that pairs well with spicy shrimp. Store-bought options can work, but fresh ones add more taste. For an extra zing, add lime zest to your salsa. This gives it a bright flavor that really pops. You can use a microplane to zest the lime easily. Incorporate diced bell peppers for added crunch. They bring color and texture to the salsa. Choose red or yellow for sweetness, or green for a fresh taste. These tips will elevate your Spicy Shrimp Tacos with Mango Salsa and make your meal unforgettable. For the full recipe, check out the details above. {{image_4}} You can switch up the protein in your tacos. Try grilled chicken or fish instead of shrimp. Both options work well with the spices and salsa. If you want a vegetarian option, use chickpeas or grilled vegetables. These choices are hearty and full of flavor. Mango salsa is delicious, but you can mix it up. Substitute mango with pineapple for a tropical twist. The sweet and tart flavor of pineapple brightens the dish. You can also add black beans for extra protein and texture. They add a nice bite to the salsa and make it more filling. Not everyone likes it spicy. For a family-friendly version, use milder spices. You can skip the cayenne pepper or reduce the amount. If you want more heat, add sriracha or hot sauce. This gives your tacos a flavorful kick without overwhelming the taste. To keep leftover tacos fresh, store the filling and tortillas separately. This way, the tortillas won't get soggy. Place the shrimp and salsa in airtight containers. Store them in the fridge for up to 2 days. When ready to eat, warm the tortillas in a pan. Then, fill them with the shrimp and salsa. For mango salsa, use a glass container with a tight lid. This helps keep the salsa fresh. You can store it in the fridge for up to 3 days. The flavors will deepen over time. If you want the best taste, eat it within 24 hours. Yes, you can freeze cooked shrimp. To do this, let the shrimp cool. Then, place them in a freezer-safe bag. Remove as much air as you can. You can store them for up to 3 months. For tortillas, wrap them in foil or plastic wrap. Then, place them in a freezer bag. They can last for about 2 months in the freezer. When you're ready, thaw them overnight in the fridge before use. For the full recipe, check the details above. For shrimp tacos, I recommend using fresh, wild-caught shrimp. Look for shrimp that are pink and firm. Avoid shrimp that smells fishy. The size matters, too. Choose medium to large shrimp for a good bite. Generally, shrimp labeled as "U15" means there are under 15 shrimp per pound. This size is perfect for tacos. Yes, you can prepare the mango salsa ahead of time. Just mix all the salsa ingredients as mentioned in the recipe. Store it in an airtight container in the fridge. It stays fresh for about 2 to 3 days. The flavors will blend and taste even better after sitting for a bit. Just give it a stir before serving. Yes, this recipe is gluten-free if you use corn tortillas. Most corn tortillas do not contain gluten. Always check the label to be sure. If you are sensitive to gluten, stick with pure corn tortillas. They add a nice flavor and texture to the tacos. These spicy shrimp tacos are easy and fun to make. You start with fresh shrimp, marinate them, and cook them quickly. The mango salsa brings a tasty twist, adding flavor and color. You can even change the protein or spice levels to suit your taste. Store leftovers properly for later enjoyment. Try this recipe for a tasty meal. By mixing ingredients and spices, you get a dish full of flavor. Enjoy the process and share it with friends!

Are you craving a burst of flavor in your meals? Look no further than these Spicy Shrimp Tacos with Mango Salsa! With fresh shrimp, creamy avocado, and sweet mango, these …

Read more

Categories Dinner

Easy Greek Chicken Casserole Flavorful Family Meal

May 27, 2025 by Chef Elliot
- 2 cups cooked rotisserie chicken, shredded - 1 cup quinoa, thoroughly rinsed - 2 cups vegetable broth - 1 cup cherry tomatoes, halved - 1 cup cucumber, diced - 1/2 cup red onion, finely chopped - 1 cup Kalamata olives, pitted and halved - 1 cup feta cheese, crumbled (divided into two portions) - 2 tablespoons olive oil - 1 tablespoon dried oregano - Salt and pepper to taste - Fresh parsley for garnish The ingredients in this Easy Greek Chicken Casserole bring flavor and color to your plate. First, I love using rotisserie chicken because it saves time. You can find it at any grocery store. Shredding it makes it easy to mix with other ingredients. Next, quinoa is my go-to grain for a healthy boost. Rinse it well to remove any bitterness. The vegetable broth adds rich flavor and moisture. Fresh veggies like cherry tomatoes and cucumbers make this dish bright and crunchy. Kalamata olives offer a briny, savory touch. The feta cheese adds creaminess and tang. I always divide the feta into two portions. It melts nicely in the casserole while leaving some to sprinkle on top. Finally, the olive oil and oregano tie the dish together. A simple sprinkle of salt and pepper enhances all these flavors. Don’t forget to garnish with fresh parsley for a pop of color. This recipe truly showcases how simple ingredients can create a beautiful family meal. For the full recipe, check out the Mediterranean Bliss Chicken Casserole. 1. Preheat your oven to 375°F (190°C). Make sure it warms up well. 2. Grease a 9x13 inch casserole dish. This helps in easy serving later. 3. In a large bowl, mix 2 cups of shredded rotisserie chicken and 1 cup of rinsed quinoa. 4. Pour in 2 cups of vegetable broth. This adds great flavor and moisture. 5. Add 1 cup of halved cherry tomatoes, 1 cup of diced cucumber, and 1/2 cup of finely chopped red onion. 6. Toss in 1 cup of pitted and halved Kalamata olives. These give a nice salty punch. 1. Crumble half of the feta cheese into the mixture. 2. Drizzle 2 tablespoons of olive oil over the top. 3. Sprinkle 1 tablespoon of dried oregano, along with salt and pepper to your taste. 4. Stir gently to mix everything well without breaking the quinoa. 5. Transfer the mixed ingredients to the prepared casserole dish. Spread it evenly for even cooking. 6. Top with the remaining feta cheese for a tasty finish. 1. Cover the casserole tightly with aluminum foil. This keeps moisture in while baking. 2. Place it in the oven and bake for 30 minutes. 3. After 30 minutes, take off the foil. Return the dish to the oven. 4. Bake for another 15 minutes. This helps the top get golden and crispy. 5. Once done, remove it from the oven. Let it sit for 5 minutes to settle. 6. Garnish with fresh chopped parsley before serving to add color and taste. For the full recipe, refer to the main section above. Using rotisserie chicken makes this dish easy and quick. You save time and effort. Just shred the chicken right before mixing. This adds great flavor. Rinse the quinoa well before cooking. Use cold water and a fine mesh strainer. This step removes bitterness. It also improves the texture. A good rinse makes the quinoa light and fluffy. Covering the casserole with foil while baking is key. It traps steam and keeps the dish moist. Without this step, the quinoa can dry out. Make sure the foil fits snugly for best results. Spread the mixture evenly in the casserole dish. This helps it cook uniformly. If one side is thicker, it may bake slower. A flat layer ensures all parts cook at the same rate. Garnish this casserole with fresh parsley. It adds color and a fresh taste. You can also sprinkle more feta on top for a richer flavor. Pair it with crusty bread or a green salad. These sides complement the dish well. For drinks, a crisp white wine works great. A light lemonade is a nice non-alcoholic option. You can find the Full Recipe for more details on this tasty meal. {{image_4}} You can switch the chicken for turkey. Ground turkey works well and adds a nice flavor. If you prefer plant-based options, consider using chickpeas or lentils. They bring protein and a great texture. For cheese, feta is classic. However, you can try mozzarella for a milder taste. Goat cheese also adds a tangy kick. Each cheese changes the dish's flavor, so feel free to experiment. To boost the taste, add spices like paprika or cumin. These spices give warmth and depth. Fresh herbs like basil or dill can also elevate the dish. They add brightness and freshness to every bite. Seasonal vegetables are another great way to enhance flavor. Add bell peppers, zucchini, or spinach. They not only add color but also more nutrients. Mixing different veggies keeps the dish exciting. For a gluten-free option, use quinoa as the base. Quinoa is naturally gluten-free and adds protein. You can also use brown rice or farro if you prefer. If you're looking for a vegan version, tofu or tempeh is perfect. Both absorb flavors well and provide a hearty texture. Simply sauté them before adding to the casserole for extra flavor. For the full recipe, check out the Mediterranean Bliss Chicken Casserole. After cooking, store leftovers in the fridge. Use an airtight container to keep the casserole fresh. Glass or BPA-free plastic containers work best. They prevent moisture loss, keeping your dish tasty for days. You can freeze the casserole for later. First, let it cool completely. Then, wrap it tightly in plastic wrap and foil. This step prevents freezer burn. When ready to eat, thaw it in the fridge overnight. Reheat in the oven at 350°F (175°C) until hot. This way, you keep the flavors just right. In the fridge, your casserole lasts about three to four days. Always check for signs of spoilage. If you see mold or a strange smell, it's best to discard it. Trust your senses to ensure food safety. Yes, you can use various chicken cuts. Chicken thighs add more flavor and moisture. You can also use boneless chicken breasts for a leaner option. Some prefer to grill or pan-sear the chicken before adding it to the casserole. This step can enhance the taste and texture. To prepare this casserole in advance, follow these steps: - Cook the chicken and quinoa. - Mix all the ingredients in a bowl, but don’t bake yet. - Transfer the mixture to your casserole dish. - Cover it tightly with foil or plastic wrap. - Store it in the fridge for up to two days. - When ready, bake it as directed. This way, you save time on busy days. Yes, this recipe is gluten-free as it uses quinoa instead of pasta or bread. Quinoa is a great grain alternative. Ensure your vegetable broth is also gluten-free. You can substitute any ingredients like olives or feta cheese as needed. This makes it easy for those with gluten sensitivities to enjoy a tasty meal. This blog post covers a simple and tasty casserole recipe using rotisserie chicken, quinoa, and fresh veggies. You learned how to prepare, mix, and bake your dish for a golden finish. Plus, I shared handy tips and ways to customize it for your taste. Remember, this recipe is flexible. You can substitute ingredients or make it vegan easily. With proper storage, you can enjoy leftovers for days. Try making this dish your own, and enjoy delicious meals with family and friends!

Looking for an easy family meal that bursts with flavor? Look no further! My Easy Greek Chicken Casserole combines tender rotisserie chicken, hearty quinoa, and fresh vegetables. This dish transforms …

Read more

Categories Dinner
Older posts
Newer posts
← Previous Page1 … Page61 Page62 Page63 Page64 Next →

TOSSED TASTES

Where flavors get playful! A fresh mix of easy bites, bold spices, and everyday cravings tossed into every recipe. 🍋🍅

PAGES

Home About Contact Privacy Policy Terms & Conditions Cookie Policy GDPR Policy Copyright Policy Disclaimer

CATEGORIES

Appetizers Desserts Salads Breakfast Dinner

Contact

  • Pinterest
  • Mail
Copyright © 2025 Tossed Tastes. All rights reserved.