Get ready for a treat! My Bakery-Style Peppermint Mocha Brownies will make your mouth water. These fudgy, rich brownies blend coffee and chocolate with a fresh peppermint twist. Perfect for any holiday gathering or just because you deserve it. I’ll walk you through the simple steps to create these delicious goodies that will impress your friends and family. Let’s dive into the tasty world of brownies!
Ingredients
Complete List of Ingredients
– 1 cup unsalted butter, melted
– 2 cups granulated sugar
– 4 large eggs
– 1 teaspoon vanilla extract
– 1/2 teaspoon peppermint extract
– 1 cup all-purpose flour
– 1/2 cup unsweetened cocoa powder
– 1 teaspoon baking powder
– 1/2 teaspoon salt
– 1 cup semi-sweet chocolate chips
– 1 tablespoon instant coffee granules
– 2 tablespoons hot water
– Crushed peppermint candies for topping
Specific Measurements for each Ingredient
– Unsalted butter: 1 cup, melted
– Granulated sugar: 2 cups
– Large eggs: 4
– Vanilla extract: 1 teaspoon
– Peppermint extract: 1/2 teaspoon
– All-purpose flour: 1 cup
– Unsweetened cocoa powder: 1/2 cup
– Baking powder: 1 teaspoon
– Salt: 1/2 teaspoon
– Semi-sweet chocolate chips: 1 cup
– Instant coffee granules: 1 tablespoon
– Hot water: 2 tablespoons
– Crushed peppermint candies: for topping
Importance of Quality Ingredients
Using quality ingredients makes a big difference in your brownies. Fresh eggs add richness. Good butter brings a creamy texture. High-quality chocolate chips melt beautifully, giving that rich, fudgy bite. The cocoa powder needs to be unsweetened for the best flavor. Don’t skip on the extracts! They are key to enhancing that peppermint and mocha taste. Fresh crushed peppermint candies not only look great but add a nice crunch. These choices ensure your brownies taste just like they came from a bakery.
Step-by-Step Instructions
Prepping the Oven and Baking Pan
Start by preheating your oven to 350°F (175°C). This helps your brownies bake evenly. Next, take a 9×13-inch baking pan. Lightly grease it or line it with parchment paper. This makes it easy to take the brownies out later.
Mixing Wet Ingredients
In a large bowl, pour in 1 cup of melted butter. Add 2 cups of granulated sugar. Whisk them together until the mixture is smooth. Then, add 4 large eggs one by one. Make sure to whisk well after each egg. This helps create a fluffy batter. Next, pour in 1 teaspoon of vanilla extract and 1/2 teaspoon of peppermint extract. Mix until everything is blended.
Combining Dry Ingredients with Wet
In another bowl, sift together 1 cup of all-purpose flour, 1/2 cup of cocoa powder, 1 teaspoon of baking powder, and 1/2 teaspoon of salt. Gradually add this dry mixture to the wet ingredients. Stir gently until just combined. Be careful not to overmix, or the brownies may become tough.
Adding Coffee and Chocolate
Take 1 tablespoon of instant coffee granules and dissolve it in 2 tablespoons of hot water. Once dissolved, fold this into your brownie batter. This step enhances the mocha flavor. Next, gently fold in 1 cup of semi-sweet chocolate chips. Make sure they are evenly mixed in.
Baking and Testing for Doneness
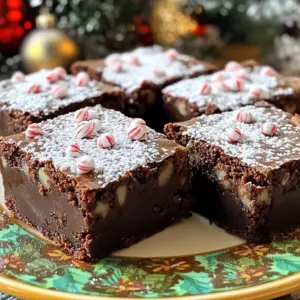
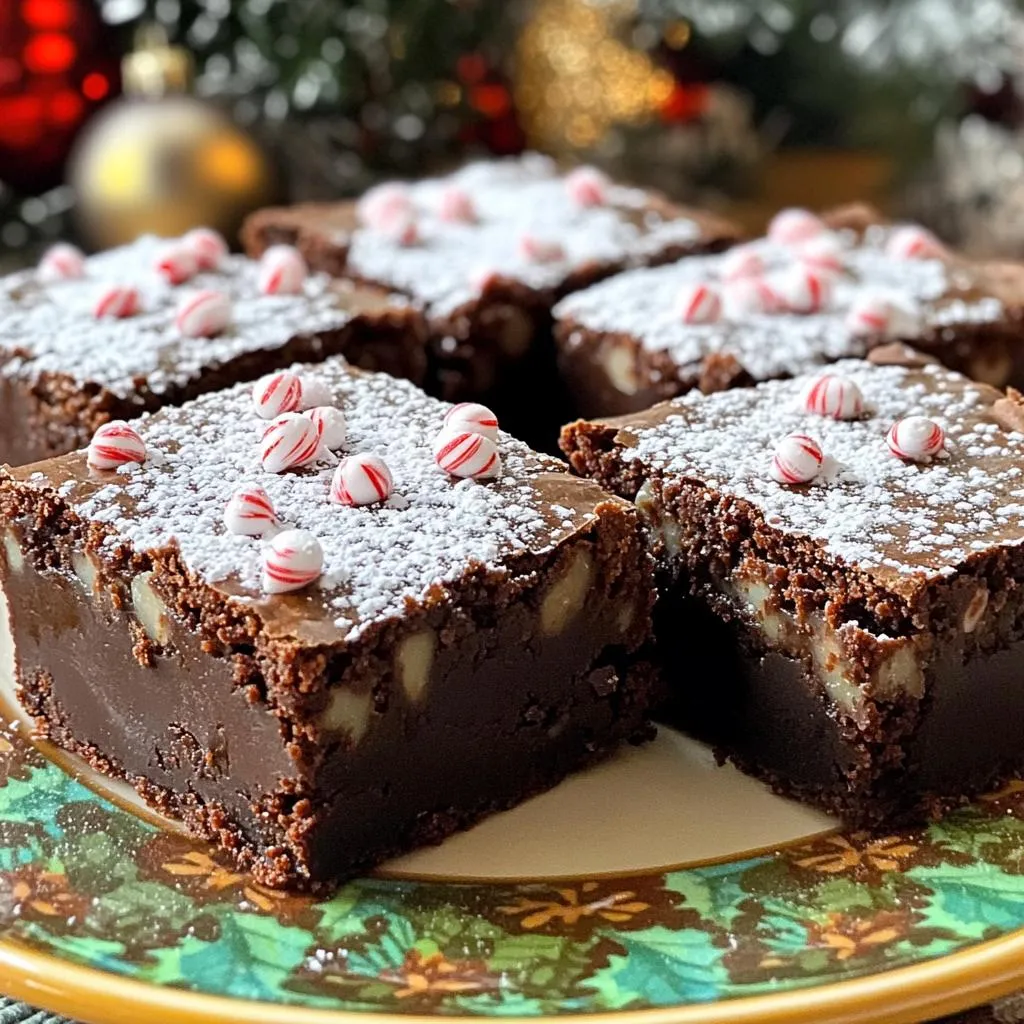
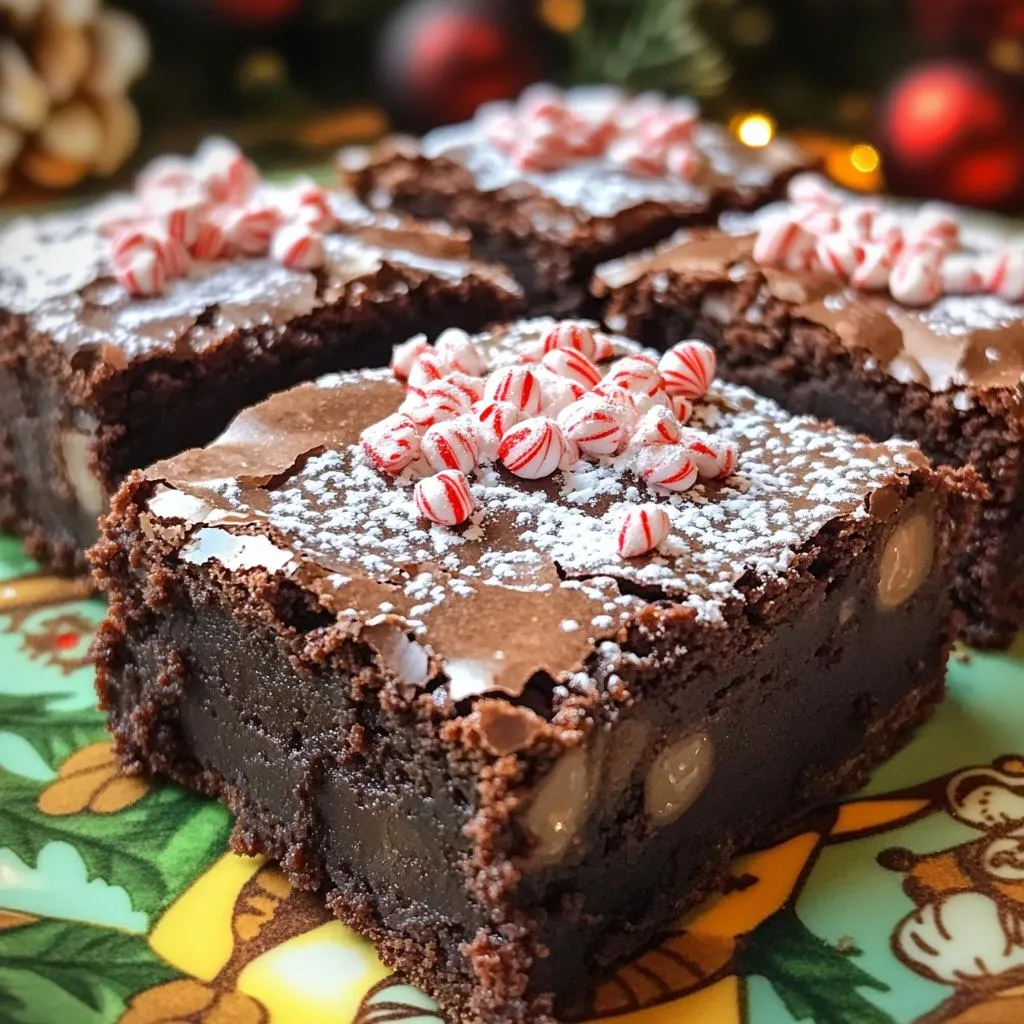
Pour the brownie batter into the prepared pan. Use a spatula to spread it evenly. Then, sprinkle crushed peppermint candies on top. Place the pan in the oven and bake for 25-30 minutes. To check if they are done, insert a toothpick into the center. If it comes out with a few moist crumbs, the brownies are ready. After baking, let them cool in the pan for at least 20 minutes before slicing.
Tips & Tricks
How to Achieve Fudgy Brownies
To get fudgy brownies, use melted butter instead of softened butter. Melted butter adds moisture and richness. Also, do not overmix the batter. Stir just until combined for a dense texture. Bake at 350°F, and test with a toothpick. It should have moist crumbs, not clean.
Best Practices for Mixing Batter
Start with the wet ingredients first. Whisk melted butter and sugar until smooth. Add eggs one at a time, mixing well after each. This helps the brownies rise evenly. When adding dry ingredients, fold gently. Overmixing leads to tough brownies.
Recommended Tools for Baking
Use a 9×13-inch baking pan for even cooking. A whisk works best for mixing wet ingredients. A rubber spatula is great for folding and scraping the bowl. Keep a toothpick handy for testing doneness. Parchment paper makes it easy to lift out brownies.
Presentation Tips for Serving
For a lovely presentation, slice brownies into squares. Dust them with powdered sugar for a sweet touch. Add a sprinkle of crushed peppermint candies on top. Serve on a festive plate to enhance the holiday spirit. Enjoy your delicious creation!
Variations
Different Flavor Combinations
You can change the flavor of these brownies easily. For a nutty twist, add chopped walnuts or pecans. This adds great texture and flavor. If you want a hint of orange, use orange zest. It gives a fresh, bright taste. You can also swap the peppermint extract for almond extract for a unique flavor. The options are endless!
Gluten-Free Option
To make gluten-free brownies, use almond flour or a gluten-free baking mix. Replace all-purpose flour with these options in equal amounts. This keeps the brownies soft and chewy. You may need to add an extra egg to help bind the mix. These adjustments keep the rich flavor while making them gluten-free.
Vegan Adaptation Ideas
You can easily make these brownies vegan. Replace the eggs with flax eggs. Just mix one tablespoon of ground flaxseed with three tablespoons of water. Let it sit for five minutes until it thickens. Use a plant-based butter or coconut oil instead of regular butter. You can also use dairy-free chocolate chips to make them fully vegan. Enjoy the same great taste without any animal products!
Storage Info
How to Store Leftover Brownies
To keep your brownies fresh, let them cool. Once cool, cut them into squares. Place them in a single layer in a container. This helps prevent sticking. Cover them tightly with a lid or plastic wrap. Store them at room temperature for up to four days. If you want them to last longer, refrigerate them. In the fridge, they can stay fresh for about a week.
Best Container for Freshness
The best container for storing your brownies is an airtight one. Use a glass or plastic container with a tight seal. This keeps moisture out and helps maintain their fudgy texture. If you don’t have a container, you can wrap each brownie individually in plastic wrap. This option is great for on-the-go snacking.
Freezing and Reheating Instructions
You can freeze brownies for later enjoyment. To freeze, wrap each square in plastic wrap. Then, place them in a freezer bag. Remove as much air as possible before sealing. Brownies can be frozen for up to three months. When you’re ready to eat them, thaw them in the fridge overnight. For a warm treat, reheat them in the microwave for about 15-20 seconds. Enjoy your delicious brownies anytime!
FAQs
Can I use different extracts?
Yes, you can use different extracts. Try using almond or orange extract for a unique twist. Just remember to keep the amount similar to the peppermint extract. This keeps the flavor balance right.
What temperature should brownies be baked at?
Bake brownies at 350°F (175°C). This temperature allows the brownies to cook evenly. Higher heat can cause edges to burn while the middle stays raw.
How do I know when brownies are done?
To check if brownies are done, insert a toothpick into the center. If it comes out with a few moist crumbs, they are ready. If it’s wet with batter, bake them a few more minutes.
Can I make these brownies ahead of time?
Yes, you can make these brownies ahead of time. They taste great after a day or two. Just store them in an airtight container to keep them fresh.
In this blog post, I covered how to make delicious brownies. I shared the best ingredients and their measurements. I explained the steps from prep to baking. You learned tips for fudgy texture and presentation. I also included variations for gluten-free and vegan options. Finally, I provided storage tips to keep brownies fresh.
Remember, great brownies start with quality ingredients and careful steps. Enjoy baking and sharing your sweet creations!