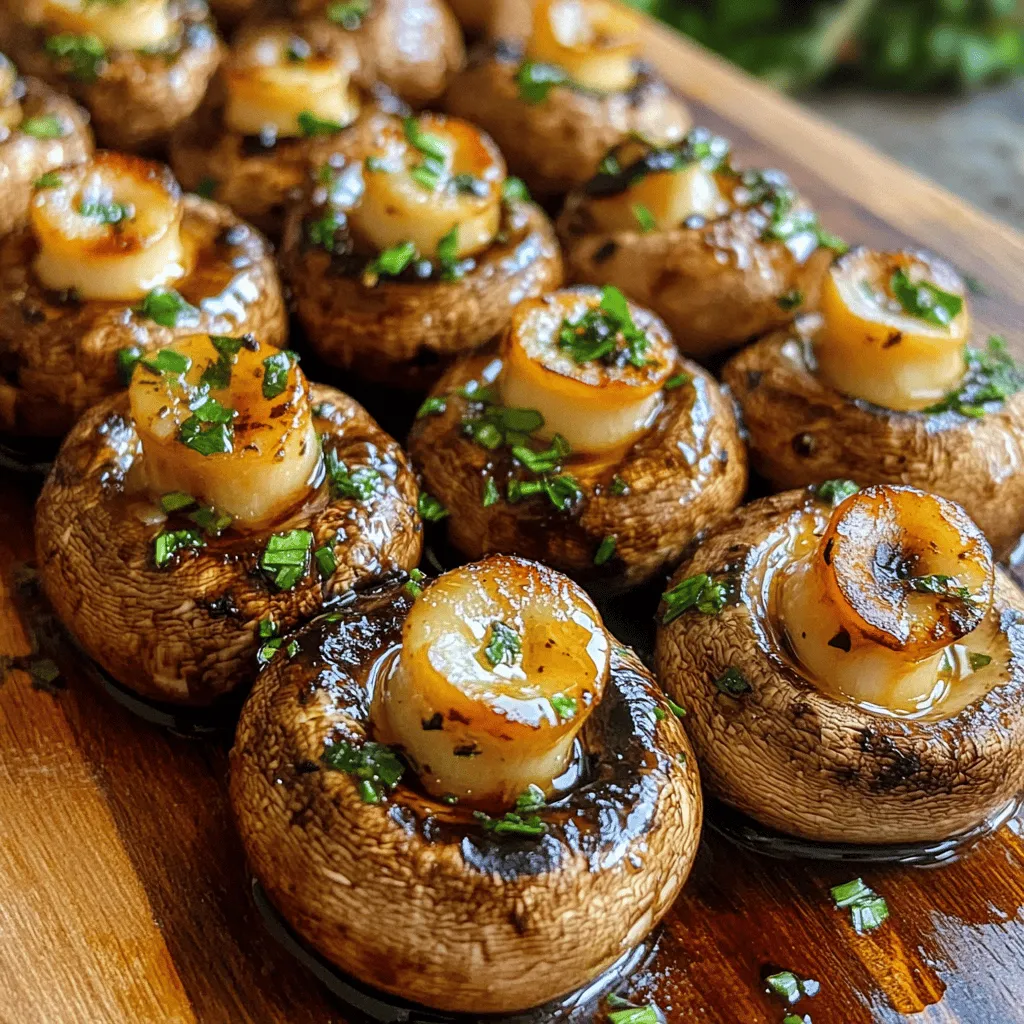
Appetizers

To make Cheesy Pepperoni Pizza Roll-Ups, gather these key ingredients: - 1 package of refrigerated pizza dough - 1 cup shredded mozzarella cheese - 1 cup pepperoni slices - 1/2 cup marinara sauce for dipping - 1 tablespoon Italian seasoning - 1 garlic clove, minced - 1 tablespoon olive oil - Cornmeal for dusting (optional) - Fresh basil leaves for garnish (optional) These ingredients come together to create a tasty snack. You can find most of them at your local grocery store. I love using fresh mozzarella for a creamier texture, but shredded works great too. The pepperoni adds a nice kick, but feel free to swap it out for turkey or a veggie option. When gathering your ingredients, remember to enjoy the process. Cooking should be fun! Plus, these roll-ups are perfect for sharing, making them a great choice for game night or a quick lunch. If you're curious about the full recipe, check out the link for detailed steps. First, preheat your oven to 400°F (200°C). This helps the roll-ups bake well. Line a baking sheet with parchment paper. If you want, sprinkle a bit of cornmeal on the parchment. This adds a nice texture to the roll-ups. Next, take your refrigerated pizza dough. On a lightly floured surface, roll it out gently. Aim for a rectangle about 1/4 inch thick. Now, let’s make the filling. Grab a pastry brush and apply olive oil all over the dough. This adds flavor and helps the garlic stick. Mince one garlic clove and sprinkle it over the oil evenly. Then, it’s time for the cheese! Spread 1 cup of shredded mozzarella cheese across the dough. Leave a little space at the edges. Now, layer 1 cup of pepperoni slices on top of the cheese. Finish with 1 tablespoon of Italian seasoning for extra taste. Once your filling is ready, it’s time to roll. Starting at one end, tightly roll the dough into a log. Make sure the cheese and pepperoni stay inside. Use a sharp knife to slice the log into pieces about 1.5 inches thick. You should get around 12 to 16 roll-ups. Place the sliced roll-ups on the prepared baking sheet. Make sure there is space between each piece. This helps them cook evenly. Now, bake the roll-ups in the oven for 15 to 20 minutes. They should turn golden brown, and the cheese will be melted and bubbling. Once they are done, take them out and let them cool for a few minutes before serving. Enjoy warm with marinara sauce for dipping. If you like, garnish with fresh basil leaves for a nice touch. For the full recipe, check out the ingredients and steps above. To make the best roll-ups, focus on your rolling technique. When rolling, start at one edge and apply steady pressure. This helps to create a uniform shape. If the dough resists, let it rest for a few minutes. This will make it easier to roll. For a golden crust, preheat your oven to 400°F. Place the roll-ups on a baking sheet lined with parchment. If you like, add a light dusting of cornmeal. This gives the crust a nice texture. Bake until they turn golden brown, about 15-20 minutes. To boost the taste, consider adding spices. A sprinkle of crushed red pepper or some oregano can add a kick. You can also mix in some chopped olives or bell peppers for extra flavor. If you want to swap out the marinara sauce, try ranch or garlic sauce. You can even use pesto for a twist. These options add a new layer to your dip! Enjoy experimenting with different flavors to find your favorite. {{image_4}} You can switch up the cheese for fun flavors. Try cheddar or pepper jack for a kick. These cheeses melt well and add new tastes. If you want a lighter option, use ricotta. It gives a creamy texture that pairs nicely with pepperoni. For a healthier choice, consider using turkey or vegetarian pepperoni. Turkey pepperoni has less fat but still packs a punch. Vegetarian pepperoni mimics the flavor and can please everyone. Both options keep the roll-ups tasty and exciting. Get creative by adding veggies or other fillings. Spinach, bell peppers, or mushrooms work well. Just chop them small and spread them with the cheese. You can also mix in some olives for a briny surprise. For dipping sauces, try more than just marinara. Ranch or garlic aioli can elevate your roll-ups. A spicy sriracha sauce adds a fun heat. Each dip can change the whole meal. Enjoy mixing and matching to find your favorite pairings! To keep your leftover roll-ups fresh, store them in an airtight container. This helps keep them soft and tasty. Place a paper towel inside the container to absorb moisture. You can store these in the fridge for up to three days. For long-term storage, freezing is your best bet. Wrap each roll-up in plastic wrap and then place them in a freezer bag. This keeps them safe from freezer burn. They will last in the freezer for about two months. When you are ready to eat, you can thaw them in the fridge overnight. When reheating, you have two main options: the oven or the microwave. The oven is the best choice if you want that crunchy texture. Preheat your oven to 350°F (175°C). Place the roll-ups on a baking sheet and heat for about 10-15 minutes. This will make them warm and crispy again. If you choose to use the microwave, place a damp paper towel over the roll-ups. This will help keep them moist but may make them a bit softer. Heat for about 30 seconds to 1 minute. Check to make sure they are heated through. Enjoy your Cheesy Pepperoni Pizza Roll-Ups! For the full recipe, check above. How can I make these roll-ups ahead of time? You can prepare the roll-ups the day before. After rolling and cutting them, store them in the fridge. Cover the baking sheet with plastic wrap to keep them fresh. Bake them when you're ready to serve. Can I use homemade dough instead of refrigerated? Yes, you can use homemade dough! Just make sure it is rolled out to the same thickness. This way, it will bake evenly and hold the fillings well. What is the best way to customize this recipe? You can add your favorite toppings! Try different cheeses or veggies. You can also switch out the pepperoni for turkey or veggie options. This makes it fun and unique for every taste. How do I know when the roll-ups are done baking? Look for a golden brown color on the outside. The cheese should be melted and bubbling. If you see that, your roll-ups are ready! Enjoy them warm with marinara sauce for a tasty treat. For complete instructions, check out the Full Recipe. Cheesy Pepperoni Pizza Roll-Ups are fun to make and eat. You need simple ingredients like pizza dough, cheese, and pepperoni. We detailed the steps to prep, fill, and bake them. I shared tips for perfect shapes and golden crusts. You can even customize these roll-ups with different fillings. Enjoy trying out these ideas in your kitchen. Each bite brings joy, and the process is easy and rewarding. Happy cooking!
Cheesy Pepperoni Pizza Roll-Ups Tasty Snack Idea
Looking for a fun snack that’s easy to make and full of flavor? You’ve come to the right place! These Cheesy Pepperoni Pizza Roll-Ups are
To make delicious cheese breadsticks, you need a few key ingredients. Here’s a list for you: - 2 cups all-purpose flour - 1 tablespoon granulated sugar - 1 teaspoon salt - 2 teaspoons baking powder - 1 cup shredded mozzarella cheese - 1/2 cup milk (preferably whole) - 1/4 cup unsalted butter, melted (plus extra for brushing) - 2 teaspoons garlic powder - 1 tablespoon fresh parsley, finely chopped (optional, for garnish) These ingredients work together to create a soft and cheesy breadstick. The flour gives the dough structure, while the cheese adds that creamy flavor we all love. You can add a few optional ingredients to make your breadsticks even better. Consider these: - Different types of cheese like cheddar or parmesan for varied taste. - Fresh herbs like rosemary or thyme to add a fragrant note. - Spices such as paprika or chili flakes for a hint of heat. Using these extras can really elevate your cheese breadsticks. Feel free to mix and match based on what you have at home. Using good-quality ingredients matters. Here are some tips: - Choose fresh mozzarella, as it melts beautifully and tastes great. - Use whole milk for a richer flavor and a softer texture. - Opt for unsalted butter to control the salt level in your dough. When you select quality ingredients, your cheese breadsticks will taste fantastic. Always remember, fresh is best! For the full recipe, check out the detailed steps to create these tasty snacks. First, gather your ingredients for the dough. You need all-purpose flour, sugar, salt, baking powder, shredded mozzarella, milk, and melted butter. 1. Preheat your oven to 375°F (190°C). 2. Line a baking sheet with parchment paper to prevent sticking. 3. In a large bowl, whisk together the flour, sugar, salt, and baking powder. Make sure there are no lumps. 4. Next, fold in the shredded mozzarella cheese. Ensure it's mixed well with the dry ingredients. 5. In a separate bowl, combine the milk and melted butter. Whisk until they blend together. 6. Pour this wet mixture into the dry ingredients. Mix with a wooden spoon or spatula until a soft dough forms. 7. Transfer the dough to a floured surface. Knead gently for about one minute until it feels smooth. Now it’s time to shape the dough into breadsticks. 1. Roll the dough into a rectangle about 1/2 inch thick. 2. Use a sharp knife or pizza cutter to cut the dough into strips. Aim for strips that are about 1 inch wide and 4 inches long. 3. Arrange the strips on the prepared baking sheet. Leave space between each stick for rising. Baking is where the magic happens. 1. In a small bowl, mix garlic powder with a tablespoon of melted butter. 2. Use a pastry brush to apply this garlic butter over the tops of the breadsticks. 3. Place the baking sheet in the oven and bake for 15-18 minutes. Look for golden edges and a slightly crispy top. 4. Once baked, let the breadsticks cool for a few minutes. You can sprinkle chopped parsley on top for a fresh touch if you like. 5. Serve warm, ideally with marinara sauce for dipping. Enjoy your delicious cheese breadsticks! Make sure to check the full recipe for more details and insights on making these tasty snacks! To get soft and chewy breadsticks, use the right mix of flour. All-purpose flour works best. Don't over-knead the dough. Knead just until smooth. This keeps the breadsticks light. Also, let the dough rest for a few minutes. This helps it rise better. Brush the sticks with melted butter right before baking for a nice finish. One common mistake is adding too much flour. This can make the dough dry. Always measure flour carefully. Another mistake is not letting the dough rise. Rising gives the breadsticks their fluffy texture. Lastly, don't skip the garlic butter. It adds a lot of flavor. Use the Full Recipe to guide you through each step. For extra flavor, try adding herbs. A bit of dried oregano or thyme can make a big difference. You can also mix in some grated Parmesan cheese. It adds a nice salty kick. For a spicy twist, add red pepper flakes to the garlic butter. This gives your breadsticks a fun zing! {{image_4}} You can mix things up by using different types of cheese. While mozzarella is a favorite, try cheddar for a sharp taste. If you like blue cheese, it adds a bold flavor. Mix in some parmesan for a nutty twist. Each cheese will change the taste and texture. You can blend cheeses for a fun, unique treat. Just remember, different cheeses melt in different ways. Adding herbs and spices can enhance the flavor. Fresh herbs like rosemary or thyme give a fragrant touch. Dried herbs like oregano or basil work well, too. For a kick, sprinkle in some red pepper flakes. Garlic powder adds a savory punch. You can even mix in some Italian seasoning for a classic taste. Be creative with your choices to find your favorite mix. Stuffed cheese breadsticks are a fun variation. You can fill them with cheese or other tasty fillings. Try adding pepperoni, cooked spinach, or roasted peppers. To stuff them, roll out the dough flat, place your filling, and fold it over. Pinch the edges to seal, then cut into strips. Bake as usual for a cheesy surprise inside. These stuffed sticks are perfect for a snack or appetizer. For the full recipe, check out Cheesy Garlic Pull-Apart Breadsticks. To keep your cheese breadsticks fresh, store them in an airtight container. Place parchment paper between layers to prevent sticking. You can keep them at room temperature for one day. For longer storage, move them to the fridge. They will stay good for up to three days. When you're ready to enjoy leftovers, preheat your oven to 350°F (175°C). Place the breadsticks on a baking sheet. Bake for about 5-7 minutes until warm. This method helps maintain their soft texture. If you want to freeze cheese breadsticks, let them cool completely first. Wrap each stick in plastic wrap, then place them in a freezer bag. They can last for up to three months in the freezer. When you're ready to eat, thaw them in the fridge overnight. Reheat as mentioned above for the best taste. After trying the Full Recipe, you’ll have many delicious breadsticks to enjoy later! I recommend using mozzarella cheese. It melts well and gives a nice stretch. You can also mix in some cheddar for a sharper taste. Other good choices include provolone or gouda. These cheeses add flavor and richness to your breadsticks. Yes, you can use gluten-free flour. Just ensure it's a 1:1 substitute for all-purpose flour. This swap keeps the texture light. You may need to adjust the liquid slightly, so watch the dough's consistency. It should remain soft and pliable. Look for golden brown edges and a slightly crispy top. The breadsticks should feel firm but soft inside. If you poke them lightly, they should spring back. The baking time is around 15-18 minutes at 375°F (190°C). Enjoy them warm for the best taste with marinara sauce. This article covered key ingredients and their importance in making cheese breadsticks. I shared step-by-step instructions to prepare, shape, and bake them perfectly. We explored tips for soft and chewy breadsticks, plus common mistakes to avoid. I highlighted fun variations and best practices for storing and reheating leftovers. Using fresh, quality ingredients matters most. Enjoy experimenting with flavors and textures. Now, you have all you need to create delicious cheese breadsticks at home!
Cheese Breadsticks Fresh and Tasty Snack Idea
If you crave a warm, cheesy snack that’s easy to make, cheese breadsticks are perfect. They’re soft, chewy, and packed with flavor. In this post,
- 1 large loaf of fresh Italian bread - 1 cup shredded mozzarella cheese - 1 cup shredded sharp cheddar cheese - ½ cup cream cheese, softened - 1 cup mixed vegetables (diced bell peppers, onions, and mushrooms) - 1 cup cooked chicken or leftover rotisserie chicken, finely shredded - 2 tablespoons garlic butter, melted - 1 teaspoon Italian seasoning blend - Salt and black pepper to taste - Fresh parsley, chopped, for garnish For this recipe, the most special items are the cheeses and garlic butter. You can find shredded mozzarella and cheddar cheese at any grocery store. Look for the cream cheese in the dairy section. Garlic butter is easy to make at home. Just melt butter and mix in minced garlic. If you want a shortcut, some stores sell it ready-made. For the mixed vegetables, fresh ones are great, but frozen works too. Choose a mix of bell peppers, onions, and mushrooms to add flavor. If you have dietary needs, you can change some ingredients. For a vegetarian option, skip the chicken and add more veggies. Use a dairy-free cream cheese to make it vegan. If you're lactose intolerant, look for lactose-free cheese. You can also use gluten-free bread to make this dish suitable for those who avoid gluten. Just make sure the bread is fresh and has a good texture for the best results. 1. Preheat your oven to 375°F (190°C). This step warms the air for baking. 2. Prepare the bread by slicing the Italian loaf in half lengthwise. Set the halves aside. 3. In a large bowl, mix together the mozzarella, cheddar, and cream cheese. 4. Add the diced vegetables and shredded chicken to the cheese mixture. 5. Pour in the melted garlic butter and sprinkle the Italian seasoning. Stir well. 6. Taste the mixture and add salt and black pepper as needed for flavor. 7. Spread the cheesy filling evenly on the bottom half of the bread. 8. Place the top half back on the cheesy bottom. Press gently to hold it together. 9. Wrap the loaf in aluminum foil. This keeps the bread moist while it bakes. 10. Bake the wrapped loaf for about 20-25 minutes. This helps the flavors blend. 11. Remove the foil and bake for an extra 10-15 minutes. This makes the top golden and crispy. 12. Let the loaf cool for a few minutes. Then slice it into thick pieces. - Use fresh vegetables for the best flavor. Diced bell peppers, onions, and mushrooms work well. - Shred the chicken finely for even mixing. Leftover rotisserie chicken is a great option. - Soften the cream cheese first. This makes it easier to mix with other cheeses. - Set your oven to 375°F (190°C) before you start. - Bake wrapped for 20-25 minutes, then uncovered for 10-15 minutes. - Check for a golden brown top. This means it’s ready. For the complete instructions, refer to the Full Recipe. To get that perfect cheesy texture, use a mix of cheeses. I love combining mozzarella and sharp cheddar. Mozzarella adds stretch, while cheddar gives a rich taste. Make sure your cream cheese is soft. This helps it blend well with the other cheeses. When you mix them, stir until smooth. This makes every bite creamy and delicious. One common mistake is not preheating your oven. Always preheat to 375°F (190°C). If you skip this step, your bread may not cook evenly. Another mistake is overstuffing the bread. Use the right amount of filling to keep it from spilling out. Lastly, don’t skip the foil wrap. It helps keep the bread moist while baking. Serve Cheesy Garbage Bread Delight hot and fresh from the oven. It pairs well with marinara sauce for dipping. A side salad adds freshness and crunch. Try a simple green salad with a light vinaigrette. For drinks, a cold soda or a glass of iced tea works great. Sharing this bread at parties makes everyone happy! For detailed steps, check the Full Recipe. {{image_4}} You can make cheesy garbage bread your own! Use different meats or veggies. Here are some ideas: - Pepperoni: Add slices for a pizza twist. - Bacon: Crumble cooked bacon for a smoky flavor. - Spinach: Mix in fresh spinach for added greens. - Broccoli: Diced cooked broccoli gives a nice crunch. - Olives: Chopped olives can add a briny bite. Feel free to swap ingredients based on what you like. The filling is flexible and fun! You can easily make this dish vegetarian or vegan. For vegetarian, skip the meat and add more veggies. Try these options: - Mushrooms: They add a hearty flavor. - Zucchini: Shredded zucchini gives moisture and taste. - Sun-dried tomatoes: They add a sweet and tangy kick. For a vegan option, replace cheeses with plant-based versions. Use vegan cream cheese, vegan mozzarella, and nutritional yeast for a cheesy taste without dairy. To make your cheesy garbage bread even better, try these flavor boosters: - Spices: Add red pepper flakes for heat or smoked paprika for depth. - Herbs: Fresh basil or oregano can brighten the dish. - Sauces: Drizzle some hot sauce or ranch dressing before serving for extra flavor. Experiment with combinations that excite your taste buds. Each tweak can lead to a new favorite! For storing leftovers, wrap the cheesy garbage bread tightly in plastic wrap. Place it in an airtight container. You can also use aluminum foil if you don't have plastic wrap. This keeps the bread fresh and moist. To reheat, preheat your oven to 350°F (175°C). Unwrap the bread and place it on a baking sheet. Cover it with foil to keep it from drying out. Heat for about 10-15 minutes. You want the cheese to melt again and the bread to be warm. To freeze, slice the bread first. Wrap each slice in plastic wrap, then put them in a freezer bag. Remove as much air as possible. You can freeze it for up to three months. When ready to eat, thaw in the fridge overnight, then reheat as mentioned above. For the full recipe, check out the ingredients and steps to make this delight at home! You can use cooked turkey or sausage instead of chicken. Both add great flavor. If you want a meat-free option, try using extra vegetables. Mushrooms or spinach work well. You can also use tofu or tempeh for a protein boost. Just make sure to season your substitutes well for the best taste. Yes, you can prepare Cheesy Garbage Bread Delight ahead of time. Assemble the bread and filling, then wrap it in foil. Store it in the fridge for up to 24 hours. When you’re ready to bake, just pop it in the oven. This makes it a great option for meal prep or gatherings. To spice things up, add chopped jalapeños or red pepper flakes to the cheese mix. You can also use pepper jack cheese instead of regular cheese. For a smoky flavor, try adding chipotle peppers in adobo sauce. Adjust the spice level to suit your taste for a zingy twist! Cheesy Garbage Bread Delight is fun and tasty. We covered key ingredients and specialty items. You learned substitutions for different diets. The step-by-step guide helps you cook with ease. Tips ensure the perfect cheesy texture, avoiding common mistakes. Explore variations to fit your taste. Also, effective storage methods keep leftovers fresh. This dish is great for sharing, and your friends will love it. Enjoy making and savoring your Cheesy Garbage Bread Delight!
Cheesy Garbage Bread Delight Savory and Easy Recipe
If you’re craving a fun and cheesy dish, look no further! My Cheesy Garbage Bread Delight is here to satisfy your taste buds. This recipe