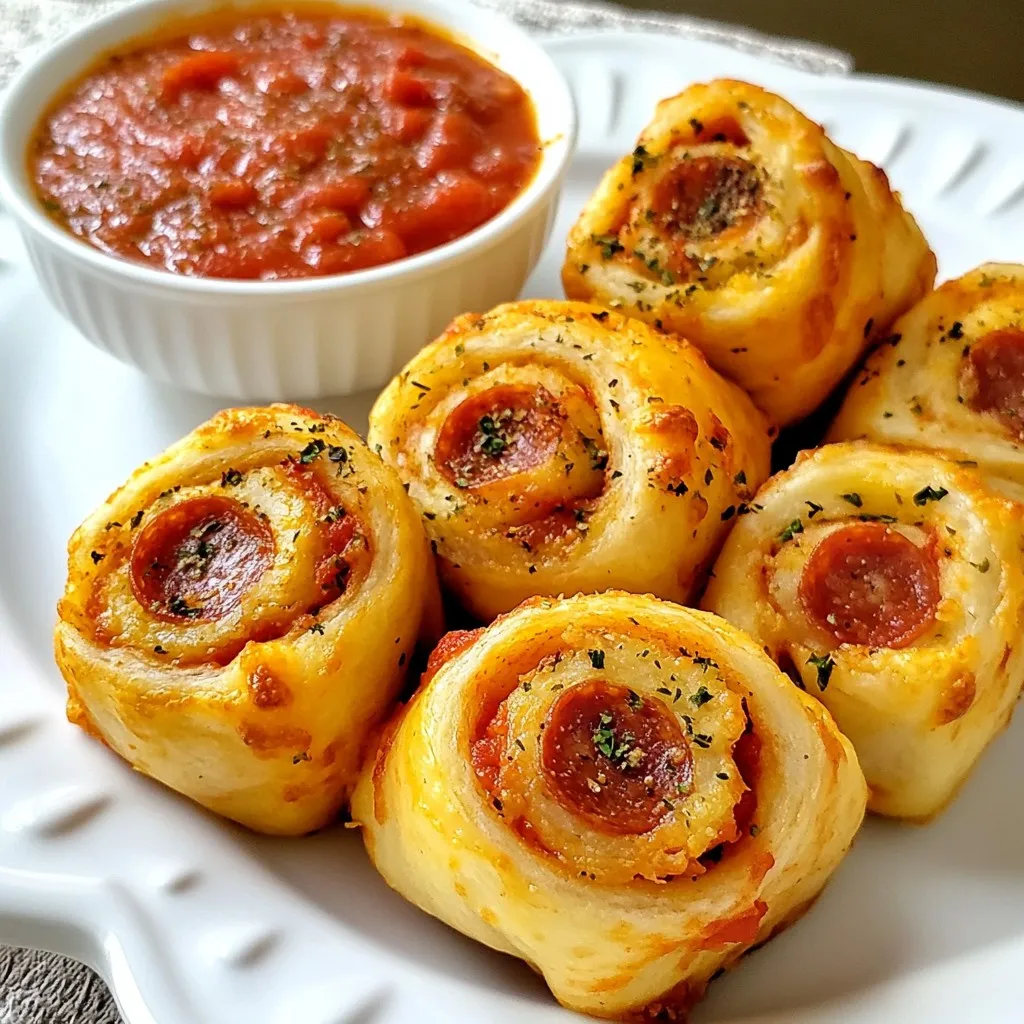
Appetizers

To make this tasty dish, you need simple ingredients. Here’s what you will need: - 500g fresh button mushrooms, thoroughly cleaned with stems trimmed - 4 cloves garlic, finely minced - 3 tablespoons extra virgin olive oil - 1 tablespoon balsamic vinegar - 1 tablespoon fresh thyme leaves (or 1 teaspoon dried thyme) - Salt and freshly ground black pepper, to taste - 1 tablespoon fresh parsley, finely chopped (for garnish) Each ingredient brings its own flavor and charm. The mushrooms are soft when cooked right. Garlic adds a rich taste, while thyme gives a fresh touch. Olive oil helps with cooking and adds a nice finish. You can add a few more items to boost the taste. Here are some options: - A pinch of red pepper flakes for heat - A squeeze of lemon juice for brightness - A splash of white wine for depth These extras can make the dish even more exciting. Feel free to mix and match based on your tastes. For the best flavor, use these seasonings: - Sea salt for a clean taste - Freshly cracked black pepper for warmth - A sprinkle of Parmesan cheese for richness Garnishing is also key. Fresh parsley adds color and freshness. Serve the mushrooms warm for the best experience. This dish can shine on its own or be a side for a larger meal. You can find the full recipe in the section above. To start, gather your ingredients. You will need fresh button mushrooms, garlic, olive oil, balsamic vinegar, thyme, salt, and pepper. First, clean the mushrooms by rinsing them under cool water. Trim off the stems to ensure they cook evenly. In a bowl, mix the mushrooms with minced garlic, olive oil, balsamic vinegar, thyme, and season with salt and pepper. Toss it gently so every mushroom gets coated in flavor. Once you prepare the mushrooms, it’s time to cook. Heat a grill pan or skillet over medium-high heat. When the pan is hot, place the mushrooms in a single layer. Don’t crowd them; they need space to brown. Sauté for about 4-5 minutes without stirring. This helps them get a nice golden color. After that time, flip the mushrooms and cook for another 4-5 minutes. Stir occasionally to avoid burning. They should be tender when done. After sautéing, carefully remove the mushrooms from the pan. Place them on a serving dish that looks nice. For a fresh touch, sprinkle chopped parsley on top. These mushrooms look great served warm. You can enjoy them with rustic bread or creamy polenta for a tasty meal. For the full recipe, check the details above. To cook mushrooms well, start with fresh ones. Clean them gently to keep their shape. Use a grill pan or skillet for best results. Heat the pan until it’s hot before adding the mushrooms. This helps to sear them and keep their moisture in. Remember, do not wash mushrooms under running water. Instead, use a damp cloth or brush to clean them. To get that perfect texture, slice your mushrooms evenly. This ensures they cook at the same rate. Mix them with olive oil and seasonings before grilling. Make sure to spread them in a single layer. Avoid overcrowding the pan; this leads to steaming, not grilling. Flip them only once during cooking. This helps develop a nice, golden crust. One common mistake is not preheating the pan. If the pan isn’t hot, mushrooms can become soggy. Another mistake is using too much oil. Just enough oil will help the mushrooms brown without becoming greasy. Don’t forget to season as you go. Adding salt too late can draw out moisture and make them tough. Lastly, avoid stirring them too much. Let them sit for a few minutes to form that nice char. For more detailed steps, check out the Full Recipe. {{image_4}} You can change the taste of your sautéed grilled garlic mushrooms. Try using different oils. Instead of olive oil, use avocado oil for a nutty flavor. You can also add a splash of lemon juice for a zesty kick. Feel free to swap balsamic vinegar with red wine vinegar. This change gives a tangy twist. For a spicy touch, add red pepper flakes. Mixing in some soy sauce can give it an Asian flair. Each of these choices can make your dish unique. While button mushrooms are great, there are many options. Try cremini mushrooms for a richer taste. Shiitake mushrooms also add an earthy flavor. If you want something different, use portobello mushrooms. They are meaty and can be grilled whole. Oyster mushrooms are lighter and cook quickly. Mix and match different types for a fun and tasty dish. Each type brings its own special flavor. These mushrooms go well with many foods. Serve them with grilled meats like chicken or steak. They also taste great next to pasta dishes. Try them on a bed of rice or quinoa for a hearty meal. You can also add them to salads for an extra treat. For a simple meal, pair them with crusty bread. The options are endless, so get creative! To store leftover mushrooms, let them cool first. Place them in an airtight container. Keep them in the fridge. They stay fresh for about three days. Make sure they are dry to avoid spoilage. Reheat mushrooms in a skillet. Add a bit of olive oil over medium heat. Cook for about three to five minutes until they are warm. You can also use the microwave. Heat on high for about 30 seconds at a time. Stir after each interval to ensure even warming. If you want to freeze mushrooms, cook them first. This helps them keep their taste and texture. Let them cool before placing them in a freezer bag. Remove as much air as possible. They can last up to three months in the freezer. When you’re ready to use them, thaw overnight in the fridge. They are great in soups or stews. For more details, check the Full Recipe. The best mushrooms for sautéing are button, cremini, or shiitake. Button mushrooms have a mild taste, while cremini and shiitake offer a deeper flavor. When you sauté them, they get nice and tender. Their texture holds up well, making them perfect for this dish. Yes, you can make Sautéed Grilled Garlic Mushrooms ahead of time. Cook them, then cool them down. Store them in an airtight container in the fridge. They stay fresh for up to three days. When you’re ready to serve, just reheat them on the stove. This way, you save time for your main meal. Garlic mushrooms taste great with many dishes. They pair well with grilled meats like chicken or steak. You can also serve them with pasta or risotto for a hearty meal. A slice of crusty bread is perfect to soak up the flavors. For a lighter option, enjoy them on top of a fresh salad. Sautéed grilled garlic mushrooms are easy and tasty. We covered the best ingredients, steps, and tips to make them perfect. You can add flavors or use different mushrooms to change things up. Storing leftovers is simple, and reheating keeps them tasty. Try new ideas and enjoy your cooking! With these tips, you can impress anyone. Your next meal will be a hit. Follow these steps and make mushrooms shine on your plate. Trust me, you won't regret it!
Sautéed Grilled Garlic Mushrooms Tasty and Simple Dish
Looking for a quick dish that bursts with flavor? Sautéed Grilled Garlic Mushrooms are just the ticket. They are easy to make and taste fantastic,
To make these tasty biscuits, you need a few key ingredients: - 2 cups all-purpose flour - 1 tablespoon baking powder - 1/2 teaspoon baking soda - 1 teaspoon salt - 1/2 teaspoon garlic powder - 1/2 cup cold unsalted butter, cubed - 1 cup shredded sharp cheddar cheese - 1 cup canned green chiles, drained and finely chopped - 3/4 cup buttermilk These ingredients work together to create a fluffy and flavorful biscuit. The cheddar gives a rich taste, while the green chiles add a nice kick. You can change things up with optional ingredients: - 1 tablespoon fresh cilantro, chopped (for garnish) Feel free to try different types of cheese or add spices for more heat. You could use pepper jack cheese for an extra spicy twist. To make these biscuits, gather some simple kitchen tools: - Mixing bowl - Whisk - Pastry cutter or your fingertips (for mixing butter) - Baking sheet - Parchment paper Having these tools on hand makes the process smooth and easy. You can find everything you need in most kitchens. For the full recipe, check [Full Recipe]. Start by preheating your oven to 425°F (220°C). This helps the biscuits rise well. Line a baking sheet with parchment paper to avoid sticking. In a large bowl, mix 2 cups of flour, 1 tablespoon of baking powder, 1/2 teaspoon of baking soda, 1 teaspoon of salt, and 1/2 teaspoon of garlic powder. Make sure to whisk these dry ingredients until they are well combined. Next, add 1/2 cup of cold, cubed butter to your bowl. Use a pastry cutter or your fingers to work the butter into the flour mixture. You want it to look like coarse crumbs with some butter pieces left. This will make the biscuits flaky. Now, fold in 1 cup of shredded sharp cheddar cheese and 1 cup of finely chopped canned green chiles. Be gentle here; you don’t want to overwork the dough. Finally, pour in 3/4 cup of buttermilk. Stir until the dough comes together. It’s okay if it has some lumps. Transfer the dough onto a lightly floured surface. Pat it down into a rectangle about 1 inch thick. Avoid pressing too hard; you want to keep it fluffy. Use a biscuit cutter or a round glass to cut out biscuits. Place them on the lined baking sheet, leaving space between each one. Gather the scraps and gently press them together to cut more biscuits if needed. Bake your biscuits in the preheated oven for about 12 to 15 minutes. Watch for them to turn golden brown and rise nicely. Once they are done, take them out and let them cool on the baking sheet for a few minutes. If you like, sprinkle some chopped cilantro on top for extra flavor and color. Enjoy these delicious biscuits warm! For the full recipe, check out the earlier section. To make flaky biscuits, keep your butter cold. Cold butter creates steam as it melts, which gives biscuits their flaky texture. Cut the butter into small cubes and chill it before adding to the flour. Mix the butter into the flour until it looks like coarse crumbs. Avoid overmixing; a few chunks of butter are okay. This helps keep your biscuits light and airy. You can easily adapt this recipe for different diets. For a gluten-free option, use a gluten-free flour blend. Make sure it has a binding agent. If you need dairy-free biscuits, swap out the buttermilk with almond milk and add a splash of vinegar. You can also use dairy-free butter. These simple swaps maintain the flavor without losing quality. These biscuits shine at any meal. Serve them warm, right out of the oven. They pair well with soups, stews, or salads. You can also enjoy them with breakfast. Spread some butter or jam on top for a tasty treat. For a fun twist, serve them with a spicy dipping sauce. They also make great snacks on their own. Enjoy these biscuits however you like! Check out the Full Recipe for detailed instructions. {{image_4}} You can change the cheese in this recipe to make it your own. Try using Monterey Jack for a creamier taste. Or, consider pepper jack for a spicy kick. If you love blue cheese, mix in a little for a bold flavor. Each cheese adds its unique twist, making the biscuits fun to experiment with. Want to turn up the heat? Add more green chiles or use fresh jalapeños. Diced jalapeños give a bright flavor and heat. For mild flavors, use fewer chiles or go with sweet peppers. Adjusting the spice level lets you cater to your taste. Feel free to add other ingredients for extra flavor. Try mixing in cooked bacon or sausage for a savory boost. You can also add herbs like chives or thyme for a fresh touch. A sprinkle of corn or sun-dried tomatoes adds sweetness and texture. These additions keep the biscuits exciting and tasty. You can find the full recipe here. To keep your leftover biscuits fresh, place them in an airtight container. You can stack them, but be careful not to crush them. Store the container at room temperature for up to two days. For longer storage, refrigerate them. Just remember, cold air can dry out biscuits. If you want to save biscuits for later, freezing is a great option. First, let the biscuits cool completely. Then, arrange them in a single layer on a baking sheet. Place the sheet in the freezer until the biscuits are firm. After that, transfer them to a freezer bag. Remove as much air as possible. They will stay good for up to three months. When you’re ready to enjoy the biscuits again, the process is easy. Preheat your oven to 350°F (175°C). Place the biscuits on a baking sheet and cover them with foil to prevent drying. Heat for about 10-15 minutes, or until warm. You can also microwave them for about 20-30 seconds. Just be cautious, as they can get tough if overheated. Enjoy your warm, tasty biscuits! For the full recipe, check the earlier section. To make Green Chile Cheddar Biscuits from scratch, follow these steps: - Preheat your oven to 425°F (220°C). - Line a baking sheet with parchment paper. - In a bowl, mix 2 cups of flour, 1 tablespoon of baking powder, 1/2 teaspoon of baking soda, 1 teaspoon of salt, and 1/2 teaspoon of garlic powder. - Cut in 1/2 cup of cold butter until it looks like crumbs. - Stir in 1 cup of shredded cheddar cheese and 1 cup of chopped green chiles. - Add 3/4 cup of buttermilk and mix until just combined. - Pat the dough to 1-inch thick and cut out biscuits. - Bake for 12-15 minutes until golden brown. For the full recipe, you can refer to the earlier section. You can serve Green Chile Cheddar Biscuits with various dishes: - Pair them with soups like tomato or chili. - Serve alongside grilled meats for a tasty contrast. - Enjoy them with eggs for breakfast or brunch. - They also work well with a fresh salad for lunch. - Try them with a spicy dip for a fun snack. To check if your biscuits are done baking, look for these signs: - They should be golden brown on top. - The biscuits should rise nicely and feel firm to the touch. - If you tap the bottom, it should sound hollow. - A toothpick inserted in the center should come out clean or with just a few crumbs. In this article, we explored how to make tasty Green Chile Cheddar Biscuits. We discussed the key and optional ingredients, along with the tools you need. I shared a step-by-step guide to prepare, cut, and bake the biscuits. You learned tips for achieving flaky texture and dietary swaps, plus fun ways to serve them. These biscuits are both easy and versatile. Try different cheeses or spice levels. Enjoy making this dish, and don't forget to share with friends!
Green Chile Cheddar Biscuits Flavorful and Easy Recipe
If you’re craving a warm, cheesy treat, you’re in the right place! I’ll show you how to make Green Chile Cheddar Biscuits that are both
- 2 cups popcorn, freshly popped - 1 cup pretzel sticks - 1 cup candy corn - 1 cup roasted peanuts - 1 cup mini marshmallows - 1 teaspoon pumpkin spice - 1/4 cup dark chocolate chips - 1 tablespoon melted coconut oil When making Scarecrow Crunch Snack Mix, I focus on using fresh and tasty ingredients. Quality matters here. - Choosing quality popcorn: Look for kernels that pop big and fluffy. Buy from a store with high turnover to ensure freshness. - How to select candy corn: Choose candy corn that looks bright and shiny. Check the expiration date for the best flavor. - Fresh vs. roasted peanuts: Use roasted peanuts for crunch. They should smell nutty and taste good. Avoid stale nuts that have an off smell. These tips help you create a mix that is fun and delicious. The right ingredients make the best Scarecrow Crunch! - Prep time: 10 minutes - Cook time: 15 minutes - Total time: 25 minutes - Servings: 4-6 servings Making Scarecrow Crunch Snack Mix is simple and fun. First, you need to gather your ingredients. This snack mix combines sweet and salty flavors, making it perfect for fall. 1. Mixing dry ingredients: In a large mixing bowl, add the freshly popped popcorn, pretzel sticks, candy corn, roasted peanuts, and mini marshmallows. Gently mix these until they are well combined. You want all the treats to be evenly spread out. 2. Preparing the coconut oil and pumpkin spice blend: In a small bowl, blend 1 tablespoon of melted coconut oil with 1 teaspoon of pumpkin spice. Stir until this mixture is smooth and creamy. 3. Combining and tossing the mix: Drizzle your coconut oil and pumpkin spice blend over the dry mix. Use a spatula to toss everything gently. Make sure each piece gets a nice coating without breaking the popcorn or marshmallows. Next, fold in 1/4 cup of dark chocolate chips carefully. - Instructions for cooling: Spread the mix evenly on a baking sheet lined with parchment paper. Let it cool for about 15 minutes. This helps the flavors blend well together. - Tips for presentation: For a festive look, serve the Scarecrow Crunch in a colorful bowl. You can also fill small treat bags tied with twine. This makes a charming snack for parties or Halloween fun. Now, you can enjoy this delightful fall treat! For the complete recipe, check out the Full Recipe section. To make Scarecrow Crunch even tastier, try adding extra spices. A pinch of cinnamon or nutmeg can bring warmth. You can also boost flavor with sea salt or cayenne pepper for a kick. These spices can change the taste in a fun way. Experimenting with different nuts can also add crunch. Almonds or cashews work well if you want a twist. They give a unique flavor and texture. Just remember to keep any nut allergies in mind. Ensuring an even coating is key for the best snack mix. Mix the popcorn and other ingredients gently. This helps them blend well without breaking the popcorn. When you add the coconut oil and pumpkin spice, drizzle it slowly. This way, every bite gets that yummy flavor. Preventing chocolate melt is also important. Add the dark chocolate chips at the end. Fold them in carefully. If they melt, the mix will look messy. For gluten-free variations, swap regular pretzel sticks for gluten-free ones. Many brands offer tasty options. This way, everyone can enjoy the snack mix. If you need nut-free alternatives, skip the peanuts. You can use sunflower seeds instead. They add crunch without the nut allergy risk. These simple swaps keep the fun while making it safe for all. {{image_4}} You can easily change your Scarecrow Crunch for different seasons. For Thanksgiving, add dried cranberries. These give a sweet, tart flavor that pairs well with the mix. They also add vibrant color, making your snack even more festive. For Halloween, think about using colored sprinkles. Choose orange and black ones to match the theme. They add fun and whimsy, perfect for parties. Want to switch things up? Try seasoned pretzels instead of regular ones. They add a savory twist that balances the sweetness of candy corn. You can also experiment with different types of chocolate. White chocolate can offer a creamy taste, while milk chocolate is rich and sweet. Each option gives your mix a new flavor profile. Scarecrow Crunch can be more than just a snack. Use it as a topping for desserts like ice cream or yogurt. The mix adds crunch and flavor that enhances your treats. You can also pair it with beverages. It works well with hot cider or sweet tea, making it a cozy fall snack. Enjoy it at gatherings or as a fun treat at home. To keep your Scarecrow Crunch snack mix fresh, use an airtight container. This helps to lock in flavor and crunch. Store it in a cool, dry place. Direct sunlight and heat can make the mix stale faster. How long will it last? When stored properly, the snack mix can last up to two weeks. Signs of spoilage include a stale taste or a change in smell. If it feels soft or chewy, it’s time to toss it. You can transform leftovers into new snacks. Try mixing it with yogurt for a tasty treat. You can also use the mix for homemade gift bags. Fill small bags with the snack mix and tie them with festive ribbons. It makes a fun gift for friends and family! Scarecrow Crunch Snack Mix is a fun fall treat. It combines popcorn, pretzels, and candy corn. This mix is great for parties or just a cozy night in. It has a sweet and salty taste that everyone loves. The pumpkin spice adds a warm touch, making it perfect for autumn. You can make it fast, which is a bonus when you're busy. Kids and adults enjoy this mix alike. Yes, you can prepare this mix in advance. Just make sure to store it in an airtight container. This keeps the mix fresh and crunchy. I often make it the day before a gathering. That way, I can focus on other things. If you want it to last longer, avoid adding chocolate chips until just before serving. This keeps them from melting and losing their shape. To make your Scarecrow Crunch even more festive, try adding colored sprinkles. You can choose orange and black for Halloween or red and green for Christmas. Another idea is to use seasonal candies, like pumpkin-shaped chocolates. You can also serve it in a bright bowl or create treat bags tied with ribbon. Adding a few decorative touches makes it more fun for guests. Scarecrow Crunch has both healthy and sweet ingredients. Popcorn is a whole grain and low in calories. However, candy corn and chocolate chips add sugar. If you want a healthier mix, use less candy corn. You can also swap dark chocolate for a sugar-free option. Adding nuts is a great way to boost protein and healthy fats. This mix can be a fun treat, but balance is key. This blog post has walked you through creating Scarecrow Crunch Snack Mix. You’ve learned the best ingredients, step-by-step cooking tips, and ways to store it. Remember, you can customize it for any season or diet. Get creative with flavors and textures to make this mix your own. Enjoy your tasty treats and share them with friends and family. Happy snacking!
Scarecrow Crunch Snack Mix Delightful Fall Treat
Fall is here, and so is the perfect treat to celebrate! Scarecrow Crunch Snack Mix combines sweet and salty flavors that will delight your taste
- 4 ripe tomatoes, diced - 1 small red onion, finely chopped - 1 jalapeño, deseeded and minced - 1/4 cup fresh cilantro, chopped - Juice of 1 lime - 1 teaspoon ground cumin - Salt, to taste - 1 tablespoon extra virgin olive oil - Avocado for creaminess - Corn for sweetness - Black beans for protein To make a fresh salsa, you need simple ingredients. Ripe tomatoes are key. They add sweetness and juiciness. Diced tomatoes create a nice base. Next, chop a small red onion. It brings a sharp taste to the mix. Add a minced jalapeño for some heat. Remove the seeds for less spice. If you want it hotter, keep a few seeds. Chop fresh cilantro for a burst of flavor. Now, squeeze the juice of one lime. This adds a tangy kick. Ground cumin gives it a warm, earthy note. Season with salt to bring out the flavors. To finish, drizzle in extra virgin olive oil. It will add richness to the salsa. You can also get creative with optional ingredients. Try adding diced avocado for creaminess. Corn can sweeten the mix, while black beans add protein. This base recipe is perfect for quick meals. You can adapt it to suit your taste. For the full recipe, check out the details in this article. 1. In a medium bowl, combine diced tomatoes, red onion, jalapeño, and cilantro. 2. Squeeze lime juice over the mixture. 3. Add ground cumin and olive oil. 1. Season with salt to taste. 2. Toss all ingredients gently with a spatula. 1. Allow salsa to sit for 10 minutes for flavor melding. This resting time lets the flavors mix and deepen. You will notice how fresh and bright it tastes after. For the best experience, serve it as a dip or topping. Enjoy your zesty creation! Don't forget to check the Full Recipe for more tips. - Use lemon juice instead of lime. - Replace cilantro with parsley for a different flavor. Sometimes you might not have lime juice or cilantro. Lemon juice works just fine and gives a nice tang. If you don’t like cilantro, parsley is a great swap. It adds freshness without the strong taste. - Let it rest longer for deeper flavor. - Adjust jalapeño for desired heat. After mixing your salsa, let it rest. This helps the flavors blend together. If you want it spicier, add more jalapeño. You can also take out the seeds to reduce heat. - Serve in colorful bowls. - Garnish with cilantro or lime wedges. Serving your salsa in a bright bowl makes it pop. For a nice touch, add a sprig of cilantro or some lime wedges on top. This adds color and makes it look fresh. For the full recipe, check out the steps and enjoy your salsa! {{image_4}} To bring a sweet twist to your salsa, try adding diced mango or pineapple. These fruits enhance the freshness and add a bright note. The juicy sweetness pairs well with the tangy lime and spicy jalapeño, making every bite feel like a tropical escape. You can mix in one cup of diced fruit to keep it balanced. If you love heat, increase the amount of jalapeño or add diced habanero. Start by adding just a little at a time, tasting as you go. This way, you can control the spice level. Spicy salsa can bring excitement to your chips or tacos. Just remember, a little heat goes a long way! For a heartier texture, try making chunky salsa. Use fewer diced tomatoes and leave some whole. This gives your salsa a rustic feel and makes it more satisfying to scoop. The larger pieces bring a fun crunch, adding more dimension to your dish. Plus, it looks beautiful when served! For the full recipe, be sure to check out the Zesty Tomato & Cilantro Salsa! Keep your salsa in an airtight container in the fridge. This helps lock in the fresh taste. If you want to enjoy it later, make sure it is tightly sealed. For the best flavor and freshness, consume your salsa within 3-5 days. After this time, the taste may change, and it might lose its crispness. Always check for any signs of spoilage before eating. You can freeze salsa in portions for later use. Use small containers or freezer bags. This way, you can enjoy your salsa even after a few weeks! Just remember to let it thaw in the fridge before using. Homemade salsa typically lasts 3-5 days in the fridge. To keep it fresh, store it in an airtight container. This helps lock in flavor and keeps out air. Always check for any signs of spoilage before serving. Yes, you can use canned tomatoes for convenience. They save time and still taste great. Look for whole or diced tomatoes without added salt or flavorings. Drain them well to avoid excess liquid in your salsa. You can serve salsa with tortilla chips, tacos, grilled meats, or seafood dishes. It adds a fresh, zesty kick to any meal. Try it on top of fish tacos or alongside grilled chicken for a tasty combo. For a fun twist, mix it into a salad for added flavor. This blog post shared simple steps to make fresh salsa. You learned which key ingredients to use and the quick prep methods. I highlighted some fun variations and storage tips. Homemade salsa is easy and tasty. You can customize it to fit your taste and needs. Enjoy your delicious salsa with chips or tacos. It brings flavor and joy to every meal. Now, get creative and make the salsa yours!
Quick and Easy Salsa Flavorful and Fresh Recipe
Are you ready to spice up your meals? This Quick and Easy Salsa recipe is your answer! With fresh ingredients like ripe tomatoes, zesty jalapeños,
- 2 cups all-purpose flour - 1 teaspoon salt - 1 teaspoon baking powder - 2 tablespoons olive oil - 3/4 cup warm water - 1 cup shredded mozzarella cheese - 1/2 cup pepperoni slices - 1 teaspoon Italian seasoning - Red pepper flakes - 1/2 cup marinara sauce - Mixing bowl - Rolling pin - Baking sheet Gathering the right ingredients is key. First, all-purpose flour forms the base of the dough. It gives pizza pockets their chewy texture. Next, shredded mozzarella cheese provides that gooey, melty goodness we all love. I also like to add pepperoni slices for a classic touch. If you want to spice things up, try adding Italian seasoning and red pepper flakes. These give a nice boost of flavor. Marinara sauce is great for dipping or adding to the filling. You will need a mixing bowl to combine your ingredients. A rolling pin helps shape the dough into the right size. Finally, a baking sheet will hold your pizza pockets while they bake to golden perfection. For the full recipe, check out the details above. Enjoy making these tasty treats! - Combine 2 cups of all-purpose flour, 1 teaspoon salt, and 1 teaspoon baking powder in a mixing bowl. Mix well. - Create a well in the center. Add 2 tablespoons of olive oil and 3/4 cup of warm water. Stir until a soft dough forms. - Dust a flat surface with flour. Knead the dough for 3-5 minutes until it feels smooth. - Cover the dough with a kitchen towel and let it rest for 15 minutes. This helps the gluten relax. - While the dough rests, gather your filling. Measure 1 cup of shredded mozzarella cheese and slice 1/2 cup of pepperoni. You can use veggies if you prefer. - Add 1/2 cup of marinara sauce to the mix. This adds great flavor to each bite. - Roll out the dough to about 1/8 inch thick. Use a round cutter or knife to cut circles 4-6 inches wide. - On one half of each piece, place a layer of mozzarella cheese, some pepperoni, and a teaspoon of marinara sauce. Sprinkle with 1 teaspoon of Italian seasoning. - Fold the dough over the filling, pressing the edges to seal. You can crimp the edges with a fork for a fun look. - Place the pockets on a baking sheet lined with parchment paper. Brush the tops with an egg wash made from 1 egg, whisked. - Bake in a preheated oven at 400°F (200°C) for 15-20 minutes until golden brown. Error: Error code: 429 - {'error': {'message': 'Rate limit reached for gpt-4o-mini in organization org-zFeAnX8gJvsCtEtJubNX3NN3 on tokens per min (TPM): Limit 200000, Used 199658, Requested 2178. Please try again in 550ms. Visit https://platform.openai.com/account/rate-limits to learn more.', 'type': 'tokens', 'param': None, 'code': 'rate_limit_exceeded'}} You can switch up the cheese for your pizza pockets. Cheddar gives a sharp flavor. Pepper jack adds a nice spice. Gouda melts beautifully and has a sweet taste. Mixing these cheeses can create a fun, unique flavor. Try a blend for a tasty twist! You can customize the meat in your pizza pockets. Chicken works great for a lighter option. Sausage adds a hearty touch, while bacon brings a smoky flavor. Each choice can change the taste and feel of your pizza pocket. Mix and match to find your favorite! For a vegan option, use plant-based cheese. You can fill it with veggies like peppers, mushrooms, or spinach. This way, you keep it tasty and meat-free. It’s a great way to enjoy pizza pockets while sticking to a plant-based diet. There are so many options to explore! Don’t forget to check the Full Recipe for more ideas! To store leftover pizza pockets, let them cool first. Place them in an airtight container. You can keep them in the fridge for up to three days. If you want to enjoy them later, make sure to wrap them well before storing. This helps keep them fresh and tasty. Freezing pizza pockets is easy and a great way to save some for later. First, let them cool completely. Then, wrap each one in plastic wrap. After that, place them in a freezer bag or container. They stay good for up to three months. This method helps lock in all the cheesy goodness. When it’s time to enjoy your pizza pockets again, reheating is key. You can use an oven or an air fryer for the best results. For the oven, preheat it to 375°F (190°C). Place the pockets on a baking sheet and heat for about 10-15 minutes. This keeps them crispy. If using an air fryer, set it to 350°F (175°C) for 5-7 minutes. Both methods help maintain the yummy texture. To make your dough easy to handle, keep it at room temperature. Warmer dough is easier to roll out. If your kitchen is humid, it can affect the dough. Use less water if it's too sticky. If it's too dry, add a bit more water. Yes! You can bake the pizza pockets and store them for later. Let them cool fully before storing. Place them in an airtight container in the fridge. They will last up to three days. To reheat, pop them in the oven at 350°F (175°C) for about 10-15 minutes. If you notice leaks, it usually means the filling is too full or not sealed well. Make sure to press the edges firmly. Use a fork to crimp the edges for a tight seal. If some cheese spills out, it’s okay! Just enjoy the extra cheesy goodness. You now have all you need to make tasty pizza pockets at home. Start with simple ingredients like flour, cheese, and pepperoni. Follow the easy steps for dough and filling. Don’t forget my tips for sealing and customizing your pockets to fit your taste. You can even try vegan options! Remember to store or freeze extras for later. With these easy tricks, you can enjoy hot, fresh pizza pockets whenever you want. So, gather your ingredients and get cooking! Enjoy!
Easy Cheesy Homemade Pizza Pockets Quick and Tasty
Looking for a quick and tasty snack that you can make at home? Try these Easy Cheesy Homemade Pizza Pockets! With gooey mozzarella and your
- 1 cup balsamic vinegar - 1/4 cup packed brown sugar - 1 tablespoon Dijon mustard - 1 teaspoon garlic powder - 1/2 teaspoon freshly ground black pepper - Pinch of sea salt - 1 tablespoon extra virgin olive oil (optional) To create a great balsamic glaze, I love using simple ingredients. Balsamic vinegar is the star here. This thick, dark vinegar gives the glaze its sweet and tangy flavor. Brown sugar adds a nice sweetness that balances the vinegar's bite. Dijon mustard gives the glaze a subtle kick. Garlic powder brings depth, while black pepper adds warmth. A pinch of sea salt enhances all these flavors. If you want a richer taste, you can add olive oil. This glaze is easy to make and uses items you likely have in your kitchen. You can find the full recipe above. Enjoy the simple and delicious flavors of this glaze! Pour balsamic vinegar and brown sugar into a saucepan. Stir gently until the brown sugar mostly dissolves. This creates a sweet and tangy base for the glaze. Add Dijon mustard, garlic powder, black pepper, and a pinch of sea salt. Whisk these ingredients together until the mixture is smooth. This step helps to enhance the flavor of your glaze. Place the saucepan over medium heat. Bring the mixture to a gentle boil, stirring occasionally. This keeps it from sticking to the pan and burning. Once it starts boiling, reduce the heat to low. Allow the mixture to simmer for 15-20 minutes. It will thicken to a syrupy consistency. Remember to stir it occasionally. If you want a richer flavor, stir in olive oil once the glaze thickens. This step adds depth and enhances the overall taste. Remove the saucepan from heat. Let the glaze cool slightly. Carefully transfer it to a clean jar or an airtight container for storage. You can find the full recipe here: [Full Recipe]. To check if your glaze is thick enough, use a spoon. Dip the spoon into the glaze, lift it out, and let it drip. If the glaze coats the back of the spoon and holds its shape, it’s ready. Remember, it will thicken more as it cools, so don’t overcook it. Aim for a syrupy texture that adds a rich touch to your dishes. You can easily boost the taste of your balsamic glaze. Try adding a pinch of red pepper flakes for heat or a tablespoon of honey for extra sweetness. Fresh herbs, like rosemary or thyme, can also add depth. Experiment with these additions to make the glaze your own. Just a small tweak can transform it into a unique flavor experience. When making balsamic glaze, avoid cooking it over high heat. This can cause it to burn or become too thick too fast. Also, don't skip the stirring. Stirring helps prevent sticking and burning. Lastly, don’t rush the simmering time. Allow it to reduce slowly to develop those rich flavors. Following these tips will help you create a perfect glaze every time. {{image_4}} You can make your balsamic glaze even better by adding fruits or herbs. Try mixing in fresh strawberries or raspberries during cooking. These fruits add a lovely sweetness and a pop of color. You can also use herbs like rosemary or thyme. Just toss in a few sprigs while the glaze simmers. They give a nice earthy flavor that pairs well with the balsamic. While balsamic vinegar is great, you can switch it up. Apple cider vinegar adds a fruity twist. Red wine vinegar gives a sharp taste. Each type of vinegar will change the glaze’s flavor. Feel free to experiment. Just keep the same amount of vinegar in the recipe for best results. If you like spice, try adding some heat to your glaze. A pinch of red pepper flakes can elevate the flavor. For a bolder kick, mix in a bit of sriracha or hot sauce. Start with a small amount and taste as you go. This way, you can control how spicy it gets. To keep your balsamic glaze fresh, use an airtight container. A glass jar works best. Make sure it is clean and dry before pouring in the glaze. Store it in the fridge. This keeps the flavors intact and prevents spoilage. Your homemade balsamic glaze can last up to two weeks in the refrigerator. After that, the flavor may fade. Always check for any off smells or changes in color. If it looks or smells strange, it's best to toss it. You can freeze balsamic glaze if you want to keep it longer. Pour it into ice cube trays for easy portions. Once frozen, transfer the cubes to a freezer bag. When ready to use, thaw cubes in the fridge overnight or warm them gently on the stove. This way, you can enjoy the rich flavors for months! To balance the sweetness, add more acidity. You can mix in a splash of lemon juice or a bit of apple cider vinegar. This will help cut through the sweetness. You might also try using less brown sugar in your recipe. Start with half the amount and taste as you go. Adjust until you find the right balance for your taste buds. Yes, balsamic glaze makes a great marinade! It adds flavor to meats and veggies. Try marinating chicken, beef, or even tofu for about an hour. The sweet and tangy notes work well with grilled or roasted dishes. Just remember to coat the food evenly for the best taste. Balsamic glaze pairs well with many dishes. Here are some ideas: - Drizzle over grilled chicken or steak for a tasty kick. - Use it on roasted vegetables like Brussels sprouts or carrots. - Add it to salads for a fresh burst of flavor. - It also works well on pizza or bruschetta, adding a gourmet touch. Explore these options to enhance your meals! For the full recipe, check out the section above. In this post, I guided you through making an easy balsamic glaze. We covered key ingredients, step-by-step instructions, and tips for perfecting the glaze. I shared variations and storage tips to help you customize and keep it fresh. Remember, creating your own glaze opens up endless flavor possibilities. With your new skills, you can enhance any dish. Enjoy the process and get creative in the kitchen!
Easy Balsamic Glaze Simple and Flavorful Recipe
Looking to elevate your meals? This Easy Balsamic Glaze is your answer! With just a few simple ingredients, you can create a sweet and tangy
- 6 cups cucumbers, finely chopped - 2 cups bell peppers (a mix of red and green), finely chopped - 1 cup onions, finely chopped Cucumbers are the star of this relish. They give it a crisp bite. Use fresh, firm cucumbers for the best taste. Bell peppers add color and sweetness. I like to mix red and green for a vibrant look. Onions bring a nice sharpness that balances the flavors. - 3 cups granulated sugar - 2 cups apple cider vinegar - 1 tablespoon mustard seeds - 1 tablespoon celery seeds - 1 teaspoon ground turmeric - 2 teaspoons salt - 1 teaspoon ground black pepper The sugar is what makes this relish sweet. It blends well with the tangy apple cider vinegar. Mustard seeds and celery seeds add depth. Ground turmeric gives it a beautiful color. Salt and pepper enhance all the flavors in the mix. - 1/4 teaspoon red pepper flakes (optional, for a hint of spice) - Salt and pepper If you want some heat, add red pepper flakes. This will give your relish a little kick. Adjust salt and pepper to your taste. Always remember, you can customize this recipe to fit your preferences. For the full recipe, check the Sweet and Tangy Cucumber Relish section. Enjoy making this delightful condiment! Soaking and Draining Process Start with 6 cups of finely chopped cucumbers. Rinse them under cold water to freshen them up. Place them in a large mixing bowl. Sprinkle the cucumbers with 2 teaspoons of salt. Pour in enough water to cover them completely. Let them soak for about 2 hours. This helps reduce moisture and keeps them crunchy. Importance of Rinsing and Draining After soaking, drain the cucumbers in a colander. Rinse them under cold running water. This step removes excess salt, ensuring your relish is not too salty. Allow the cucumbers to drain well before you mix them with other ingredients. Mixing Vegetables in a Pot In a large pot, mix the drained cucumbers with 2 cups of finely chopped bell peppers and 1 cup of finely chopped onions. Stir gently to combine the veggies evenly. This mix will form the base of your relish. Preparing the Vinegar Mixture In a separate saucepan, pour in 2 cups of apple cider vinegar. Add 3 cups of granulated sugar, 1 tablespoon of mustard seeds, 1 tablespoon of celery seeds, 1 teaspoon of ground turmeric, 2 teaspoons of salt, and 1 teaspoon of ground black pepper. If you want a hint of spice, add 1/4 teaspoon of red pepper flakes. Heat this mixture on medium-high. Stir often until the sugar dissolves completely. Simmering Instructions Once the vinegar mixture boils, pour it over the cucumber and vegetable mix in the large pot. Stir well to coat all ingredients. Turn the heat up to medium. Bring everything to a rolling boil. Then, reduce the heat to a gentle simmer. Cook for 10 to 15 minutes, stirring occasionally. This helps all the flavors meld together. Sterilizing Jars While your relish simmers, get your canning jars ready. Submerge them in boiling water for about 10 minutes. This step kills any bacteria, making the jars safe for your relish. Ladling and Sealing Jars After simmering, carefully ladle the hot relish into the warm jars. Leave about 1/2 inch of space at the top. Clean the jar rims with a cloth to remove any residue. Place a sterilized lid on each jar and secure it with a band. Tighten just until snug, but don't over-tighten. It can stop the jar from sealing properly. Processing the Jars To seal the jars, process them in a boiling water bath for 10 minutes. This creates a vacuum seal to keep your relish fresh. Cool and Store After processing, take the jars out of the water and let them cool on a clean towel. You will hear a satisfying “pop” sound as they seal. This sound means your hard work paid off! - Over-soaking Cucumbers: Don’t soak cucumbers for too long. Two hours is enough. If you soak them longer, they may lose their crunch. - Incorrect Jar Sealing: Ensure lids are snug but not too tight. Over-tightening can prevent a proper seal. A good seal is key for safe canning. - Allowing Relish to Chill Before Serving: Chill the relish in the fridge. Chilling helps the flavors blend better, making each bite even tastier. - How Long to Simmer: Simmer your relish for 10 to 15 minutes. This time allows the flavors to meld without losing the crunch of the cucumbers. - Necessary Canning Equipment: Use proper canning tools. You need sterilized jars, lids, and a boiling water bath for safe processing. - Checking Seals After Processing: Once cooled, press the center of each lid. If it doesn’t pop back, it’s sealed. If it does pop, refrigerate and use right away. These tips can help you make a perfect batch of sweet cucumber relish. Enjoy your canning journey! For the complete process, check the Full Recipe. {{image_4}} You can easily make a sweet and spicy version of cucumber relish. To adjust the flavor, play with sugar and spice levels. If you want more heat, add more red pepper flakes. If you prefer it milder, reduce them. You could also add jalapeños for an extra kick. You can customize your relish by using different vinegars. Try white vinegar for a sharper taste or rice vinegar for a milder flavor. Mixing in other vegetables can also add depth. Carrots, zucchini, or even radishes can give your relish a unique twist. Just remember to chop them finely, so they blend well. For those looking to lower sugar, you can decrease the sugar amount without losing taste. You might also use a sugar substitute like stevia. For gluten-free diets, this recipe is safe as it contains no gluten ingredients. Always check your specific brands to ensure they are gluten-free. To keep your sweet cucumber relish fresh, store it in a cool, dark place. - Ideal Temperature Conditions: Aim for a temperature between 50°F and 70°F. This range helps maintain flavor and quality. - Avoiding Light Exposure: Light can change the taste and color. Keep jars in a dark cupboard or pantry. Understanding the shelf life of your relish is key to enjoying it fully. - Understanding How Long it Lasts: When stored well, your relish can last up to one year. - Signs of Spoilage to Look For: Check for any off smells, bubbles, or mold. If you see any, it's best to discard the jar. Both methods have their perks, but they serve different needs. - Pros and Cons of Each Method: Canning offers long-term storage and retains flavor well. Freezing is quicker but may change texture. Choose what fits your cooking style best! For the complete recipe, see the Full Recipe section. Sweet cucumber relish shines as a condiment. It pairs well with burgers, hot dogs, and grilled meats. You can also mix it into salads or use it as a dip with chips. Try it on sandwiches for a tasty crunch. The sweet and tangy flavor adds a delightful twist to many dishes. Yes, you can easily adjust the sweetness. If you prefer less sugar, reduce the amount of granulated sugar in the recipe. Alternatively, you can add more sugar if you like it sweeter. Taste the mixture before canning to find your perfect balance. This way, you can customize the flavor to suit your liking. To check if your jars sealed, press the center of each lid. If it pops back, it hasn't sealed. If it stays down, the jar sealed well. After processing, let the jars cool. Listen for the popping sound, which means they sealed correctly. Store sealed jars in a cool, dark place. For the best flavor, wait at least two weeks before eating your relish. This resting time allows the flavors to meld and deepen. However, it can be enjoyed sooner if you can't wait. Just remember, the longer it sits, the better it tastes! Absolutely! This recipe is perfect for beginners. The steps are clear and simple to follow. Just take your time with each part. Pay attention to the soaking, draining, and sealing steps. With a little care, you will create delicious relish. You can find more canning recipes in cookbooks, food blogs, and online forums. Websites like the USDA's page on canning offer reliable information. You can also join local canning groups for tips and ideas. Explore and discover new flavors to try! To wrap up, making sweet cucumber relish is fun and simple. Start with fresh cucumbers, bell peppers, and onions. Add sugar, vinegar, and spices for flavor. Follow easy steps, from soaking to canning. Remember tips to avoid mistakes and enhance taste. Feel free to experiment with flavors to make it your own. Store it right for the best taste later. Enjoy your homemade relish! It’s perfect for meals or gifts.
Delicious Sweet Cucumber Relish for Canning Recipe
Are you ready to add a burst of flavor to your meals? This “Delicious Sweet Cucumber Relish for Canning Recipe” is your answer! With fresh
To make Cheesy Jalapeño Popper Bites, gather these ingredients: - 12 fresh jalapeños, halved and seeds removed - 1 cup cream cheese, softened to room temperature - 1 cup sharp cheddar cheese, shredded - 1/2 cup panko breadcrumbs for extra crunch - 2 tablespoons green onions, finely chopped - 1 teaspoon garlic powder - 1/2 teaspoon smoked paprika - Salt and freshly ground black pepper to taste - Cooking spray or olive oil for greasing You can adjust this recipe to fit different diets. For a dairy-free version, use vegan cream cheese and vegan cheese. If you want a low-carb option, skip the panko breadcrumbs or use crushed pork rinds instead. You can also try using different peppers, like mini sweet peppers, if you prefer a milder flavor. To make this snack, you will need some basic kitchen tools: - Baking sheet - Parchment paper or cooking spray - Mixing bowl - Spoon or spatula for mixing - Knife for halving the peppers - Measuring cups and spoons These tools will help you create delicious Cheesy Jalapeño Popper Bites with ease. Don't forget to check the [Full Recipe] for step-by-step guidance! First, set your oven to 375°F (190°C). While it warms up, grab a baking sheet. Line it with parchment paper or spray it lightly with cooking spray. This will help with cleanup later. In a big bowl, mix the softened cream cheese and shredded sharp cheddar cheese. Add the green onions, garlic powder, smoked paprika, salt, and black pepper. Stir well until the mixture is smooth and creamy. This filling is key to the flavor. Now, take each jalapeño half. Spoon in a good amount of the cheese filling. Pack it in gently so it’s full. Next, sprinkle panko breadcrumbs over each stuffed jalapeño. Press lightly to help them stick. This adds a nice crunch. Place the stuffed jalapeños on the prepared baking sheet. Leave some space between each one. For extra flavor, spray the tops with cooking spray or drizzle with olive oil. Bake them in the oven for 20-25 minutes. They’re done when the jalapeños are tender and the tops are golden brown. Enjoy your Cheesy Jalapeño Popper Bites! For the full recipe, check the details above. To get the best taste, use room-temperature cream cheese. Softening it makes mixing easy. Blend it well with the sharp cheddar cheese. This blend creates a creamy and tasty filling. Ensure there are no lumps. A smooth mixture helps the flavors mix better. Jalapeños can vary in heat. If you prefer mild poppers, remove all the seeds and membranes. This step reduces the spice level significantly. For more heat, you can leave some seeds in. Taste the filling before stuffing the jalapeños. Adjust the spice based on your liking. Make your poppers look great! Serve them on a colorful platter. Sprinkle extra green onions on top for a fresh touch. Add a small bowl of ranch dressing or sour cream on the side. This dip adds creaminess and helps balance the heat. Serve hot for the best taste. These tips will impress your guests and make your poppers shine! For the complete recipe, check the full recipe. {{image_4}} To make these bites vegetarian, swap the cream cheese for a plant-based option. You can use vegan cream cheese, which works well. For the cheese, try vegan cheddar or mozzarella shreds. These changes keep the texture while making it meat-free. If you're looking for a richer flavor, add nutritional yeast to the mix. This gives a cheesy taste without using dairy. While I love sharp cheddar, you can experiment with other cheeses too. Creamy goat cheese adds a tangy twist. Pepper jack gives a spicy kick. Mozzarella melts beautifully and keeps the bites gooey. Mix and match your favorites to find the perfect blend. Just ensure the cheese you select can melt well for that delightful texture. You can spice things up by adding different herbs and spices. For a smoky flavor, try adding chipotle powder. If you love fresh herbs, mix in chopped cilantro or parsley. A dash of cumin can add warmth, while lime juice brings a fresh zing. Experiment with these flavors to make each batch unique and exciting. You can also add a touch of hot sauce for extra heat. Store any leftover Cheesy Jalapeño Popper Bites in an airtight container. Make sure they cool down first. Place a paper towel inside to absorb moisture. This keeps them fresh and helps prevent sogginess. They will stay good in the fridge for up to three days. To reheat your popper bites, use the oven for best results. Preheat the oven to 350°F (175°C). Place the bites on a baking sheet. Heat them for about 10-15 minutes. This ensures they stay crispy and warm throughout. You can also use a microwave but know that the texture may change. If you want to store them longer, freezing is a great option. First, arrange the poppers in a single layer on a baking sheet. Freeze them for about an hour. After they are firm, transfer them to a freezer-safe bag. Remove as much air as possible. They can last up to three months in the freezer. When ready to eat, bake them from frozen. Just add a few extra minutes to the cooking time. Enjoy your delicious Cheesy Jalapeño Popper Bites any time! Yes, you can use other peppers. Bell peppers or poblano peppers work well too. They have mild flavors. If you want a kick, try serrano peppers. Each pepper gives a unique taste to the poppers. To reduce the heat, remove all the seeds and membranes from the jalapeños. You can also mix in some sour cream or cream cheese to the filling. This adds creaminess and cools down the spice. These popper bites taste great with ranch dressing or sour cream. You can also try barbecue sauce or a creamy avocado dip. Each sauce adds a different flavor to your bites. You can prepare the poppers in advance. Stuff the jalapeños and place them on a baking sheet. Cover and refrigerate them for up to 24 hours. Bake them right before serving for the best taste. For the full recipe, check out the detailed steps. You can create tasty Cheesy Jalapeño Popper Bites easily. We covered the key ingredients needed, including alternatives for special diets. I provided step-by-step instructions for prep and baking, plus useful tips for the perfect blend and presentation. Explore fun variations to suit your taste and learn how to store and reheat leftovers effectively. Now you can impress your guests with these delicious bites, no matter the occasion. Enjoy making and sharing them!
Cheesy Jalapeño Popper Bites Irresistible Snack Recipe
Are you ready to spice up your snack game? These Cheesy Jalapeño Popper Bites are easy to make and packed with flavor. Whether you’re hosting
- 1 lb (450g) chicken breast, cut into bite-sized pieces - 1 cup buttermilk - 1 cup all-purpose flour - 1/2 cup cornstarch The chicken breast is the star of this dish. It gives a nice, tender bite. Buttermilk helps to make the chicken juicy and adds flavor. All-purpose flour and cornstarch create that perfect crunchy coating. The mix of these ingredients gives the chicken its signature crispy texture. - 2 teaspoons garlic powder - 1 teaspoon paprika - 1 teaspoon cayenne pepper (adjust for your preferred heat level) - Salt and pepper, to taste These seasonings are key to making each bite burst with flavor. Garlic powder adds depth, while paprika gives a subtle smokiness. The cayenne pepper brings the heat, but you can adjust it to suit your taste. Salt and pepper balance everything out, making the chicken even more tasty. - 1/2 cup mayonnaise - 2 tablespoons sweet chili sauce - 1 tablespoon sriracha (adjust to taste for spiciness) - 1 teaspoon honey - 1 teaspoon fresh lime juice The Bang Bang sauce is creamy, sweet, and spicy. Mayonnaise forms the base, giving a rich texture. Sweet chili sauce adds sweetness, while sriracha packs a spicy punch. Honey balances the heat, and lime juice brightens the flavor. This sauce is what makes the dish truly special. You can find the full recipe in the article. To start, marinate the chicken. In a medium bowl, mix the chicken pieces with buttermilk. Make sure every piece is well-coated. This marinating process is key. It helps tenderize the chicken and boosts flavor. If you have time, let it sit overnight. If not, one hour will work too. Buttermilk is important. It adds moisture and tang. This helps the chicken stay juicy when cooked. It also allows the breading to stick better. Next, you need to prepare the breading. In a shallow dish, combine the flour, cornstarch, garlic powder, paprika, cayenne pepper, salt, and pepper. Whisk them together until smooth. This mix gives your chicken a crispy and tasty coating. Now for the dredging technique. After marinating, take each chicken piece. Dredge it in the flour mix, making sure it’s fully coated. Shake off any extra flour. Then set the pieces aside on a plate. This step is crucial for that perfect crunch. Now it’s time to cook. First, pour enough oil into a deep frying pan. The oil should cover the bottom by 1-2 inches. Heat the oil over medium-high heat. Use a cooking thermometer and aim for 350°F (175°C). This temperature is key for crispy chicken. When the oil is hot enough, carefully add the breaded chicken. Be careful not to crowd the pan. Frying in batches helps the chicken cook evenly. Fry for about 4-5 minutes. Look for a golden brown color to know they’re ready. Use a slotted spoon to take them out. Place the chicken on paper towels to drain excess oil. Cooking this way gives you that sought-after crunch. For the full recipe, you can check the complete instructions. Enjoy your cooking! To get that crunchy texture, keep an eye on the oil temperature. It should be about 350°F (175°C). Use a thermometer to check. If the oil is too cool, the chicken will soak up too much oil. If it's too hot, the outside will burn while the inside stays raw. Fry in small batches to ensure even cooking. This way, each piece gets proper heat for that perfect crunch. You can adjust the heat level in the Bang Bang sauce. If you like it spicy, add more sriracha. For a milder taste, reduce the sriracha and add more sweet chili sauce. Don't forget to taste as you go! You can also add a pinch of salt or a dash of garlic powder to enhance the sauce flavor. This adds a nice touch and makes each bite even better. For a stunning presentation, serve your Bang Bang chicken on a colorful platter. Garnish with finely chopped green onions for a fresh look. A sprinkle of sesame seeds adds a nice crunch. Add lime wedges on the side too. This lets guests squeeze fresh lime juice over the chicken before taking a bite. It adds a zesty kick that pairs well with the sauce. Enjoy the visual and tasty feast! {{image_4}} You can make your Bang Bang Chicken even spicier. Adding extra sriracha to the sauce gives it a kick. If you want to change it up, try different hot sauces. A chipotle sauce adds a smoky taste. A habanero sauce gives bold heat. Experiment to find your perfect spice level. If you want a lighter dish, baking works great. Coat the chicken and bake it at 400°F for 20-25 minutes. This keeps it crispy without all the oil. You can also make it gluten-free. Use almond flour or gluten-free breadcrumbs instead of regular flour for the breading. Pair your Bang Bang Chicken with tasty sides. Rice or quinoa works well for a full meal. You can even turn it into a wrap. Use tortillas and add fresh veggies for crunch. For a salad, toss it with greens and your favorite dressing. Enjoy the flavors in many ways! To keep your Bang Bang Chicken fresh, place it in an airtight container. Make sure the chicken cools down before sealing it. Store in the fridge for up to three days. This keeps the chicken safe and tasty. Use glass or plastic containers with tight lids for best results. These help prevent moisture loss. To reheat your chicken, use an oven or air fryer. These methods keep the chicken crispy. Preheat your oven to 375°F (190°C). Place the chicken on a baking sheet and warm for about 10 minutes. For an air fryer, set it to 350°F (175°C) and heat for 5-7 minutes. Avoid using the microwave, as it can make the chicken soggy. You can freeze Bang Bang Chicken before or after cooking. If freezing raw, marinate the chicken first, then freeze it in a bag. Be sure to remove excess air from the bag. If freezing cooked chicken, let it cool and place it in a container. It stays good for up to three months. When ready to eat, thaw in the fridge overnight before reheating. Can I use chicken thighs instead of breasts? Yes, you can use chicken thighs. They will add more flavor and moisture. Just cut them into bite-sized pieces, like the breasts. What if I don't have buttermilk? If you lack buttermilk, mix one cup of milk with one tablespoon of vinegar or lemon juice. Let it sit for five minutes. This will mimic buttermilk's tanginess. How many calories per serving? Each serving has about 400 calories. This can change based on the amount of sauce you use. Is this recipe suitable for meal prep? Yes, this recipe works well for meal prep. The chicken stays crispy when stored properly. Can this recipe be made vegetarian? Definitely! You can use tofu or cauliflower instead of chicken. Just adjust the cooking time based on the ingredient. What are some dipping sauce alternatives? You can try ranch, barbecue sauce, or even a yogurt-based sauce. Each offers a different taste to enjoy with the crispy chicken. Bang Bang Chicken is a tasty dish that combines juicy chicken with a zesty sauce. You learned about the key ingredients, like buttermilk, which makes the chicken tender. We explored cooking tips to ensure a crispy finish and shared helpful tricks to enhance flavor and presentation. You can easily modify the recipe to fit your taste, too. Remember, storage and reheating strategies keep your leftovers delicious. With these insights, you're ready to impress with your Bang Bang Chicken. Enjoy cooking and sharing this treat with others!
The BEST Crispy Bang Bang Chicken Recipe Delight
Are you ready to dive into the crispy, spicy goodness of Bang Bang Chicken? In this guide, I’ll show you how to make the BEST
For this dish, you need 1 lb of fresh salmon fillets. I like to use wild-caught salmon. It has better flavor and is healthier. Look for fillets that are bright and shiny. The flesh should be firm to the touch. You will want to prepare some tasty toppings. Here's what you need: - 1 cup cherry tomatoes, finely diced - 1/4 cup fresh basil leaves, coarsely chopped - 2 cloves garlic, minced - 1 tablespoon balsamic vinegar - 1 tablespoon extra virgin olive oil - Salt and freshly ground black pepper, to taste These toppings add a fresh burst of flavor. The cherry tomatoes bring sweetness. The basil adds a lovely aroma. Garlic gives a nice kick, and balsamic vinegar ties everything together. For the base, use 1 French baguette. Slice it into 1/2-inch thick pieces. This bread crisps up nicely when toasted. You will also need salt and freshly ground black pepper to season the salmon. Seasoning enhances the natural taste of the fish. This full recipe creates a stunning and delicious appetizer. Enjoy the process of making this bruschetta salmon! First, preheat your oven to 375°F (190°C). This heat will help bake the salmon and toast the bread. Next, gather your ingredients. You will need fresh salmon fillets, cherry tomatoes, basil, garlic, balsamic vinegar, olive oil, salt, pepper, a French baguette, and feta cheese if you like. Having everything ready makes cooking smoother. In a medium bowl, mix together the finely diced cherry tomatoes, coarsely chopped basil leaves, and minced garlic. Add in balsamic vinegar and olive oil. Season this mixture with salt and pepper to taste. Stir it well until the flavors mix. Let this sit while you prepare the salmon. This resting time helps the flavors deepen and blend beautifully. Now, take the salmon fillets and place them skin-side down on a lined baking sheet. Season them with salt and pepper. Bake the salmon for about 15-18 minutes. It will be done when it flakes easily with a fork. While the salmon bakes, arrange the sliced baguette on another baking sheet. Toast the bread in the oven for 5-7 minutes, or until golden and crispy. Once everything is ready, flake the salmon into bite-sized pieces. Now, assemble your bruschetta. Take a toasted slice of baguette and spoon the tomato basil mixture on top. Add a layer of flaked salmon. If you want, sprinkle some crumbled feta cheese for added flavor. Serve your bruschetta while warm and enjoy this easy and tasty appetizer. For a full recipe, check out Bruschetta Salmon Delight. To get that perfect flakiness in your salmon, start with fresh fillets. Look for bright, moist fish with no strong smell. Season with salt and pepper before baking. Bake at 375°F for 15-18 minutes. Check if it flakes easily with a fork; that’s your sign it's ready. If you want a little extra flavor, drizzle lemon juice on top just before serving. This adds brightness! For crispy, golden-brown baguette slices, cut them about 1/2 inch thick. Lay them on a baking sheet in a single layer. Toast them in the oven at the same time as the salmon. Watch them closely. They usually take about 5-7 minutes. You want them golden, not burnt. For extra flavor, brush the slices lightly with olive oil before toasting. When plating your bruschetta, arrange the pieces on a nice platter. You can add a few extra basil leaves for color. A drizzle of balsamic glaze adds a nice finish and a pop of flavor. Try to serve them warm, right after making. This keeps the bread crunchy and toppings fresh. If you’re feeling fancy, sprinkle some feta cheese on top for a gourmet touch. For the full recipe, check out the complete instructions in the document. {{image_4}} You can change up your bruschetta salmon with fun toppings. Here are some ideas: - Avocado slices: Add creamy avocado for richness. - Arugula: A handful of arugula gives a peppery bite. - Pesto: Swirl some pesto on top for a fresh twist. - Pickled red onions: These add a tangy crunch. - Capers: A few capers can bring extra flavor. Feel free to mix and match these toppings. Each adds a unique taste. If you need gluten-free choices, use gluten-free bread. Many brands offer tasty gluten-free baguettes. You can also use: - Cucumber slices: These make a refreshing base. - Polenta rounds: Cooked and grilled polenta works well too. These options keep your dish flavorful while meeting dietary needs. You can cook salmon in different ways for bruschetta. Here are some methods: - Grilling: This gives a smoky flavor. Just grill fillets for about 5-7 minutes per side. - Pan-searing: Cook salmon in a hot skillet for a crispy skin. This takes about 4-5 minutes per side. - Poaching: For a gentle method, poach salmon in water or broth. This takes about 10-12 minutes. Each method adds its own touch to the dish. Try them out to find your favorite! For the full recipe, check out the Bruschetta Salmon Delight. If you have leftover salmon, store it right away. Place it in an airtight container. It stays fresh for up to three days in the fridge. Make sure to let it cool before sealing. This keeps the moisture in and prevents spoilage. If you want to keep it longer, freeze the salmon. Wrap it tightly in plastic wrap, then place it in a freezer bag. Frozen salmon can last for about two months. Remember to label the bag with the date. The bruschetta mixture is tasty, but it can lose its crunch. Store it in a separate airtight container. Keep it in the fridge and use it within two days. This is key for keeping the tomatoes and basil fresh. If you want to make it ahead, prepare it without adding salt. The salt can draw out moisture and make it soggy. Add salt just before serving for the best taste. Reheat salmon gently to keep it moist. Place the salmon on a plate and cover it with a damp paper towel. Microwave it on low power for 20-30 seconds. Check often to avoid overcooking. You can also reheat it in an oven. Preheat the oven to 250°F (120°C) and place the salmon on a baking sheet. Heat for about 10 minutes. This method keeps the salmon flaky and tender. Enjoy your Bruschetta Salmon by adding the fresh mixture just before serving. Check the [Full Recipe] for more details! For Bruschetta Salmon, I recommend using fresh, wild-caught salmon. Sockeye or king salmon works best. These types have rich flavors and firm textures, making them perfect for this dish. They hold up well during cooking and pair nicely with the tomato basil topping. Farmed salmon can work too, but it may have a milder taste. Always choose salmon that looks bright and smells fresh. Yes, you can prepare parts of Bruschetta Salmon ahead of time. You can make the tomato basil mixture a few hours in advance. Just store it in the fridge until you're ready to assemble. For the salmon, I suggest cooking it fresh for the best taste. You can also toast the baguette slices ahead of time. Just keep them in an airtight container. This way, your appetizer stays crisp and delicious. Bruschetta Salmon pairs well with a variety of sides. A simple green salad with lemon vinaigrette adds freshness. Grilled veggies make a tasty complement too. You could also serve it with a light pasta dish. For drinks, a crisp white wine or sparkling water works great. These options enhance the flavors without overpowering your delicious bruschetta. You can find the full recipe for this delightful dish in the earlier sections. This blog post covered how to make a tasty bruschetta salmon dish. We discussed fresh salmon fillets and flavorful bruschetta toppings. I shared step-by-step instructions to help you prepare, bake, and toast your meal. Tips for perfecting texture and presentation added extra flair. Don't forget to explore variations and storage options for leftovers. With this guide, you'll impress your friends and family with a simple yet delicious recipe. Get cooking and enjoy every bite!
Bruschetta Salmon Flavorful and Easy Appetizer
If you’re looking for a fun and tasty appetizer, Bruschetta Salmon is your answer! This dish is simple to make and packed with flavor. You’ll