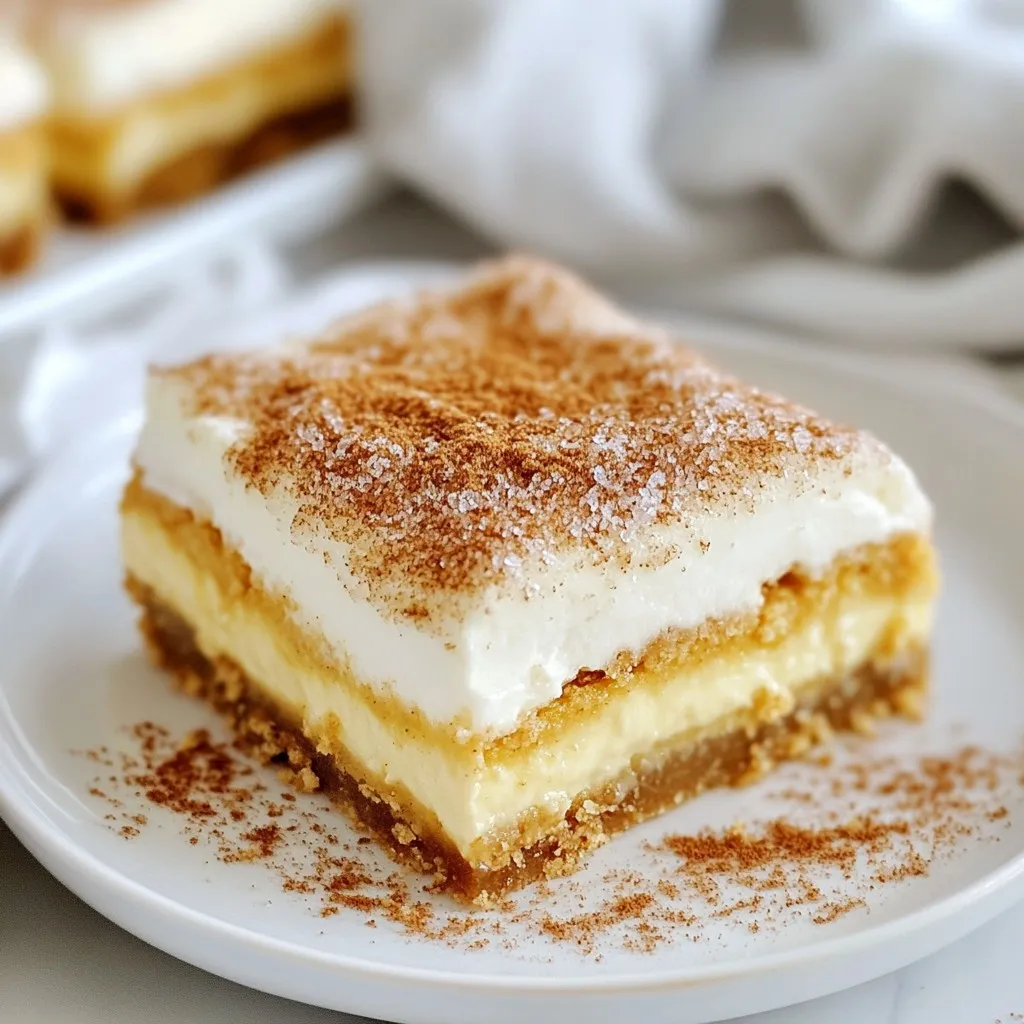
Desserts

To create these chewy delights, you need the following key ingredients: - 1 cup pumpkin puree - 1/2 cup unsalted butter, softened - 1/2 cup packed brown sugar - 1/4 cup granulated sugar - 1/4 cup pure maple syrup - 1 large egg - 1 teaspoon vanilla extract - 2 cups all-purpose flour - 1/2 teaspoon baking soda - 1 teaspoon baking powder - 1 teaspoon ground cinnamon - 1/2 teaspoon ground nutmeg - 1/4 teaspoon ground ginger - 1/4 teaspoon fine sea salt - 1 cup chocolate chips (optional) These ingredients come together to create a perfect balance of flavors. The pumpkin puree gives moisture and a lovely taste. The sugars add sweetness, while the spices bring warmth. You can enhance your cookies with a few fun extras: - 1/2 cup chopped nuts (like walnuts or pecans) - 1/2 teaspoon ground cloves - A sprinkle of sea salt on top before baking These options let you customize the flavor. Nuts add crunch, while cloves deepen the spice profile. A sprinkle of salt can enhance sweetness, making each bite pop. If you have allergies or dietary needs, here are some easy swaps: - Use dairy-free butter for a vegan option. - Substitute the egg with 1/4 cup applesauce for a vegan choice. - For gluten-free cookies, replace all-purpose flour with a gluten-free blend. These substitutions help you enjoy these cookies no matter your dietary restrictions. Follow the [Full Recipe] for detailed steps to make these delicious cookies! Start by gathering all your ingredients. You need pumpkin puree, butter, sugars, maple syrup, an egg, and vanilla. You also need flour, baking soda, baking powder, spices, and salt. Preheat your oven to 350°F (175°C). This helps the cookies bake evenly. Line your baking sheet with parchment paper to stop sticking. In a mixing bowl, beat the softened butter and sugars with an electric mixer. Mix until fluffy, which takes about 2 to 3 minutes. Then, add the pumpkin puree, maple syrup, egg, and vanilla. Mix on low speed until smooth. In another bowl, whisk together the flour, baking soda, baking powder, and spices. This step is key for even flavor. Gradually add this dry mix to the wet ingredients. Stir gently until combined. Be careful not to overmix. If you want chocolate chips, fold them in now. Using a cookie scoop, drop dough onto the baking sheet, leaving 2 inches between each scoop. Place the baking sheet in your preheated oven. Bake the cookies for 10 to 12 minutes. They should have firm edges and a light golden color. Remember, the cookies will continue to firm up as they cool. After baking, let them cool on the sheet for about 5 minutes. Then, transfer them to a wire rack to cool completely. For chewy cookies, don’t overmix the dough. This keeps them soft. Using brown sugar adds moisture and chewiness. Make sure your butter is softened, not melted, to get the right texture. Also, measure your flour carefully. Too much flour can make your cookies dry. Finally, cool your cookies properly. This helps them set and stay soft. Enjoy your chewy maple pumpkin cookies! For the full recipe, refer to the provided link. When making chewy maple pumpkin cookies, watch for a few common mistakes. First, always use room temperature ingredients. Cold butter or eggs can change the cookie's texture. Second, don’t overmix the dough. Gently combine the wet and dry ingredients. Overmixing makes cookies tough. Third, avoid using too much flour. Measure carefully for the best results. To boost flavor, use high-quality maple syrup. It adds a rich taste that shines in every bite. Adding a pinch of sea salt enhances the sweetness. For a bit of spice, try adding a dash of ground cloves or allspice. You can also mix in chocolate chips for a fun twist. They create a nice contrast with the pumpkin flavor. When serving your cookies, small details count. Stack them on a decorative plate or in a jar. Tie a ribbon around the jar for a nice touch. Dust the cookies with powdered sugar for extra flair. This simple step makes them look even more inviting. You can even add a sprig of mint for color. These small touches make your cookies a delight to see and eat. {{image_4}} You can switch up the flavors in these cookies. Try adding white chocolate chips for a sweet twist. You might also enjoy using butterscotch chips for a unique flavor. If you love spices, mix in cloves or allspice to enhance that warm taste. For a more savory note, add toasted pecans or walnuts. Each option brings a new layer of joy to your chewy maple pumpkin cookies. Making these cookies gluten-free is easy. Just use almond flour or a gluten-free blend instead of all-purpose flour. For a vegan version, replace the egg with flaxseed meal or applesauce. Use coconut oil or a vegan butter in place of regular butter. These swaps keep the cookies soft and tasty without any animal products. You can add fun seasonal flavors to your cookies. In the fall, try mixing in chopped apples or dried cranberries for a fruity twist. During the winter holidays, consider adding peppermint extract or candy cane pieces. In spring, use zest from lemons or oranges for a bright, fresh taste. Each season can inspire new flavors, making these cookies a year-round treat. For the full recipe, be sure to check out the detailed instructions. Storing your chewy maple pumpkin cookies is easy. First, let them cool completely. Once they are cool, place them in an airtight container. This keeps them soft and fresh. If you want to keep them longer, layer parchment paper between each cookie. This prevents them from sticking together. You can freeze these cookies for later. To do this, cool the cookies and place them in a single layer on a baking sheet. Freeze them for about an hour. After they are firm, transfer them to a freezer-safe bag. Make sure to remove excess air before sealing. You can freeze them for up to three months. When stored properly, these cookies last about a week at room temperature. Always keep them in an airtight container. If you notice them getting dry, try adding a slice of bread to the container. The bread will help keep the cookies moist. For the best taste, enjoy them within the first few days. For more details, check the full recipe. Yes, you can use canned pumpkin puree. It saves time and gives great flavor. Just ensure it is pure pumpkin and not pumpkin pie filling. This helps keep your cookies tasty and not too sweet. To make your cookies chewier, use more brown sugar. Brown sugar has moisture, which adds chewiness. You can also try chilling the dough before baking. This helps the cookies hold their shape and stay soft. If you need a substitute for maple syrup, try honey or agave syrup. Both will give a nice sweetness. You can also use corn syrup, but it has a different flavor. Adjust the amount to fit your taste. Yes, you can add nuts! Walnuts or pecans work well in this recipe. Just chop them up and fold them into the dough. This adds crunch and extra flavor to your chewy maple pumpkin cookies. For the full recipe, check out the detailed steps above. These chewy maple pumpkin cookies are easy and fun to make. We covered key ingredients and alternatives, plus tips for baking and storing. I shared common mistakes to avoid, flavor boosts, and neat ways to serve. Don’t forget the fun variations to try. Now, you’re all set to bake these tasty cookies. Enjoy making them your own, and happy baking!
Chewy Maple Pumpkin Cookies Delightfully Soft Treat
Get ready to bring warmth to your kitchen with my Chewy Maple Pumpkin Cookies! These delightfully soft treats blend rich pumpkin flavor with sweet maple
- 1 ½ cups graham cracker crumbs - ½ cup unsalted butter, melted - 2 tablespoons brown sugar - 1 teaspoon cinnamon - 3 cups apples, peeled, cored, and diced (mix of Granny Smith and Honeycrisp) - ½ cup brown sugar - 1 teaspoon cinnamon - ½ teaspoon nutmeg - 1 tablespoon lemon juice - 1 tablespoon cornstarch - 1 tablespoon unsalted butter - 16 oz cream cheese, softened - ¾ cup granulated sugar - ½ cup sour cream - 3 large eggs - 1 teaspoon vanilla extract - ¼ cup salted caramel sauce (store-bought or homemade) - ½ cup salted caramel sauce - ¼ cup chopped pecans (optional) - Flaky sea salt for sprinkling Each ingredient plays a key role in the rich flavor and texture of this cheesecake. The crust provides a sweet and crunchy base, while the apple filling adds warmth and fruitiness. The cheesecake filling is creamy and rich due to the cream cheese, and the caramel sauce ties everything together with a sweet, salty finish. For the best taste, use fresh apples and high-quality caramel. The balance of flavors will amaze you and your guests. Be sure to check out the Full Recipe for all the steps to create this delightful treat! Start by heating your oven to 350°F (175°C). In a medium bowl, mix 1 ½ cups of graham cracker crumbs, ½ cup of melted unsalted butter, 2 tablespoons of brown sugar, and 1 teaspoon of cinnamon. Press this mixture into the bottom of a 9-inch springform pan. Bake for 8 to 10 minutes until it’s lightly golden. Let it cool while you prepare the filling. For the apple pie filling, take 3 cups of peeled and diced apples. I like to mix Granny Smith and Honeycrisp apples for a nice balance. In a large pan, combine the apples with ½ cup of brown sugar, 1 teaspoon of cinnamon, ½ teaspoon of nutmeg, 1 tablespoon of lemon juice, 1 tablespoon of cornstarch, and 1 tablespoon of unsalted butter. Cook over medium heat for about 5 to 7 minutes until the apples are soft but not mushy. Set aside to cool. For the cheesecake filling, beat 16 oz of softened cream cheese in a large bowl for 2 to 3 minutes until creamy. Gradually add ¾ cup of granulated sugar while mixing. Next, blend in ½ cup of sour cream and add 3 large eggs one at a time. Finish with 1 teaspoon of vanilla extract and ¼ cup of salted caramel sauce. Mix until just combined to avoid overbeating. Now, it’s time to layer! Pour half of the cheesecake filling over your cooled crust. Then, add half of the apple pie filling on top. Pour the rest of the cheesecake filling over the apples, and finally, drop the remaining apple pie filling on top. Use a knife to swirl slightly for a beautiful effect. Bake your layered cheesecake in the preheated oven for 55 to 60 minutes. The center should be set but still slightly jiggly. Turn off the oven, crack the door, and let it cool inside for an hour. This helps prevent cracks. Once cooled, take the cheesecake out and let it reach room temperature. Cover it and chill in the fridge for at least 4 hours, or overnight if you can wait. This step is key for the best texture. Before serving, drizzle ½ cup of salted caramel sauce on top. You can also sprinkle ¼ cup of chopped pecans and a pinch of flaky sea salt for extra flavor. Enjoy your delightful creation! For the complete recipe, check out the Full Recipe section above! To make a great crust, start with fresh Graham crackers. Crush them finely for a smooth texture. Melt unsalted butter and mix it well with the crumbs. Add brown sugar and cinnamon to enhance flavor. Press this mixture firmly into the bottom of your springform pan. Bake it until it's light brown. This step adds crunch and keeps the crust sturdy. I love using a mix of Granny Smith and Honeycrisp apples. Granny Smith gives tartness, while Honeycrisp adds sweetness. Peel and core them before dicing. For a unique twist, try adding Fujis or Braeburns too. Their flavors blend well, making your pie filling extra tasty. Remember, fresh apples make a big difference in taste. Cracks can happen if the cheesecake bakes too fast. Bake at a lower temperature and avoid overmixing. After baking, turn off the oven and leave the door ajar for an hour. This gentle cooling helps prevent cracks. Also, cooling in the fridge for several hours helps it set well. A well-set cheesecake is less likely to crack. If you have leftovers, store them properly. Cover the cheesecake tightly with plastic wrap. You can also use a cake dome for added protection. Keep it in the fridge for up to five days. For longer storage, wrap slices in foil and freeze. Just thaw in the fridge before serving. Enjoy your sweet treat later! {{image_4}} You can switch up the flavor in your cheesecake. Try adding spices like ginger or nutmeg. These add a warm touch to the dish. You can also use flavored extracts. Almond or maple can give it a nice twist. Mix in some cocoa powder for a chocolatey vibe. Each choice brings fun new tastes to your salted caramel apple pie cheesecake. If you want a gluten-free crust, use almond flour or ground oats. Both work well and taste great. You can also try using gluten-free graham crackers. Just replace regular ones in the recipe. Mix them with butter and sugar as usual. Your cheesecake will taste just as good without gluten. To make a vegan version, swap cream cheese for cashew cream or coconut yogurt. For the crust, use coconut oil instead of butter. You can replace eggs with flaxseed meal or chia seeds mixed with water. Use a vegan caramel sauce or make your own with coconut milk and brown sugar. These swaps keep the taste rich and satisfying while staying plant-based. Explore these variations to find your favorite version of the salted caramel apple pie cheesecake. For the complete recipe, refer to the Full Recipe section. To keep your salted caramel apple pie cheesecake fresh, wrap it well. Use plastic wrap or aluminum foil. Store it in the fridge. This prevents drying and keeps flavors strong. Avoid putting it in a place with strong odors. Cheesecake easily absorbs smells from other foods. When stored correctly, your cheesecake can last up to five days in the fridge. After that, it may lose its taste and texture. Check for any signs of spoilage before eating. If it looks or smells off, it's best to toss it. You can freeze your cheesecake for up to three months. First, cool it completely. Then, wrap it tightly in plastic wrap. Place it in a freezer-safe container. When you're ready to enjoy it, thaw it in the fridge overnight. This keeps it creamy and tasty. For the best flavor, add the salted caramel topping just before serving. For the full recipe, check the details above. To make salted caramel apple pie cheesecake, start with the crust. Mix graham cracker crumbs, melted butter, brown sugar, and cinnamon. Press this mix into a springform pan. Bake it for about 10 minutes. For the apple filling, cook diced apples with brown sugar, cinnamon, and nutmeg until soft. In another bowl, beat softened cream cheese and sugar until smooth. Add sour cream and eggs, then mix gently. Layer the cheesecake with apple filling and bake. Cool it down, then chill it in the fridge for a few hours. Drizzle with salted caramel before serving. Yes, you can use store-bought caramel sauce. It saves time and still tastes great. Look for a high-quality brand to get a rich flavor. Pour it over the cheesecake right before you serve. This makes it easy and quick. If you need a substitute for cream cheese, try mascarpone cheese. It has a similar texture and taste. You can also use Greek yogurt for a lighter version. Just keep in mind that it may change the flavor a bit. You know the cheesecake is done when the edges are set but the center is still slightly wobbly. It will firm up as it cools. Also, the top should look dry. If it cracks, it may have been overbaked, so watch it closely! Yes, you can make this cheesecake ahead of time! It tastes even better after a day in the fridge. Just cover it well to keep it fresh. You can store it for up to five days. This makes it perfect for parties or special events. For the detailed recipe, check out the Full Recipe. You’ve learned how to make a delicious Salted Caramel Apple Pie Cheesecake. From choosing the right ingredients to baking and storing your creation, each step is key. Remember, a perfect crust starts with good tips, and knowing your apples matters. Adapt the recipe to fit your needs with gluten-free or vegan options. This cheesecake is sure to impress, whether for a special occasion or a simple dessert. Try this recipe, enjoy the process, and savor every bite. Happy baking!
Salted Caramel Apple Pie Cheesecake Delight
Get ready to indulge in a dessert that combines the best of all worlds: Salted Caramel Apple Pie Cheesecake! This delicious treat layers creamy cheesecake
- 1 cup apple butter - 1/2 cup unsalted butter, softened to room temperature - 2 cups powdered sugar - 1 teaspoon pure vanilla extract - 1 teaspoon ground cinnamon - 1-2 tablespoons milk (for desired consistency) - A pinch of salt To make apple butter icing, you need simple and fresh ingredients. Apple butter gives it a rich flavor. Softened unsalted butter helps create a smooth texture. Powdered sugar adds sweetness and makes it creamy. A dash of vanilla extract brings warmth. Ground cinnamon adds a cozy spice. Milk helps adjust the icing's thickness for spreading. Lastly, a pinch of salt boosts all the flavors. Gather these items before you start. Having everything ready makes the process easy. Each ingredient plays a role in making the icing taste amazing. If you want to make more icing, simply double the ingredients. You can find the full recipe above. To start, you need to combine the apple butter and softened butter. In a large bowl, add one cup of apple butter and half a cup of softened unsalted butter. Use a hand mixer or a stand mixer to blend them until smooth. This step makes your base creamy and rich. Next, gradually add the powdered sugar. I suggest adding it in one cup at a time. Start mixing on low speed. This way, you won't create a sugar cloud in your kitchen! Once most of the sugar is mixed in, you can increase to medium speed. After the sugar is well blended, mix in the vanilla extract, ground cinnamon, and a pinch of salt. Beat everything together until it becomes smooth. This will give your icing great flavor. Now, if your icing is too thick, you can adjust it with milk. Start by adding one tablespoon of milk at a time. Continue to mix until you reach your desired consistency. You want it smooth, but not runny. If you want a thicker icing, skip the milk. For a creamy texture, make sure to mix long enough. This helps all the ingredients come together nicely. You can use this apple butter icing on many desserts. It works well on cakes, cupcakes, and even cookies. To frost cakes, spread the icing evenly with a spatula. For cupcakes, consider using a piping bag for a fun design. If you want a rustic look, drizzle the icing over cakes. For a beautiful finish, add a sprinkle of cinnamon or a thin apple slice as a garnish. You can change the flavor of your apple butter icing easily. Try adding spices like nutmeg or ginger for a warm twist. A little cardamom also adds depth. Adjust the sweetness, too. If you want it sweeter, add more powdered sugar. For a less sweet icing, cut down on the sugar and balance it with more apple butter. Make your dessert shine with creative decorating styles. Use a piping bag to swirl icing on cupcakes, creating fun shapes. For cakes, drizzle the icing for a rustic look. You can also use a spatula to spread it for a smooth finish. Garnish your treats with a sprinkle of cinnamon or a thin slice of fresh apple. These touches make your desserts look even more appealing. Don’t let any icing go to waste! Use it on pancakes or waffles for a sweet breakfast treat. You can also spread it between cake layers for extra flavor. If you have a small batch, try it on hand pies or muffins. The icing adds a delightful touch to any baked good. {{image_4}} You can play with flavors to make your apple butter icing even better. Adding chocolate can create a rich twist. Simply mix in cocoa powder to your icing. Start with two tablespoons, then taste and adjust. Caramel flavors can also enhance your icing. Drizzle in some caramel sauce while mixing. This adds a sweet, buttery taste that pairs well with apple. You can also try using different spices. Adding nutmeg or ginger gives your icing a warm kick. Just a pinch can change the whole flavor profile. If you follow a vegan diet, I have good news! You can swap the unsalted butter with vegan butter. Use the same amount for a creamy texture. Make sure your apple butter is also vegan-friendly. For those avoiding gluten, this icing is naturally gluten-free. All the ingredients are gluten-free, so you can enjoy without worry. Just check the powdered sugar to ensure it's safe. In fall, you can add seasonal ingredients to your apple butter icing. Consider adding a splash of maple syrup for a cozy flavor. You could also mix in crushed pecans for a nutty crunch. Using different fruit butters can create unique flavors. Try using pear or pumpkin butter instead of apple. Each fruit brings its own taste, making your icing special for any occasion. For full details on making the icing, check out the Full Recipe. To keep your apple butter icing fresh, store it in an airtight container. This helps prevent it from drying out. Make sure to cover the icing tightly with plastic wrap. You want to keep air out to maintain its creamy texture. If you use a container, press plastic wrap against the icing's surface. This extra layer protects against moisture loss. You can freeze your apple butter icing if you want to save some for later. Use a freezer-safe container and leave some space at the top. The icing will expand as it freezes. When you are ready to use it, thaw it in the fridge overnight. For best results, stir it gently after thawing to restore the creamy texture. If it seems too thick, add a little milk and mix. Apple butter icing lasts about one week in the fridge. If you freeze it, it can last up to three months. Always check for signs of spoilage. Look for changes in texture, color, or smell. If it smells off or has mold, it’s best to toss it out. Enjoy your delicious icing while it's fresh! To make apple butter icing, start by mixing softened unsalted butter with apple butter. Use a mixer until smooth and fluffy. Then, add powdered sugar one cup at a time. Mix on low speed to avoid a sugar cloud. Next, add vanilla extract, ground cinnamon, and salt. Beat until creamy. If it’s too thick, add milk to reach your desired consistency. For a full recipe, check out the details above. Yes, apple butter icing works great on cookies! It adds a rich flavor and a smooth texture. Try it on sugar cookies, gingerbread, or oatmeal cookies. The sweet apple taste pairs well with many cookie types. You can also use it as a filling between cookies for a fun twist. To thin your icing, add milk slowly. Start with one tablespoon and mix. Check the consistency, and add more if needed. This way, you keep the flavor strong while making it easier to spread. Stop adding milk once you reach a smooth, spreadable texture. You can pair apple butter icing with many desserts. It shines on cakes, especially spice and pumpkin cakes. It also enhances cupcakes and cinnamon rolls. For a unique treat, use it on pancakes or waffles. The warm spices and sweet apple flavor create delicious combinations. You can store apple butter icing in the fridge for up to one week. Make sure to cover it well with plastic wrap. This keeps it fresh and prevents it from drying out. If you want to keep it longer, consider freezing it. Just thaw it in the fridge before using, and remix if needed. In this article, I explored apple butter icing, its ingredients, and how to make it. I shared tips for blending flavors and offered creative ways to decorate your treats. We also discussed how to store leftover icing and suggested using seasonal flavors for variety. In closing, apple butter icing is versatile and delicious. It adds a special touch to cakes and cookies. Don’t hesitate to experiment with flavors and techniques. Enjoy your baking journey!
Apple Butter Icing Creamy and Delicious Treat
If you love sweet treats with a twist, you’re in for a delight! My Apple Butter Icing is creamy, rich, and packed with flavor. It’s
- 1 ½ cups all-purpose flour - 1 cup granulated sugar - ½ cup unsweetened cocoa powder - 1 ½ teaspoons baking powder - ½ teaspoon baking soda - ½ teaspoon salt - ½ cup unsalted butter, softened to room temperature - 2 large eggs, at room temperature - 1 teaspoon pure vanilla extract - ½ cup whole milk, at room temperature - ½ cup boiling water - 1 cup whipped cream (for frosting) - ½ cup strawberry preserves - ½ cup chocolate ganache (for drizzling) - Edible rose petals (for garnish) When making Neapolitan Rose Cake, gather all your ingredients first. It helps keep things organized. The flour gives structure. Sugar adds sweetness. Cocoa powder gives a rich chocolate flavor. Baking powder and baking soda help the cake rise. Salt enhances the flavors. Using unsalted butter makes it easy to control salt levels. Eggs bring moisture and bind the cake. Vanilla extract adds depth to the taste. Whole milk makes the batter smooth and rich. Boiling water thins the batter, ensuring a moist cake. You will need whipped cream to frost the cake. Strawberry preserves add a fruity layer. Chocolate ganache creates a beautiful drizzle. Edible rose petals are for decoration, giving the cake a lovely look. For the full recipe, follow the steps carefully. Each ingredient plays a key role in making this cake delightful. Enjoy baking and sharing this treat! Start by preheating your oven to 350°F (175°C). Grease two 8-inch round cake pans with butter or cooking spray. Then, dust them lightly with flour. This step helps the cakes come out easily without sticking. In a large bowl, sift together these dry ingredients: - 1 ½ cups all-purpose flour - 1 cup granulated sugar - ½ cup unsweetened cocoa powder - 1 ½ teaspoons baking powder - ½ teaspoon baking soda - ½ teaspoon salt This helps the batter stay smooth and light. Next, add: - ½ cup unsalted butter, softened - 2 large eggs - 1 teaspoon pure vanilla extract - ½ cup whole milk Mix everything with an electric mixer on medium speed for 2-3 minutes. The batter should be smooth. Carefully stir in: - ½ cup boiling water Your batter will look thin, but that's fine. It makes the cake moist. Divide the batter evenly between the two pans. Bake in the preheated oven for 30-35 minutes. To check if they’re done, insert a toothpick in the center. It should come out clean. Once baked, take them out of the oven. Let them cool in the pans for about 10 minutes. After that, gently turn the cakes onto wire racks. This helps them cool completely and prevents sogginess. When the cakes are cool, place one layer on a serving platter. Spread a generous layer of: - ½ cup strawberry preserves - 1 cup whipped cream This creates a tasty filling. Carefully add the second cake layer on top. Use the remaining whipped cream to frost the top and sides evenly. Drizzle the cake with: - ½ cup chocolate ganache Warm it slightly if needed. Let it flow down the sides for a lovely look. To finish, add fresh edible rose petals on top. This gives the cake a beautiful and romantic touch. For more details, check the Full Recipe. When making Neapolitan Rose Cake, avoid these common mistakes: - Overmixing the batter: This can make the cake dense. Mix just until combined. - Skipping the cooling stage: Let the cakes cool fully before frosting. This prevents melting. - Using cold ingredients: Room temperature eggs and milk help create a smooth batter. To keep your cake moist and flavorful: - Use boiling water: This activates the cocoa and helps the cake stay moist. - Add a splash of milk: A little extra milk in the frosting makes it creamier. - Use fresh strawberry preserves: This adds a burst of flavor inside the cake. For a smooth and delicious frosting: - Beat the whipped cream: Whip until soft peaks form, but don’t overdo it. - Chill your tools: Use cold mixing bowls to help the cream whip better. - Spread evenly: Use a spatula to apply frosting smoothly on top and sides. Follow these tips, and your Neapolitan Rose Cake will impress everyone! For all the steps, check out the Full Recipe. {{image_4}} You can change the flavor of the Neapolitan Rose Cake easily. Want a bright twist? Use lemon zest and lemon juice in the batter. This gives the cake a fresh and zesty taste. For a warm, sweet flavor, add vanilla bean paste instead of pure vanilla extract. You can also mix in almond extract for a nutty touch. Making this cake gluten-free is simple. Swap the all-purpose flour for a gluten-free flour blend. Look for one that includes xanthan gum to help with texture. You can also use almond flour for a nutty flavor. Make sure your baking powder is gluten-free. Always check labels for safety. Garnishing your cake adds charm. Besides edible rose petals, try fresh berries like raspberries or strawberries. They add color and a burst of flavor. You can also sprinkle crushed nuts on top for a crunchy texture. Another fun idea is to add chocolate shavings or colorful sprinkles for a festive look. Each garnish can make your cake unique. To keep your Neapolitan Rose Cake fresh, wrap it well. Use plastic wrap or place it in an airtight container. This step keeps moisture in and prevents the cake from drying out. Store it at room temperature for short-term storage. If you live in a hot place, keep it in the fridge. You can freeze the Neapolitan Rose Cake for longer storage. First, ensure it is fully cooled. Wrap the cake tightly in plastic wrap and then foil. This prevents freezer burn. Label the package with the date. You can freeze it for up to three months. When ready to enjoy, thaw it in the fridge overnight before serving. The cake stays fresh for about 3-4 days at room temperature. If stored in the fridge, it lasts up to a week. For the best taste, eat it sooner rather than later. Always check for any signs of spoilage before serving. Enjoy your delicious creation! For the complete recipe, refer to the Full Recipe section. Neapolitan Rose Cake has roots in Italy, specifically Naples. It combines classic Italian flavors. The cake reflects the region's rich culinary history. It brings together chocolate, strawberry, and vanilla in one dessert. This cake is often made for special occasions. Its beautiful rose design enhances its charm and appeal. Yes, you can use various frostings for this cake. Cream cheese frosting adds tanginess and depth. A buttercream frosting gives a sweet and creamy touch. For a lighter option, try whipped cream. You can even mix flavors, like chocolate and vanilla, for fun twists. Store leftover Neapolitan Rose Cake in an airtight container. Keep it in the fridge for up to five days. If you want to freeze it, wrap slices tightly in plastic wrap. This way, the cake stays fresh for up to three months. Thaw it in the fridge when ready to enjoy again. Serve the Neapolitan Rose Cake on elegant plates. Add fresh strawberries or raspberries for color. A dollop of whipped cream on the side enhances the treat. You can also pair it with a scoop of vanilla ice cream. This combination boosts the dessert's flavor and makes it extra special. To decorate the cake, use edible rose petals for a floral touch. You can also add chocolate shavings or sprinkles for fun. Try placing fresh fruit on top, like sliced strawberries or cherries. A drizzle of extra chocolate ganache adds a rich look. Be creative and let your style shine! In this blog post, I shared the key ingredients and steps to make a Neapolitan Rose Cake. We discussed mixing the batter, baking, cooling, and assembling the cake. Tips helped you avoid common mistakes and explore flavor variations. Don’t forget storage techniques to keep your cake fresh. Now, you can impress anyone with this tasty dessert. Enjoy baking and experimenting with creative garnishes. Your cake will surely delight everyone, and you'll feel proud of your work.
Neapolitan Rose Cake Delightful and Easy Recipe
Are you ready to impress with a stunning dessert? The Neapolitan Rose Cake combines rich chocolate, creamy vanilla, and sweet strawberry, all in one lovely
To make Easy Pumpkin Pie Twists, gather these key ingredients: - 1 sheet of puff pastry, thoroughly thawed - 1 cup creamy pumpkin puree - 1/2 cup packed brown sugar - 1 teaspoon aromatic pumpkin pie spice - 1/2 teaspoon pure vanilla extract - 1 egg, beaten (for egg wash) - 2 tablespoons granulated sugar (for a sweet topping) These ingredients work together to create a perfect blend of flavors. For the best outcome, stick to these measurements: - Use exactly 1 cup of pumpkin puree for creaminess. - Pack the brown sugar tightly in the measuring cup to get the right sweetness. - Measure the pumpkin pie spice carefully to ensure balanced flavor. Following these measurements ensures your twists taste just right. You can enhance your pumpkin pie twists with a few optional extras: - Add a pinch of salt to balance the sweetness. - Include chopped nuts, like pecans or walnuts, for texture. - Drizzle melted chocolate over the baked twists for a decadent touch. These extras can elevate your dish and make it even more delicious. For the full recipe, check out the details provided. First, you need to preheat your oven to 400°F (200°C). This step is key for a nice bake. While the oven heats, grab a baking sheet. Line it with parchment paper. This helps keep the twists from sticking. Take your thawed puff pastry and place it on a clean, lightly floured surface. Gently roll it out. You want to flatten it a bit and get rid of any creases. Use a sharp knife or a pizza cutter to cut the pastry into 12 equal rectangles. Make sure they are all roughly the same size. Now, let’s make the filling. In a medium bowl, combine the creamy pumpkin puree, packed brown sugar, pumpkin pie spice, and pure vanilla extract. Stir this mixture very well until it is smooth. This filling should be rich and flavorful. Take about a tablespoon of your pumpkin filling and place it on one half of each pastry rectangle. Be sure to leave a small margin at the edge for sealing. Next, fold the other half of the pastry over the filling. Press the edges firmly to seal. Use a fork to crimp the edges. This adds a nice look and keeps the filling inside. Before baking, prepare an egg wash. Brush the beaten egg over the tops of the pastry twists. This gives them a beautiful golden-brown color. For a sweet touch, sprinkle a bit of granulated sugar on top of each twist. Place the twists on the prepared baking sheet. Bake them in the preheated oven for about 15-20 minutes. Keep an eye on them. They should puff up and turn a lovely golden brown. Once done, remove them from the oven and let them cool slightly before serving. For the full recipe, check the details above. Enjoy! To get that lovely golden-brown finish, watch your oven closely. Use an egg wash on the twists. This gives them a nice shine. Also, sprinkle some sugar on top. This adds sweetness and a slight crunch. Bake until they puff up and turn golden. It usually takes about 15 to 20 minutes. One common mistake is not sealing the pastry well. If you skip this step, the filling may leak out. Another mistake is not rolling the pastry enough. If it’s too thick, it won't cook evenly. Lastly, avoid overcrowding the baking sheet. Give each twist space to puff up and brown nicely. Twisting the pastry can be tricky. Try this method: Once you fill the pastry, fold it over and seal it. Then, cut a small slit on top. This allows steam to escape and helps the pastry cook better. If you want a fun twist, literally twist the filled pastry before sealing it. This makes for a beautiful pattern. Remember, practice makes perfect! {{image_4}} You can mix up the filling to make it unique. Try adding a bit of cream cheese for a rich texture. You can also use maple syrup instead of brown sugar for a sweet twist. Want a spicy kick? Add a pinch of cayenne or nutmeg. For a fruity twist, mix in some finely chopped apples or pears. Each of these options brings a new taste while still keeping the pumpkin base. While I love using puff pastry for its flaky layers, you can explore other options. Try using phyllo dough for a lighter, crispier bite. If you want something sweeter, use a pie crust instead. You can even make your own dough for a personal touch. Each pastry type gives a different feel and taste to your pumpkin pie twists. These twists are perfect for any gathering. Serve them warm at a fall party for a cozy vibe. They also make a great snack for movie night. If you have a holiday dinner, place them on a beautiful platter. You can dust them with powdered sugar for a festive look. They are also wonderful with a scoop of vanilla ice cream on the side. No matter the event, these twists will impress your guests! After you enjoy your pumpkin pie twists, let them cool completely. Then, place them in an airtight container. This keeps them fresh and prevents them from getting soggy. You can store them at room temperature for one day. If you want to keep them longer, put them in the fridge. They will stay good for up to three days. To enjoy your twists warm, use the oven. Preheat it to 350°F (175°C). Place the twists on a baking sheet and cover them with foil. Heat for about 10-15 minutes. This method will keep them crispy and tasty. You can also use a microwave, but this may make them soft. If you use the microwave, heat for 10-15 seconds at a time until warm. If you want to save your pumpkin pie twists for later, freezing is a great option. First, let them cool completely. Then, wrap each twist tightly in plastic wrap. Next, place them in a freezer-safe bag or container. They can last up to three months in the freezer. To eat them, thaw in the fridge overnight and reheat as mentioned above. Enjoy your tasty treats anytime! Yes, you can use homemade pumpkin puree. Just make sure it is smooth and thick. Drain any extra moisture to prevent a soggy filling. Homemade adds a fresh taste and can be fun to make. To make pumpkin pie twists gluten-free, use gluten-free puff pastry. Many brands offer this option. Check the label to ensure it fits your needs. Follow the same steps for filling and baking. Serve the twists warm or at room temperature. Place them on a nice platter for a festive look. Dust with powdered sugar for a sweet touch. They make a great snack or dessert for gatherings. Pumpkin pie twists last about 2-3 days at room temperature. Keep them in an airtight container. They can also stay fresh in the fridge for up to a week. Yes, you can make the twists ahead of time. Assemble them and store them in the fridge for up to 24 hours. Bake them right before serving for the best taste and texture. To keep the pastry crispy, avoid overfilling the twists. Bake them until golden brown and cool on a wire rack. This prevents steam from making them soggy. For extra crunch, serve them soon after baking. You now have all you need to make Easy Pumpkin Pie Twists. From choosing the right ingredients to baking tips, this guide covers everything. Feel free to add your own twist with flavors or crust options. Remember, keep an eye on baking time for the best results. Enjoy these tasty treats at any gathering or cozy night in. Happy baking, and I hope you share these delicious twists with friends and family!
Easy Pumpkin Pie Twists Simple and Tasty Recipe
Get ready to impress your friends and family with my Easy Pumpkin Pie Twists! This simple and tasty recipe combines the creamy goodness of pumpkin
To make a great pumpkin coffee cake, gather these key items: - 1 cup canned pumpkin puree - 1/2 cup vegetable oil - 1 cup granulated sugar - 1/2 cup packed brown sugar These ingredients form the base of your cake. The canned pumpkin gives the cake its rich flavor and moisture. The oils keep it tender and fluffy. Using both granulated and brown sugar adds sweetness and depth to the taste. Next, you will need some herbs and spices for flavor: - 1 teaspoon ground cinnamon - 1/2 teaspoon ground nutmeg - 1/4 teaspoon ground ginger - 1 teaspoon baking soda - 1 teaspoon baking powder These spices bring warmth and richness to your cake. The baking soda and baking powder help it rise, making it light and airy. Consider adding these optional items for extra texture and taste: - 1/2 cup chopped walnuts - 1/4 cup brown sugar (for topping) - 1 teaspoon ground cinnamon (for topping) - 1/2 cup powdered sugar (for glaze) - 2 tablespoons milk (for glaze) Chopped walnuts provide a nice crunch. The topping adds a sweet, crunchy layer. Feel free to get creative with your add-ins! Check out the full recipe for more details. - First, preheat your oven to 350°F (175°C). This step is key for even baking. - Next, prepare a 9x13-inch baking pan by lightly greasing it. This keeps the cake from sticking. - In a large bowl, mix together 1 cup of canned pumpkin puree, 1/2 cup of vegetable oil, 1 cup of granulated sugar, and 1/2 cup of brown sugar. Stir until you see no lumps. - Now, add 2 large eggs, 1/4 cup of milk, and 2 teaspoons of vanilla extract to the pumpkin mix. Whisk it all together until creamy. - In a separate bowl, sift 2 cups of all-purpose flour, 1 teaspoon of baking soda, 1 teaspoon of baking powder, 1 teaspoon of ground cinnamon, 1/2 teaspoon of ground nutmeg, 1/4 teaspoon of ground ginger, and 1/4 teaspoon of salt. This helps mix the dry ingredients well. - Gradually add the dry mix into the wet mix. Fold gently with a spatula until just combined. Don’t overmix; this keeps your cake soft. - If you like, fold in 1/2 cup of chopped walnuts for some crunch. - Carefully pour the batter into your greased pan. Use a spatula to smooth the top. - For the topping, mix 1/4 cup of brown sugar with 1 teaspoon of cinnamon in a small bowl. Sprinkle it evenly over the batter. - Bake for about 30-35 minutes. To check if it's done, insert a toothpick into the center. If it comes out clean, your cake is ready. - Once baked, let the cake cool in the pan for 10 minutes. Then, transfer it to a wire rack to cool completely. - For the glaze, whisk together 1/2 cup of powdered sugar and 2 tablespoons of milk until smooth. Drizzle this over the cake before serving. Enjoy your homemade Pumpkin Spice Coffee Cake! For the full recipe, refer to the detailed instructions provided. To make the best pumpkin coffee cake, avoid overmixing your batter. When you mix too much, it can make the cake dense. Mix until just combined for a light texture. After baking, test for doneness. Insert a toothpick into the center. If it comes out clean, your cake is ready. Serve your pumpkin coffee cake warm. This enhances its flavor and aroma. Garnish with a sprinkle of cinnamon or nuts for a nice touch. You can also place slices on decorative plates. For a fun twist, serve it with a dollop of whipped cream or a scoop of vanilla ice cream. One common mistake is not measuring ingredients correctly. Use measuring cups for dry items and liquid measuring cups for wet. Baking at the wrong temperature can ruin your cake. Always preheat your oven to 350°F (175°C) before baking. This helps your cake rise and cook evenly. {{image_4}} You can switch things up with flavors in your pumpkin coffee cake. One fun twist is adding chocolate chips. The rich chocolate pairs perfectly with the warm pumpkin. It creates a sweet treat that feels like a hug. You can also try a maple glaze instead of powdered sugar glaze. This adds a deep, sweet touch that makes each bite special. If you need gluten-free options, you can easily swap all-purpose flour for a gluten-free blend. Make sure the blend contains xanthan gum to help with texture. For a vegan version, replace eggs with flax eggs. Mix one tablespoon of ground flaxseed with three tablespoons of water for each egg. Use a non-dairy milk like almond or oat. This keeps the cake moist and tasty without animal products. Want to make your cake more festive? Add cranberries or apples to the batter. They give a pop of flavor and a nice texture. For a fun kick, sprinkle in some chili flakes. This unexpected heat pairs well with the sweet pumpkin and spices. It’s a great way to surprise your family and friends! For the complete recipe and more tips, check the Full Recipe. To keep your pumpkin coffee cake fresh on the counter, wrap it tightly in plastic wrap. This keeps the moisture in and avoids drying out. Place it in a cool, dry spot away from direct sunlight. If you want to refrigerate it, put it in an airtight container. This helps it last longer, but it may dry out a bit. For freezing pumpkin coffee cake, cut it into slices first. Wrap each slice in plastic wrap, then place in a freezer bag. This way, you can grab just what you need. When you’re ready to enjoy it, take a slice out of the freezer. Let it thaw in the fridge overnight or at room temperature for a few hours. To reheat, microwave it for about 15 seconds or warm it in the oven at 350°F for 10 minutes. Pumpkin coffee cake lasts about 3 to 4 days on the counter. In the fridge, it can last up to a week. Check for signs of spoilage, like mold or an off smell. If it feels dry or hard, it’s time to toss it. For frozen cake, it stays good for about 2 to 3 months. Always remember to trust your senses when it comes to food safety! To keep your coffee cake moist, use enough oil and pumpkin. The oil adds richness. Pumpkin puree also adds moisture. Do not overmix the batter; this can make the cake dry. Bake it just until a toothpick comes out clean. Yes, you can use fresh pumpkin instead of canned. Cook and puree the fresh pumpkin first. Make sure it is smooth and has no lumps. Fresh pumpkin may have a bit more water. You might need to adjust the flour slightly. Serve your pumpkin coffee cake warm or at room temperature. Pair it with coffee for a great treat. You can also add whipped cream or a scoop of vanilla ice cream. Garnish with a sprinkle of cinnamon for extra flair. To make the glaze thicker, add more powdered sugar. If it is too thick, add a bit more milk. Mix until you reach the desired consistency. A thicker glaze stays on top, while a thinner glaze drizzles down the sides. Yes, you can use other oils like coconut or olive oil. Each oil will change the flavor a little. Coconut oil adds a nice touch of sweetness. Olive oil gives a richer taste but may change the cake's flavor profile. In this post, we explored how to make delicious pumpkin coffee cake. You learned about essential ingredients like canned pumpkin and spices. I shared step-by-step instructions for mixing and baking. We discussed tips to perfect your cake and how to present it. You even discovered tasty variations and storage methods. Remember, baking is fun and allows creativity. Enjoy your homemade pumpkin coffee cake and share it with loved ones! Bake smart and savor every bite.
Pumpkin Coffee Cake Easy and Delicious Recipe
Fall is here, and what better way to celebrate than with a warm slice of Pumpkin Coffee Cake? This easy and delicious recipe combines the
- 4 cups Rice Krispies cereal - 1 cup marshmallows (mini or regular) - 1 cup dulce de leche - 1/2 cup unsalted butter - 1/2 teaspoon sea salt - 1 teaspoon vanilla extract - Optional: Flaky sea salt for garnish You can adjust the recipe for different servings easily. For 6 servings, use half the ingredients. For 24 servings, double everything. If you need swaps for dietary needs, try gluten-free Rice Krispies. You can also use vegan butter and marshmallows for a dairy-free version. If you can't find dulce de leche, you can make a quick version by simmering sweetened condensed milk. Just be sure to stir it often to avoid burning. This way, you can still enjoy that rich, sweet flavor in your treats! For added fun, mix in some nuts or chocolate chips if you like. These small changes can make your treats even more special. 1. Melting the butter: Begin by placing unsalted butter in a medium saucepan. Heat it over medium heat. Stir it often to keep it from burning. Watch closely for a rich golden brown color. A nutty smell will fill the air. That’s when you know it’s ready! 2. Mixing in marshmallows and dulce de leche: Remove the pan from heat once the butter is brown. Add mini or regular marshmallows to the pan. Stir until the marshmallows melt and blend into a smooth mixture. Next, mix in the dulce de leche. Stir until it’s all well combined. 1. Folding in the Rice Krispies: Now, it’s time to add the Rice Krispies. Use a spatula to gently fold them into the mixture. Make sure every piece is coated but be careful not to crush the cereal. 2. Preparing the baking dish: Take a 9x13 inch baking dish and line it with parchment paper. Leave some paper hanging over the edges. This makes it easy to lift out the treats later. Pour the mixture into the dish. Press it down evenly using a spatula or your greased hands. 1. Cooling times: Let the Rice Krispie treats cool at room temperature. This helps them set properly. It takes about 20 minutes for them to firm up. 2. Cutting and serving suggestions: Once cooled, take the treats out using the parchment paper. Cut them into squares or rectangles. For a nice touch, sprinkle flaky sea salt on top before serving. Enjoy your delicious Brown Butter Dulce de Leche Rice Krispie Treats! You can find the Full Recipe for more details. To get the right brown butter color, watch the butter closely. Melt it over medium heat. Stir it often. You want it to turn a deep golden brown. This gives a nutty taste that makes your treats special. The smell will guide you. When you smell that rich aroma, it's ready. For a smooth marshmallow mixture, use low heat. Add the marshmallows to the brown butter slowly. Stir until they melt completely. If the mixture is lumpy, keep stirring. It should be creamy and smooth before you add the dulce de leche. To boost flavor, try adding mix-ins. Chopped nuts or mini chocolate chips work well. You can also add dried fruit for a chewy bite. Each mix-in gives a new twist to your treats. Different types of dulce de leche can change the taste too. You might use a store-bought version or make your own. Each option has a unique flavor that can surprise you. Choose based on your taste and what you have. For a fancy touch, present the treats on a colorful platter. Line it with parchment paper. This adds charm and makes cleanup easy. A sprinkle of flaky sea salt on top looks great and adds flavor. Pair your Rice Krispie treats with cold milk or hot cocoa. They also go well with coffee or tea. You can even serve them with ice cream for a fun dessert. Enjoy experimenting with different pairings! For the full recipe, check out the details above. {{image_4}} You can switch up these treats easily. Here are two fun ideas: - Chocolate Brown Butter Dulce de Leche Rice Krispie Treats: Add 1/2 cup of chocolate chips to the melted marshmallow mix. This adds a rich, sweet taste. The chocolate pairs great with the dulce de leche and brown butter. - Nut Butter Twist Rice Krispie Treats: Swap the dulce de leche for 1 cup of your favorite nut butter, like almond or peanut. It gives a creamy, nutty flavor that kids and adults will love. Making treats for everyone is easy with a few changes: - Gluten-free options: Use gluten-free Rice Krispies. Check the label on your marshmallows to ensure they are also gluten-free. - Vegan substitutions: Use a plant-based butter and dairy-free marshmallows. This way, you cater to vegan friends without losing taste. Get creative with the seasons! Here are a couple of ideas: - Halloween-themed treats: Add orange and black sprinkles to the top. You can also mix in candy corn for fun flavors and colors. - Holiday-inspired flavors: Stir in 1/2 teaspoon of peppermint extract during the melting stage. You can also sprinkle crushed candy canes on top for a festive touch. By using these variations, you can make Brown Butter Dulce de Leche Rice Krispie Treats for any occasion. Check out the full recipe for more details! To keep your Brown Butter Dulce de Leche Rice Krispie Treats fresh, store them in an airtight container. This will help prevent them from getting hard or stale. If you have leftovers, use a container that seals tightly. I recommend a glass or plastic container with a lid. You can also layer the treats with parchment paper to keep them from sticking together. These treats can stay fresh for about one week at room temperature. If you see any signs of spoilage, like a bad smell or a dry texture, it’s best to toss them. Freshness is key to enjoying their delicious flavor. Yes, you can freeze Rice Krispie treats! To do this, wrap them tightly in plastic wrap or foil. Then, place them in a freezer-safe bag or container. They can last up to three months in the freezer. When you’re ready to enjoy them, let them thaw in the fridge overnight. After thawing, they should taste just as good as when you made them. Can I use other cereal instead of Rice Krispies? Yes, you can use other cereals! Try Cornflakes or Fruity Pebbles for fun twists. Each cereal has a unique taste, so pick one you like. Just make sure it’s crispy and light. What can I use if I don't have dulce de leche? If you lack dulce de leche, use caramel sauce instead. It has a similar sweet, creamy texture. You can also make a simple caramel at home using sugar and cream. Why did my Rice Krispie treats get hard? If your treats are hard, you likely used too much cereal. This can dry them out. Make sure to follow the recipe closely for the best texture. Adding a touch of melted butter might help soften them up. How to fix a sticky mixture? If your mixture is too sticky, add a bit more Rice Krispies. You can also coat your hands with cooking spray while pressing them into the pan. This helps prevent sticking. Ideal cooking temperatures for perfect results Always melt the butter on medium heat. This ensures even cooking and prevents burning. Watch closely as it turns golden brown. Adjustments for high-altitude cooking At high altitudes, you may need to reduce the amount of marshmallows. This keeps the treats from getting too puffy. Increase the cooking time slightly to ensure everything melts well. In this blog post, we explored how to make delicious Rice Krispie treats. We covered the essential ingredients, step-by-step instructions, and helpful tips. You learned about variations to suit your taste and dietary needs. With the right techniques, you can create a tasty treat perfect for any occasion. Use fresh ingredients for the best flavor. Follow these steps, and enjoy making your own delightful Rice Krispie treats!
Brown Butter Dulce de Leche Rice Krispie Treats Delight
Are you ready to elevate your Rice Krispie treats to a whole new level? In this blog, I’ll guide you through making Brown Butter Dulce
- 2 cups all-purpose flour - 1 cup granulated sugar - 1 teaspoon baking powder - 1/2 teaspoon baking soda - 1/2 teaspoon salt - 1 tablespoon ground cinnamon - 1/2 cup unsalted butter, melted & slightly cooled - 2 large eggs, beaten - 1 teaspoon pure vanilla extract - 1/2 cup sour cream - 2 medium apples, peeled and diced (suggestions: Granny Smith or Honeycrisp) - 1/2 cup chopped walnuts or pecans (optional) - Topping: 1 tablespoon brown sugar, pinch of ground cinnamon You need a mix of wet and dry ingredients to make this bread. Start with the dry ones. Gather flour, sugar, baking powder, baking soda, salt, and cinnamon. Whisk them together in a bowl. This step helps create a light and fluffy bread. Next, you tackle the wet ingredients. In another bowl, combine melted butter, beaten eggs, vanilla, and sour cream. Mix well until smooth. This mixture adds richness to your bread. Now, for the fun part! Add your diced apples. I suggest using Granny Smith for tartness or Honeycrisp for sweetness. If you like, toss in chopped nuts for crunch. This mix makes the bread special. Don't forget the topping! A sprinkle of brown sugar and cinnamon gives a sweet crust. Finding the right mix of flavors in this recipe is key. You can find the full recipe to guide you through each step. Enjoy making this delightful treat! - Preheat the oven to 350°F (175°C). - Prepare a 9x5-inch loaf pan with grease or parchment paper. Start by getting your oven nice and hot. This helps the bread bake evenly. Greasing the loaf pan makes it easy to take the bread out later. You can also use parchment paper for easy cleanup. - Combine flour, sugar, baking powder, baking soda, salt, and cinnamon in a large mixing bowl. In a big bowl, mix the dry ingredients. Use a whisk to blend them well. This helps the baking powder and baking soda work better. You want every bite to taste just right. - Blend melted butter, eggs, vanilla extract, and sour cream until smooth. In another bowl, combine the wet ingredients. Make sure the butter is cooled before mixing. Stir until the mixture is nice and creamy. This gives the bread a rich flavor. - Gradually mix wet ingredients into dry ingredients, stirring gently. Now, pour the wet mix into the dry mix. Stir slowly so you don’t overmix. A few lumps are okay. This helps keep the bread soft and fluffy. - Fold in diced apples and optional nuts until evenly distributed. Next, add the diced apples. If you want, you can also add nuts for crunch. Gently fold them in so they spread out in the batter. This adds flavor and texture. - Pour the batter into the pan, add topping, and bake for 50-60 minutes. Pour the batter into your prepared pan. Spread it evenly with a spatula. For a sweet crust, mix brown sugar and cinnamon, then sprinkle it on top. Bake the bread for 50-60 minutes. Check with a toothpick to see if it’s done. If it comes out clean, your bread is ready! For the complete process, check out the Full Recipe. To get the best texture, avoid overmixing your batter. Mixing too much makes the bread dense. Use a gentle hand when blending wet and dry ingredients. You want a few lumps; they keep the loaf tender. For apples, I recommend Granny Smith or Honeycrisp. These apples give a nice balance of sweet and tart flavors. If you have dietary needs, you can make some easy swaps. Use gluten-free flour to make this bread gluten-free. You can also swap sour cream for a dairy-free yogurt. This will keep the bread moist without dairy. These substitutions work well without losing flavor. To add more flavor, consider extra spices. A pinch of nutmeg or allspice can elevate the taste. You might also try a splash of almond or maple extract. These small changes can make your bread even more special. {{image_4}} You can change the flavor of your cinnamon apple bread by adding different nuts or dried fruits. For a crunchy bite, try using chopped walnuts or pecans. These nuts add a rich flavor that pairs well with apples. If you love dried fruits, consider adding raisins or cranberries. They bring a nice sweetness and chewiness to the bread. Mix and match to find your favorite combo. Each choice brings a new twist to this classic recipe. Want to give your bread a fresh taste? Add some citrus zest! Grated lemon or orange peel can brighten the flavors. Just a little zest goes a long way. It adds a zing that cuts through the sweetness. This small change makes your bread feel special. It’s a fun way to surprise your taste buds. Try it next time you bake! A glaze can make your cinnamon apple bread even sweeter. A simple glaze can be made with powdered sugar and milk. Just mix them until smooth and drizzle it over the cooled bread. For a richer flavor, try a maple glaze. Mix maple syrup with powdered sugar for a tasty topping. You can also sprinkle some extra cinnamon on top for a lovely finish. Glazes are easy to make and add a nice touch to your bread. For the full recipe, check out the instructions above! To keep your cinnamon apple bread fresh for a few days, store it at room temperature. Wrap it in plastic wrap or place it in an airtight container. This helps keep the moisture in and prevents it from drying out. Enjoy it for breakfast or a snack without worrying about it going stale. If you want to save some for later, freezing is a great option. First, let the bread cool completely. Wrap it tightly in plastic wrap, then place it in a freezer bag. This keeps out air and prevents freezer burn. When you're ready to eat it, thaw it in the fridge overnight or at room temperature for a few hours. This way, your bread stays soft and tasty. To reheat your cinnamon apple bread, slice it and place it in a toaster oven or regular oven. Heat it at 350°F (175°C) for about 10-15 minutes. You can also microwave slices for 15-20 seconds. For a little extra flavor, add a pat of butter on top before reheating. This makes the bread warm and delightful. For the full recipe, check out the link! Cinnamon Apple Bread lasts about 3 to 5 days when you store it right. Keep it in an airtight container at room temperature. This helps keep it soft and fresh. If you want it to last longer, you can freeze it. Wrap it tightly in plastic wrap and then foil. It can last for up to 3 months in the freezer. Just remember to thaw it in the fridge before serving. For this recipe, I love using Granny Smith or Honeycrisp apples. Granny Smith apples give a nice tartness that balances the sweetness of the bread. Honeycrisp apples add a sweet crunch and juicy texture. You can also try Fuji or Jonagold apples for a sweeter taste. Yes, you can make this recipe ahead of time! You can mix the batter and pour it into the pan. Cover it tightly and keep it in the fridge for up to 24 hours. When you're ready, just bake it straight from the fridge. If you want to freeze it, bake the bread first, then let it cool completely. Wrap it well and freeze it. Just thaw it overnight in the fridge before you serve it. To check if your bread is done, insert a toothpick into the center. If it comes out clean, the bread is ready. The top should also be a nice golden brown. If the toothpick has wet batter on it, give it a few more minutes in the oven. Keep an eye on it to avoid overbaking. Enjoy that lovely scent filling your kitchen! This blog post covered all you need to bake delicious Cinnamon Apple Bread. We explored ingredients, mixing techniques, baking steps, and tips for success. Remember, use fresh apples like Granny Smith for the best flavor. Avoid overmixing to keep the bread tender. Whether you choose to add nuts or a glaze, there are endless variations to enjoy. By following these steps, you can create a tasty treat that’s perfect for any occasion. Happy baking, and enjoy every slice you make!
Cinnamon Apple Bread Irresistible and Simple Recipe
Welcome to your new favorite baking adventure: Cinnamon Apple Bread! This simple recipe blends sweet apples with warm cinnamon, creating a cozy treat that will
- 2 ½ cups all-purpose flour - 1 ½ cups granulated sugar - 1 cup unsalted butter, softened - 4 large eggs - 1 cup buttermilk To create a funfetti cake, you need a few key ingredients. First, all-purpose flour gives the cake its structure. The sugar adds sweetness and helps it rise. Softened butter creates a rich flavor and tender texture. Eggs bind the ingredients and add moisture. Finally, buttermilk makes the cake light and fluffy. - 1 tablespoon baking powder - ½ teaspoon baking soda - ½ teaspoon salt Baking powder and baking soda are crucial for making the cake rise. They create air pockets while baking. Salt enhances the flavors and balances the sweetness. These simple ingredients are essential for a successful cake. - 1 tablespoon pure vanilla extract - ¾ cup rainbow sprinkles - 1 cup frosting of your choice Vanilla extract adds a lovely flavor that complements the cake. Rainbow sprinkles bring color and joy to each slice. Choose your favorite frosting to finish the cake and make it even more delicious. I recommend a buttercream frosting for that classic taste. For the full recipe, be sure to check the complete guide to making this delightful funfetti cake! - Preheat the oven to 350°F (175°C). - Grease and prepare two 9-inch round cake pans. Use butter and flour or line with parchment paper. - In a large bowl, sift together the flour, baking powder, baking soda, and salt. This makes sure they mix well. - Use an electric mixer to cream the softened butter and granulated sugar. Mix until it looks light and fluffy. This step takes about 3-4 minutes. - Add the eggs one by one. Mix well after each egg. Then add the vanilla extract and combine everything. - Gradually add the dry mix and buttermilk to the butter and sugar mix. Start with about one-third of the dry mix, then add half of the buttermilk. Repeat this until all ingredients are added. - Be gentle while mixing so the batter stays light. - Now, gently fold in ¾ cup of rainbow sprinkles. Use a spatula to avoid breaking the sprinkles. - Divide the batter evenly between the two prepared pans. Smooth the tops with a spatula and sprinkle extra rainbow sprinkles on top. - Place the pans in the oven and bake for 25-30 minutes. Check if it's done by inserting a toothpick in the center. It should come out clean or with a few moist crumbs. - After baking, let the cakes cool in the pans for about 10 minutes. Then move them to a wire rack to cool completely. - Once the cakes are cool, frost the top of one layer with your favorite frosting. You can use buttercream for a classic taste. - Sprinkle more rainbow sprinkles on top of the frosting before placing the second layer on. - Frost the top and sides of the whole cake, making it look festive with extra sprinkles. For the full recipe, check out the Funfetti Cake Extravaganza. For the best funfetti cake, use room temperature ingredients. When butter, eggs, and buttermilk are at room temperature, they mix better. This helps create a fluffy texture. Cold ingredients can make your cake dense and heavy. Also, avoid overmixing your batter. After adding flour and buttermilk, mix just until combined. Overmixing can lead to a tough cake. You want a light and airy feel, not a brick! To make your funfetti cake pop, think about fun decorations. Use festive cake toppers or colorful candles. You can even add fresh fruit or edible flowers for a fresh look. Sprinkles are a must! Use them not just in the batter but also on top. Try different shapes and sizes. You can mix small and large sprinkles for extra fun. When serving your cake, presentation matters. Place it on a bright cake stand to highlight its colors. Scatter extra sprinkles around the base for a playful touch. Pair your cake with a scoop of vanilla ice cream or a glass of milk. It also goes well with fruity drinks or coffee. These combos will make your dessert even more delightful! {{image_4}} You can switch up the funfetti cake in many ways. One way is to make a chocolate funfetti cake. Just add cocoa powder to the dry mix. This gives a rich, sweet flavor that pairs well with sprinkles. Another option is to add lemon zest. This gives a fresh citrus twist. The zest brightens the cake and makes it even more fun. Just mix in a tablespoon of zest with the wet ingredients. Frosting plays a big role in the cake's taste. You can use cream cheese frosting for a tangy flavor. It balances the sweetness of the cake nicely. Just whip together cream cheese, butter, and powdered sugar for a smooth spread. You might also try a ganache topping. Melt chocolate with heavy cream for a shiny finish. This adds a rich layer of chocolatey goodness that everyone will love. If you need gluten-free options, use a gluten-free flour blend. It works just as well in this recipe. You can also add a bit of xanthan gum for better texture. For vegan substitutions, replace eggs with flax eggs. Just mix one tablespoon of ground flaxseed with three tablespoons of water per egg. Use plant-based butter and non-dairy milk for the rest. These swaps help you enjoy funfetti cake without any animal products. For the full recipe, check out the Funfetti Cake Extravaganza 🧁. To keep your funfetti cake fresh, refrigerate any leftovers. Place the cake in an airtight container or cover it tightly with plastic wrap. This helps prevent the cake from drying out. If you want to freeze the cake, wrap each layer in plastic wrap, then aluminum foil. This ensures no freezer burn affects the taste. To thaw, move it to the fridge overnight before serving. Funfetti cake stays fresh for about 3 to 5 days in the fridge. If you freeze it, it can last for up to 3 months. Watch for signs of spoilage, such as a bad smell, dry texture, or mold. If you notice any of these, it's time to toss the cake. To avoid dryness, wrap your cake layers in plastic wrap while storing. This keeps moisture in and helps keep the cake soft. You can also use simple syrups to enhance flavor. Just brush a little syrup on the cake layers before frosting. This adds moisture and makes each bite even better. For the full recipe, check out the Funfetti Cake Extravaganza! What is the origin of Funfetti cake? Funfetti cake began in the 1980s. It became popular thanks to a box mix by a well-known brand. The cake is special because it has colorful sprinkles mixed into the batter. This adds joy and celebration to any occasion. Can I make this cake a day in advance? Yes, you can make this cake a day ahead. Just bake it and cool it completely. Then wrap the layers in plastic wrap to keep them fresh. Frost the cake the next day for best results. Why is my cake dense? A dense cake may come from overmixing the batter. Mixing too much can develop gluten, making the cake heavy. Always mix just until combined. Also, check if your baking powder is fresh. Old baking powder can prevent the cake from rising. Can I substitute buttermilk? Yes, you can. If you don't have buttermilk, mix one cup of milk with one tablespoon of vinegar or lemon juice. Let it sit for five minutes. This creates a similar acidity to buttermilk. How do I keep the cake from falling apart while frosting? To keep the cake sturdy, cool it completely. Make sure the layers are firm before frosting. Use a thin layer of frosting as a crumb coat first. Let it set in the fridge for 15 minutes before adding more frosting. What’s the best way to store decorated cake? Store your decorated cake in an airtight container. If it's not possible, use plastic wrap to cover it. Keep it in the fridge if your frosting has cream or dairy. For cakes with buttercream, it can stay at room temperature for a day. You learned all about making a delicious Funfetti cake. We covered the ingredients, mixing, baking, and storing. Remember, room temperature ingredients are key for the right texture. You can choose fun frostings and creative decorations for your cake. There are many ways to make this treat your own. Have fun with flavor twists and sharing it with friends. With these tips, your Funfetti cake will be a hit at any gathering! Enjoy baking and create sweet memories!
This Is The Best Recipe For Funfetti Cake Delight
Get ready to bake the most delightful Funfetti Cake ever! This recipe is simple and perfect for any celebration. With vibrant sprinkles and a moist
To make this yummy bread, you need the following main ingredients: - 1 medium zucchini, grated (about 1 cup) - 1 cup all-purpose flour - 1/2 cup whole wheat flour - 1/2 cup unsweetened cocoa powder - 1 teaspoon baking soda - 1/2 teaspoon baking powder - 1/4 teaspoon salt - 1/2 cup granulated sugar - 1/2 cup packed brown sugar - 1/2 cup vegetable oil - 2 large eggs - 1 teaspoon vanilla extract - 1/2 cup semi-sweet chocolate chips - 1/2 cup milk chocolate chips - 1/2 cup white chocolate chips These ingredients give your bread its rich chocolate flavor and moisture. The essential baking ingredients are key to the right texture. The flours provide structure. The cocoa powder adds deep chocolate taste. Baking soda and baking powder help the bread rise, making it soft. Salt balances the sweetness and enhances flavor. You can add some optional flavor enhancements. Try adding chopped nuts for crunch. Walnuts or pecans work great. You can also sprinkle in cinnamon for warmth. A touch of espresso powder can boost the chocolate flavor. These options let you personalize your bread and make it even more special. For the full recipe, check this link: [Full Recipe]. Start by preheating your oven to 350°F (175°C). This step is key for even baking. While the oven heats, grab your 9x5 inch loaf pan. Lightly grease it with butter or baking spray. This helps the bread come out easily. Next, dust the pan with flour to prevent sticking. This simple prep makes a big difference. In a medium bowl, combine the grated zucchini, granulated sugar, brown sugar, vegetable oil, eggs, and vanilla extract. Use a whisk or spatula to mix everything until smooth. The zucchini adds moisture and a nice texture. In a separate large bowl, whisk together the all-purpose flour, whole wheat flour, unsweetened cocoa powder, baking soda, baking powder, and salt. This ensures the dry ingredients blend well. Mixing well helps the flavor spread evenly. Pour the wet mixture into the bowl with dry ingredients. Using a spatula or wooden spoon, stir gently until combined. You want the mixture to be just mixed, with a few lumps. This keeps the bread soft. Now it's time for the fun part! Fold in the semi-sweet, milk chocolate, and white chocolate chips. Make sure they spread evenly throughout the batter. This adds rich chocolate flavor to each slice. Spoon the batter into the prepared loaf pan. Smooth the top for an even layer. Now, it's ready to bake! For the full recipe, check above. To make your Triple Chocolate Chip Zucchini Bread rich and moist, the key is in the zucchini. Grate it finely and squeeze out any excess water. This helps keep your bread from being too wet. Use a mix of all-purpose and whole wheat flour. This blend gives a nice texture and flavor. Also, don't overmix the batter. Stir just until combined. A few lumps are okay. Overmixing can make the bread dense. Lastly, baking time matters. Keep an eye on it. Every oven is different. Use a toothpick to test for doneness. If it comes out clean or with a few crumbs, it's ready. Many bakers make some common mistakes. One is not measuring ingredients correctly. Always use dry measuring cups for flour and cocoa powder. A kitchen scale can help too. Another mistake is skipping the greasing of the pan. This can lead to sticking. Use butter or baking spray, then dust with flour. Don't forget to check your oven temperature. An oven thermometer can help you avoid baking issues. Add-ins can elevate your zucchini bread. Consider mixing in chopped nuts like walnuts or pecans for crunch. Spices like cinnamon or nutmeg can add warmth and depth. You can also use flavored extracts, like almond or orange, for a twist. For a fun touch, try adding a swirl of peanut butter or Nutella. Just drop it in before baking, and use a knife to create a swirl. These little changes can make each slice unique. Enjoy the process of making this delightful treat! For the full recipe, check out the [Full Recipe]. {{image_4}} You can make your Triple Chocolate Chip Zucchini Bread lighter. One great option is to swap some oil for applesauce. It keeps the bread moist while cutting down on fat. You can try using half applesauce and half oil. This change keeps the taste rich but makes the bread a bit healthier for you. Add your personal touch by mixing in nuts, spices, or seeds. Chopped walnuts or pecans bring a nice crunch. You can also add a teaspoon of cinnamon or nutmeg for warmth. Want to try something different? Add a pinch of cayenne pepper for a spicy twist! Each choice adds new flavors and textures to your loaf. If you need a gluten-free version, it’s easy to adapt! Use gluten-free flour blends instead of regular flour. Check the label to ensure it has a good balance of starches and proteins. You can also add a teaspoon of xanthan gum to help with the structure. This way, everyone can enjoy this chocolatey treat without worry! For the full recipe, check out the detailed steps to create this delightful dish. Store your triple chocolate chip zucchini bread in an airtight container. This keeps it fresh and moist. You can also wrap it tightly in plastic wrap. Place it in a cool, dry spot. Avoid direct sunlight or heat. For the best taste, eat it within four days. If you want it to last longer, consider freezing it. To freeze your zucchini bread, let it cool completely first. Once cool, wrap it in plastic wrap. Then, place it in a freezer-safe bag or container. Be sure to label it with the date. Zucchini bread can last up to three months in the freezer. When you’re ready to enjoy it, just thaw it in the fridge overnight. To reheat, slice the bread as needed. Place the slices on a plate and cover them with a damp paper towel. Microwave for about 10-15 seconds. This keeps the bread moist. You can also warm it in the oven at 350°F (175°C) for about 10 minutes. Enjoy it warm for a fresh taste. For extra delight, add a pat of butter or a drizzle of chocolate sauce on top. Yes, you can use frozen zucchini. Just thaw it first and drain any extra water. This helps keep your bread moist and rich. Frozen zucchini works well, but fresh will give a better texture. To help your zucchini bread rise, make sure your baking soda and baking powder are fresh. Mix the wet and dry ingredients gently. Overmixing can make the bread dense. Also, let the batter rest for a few minutes before baking. This allows the leavening agents to activate fully. If you don't have all the chocolate types, don't worry! You can mix and match. Use any combination of dark, milk, or even extra cocoa powder. The key is to keep the total amount of chocolate chips about 1.5 cups. This keeps your bread rich and chocolatey. You can also try adding nuts or dried fruit for a fun twist. Check out the Full Recipe for more details on making this delicious treat! You learned how to make delicious triple chocolate chip zucchini bread. We covered the main ingredients, essential baking tips, and fun variations. Remember to prep your oven and pan carefully for the best results. Keep texture and moisture in check to avoid common mistakes. Consider healthier options or gluten-free variations for added enjoyment. Store your bread well, and you can even freeze it for later. With these tips, baking this treat is easy and fun. Enjoy your baking time and share your tasty creations!
Triple Chocolate Chip Zucchini Bread Rich and Moist Delight
Looking for a fun way to sneak veggies into dessert? Try my Triple Chocolate Chip Zucchini Bread! This rich and moist delight combines chocolate flavors