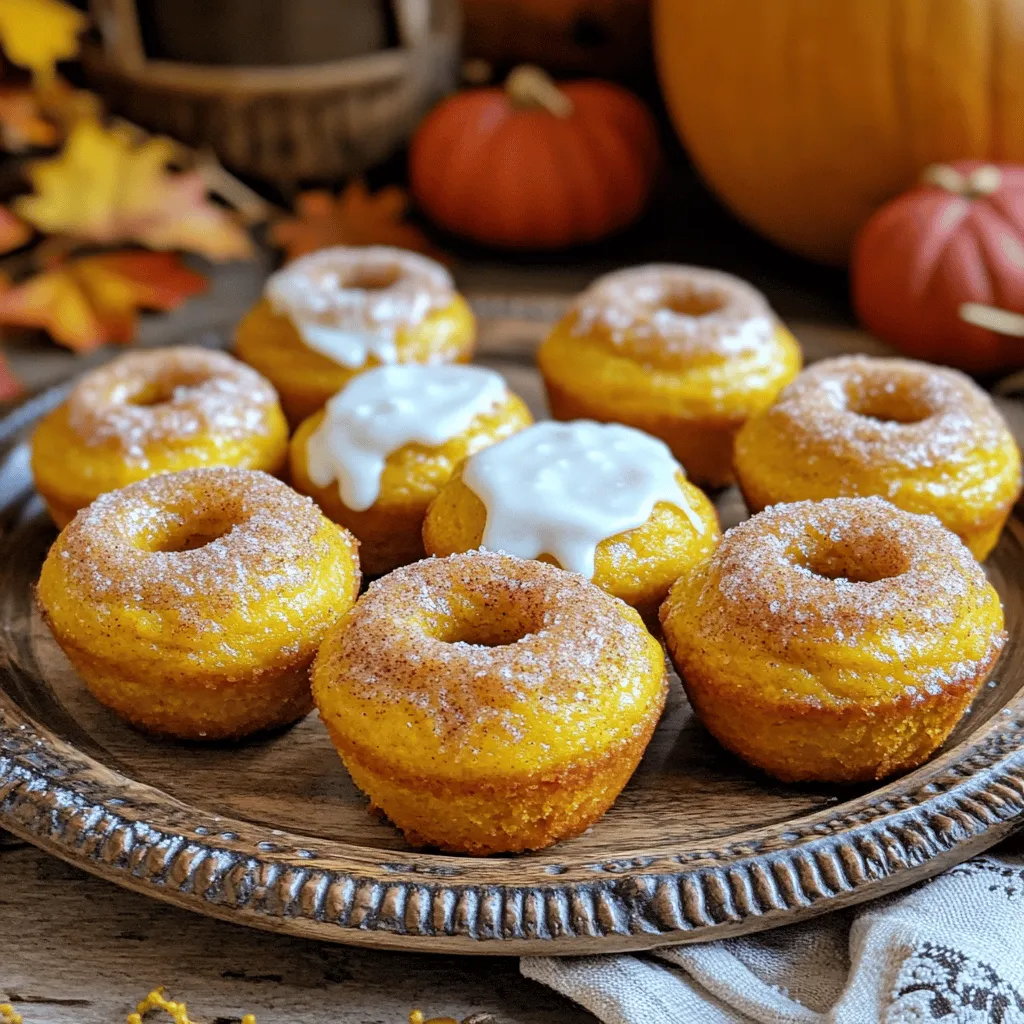
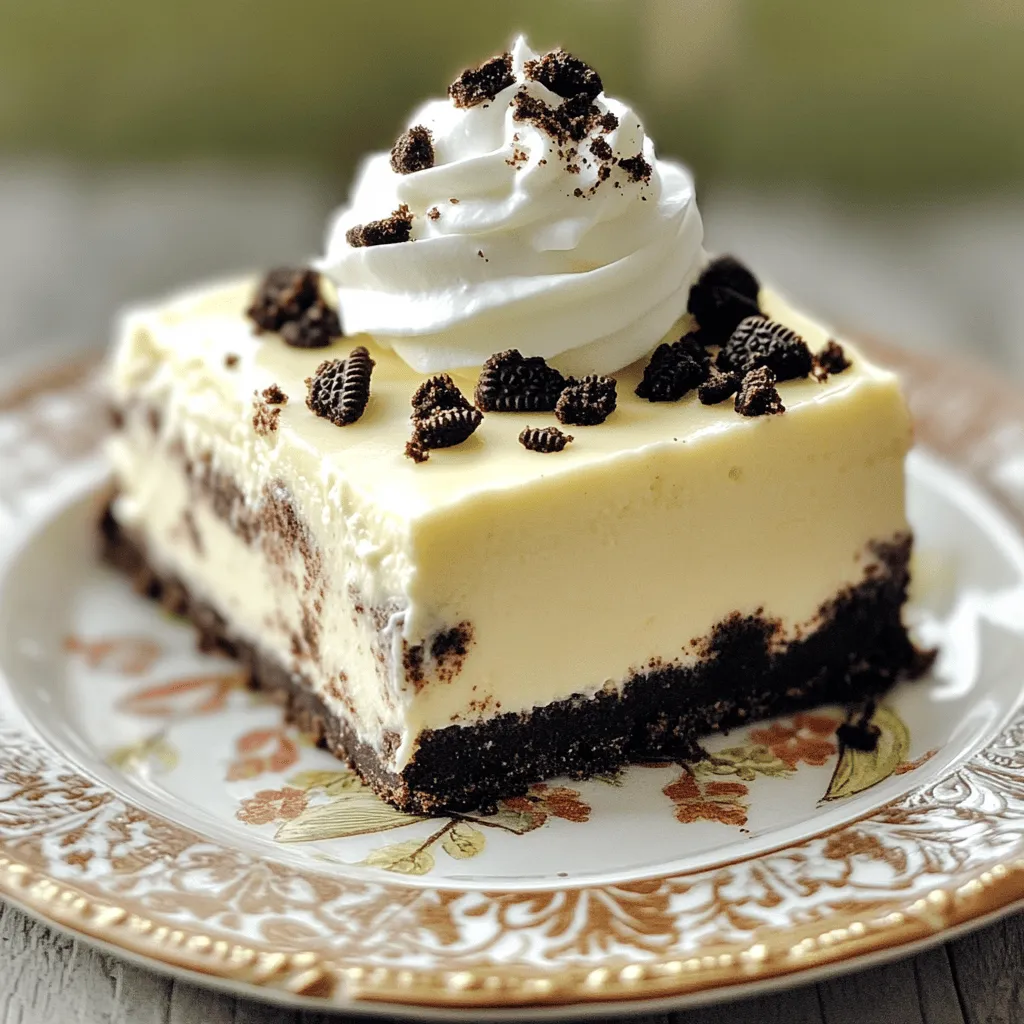
Desserts

- 1 medium zucchini (approximately 1 cup when shredded) - 1 cup all-purpose flour - ½ cup unsweetened cocoa powder - 1 teaspoon baking soda - ½ teaspoon salt - ½ cup packed brown sugar - ½ cup granulated sugar - 1 teaspoon pure vanilla extract - 2 large eggs - ½ cup vegetable oil - 1 cup chocolate chips (dark or semi-sweet) - ¼ cup walnuts, chopped (optional) Using zucchini in brownies adds moisture and a subtle flavor. The zucchini keeps your brownies soft and fudgy. It also sneaks in extra fiber without changing the taste. You can easily shred the zucchini with a box grater. Just remember to remove excess water by squeezing it in a towel. For dry ingredients, use all-purpose flour and cocoa powder. This combo gives your brownies that rich, chocolatey taste. Baking soda helps them rise while salt enhances the flavors. The sugars—brown and granulated—create a sweet balance. Don't forget the wet ingredients! The eggs bind everything together, while vegetable oil adds richness. Pure vanilla extract brings warmth and depth to the flavor. Finally, chocolate chips are a must for that gooey, melty texture. If you want, you can add walnuts for crunch. This full recipe creates a delightful treat you will love! - Preheat your oven to 350°F (175°C). - Grease a 9x9-inch baking pan or line it with parchment paper. - In a medium bowl, mix together the flour, cocoa powder, baking soda, and salt. - Set this dry mixture aside for now. - In a large bowl, combine the shredded zucchini, brown sugar, granulated sugar, vanilla, eggs, and vegetable oil. - Whisk these wet ingredients until smooth and well mixed. - Gradually add the dry mixture to the wet mixture. - Stir gently with a spatula until just combined. - Be careful not to overmix, as this can make the brownies dense. - Now, fold in the chocolate chips and walnuts if you want. - Pour the brownie batter into the prepared pan. - Use a spatula to spread it evenly in the pan. - Place the pan in the oven and bake for 25 to 30 minutes. - Check for doneness by inserting a toothpick into the center. - It should come out with a few moist crumbs, but no wet batter. - Let the brownies cool in the pan for 10 minutes. - Transfer them to a wire rack to cool completely. - Once cool, slice them into squares for serving. For the full recipe, refer back to the ingredients above. When you bake with zucchini, you add moisture and flavor. Zucchini keeps brownies soft and tender. Grate the zucchini finely to mix it well into the batter. You can use a box grater or a food processor for this task. It's key not to overmix the batter. Stir gently when combining wet and dry ingredients. Overmixing can make brownies tough. You want a light and airy texture, so mix just until combined. For serving, cut brownies into neat squares. Place them on a colorful plate to make them pop. You can dust them with powdered sugar for a touch of elegance. Try adding a scoop of ice cream on top for a warm and cold contrast. Drizzle chocolate sauce over the brownies for extra sweetness. You can also sprinkle chopped nuts or fresh berries on top for added crunch and flavor. Using zucchini in baking offers many health perks. Zucchini is low in calories but high in fiber. This fiber helps with digestion and keeps you feeling full. By using zucchini, you lower the overall calories in the brownies. This makes them a guilt-free treat. You get a tasty dessert while sneaking in some veggies! These brownies are a great way to enjoy desserts without the extra guilt. For the complete recipe, check out the Full Recipe. {{image_4}} You can easily make zucchini brownies gluten-free. Here are some great substitutes for all-purpose flour: - Almond flour - Coconut flour - Oat flour - Brown rice flour When choosing a gluten-free flour blend, aim for one that includes xanthan gum for better texture. Some good options include: - Bob's Red Mill 1-to-1 Baking Flour - King Arthur Gluten-Free Measure for Measure Flour These blends work well and keep your brownies soft and moist. To make your zucchini brownies vegan, swap eggs for flaxseed meal or chia seeds. Use these ratios: - 1 tablespoon of flaxseed meal + 3 tablespoons of water = 1 egg - 1 tablespoon of chia seeds + 3 tablespoons of water = 1 egg For chocolate chips, look for dairy-free options. I love brands like Enjoy Life or Lily's. They add sweetness without the dairy. Get creative with flavor! Adding spices can enhance your brownies. Try mixing in: - 1 teaspoon of cinnamon - ½ teaspoon of nutmeg You can also mix in nuts or dried fruits. Some tasty options are: - Chopped pecans - Almonds - Dried cranberries - Raisins These additions make each bite more exciting and delicious. For the full recipe, check out the complete guide! To keep your zucchini brownies fresh, store them at room temperature. Place them in an airtight container. This simple step helps keep the brownies soft and chewy. You can also wrap them in plastic wrap for extra protection. To keep brownies moist, add a slice of bread to the container. This trick helps them stay fresh longer. For extended shelf life, freezing is your best friend! Cut the brownies into squares and wrap each piece in plastic wrap. Place the wrapped brownies in a freezer-safe bag. They can last up to three months in the freezer. When you're ready to enjoy one, let it thaw at room temperature. To refresh the texture, heat it in the microwave for about 10 seconds. Zucchini brownies can stay fresh for about 3 to 4 days at room temperature. If stored correctly in the fridge, they can last up to a week. Look for signs of spoilage, like a dry or hard texture. If you see any mold or unpleasant smell, it's time to toss them. Always trust your senses when checking for freshness! Can zucchini brownies be made ahead of time? Yes, you can make zucchini brownies ahead of time. They stay fresh for several days. Just store them in an airtight container. This keeps them soft and tasty. You can also freeze them for up to three months. Just remember to wrap them well. How can I tell when my brownies are done? To check if your brownies are done, insert a toothpick in the center. If it comes out with a few moist crumbs, they are ready. If the toothpick has wet batter, bake them a bit longer. Brownies should not be dry, so keep an eye on them. What can I substitute for vegetable oil? If you need to swap out vegetable oil, you have options. You can use melted coconut oil or applesauce. Both will keep your brownies moist. Yogurt is also a good choice for a healthier twist. Each substitute gives a slightly different taste, so choose according to your preference. Are zucchini brownies healthier than regular brownies? Yes, zucchini brownies are often healthier than regular brownies. They have less sugar and fat. Zucchini adds moisture and fiber, making them more filling. You can enjoy a delicious treat while getting some nutrients. Plus, they can help satisfy your sweet tooth without the guilt. For the full recipe, check the earlier section! These zucchini brownies blend flavor and health in a simple recipe. We covered ingredients, baking steps, and tips for success. Don't forget about tasty variations and storage ideas. With zucchini, you can enjoy dessert while adding nutrition. Make these brownies your own by experimenting with flavors or dietary needs. Try them out and enjoy every bite!
Zucchini Brownies Decadent and Guilt-Free Delight
Are you ready to enjoy a rich, chocolatey treat without the guilt? These Zucchini Brownies are not just delicious; they’re also packed with hidden nutrition
- 1 ½ cups all-purpose flour - 1 teaspoon baking powder - 1 teaspoon baking soda - ½ teaspoon salt - 1 teaspoon ground cinnamon - ⅓ cup vegetable oil - 1 cup brown sugar, packed - 2 large eggs - 1 teaspoon vanilla extract - 1 cup grated zucchini (about 1 medium zucchini) - 1 cup diced fresh peaches (about 2 medium peaches) - ½ cup chopped walnuts - ½ cup rolled oats (for topping) - 2 tablespoons sugar (for topping) - 1 teaspoon cinnamon (for topping) These ingredients combine to create a lovely blend of flavors. The zucchini adds moisture and texture, while the peaches bring sweetness. You can easily adjust the recipe for your taste. For a nutty crunch, add chopped walnuts. If you want a sweet topping, mix the oats, sugar, and cinnamon. This combination gives the cake a nice crunch on top. For the full recipe, refer to the details provided earlier. The balance of these ingredients makes your coffee cake simple yet delicious. - Preheat your oven to 350°F (175°C). - Prepare a 9-inch round cake pan by greasing it or lining it with parchment paper. - In a medium bowl, mix together: - 1 ½ cups all-purpose flour - 1 teaspoon baking powder - 1 teaspoon baking soda - ½ teaspoon salt - 1 teaspoon ground cinnamon - In a large bowl, whisk together: - ⅓ cup vegetable oil - 1 cup brown sugar, packed - Add 2 large eggs, one at a time, mixing well after each. - Stir in 1 teaspoon vanilla extract until everything is smooth. - Gently add 1 cup grated zucchini and 1 cup diced fresh peaches to the wet mix. - Fold in the dry ingredients just until mixed. Avoid overmixing; it can make the cake dense. - If you like, gently mix in ½ cup chopped walnuts for extra crunch. - Pour the batter into your prepared cake pan, smoothing it evenly. - In a small bowl, mix together: - ½ cup rolled oats - 2 tablespoons sugar - 1 teaspoon cinnamon - Sprinkle this topping over the cake batter. - Bake for 35-40 minutes. Check doneness by inserting a toothpick. It should come out clean. - Let the cake cool in the pan for about 10 minutes. Then transfer it to a wire rack to cool completely. For the full recipe, refer to the earlier section. To make the best zucchini peach coffee cake, avoid overmixing the batter. Overmixing can make the cake dense. Stir until just combined for a light and fluffy texture. Also, measure your ingredients correctly. Accurate measurements ensure the right balance of flavors and textures. For a beautiful presentation, slice your coffee cake and serve it on a colorful plate. Garnish with fresh peach slices around the cake. A light dusting of powdered sugar adds a nice touch. Pair your cake with a hot cup of coffee or tea for a delightful treat. You can adjust the sweetness of the cake to your liking. If you prefer a sweeter cake, add more brown sugar. You can also mix in other fruits like blueberries or raspberries for different flavors. This keeps the recipe fresh and exciting. {{image_4}} You can make this cake gluten-free with some easy swaps. Use almond flour or coconut flour instead of all-purpose flour. These flours will give you a different texture. Make sure to add a binding agent like xanthan gum. For sugar, use coconut sugar or maple syrup if you prefer. If you want to make this cake vegan, you can replace the eggs. Use 1/4 cup of unsweetened applesauce per egg. This keeps the cake moist and fluffy. For dairy-free options, replace the vegetable oil with coconut oil or use a plant-based butter. You can also use almond milk instead of any dairy. To elevate the taste, add spices or zest. A pinch of nutmeg or a splash of orange zest brings out great flavors. You can also swap in different nuts like pecans or almonds for a new crunch. These small changes make the cake a unique treat every time. After baking, let the Zucchini Peach Coffee Cake cool completely. Cover it with plastic wrap or store it in an airtight container. This helps keep it moist and fresh. I suggest keeping it in the refrigerator for the best taste. It stays good for about 3 to 4 days. If you want to save it for later, freezing is a great option. First, slice the cake into pieces. Wrap each piece tightly in plastic wrap, then place them in a freezer-safe bag. This way, you can enjoy a slice anytime. To reheat, thaw it in the fridge overnight. Then, warm it in the oven at 350°F for about 10 minutes. In the fridge, the cake stays fresh for about a week. If frozen, it can last for about 3 months. Look for signs of spoilage, such as a dry texture or off smell. If it feels crumbly or smells odd, it's best to toss it. Always trust your senses when it comes to food safety. Yes, you can make the cake ahead of time. I suggest baking it a day before you plan to serve it. Once it cools, wrap it tightly in plastic wrap. This keeps it moist and fresh. You can also freeze it if needed. Just make sure to let it thaw in the fridge overnight before serving. To check if the cake is done, insert a toothpick into the center. If it comes out clean, the cake is ready. It should also spring back lightly when touched. If the toothpick has wet batter, bake it a few more minutes and test again. If you don’t have zucchini, you can use shredded carrots or applesauce. Both add moisture and sweetness. Carrots will give a slight crunch, while applesauce will make the cake softer. Adjust the sugar down if using applesauce, as it’s naturally sweet. Yes, you can use canned peaches. Drain them well and chop them into small pieces. Canned peaches are softer, so they may change the cake's texture. You might want to reduce other liquids slightly to balance it out. This recipe makes about 8 to 10 servings. If you need more, you can double the ingredients. Make sure to use a larger pan for the extra batter. This way, everyone can enjoy a slice of this delightful cake! You just learned how to make a delicious zucchini and peach coffee cake. We covered ingredients, step-by-step instructions, and helpful tips. Experiment with variations like gluten-free or vegan options. Store your cake properly to keep it fresh. Remember, baking is fun and rewarding. Enjoy your tasty creation, and share it with others. You now have the tools to impress friends and family. Happy baking!
Zucchini Peach Coffee Cake Delightfully Simple Recipe
Are you ready to enjoy a delicious twist on a classic dessert? My Zucchini Peach Coffee Cake is delightfully simple to make and bursting with
- Grated zucchini - Whole wheat flour - Unsweetened cocoa powder - Coconut sugar - Eggs Grated zucchini is the star of this recipe. It adds moisture and nutrition without changing the taste. Whole wheat flour makes these muffins hearty and adds fiber. Unsweetened cocoa powder gives the rich chocolate flavor while keeping it healthy. Coconut sugar is a great way to sweeten without refined sugars. Lastly, eggs bind everything together and provide protein. - Dark chocolate chips - Applesauce Dark chocolate chips add extra sweetness and a burst of chocolate. You can skip them if you prefer a lighter muffin. Applesauce is another optional ingredient that adds moisture and natural sweetness. It also helps lower the fat content in the muffins. - Baking powder - Baking soda - Salt Baking powder and baking soda are important for helping the muffins rise. They create air pockets and make the muffins fluffy. Salt enhances all the flavors and balances the sweetness. These ingredients are key for a perfect muffin texture. For the full recipe, check out the [Full Recipe]. - Preheat the oven to 350°F (175°C). - Prepare a muffin tin with cupcake liners or grease each cup. - In a bowl, combine the grated zucchini and applesauce. - Add vegetable oil and eggs, then mix until smooth. - Sift flour, cocoa powder, coconut sugar, baking powder, baking soda, and salt into another bowl. - Gently combine the wet and dry mixtures until just mixed. - Fill each muffin cup about 3/4 full with the batter. - Bake for 18-20 minutes. Test with a toothpick; it should be clean. Enjoy the full recipe for more details! To make the best Healthy Chocolate Zucchini Muffins, avoid overmixing. When you combine the wet and dry ingredients, stop mixing as soon as they are just blended. A few lumps are fine. Overmixing makes the muffins tough and dry. Check for doneness by inserting a toothpick into the center of a muffin. If it comes out clean or has a few moist crumbs, your muffins are ready. This step is vital for a perfect texture. To serve these muffins nicely, try a warm presentation. Drizzle honey or maple syrup on top for extra sweetness. Dusting with powdered sugar adds a lovely touch too. For a special serving idea, place a dollop of creamy Greek yogurt next to the muffins. It makes a great dip or spread. Zucchini offers many health benefits. It is low in calories and high in water. This helps keep you hydrated. Plus, zucchini is a good source of vitamins A and C. Using whole wheat flour boosts the fiber in your muffins. Fiber helps with digestion and keeps you full longer. Whole wheat flour also adds a nutty flavor that pairs well with chocolate. {{image_4}} You can easily make these muffins gluten-free. Use almond flour or oat flour in place of whole wheat flour. These flours add unique flavors and textures. Keep an eye on baking times, as gluten-free muffins may bake faster. Start checking for doneness a few minutes early. If you need a dairy-free version, replace eggs with flax eggs. Mix one tablespoon of ground flaxseed with three tablespoons of water. Let it sit until it gels. For chocolate, use dairy-free chocolate chips. This keeps the muffins rich and tasty without dairy. Add fun flavors by mixing in nuts or seeds. Walnuts or sunflower seeds add crunch and protein. You can also try spices like cinnamon or nutmeg. These spices add warmth and depth to the muffins. Experiment with different combinations to find your favorite! You can store your muffins at room temperature for up to three days. Place them in an airtight container. If you live in a hot climate, keep them in the fridge. This helps them stay fresh longer. Just remember, refrigeration can change the texture a bit. Freezing is a great option if you want to save some for later. Wrap each muffin in plastic wrap. Then, place them in a freezer bag. Make sure to remove as much air as possible. This prevents freezer burn. To thaw, take a muffin out and leave it at room temperature for about an hour. You can also microwave it for 15-20 seconds if you want it warm right away. These muffins last about one week in the fridge. If you freeze them, they can last up to three months. Watch for signs of spoilage, like mold or an off smell. If they feel hard or dry, it’s time to toss them. Enjoy your Healthy Chocolate Zucchini Muffins fresh for the best taste! For the full recipe, check the earlier sections. Yes, you can use regular flour. It will change the texture and flavor. Regular flour makes muffins lighter and fluffier. Whole wheat flour adds more nutrients and a nutty taste. You may notice a difference in moisture too. Whole wheat helps keep the muffins moist and dense. If you use regular flour, check the baking time. You might need to adjust it slightly. To sweeten your muffins, try natural sweeteners. Coconut sugar is a great choice. Brown sugar can also work well. You can use honey or maple syrup. Just remember to reduce other liquids slightly. Another option is adding mashed bananas or more applesauce. Both add sweetness without extra sugar. Taste the batter before baking. This way, you can adjust to your liking. Reheating muffins can be simple. You want to keep them moist. The best way is in the oven. Preheat it to 350°F (175°C). Wrap the muffins in foil and warm them for about 10 minutes. This method keeps them soft. You can also use the microwave. Heat for about 10-15 seconds. Add a small cup of water in the microwave. This helps maintain moisture while reheating. In this post, we covered delicious zucchini muffins, focusing on key ingredients like whole wheat flour and cocoa powder. I shared step-by-step instructions, tips for perfecting your bake, and ways to store your muffins. Remember, you can easily adapt these recipes to fit gluten-free or dairy-free diets. These muffins are not just tasty; they are healthy too. I hope you feel inspired to give this recipe a try! Enjoy your baking adventure.
Healthy Chocolate Zucchini Muffins Simple & Delicious
Looking for a sweet treat that’s both healthy and delicious? You’ve come to the right place! My Healthy Chocolate Zucchini Muffins are a simple way
- 2 cups finely grated zucchini - 1 cup unsweetened cocoa powder - 1 cup maple syrup - 2 cups all-purpose flour You can swap zucchini for other fruits or veggies. Try grated carrots or mashed bananas for a fun twist. For cocoa powder, you can use dark chocolate powder for a richer flavor. If you want a different sweetener, honey or agave syrup can work as well. Just remember, this might change the taste a bit. This recipe makes about 8 slices. Each slice is a nice portion. You can enjoy it as a snack or dessert. If you want to share, you can easily double the recipe for a larger crowd. To serve, cut the loaf into even slices for a neat presentation. Enjoy your time baking this easy and delicious treat! First, you need to preheat your oven to 350°F (180°C). This is key for even baking. While the oven heats, prepare a 9x5 inch loaf pan. You can grease it or line it with parchment paper. This helps the loaf come out easily when it’s done. Next, grab two medium-sized zucchinis. You’ll want to finely grate them until you have about 2 cups. In a large mixing bowl, combine the grated zucchini with 1 cup of maple syrup. Stir well to mix everything together. The zucchini adds moisture and keeps this loaf soft. Now, it’s time to add the dry ingredients. Slowly sift in 1 cup of unsweetened cocoa powder and 2 cups of all-purpose flour. Sifting helps to break up clumps and adds air, making your loaf light. When mixing, use a gentle hand. Stir just until you don’t see any dry flour. Overmixing can lead to a dense loaf. Keep it smooth and simple for the best texture. Pour the batter into your prepared loaf pan. Use a spatula to spread it evenly. This ensures it bakes uniformly. Now, place the pan in your preheated oven. Bake for 50 to 60 minutes. To check if it’s done, insert a toothpick in the center. If it comes out clean, your loaf is ready. Once it’s baked, let it cool in the pan for about 10 minutes. Then, move it to a wire rack to cool completely. This keeps the loaf from becoming soggy. Check out the full recipe for more details and tips! Accurate measuring is key to a great loaf. Use dry measuring cups for dry ingredients, like flour and cocoa. For liquids, use a liquid measuring cup. Always level off dry ingredients with a straight edge. This keeps your ratios right. If you pack or over-measure, your loaf may turn out dense. Want a moist loaf? Grate your zucchini finely. This helps it blend well with the batter. Squeeze out excess water if your zucchini is very wet. Don't overmix the batter; mix just until combined. This keeps the loaf light and airy. Let it cool in the pan for a bit before moving it. This helps set the texture. To serve your chocolate zucchini loaf, use a rustic wooden board. Cut the loaf into nice, even slices. Dust with powdered sugar for a sweet touch. Add fresh mint leaves for color and freshness. You can also serve it with a scoop of vanilla ice cream. This adds a creamy contrast to the rich chocolate. For the full recipe, click here. {{image_4}} You can easily change up this loaf by adding in nuts or chocolate chips. Walnuts or pecans add a nice crunch. If you love chocolate, try adding dark chocolate chips. They melt into the loaf and make it even richer. Adding spices can also boost the flavor. A little cinnamon or nutmeg gives warmth. You can even try a pinch of salt to enhance the chocolate taste. If you need a gluten-free option, use almond flour instead of all-purpose flour. This change keeps the loaf moist and tasty. You can also try gluten-free flour blends. Just make sure they are suitable for baking. For vegan substitutions, swap maple syrup with agave syrup. You can also use flax eggs instead of regular eggs. Mix one tablespoon of ground flaxseed with three tablespoons of water. Let it sit for a few minutes until it thickens. You can mix in seasonal vegetables for fun variations. In the fall, add grated carrots for a sweet twist. In summer, try shredded yellow squash along with zucchini. Both options keep the loaf moist. Seasonal flavors can also make the loaf special. In winter, add some orange zest for a refreshing touch. In spring, mix in fresh mint for a bright flavor. Each change gives the loaf a new life and taste. For the full recipe, check out the complete guide. To cool the loaf properly, let it sit in the pan for about 10 minutes. This helps it set. After that, transfer it to a wire rack. Cooling it completely is key to keeping it moist. If the loaf is warm when you store it, it can get soggy. Use an airtight container for storing your loaf. This keeps it fresh longer. You can also wrap it in plastic wrap. Keep the loaf in a cool, dry place. It will last for about 3 to 4 days at room temperature. If you want to store it longer, consider the fridge. In the fridge, it can last up to a week. For reheating, the best method is the oven. Preheat the oven to 350°F. Wrap the loaf in foil to keep it from drying out. Heat it for about 10 to 15 minutes. You can also use the microwave. Slice the loaf and heat for 15 to 20 seconds. This method is quick, but it might make it a bit softer. Enjoy your delicious loaf warm! Yes, you can freeze the chocolate zucchini loaf. To freeze, let the loaf cool completely. Wrap it in plastic wrap, then place it in a freezer bag. This way, it stays fresh for up to three months. When you’re ready to eat, thaw it overnight in the fridge. You can also microwave slices for quick thawing. Check for doneness by inserting a toothpick into the center. If it comes out clean, the loaf is done. Another sign is a firm top. The loaf may also pull away slightly from the pan edges. Trust your senses; a well-baked loaf smells rich and chocolatey. Yes, you can use other sweeteners. Honey or agave syrup works well as a substitute. If you use granulated sugar, reduce the flour by a little to balance the moisture. Adjust the sweetness to your taste. Always taste the batter before baking to ensure it’s sweet enough for you. Pair the chocolate zucchini loaf with milk, coffee, or tea. A scoop of vanilla ice cream adds a delightful touch. You can also top it with whipped cream or fresh berries for extra flavor. For a fun twist, drizzle some chocolate sauce on top. Enjoy the mix of flavors! In this blog post, we covered how to make a delicious chocolate zucchini loaf. We discussed key ingredients and possible swaps. I shared step-by-step instructions for prepping, mixing, and baking. You learned tips for measuring and ensuring the best texture. In my final thoughts, embrace creativity with this recipe. Experiment with flavors and enjoy the process. This loaf is not just tasty but also a fun way to use zucchini. Happy baking!
4 Ingredient Chocolate Zucchini Loaf Easy and Delicious
Looking for a simple, tasty treat? Try my 4 Ingredient Chocolate Zucchini Loaf! This quick recipe uses just zucchini, cocoa, maple syrup, and flour. You’ll
- 1 cup grated zucchini - 1 cup almond flour - 1/2 cup rolled oats - 1/2 cup dark chocolate chips - Optional: 1/4 cup chopped walnuts Measuring ingredients is key for great cookies. For accurate measurements, use dry measuring cups. Scoop the flour gently and level it off with a knife. For liquids, use a clear measuring cup with a spout. Always check your ingredient quality too. Fresh ingredients make a big difference in taste. For those looking for gluten-free options, almond flour works great. You can also use coconut flour, but use less. If you are nut-free, try oat flour or whole wheat flour. These alternatives keep the cookies tasty while catering to dietary needs. Always read labels to avoid allergens. 1. Preheat your oven to 350°F (175°C). This heat makes cookies bake evenly. 2. Line a baking sheet with parchment paper. This helps to keep the cookies from sticking. 3. Grate one cup of zucchini. Squeeze out the extra moisture. This step is key to avoid soggy cookies. 1. In a large bowl, combine dry ingredients: almond flour, oats, baking soda, baking powder, salt, and cinnamon. Stir until mixed well. 2. In another bowl, whisk together the wet ingredients: honey (or maple syrup), melted coconut oil, and vanilla. Mix until smooth. 3. Slowly pour the wet mix into the dry mix. Stir gently until just combined. Don’t overmix, or your cookies may be tough. 4. If you want, fold in dark chocolate chips and walnuts for extra flavor. 1. Use a cookie scoop or spoon to drop dough onto the baking sheet. Space them about 2 inches apart. 2. Lightly flatten each dough ball with the back of a spoon. The cookies won’t spread much while baking. 3. Place the baking sheet in the oven. Bake for 12-15 minutes. The edges should be golden brown, and the center should feel firm. 4. Let the cookies cool on the baking sheet for 5 minutes. Then transfer them to a wire rack to cool completely. Following these steps will help you create delicious cookies. For more details, check the Full Recipe. To get the right texture in your cookies, start with your zucchini. Make sure to squeeze out excess moisture from the grated zucchini. This key step prevents soggy cookies. Next, mix your ingredients just enough. Mixing too much can lead to tough cookies. Stir until the dough is just combined for a soft, chewy bite. You can boost flavor with simple spices. Adding cinnamon, nutmeg, or even a pinch of ginger can elevate your cookies. Want to change it up? Try adding chopped nuts, dried fruit, or coconut. For sweetness, you have options. Use honey for a light taste or maple syrup for a rich flavor. Each choice offers a unique twist. After baking, let your cookies cool on a wire rack. This helps them stay soft. For a lovely display, arrange them on a colorful plate. You can even sprinkle a few extra chocolate chips on top. Pair your cookies with fresh fruit for a bright contrast. This makes serving them even more fun and inviting. {{image_4}} You can change your zucchini cookies by adding different things. Nuts and chocolate chips both work well. If you love crunch, add chopped walnuts. They give a nice bite. On the other hand, chocolate chips add sweetness and richness. You can also try adding coconut or raisins to your cookies. Coconut gives a tropical twist, while raisins add chewy sweetness. Both options let you create a flavor that fits your taste. Spices can take your cookies to the next level. Ground cinnamon is a classic, but you can play with other spices too. Try nutmeg or ginger for a warm flavor. You can also use extracts to boost taste. Almond extract adds a lovely nutty flavor. Orange extract brightens your cookies with a fresh note. These small changes can make a big difference in taste. You can make these cookies healthier without losing flavor. One way is to reduce the sugar. Use half the amount of honey or maple syrup. This change cuts calories while keeping sweetness. You can also swap out regular flour for whole grain flour. It adds fiber and nutrients. These tweaks let you enjoy a treat that is a bit better for you. Check out the Full Recipe for more details on how to make these tasty changes. To keep your zucchini cookies fresh, use airtight containers. Glass or plastic containers work well. Place parchment paper between layers if stacking. This keeps them from sticking together. Store them at room temperature for best results. To maintain freshness, keep cookies away from heat and light. Avoid opening the container too often. The less air exposure, the better the cookies stay soft and tasty. You can freeze zucchini cookies for later use. Start by letting them cool completely. Then, place them in a single layer on a baking sheet. Freeze for about an hour to firm them up. Once frozen, transfer them to a freezer bag. Remove as much air as possible before sealing. When you're ready to enjoy them, take out the cookies and let them thaw at room temperature. For better taste, warm them in the oven for a few minutes. This helps restore their soft texture and flavor. At room temperature, your zucchini cookies will stay fresh for about five days. If you freeze them, they can last up to three months. Watch for signs of spoilage like a strange smell or a dry texture. If you see any mold, it's best to throw them away. Keep an eye on your cookies to enjoy them at their best! To make your zucchini cookies chewy, focus on moisture and fat. Use fresh zucchini and squeeze out excess water. This keeps the dough moist. Adding extra fat, like coconut oil, also helps. It makes the cookies rich and soft. You can also try adding an extra egg or egg yolk for more moisture. These tips ensure a delightful, chewy texture. Yes, you can use other veggies. Carrots or sweet potatoes work well. Both add natural sweetness and moisture. Grate them just like zucchini and follow the same steps. However, keep in mind that the flavor will change. You might need to adjust spices for a better taste. If you need a substitute for almond flour, try oat flour or coconut flour. Oat flour has a mild taste and works well in cookies. Coconut flour absorbs more moisture, so use less. A good rule is to use one-fourth of the amount. Each flour will change the cookie’s texture, so experiment to find what you like best. Flat cookies can happen due to several reasons. First, check your baking soda and baking powder. They need to be fresh for proper rising. If the dough is too warm, chill it before baking. Avoid overmixing the dough, as this can make cookies spread. Lastly, ensure you use the right measurements for flour and fat. Following these tips can lead to thick, fluffy cookies. This recipe for zucchini cookies is full of great options. You learned about the key ingredients and how to measure them correctly. I shared tips for making these cookies tasty, soft, and appealing. Remember, you can customize the recipe with different flavors. Storing and freezing tips keep your cookies fresh for longer. With these steps, you can make delicious zucchini cookies that everyone will love! Keep experimenting and enjoy your baking!
The Last Zucchini Cookie Recipe Irresistible Treat
Looking for a delicious and unique twist on a classic treat? Let me introduce you to The Last Zucchini Cookie Recipe. These cookies combine the
To make the best gluten-free zucchini bread, you need fresh, quality ingredients. Here’s what you will need: - 2 medium zucchinis, grated (approximately 2 cups) - 2 cups gluten-free all-purpose flour - 1 teaspoon baking powder - 1/2 teaspoon baking soda - 1/2 teaspoon fine sea salt - 1 teaspoon ground cinnamon - 1/4 teaspoon grated nutmeg - 3 large eggs, at room temperature - 1/2 cup honey or pure maple syrup - 1/2 cup unsweetened applesauce - 1/4 cup vegetable oil (or melted coconut oil for a hint of flavor) - 1 teaspoon pure vanilla extract - 1/2 cup chopped walnuts or pecans (optional) - 1/2 cup chocolate chips (optional, for a sweet twist) These ingredients work together to create a moist and flavorful bread. The zucchini adds moisture, while the eggs provide structure. If you want to try different flours, several options work well. You can use almond flour, oat flour, or coconut flour. Each brings its own flavor and texture. - Almond flour makes the bread denser and nutty. - Oat flour adds a subtle sweetness. - Coconut flour absorbs more moisture, so reduce the amount used. Experiment with these flours to find your favorite. Adding extra ingredients can elevate your zucchini bread. Here are some tasty options: - Chopped nuts like walnuts or pecans add crunch. - Chocolate chips can make it sweeter and more indulgent. - Dried fruit like raisins or cranberries adds a burst of flavor. - Spices like ginger or cardamom can give it a warm flavor. Feel free to mix and match these add-ins. Each choice will give your bread a unique twist. For the full recipe, check out the details provided above. Start by gathering your ingredients. You need zucchini, flour, eggs, and a few other items. Preheat your oven to 350°F (175°C). Grease a 9x5 inch loaf pan. You can also line it with parchment paper for easy removal later. In a large bowl, whisk these dry ingredients together: - 2 cups gluten-free all-purpose flour - 1 teaspoon baking powder - 1/2 teaspoon baking soda - 1/2 teaspoon fine sea salt - 1 teaspoon ground cinnamon - 1/4 teaspoon grated nutmeg Mix them well. This step ensures even flavor and texture in your zucchini bread. In another bowl, beat together three large eggs until frothy. Then, add: - 1/2 cup honey or pure maple syrup - 1/2 cup unsweetened applesauce - 1/4 cup vegetable oil (or melted coconut oil) - 1 teaspoon pure vanilla extract Mix until smooth and blended. Now, add the grated zucchini to this wet mix. Stir gently to combine everything. This keeps the zucchini bread moist and flavorful. Once done, you’re ready to combine the wet and dry mixes. Follow the steps in the [Full Recipe] for a delightful zucchini bread experience! To get the best texture in your gluten-free zucchini bread, start with fresh zucchinis. Grate them finely, and then squeeze out some of the liquid. This helps prevent a soggy loaf. Using a blend of gluten-free flours can also improve texture. I prefer a mix of almond flour and a gluten-free all-purpose flour. This gives a nice balance of flavor and moisture. Mix the wet and dry ingredients gently. Overmixing can make your bread dense and heavy. Just combine until you see no dry flour. Remember, lumps are okay! Let your batter sit for a few minutes before baking. This allows the flour to absorb moisture, helping with a moist crumb. One common mistake is not measuring your flour correctly. Too much flour can lead to a dry bread. Always spoon flour into your measuring cup and level it off with a knife. Another mistake is skipping the eggs. They provide structure and moisture, making your bread rise nicely. Using old baking powder or baking soda can affect the rise. Make sure they are fresh for best results. Lastly, don’t rush the cooling process. Let your bread cool fully on a wire rack. This helps avoid a gummy texture. To keep your gluten-free zucchini bread fresh, wrap it tightly in plastic wrap or aluminum foil. You can store it at room temperature for up to three days. For longer storage, slice the bread and freeze it. Place slices in a freezer bag, removing as much air as possible. This way, you can enjoy a slice whenever you want! When you’re ready to eat, thaw slices at room temperature or warm them in the toaster. This brings back the delightful texture. For more details, check out the full recipe for additional tips! {{image_4}} You can make zucchini bread sweet or savory. Sweet zucchini bread is a treat. It often has honey, chocolate chips, or nuts. I love the soft texture and sweet taste. On the other hand, savory zucchini bread can have herbs and cheese. Think of adding garlic powder or fresh basil. Both types are tasty and fun to make. Try mixing flavors to make your zucchini bread special. Here are some ideas: - Cinnamon and Nutmeg: These spices add warmth and depth. - Lemon Zest: It brings a bright, fresh taste. - Chopped Nuts: Walnuts or pecans give a great crunch. - Dried Fruits: Raisins or cranberries add a chewy texture. Mix and match these flavors to find your favorite. You can even create your own unique twist! You can easily modify this recipe for different diets. For a dairy-free version, use almond milk or coconut milk. If you want nut-free, skip the nuts or use seeds. Sunflower seeds work great. For a vegan option, replace eggs with flaxseed meal mixed with water. Each change keeps the bread moist and delicious. Just follow the [Full Recipe] and adjust as needed. Enjoy your baking! To keep your gluten-free zucchini bread fresh, store it in an airtight container. This prevents moisture loss and keeps the bread moist. You can also wrap the loaf tightly in plastic wrap before placing it in the container. If you like it warm, let it cool to room temperature first. This helps avoid sogginess. For longer storage, freeze your zucchini bread. First, slice the bread into pieces. Then, wrap each slice in plastic wrap. Place the wrapped slices in a freezer-safe bag. Label the bag with the date and type of bread. You can freeze it for up to three months. This way, you can enjoy a slice anytime! To thaw the bread, take it out of the freezer and leave it in the fridge overnight. If you're in a hurry, you can let it sit at room temperature for about an hour. For a warm slice, heat it in the oven at 350°F (175°C) for about 10 minutes. You can also use a microwave for quick reheating. Just place the slice on a microwave-safe plate and heat it for 15-20 seconds. Enjoy your gluten-free zucchini bread right from the oven or microwave! For the full recipe, check out the Zesty Gluten-Free Zucchini Bread section. The best gluten-free flour for baking is a blend of different flours. I recommend a mix of rice flour, tapioca flour, and potato starch. This blend gives a good texture and flavor. Look for all-purpose gluten-free flour blends, as they often contain xanthan gum, which helps with structure. Yes, you can swap zucchini for other vegetables. Carrots work well and add sweetness. You can also use grated sweet potatoes for a unique twist. Make sure to adjust the cooking time as needed, since different veggies have different moisture levels. To check if the zucchini bread is done, insert a toothpick into the center. If it comes out clean or with a few moist crumbs, it's ready. If the toothpick has wet batter, bake for a few more minutes. The edges should also pull away slightly from the pan. You learned the key ingredients, instructions, and tips for gluten-free zucchini bread. We discussed flour options and add-ins to boost flavor. Understanding how to store your bread keeps it fresh longer. Also, variations let you play with sweet or savory styles. Remember, mastering this recipe takes practice. Don't be afraid to experiment with flavors and textures. Enjoy your baking journey with gluten-free zucchini bread—it’s healthier and delicious!
Gluten-Free Zucchini Bread Delightfully Moist Recipe
Are you craving a delicious and moist gluten-free treat? Look no further! This Gluten-Free Zucchini Bread recipe is simple and packed with flavor. Whether you
- 1 cup grated zucchini - 1 cup grated carrots - 1 cup all-purpose flour - 1/2 cup whole wheat flour - 1/2 cup brown sugar, packed - 1/2 cup granulated sugar - 1/3 cup vegetable oil - 1 teaspoon baking powder - 1/2 teaspoon baking soda - 1 teaspoon ground cinnamon - 1/4 teaspoon ground nutmeg - 1/2 teaspoon salt - 1/2 cup chopped walnuts or pecans - 1/2 cup raisins or dried cranberries You need fresh and ripe zucchini and carrots for this recipe. Grating them makes them blend well into the batter and keeps the muffins moist. Remove extra moisture from the zucchini before mixing. The flour gives structure to our muffins. Using both all-purpose and whole wheat flour adds great taste and nutrition. The sugars provide sweetness and help with browning. Baking powder and baking soda make our muffins rise. Cinnamon and nutmeg bring warmth and flavor. Salt balances the sweetness and enhances taste. Feel free to add nuts or dried fruits for extra crunch or sweetness. This will make your muffins even more delightful. For the full recipe, check the details provided. - Preheat your oven to 350°F (175°C). - Prepare a muffin tin by lining it with paper liners or greasing each cup. - In a large bowl, combine 1 cup of grated zucchini and 1 cup of grated carrots. Stir to mix and set aside. - In another bowl, whisk together 1 cup of all-purpose flour, 1/2 cup of whole wheat flour, 1/2 cup of brown sugar, and 1/2 cup of granulated sugar. - Add 1 teaspoon of baking powder, 1/2 teaspoon of baking soda, 1 teaspoon of ground cinnamon, 1/4 teaspoon of ground nutmeg, and 1/2 teaspoon of salt. Mix well. - In a separate small bowl, mix 1/3 cup of vegetable oil, 2 large eggs, and 1 teaspoon of vanilla extract until smooth. - Pour the wet ingredients into the bowl with the zucchini and carrots. Mix gently with a spatula until just combined. - Gradually add the dry ingredient mixture to the wet mixture. Stir lightly until no dry spots remain. Avoid overmixing. - If using, fold in 1/2 cup of chopped walnuts or pecans and 1/2 cup of raisins or dried cranberries. - Use a spoon or ice cream scoop to fill each muffin cup about two-thirds full with batter. - Bake in the preheated oven for 18-22 minutes. Check for doneness by inserting a toothpick into a muffin; it should come out clean. - Once baked, let the muffins cool in the tin for about 5 minutes. Then, transfer them to a wire rack to cool completely. For the full recipe, refer to the detailed instructions above. To get the best texture in your muffins, don't overmix the batter. Overmixing can make them tough and dense. Mix just until the dry ingredients blend with the wet ones. This keeps your muffins light and fluffy. Squeezing excess moisture from the zucchini is key. After grating, place the zucchini in a clean kitchen towel. Twist the towel to remove the water. This step is vital, as too much moisture can lead to soggy muffins. I love adding nuts or dried fruits to enhance the flavor. Try mixing in 1/2 cup of chopped walnuts or pecans. You can also toss in 1/2 cup of raisins or dried cranberries for a sweet touch. These add-ins give a nice crunch and burst of flavor. If you want your muffins sweeter, adjust the sugar. You can reduce the brown sugar or granulated sugar slightly. Taste the batter before baking to find your preferred sweetness level. Serve your muffins warm for the best experience. They taste amazing fresh from the oven. If you prefer, you can serve them at room temperature on a bright plate. For a beautiful finish, dust the tops with powdered sugar. This adds a nice touch and makes them look fancy. You can also spread cream cheese frosting on top for a rich treat. It’s a fun way to make your muffins feel special! {{image_4}} To make these muffins gluten-free, you can use a gluten-free flour blend. Look for one that has xanthan gum included. This helps replace the structure that gluten provides. Just swap the all-purpose flour in the recipe with the gluten-free blend in a 1:1 ratio. This way, you keep the texture light and fluffy. If you want a dairy-free recipe, it's simple! You can replace the eggs with flaxseed or chia seeds. To do this, mix 1 tablespoon of either seed with 2.5 tablespoons of water. Let it sit for about 5 minutes until it thickens. For milk, use your favorite nut milk instead of dairy milk. Almond or coconut milk work great here. You can add spices to boost the flavor of your muffins. Ginger and nutmeg add warmth and depth. Just sprinkle in about 1/2 teaspoon of each. For added freshness, consider incorporating citrus zest. The zest of an orange or lemon will brighten the taste and make every bite more exciting. To keep your zucchini carrot muffins fresh, store them at room temperature. Place them in an airtight container. This method helps keep them soft and moist. You can also use a zip-top bag for easy storage. If your kitchen is warm, consider placing them in the fridge. Just remember to let them come to room temperature before serving. If you want to save muffins for later, freezing works well. Wrap each muffin in plastic wrap. Then, place them in a freezer-safe bag. This keeps air out and preserves texture. For best quality, eat them within three months. When you want to enjoy them, take a muffin out and thaw it in the fridge overnight. If you’re in a hurry, you can thaw it on the counter for a few hours. To enjoy your muffins warm, reheating is key. The best way is to use an oven. Preheat it to 350°F (175°C). Place the muffins on a baking tray and heat for about 10 minutes. This method keeps them soft. You can also microwave a muffin for about 15-20 seconds. This is quick but may make the muffin a bit chewy. Enjoy them plain or with a spread of butter or cream cheese for a tasty treat! For the full recipe, check the earlier section. Yes, you can make these muffins ahead of time. To do this, bake the muffins and let them cool completely. Store them in an airtight container at room temperature for up to three days. If you want to keep them longer, freeze them. Wrap each muffin in plastic wrap and place them in a freezer bag. They will stay good for up to three months. To enjoy frozen muffins, simply thaw them at room temperature or warm them in the microwave for a few seconds. To reduce the sweetness, cut back on the sugar. You can use half the amount of brown and granulated sugar. This will still keep the muffins moist. You can also use unsweetened applesauce or mashed bananas to add natural sweetness. This keeps the muffins soft and tasty without added sugar. You can swap out some ingredients for healthier options. For sugar, use maple syrup or honey in moderation. For oil, try unsweetened applesauce or yogurt. These swaps will help reduce calories and add nutrition. You can also replace some flour with almond flour or oat flour for added fiber. Adding more grated zucchini or carrot can boost vitamins too. This blog post covered a simple, delicious way to make zucchini carrot muffins. I shared the main ingredients, tips for great texture, and yummy variations. You learned how to store and freeze these muffins, plus answers to common questions. Don’t hesitate to experiment with add-ins or alternatives to make it your own. Baking should be fun and rewarding. Enjoy your baking journey!
Zucchini Carrot Muffins Tasty and Easy Recipe
Want a healthy snack that tastes amazing? You’re in the right place! My Zucchini Carrot Muffins are both easy and delicious. Loaded with fresh veggies
- 2 cups all-purpose flour - 1 cup granulated sugar - 1/2 cup unsalted butter, softened - 1 cup sour cream - 2 large eggs - 1 teaspoon pure vanilla extract - 1 1/2 teaspoons baking powder - 1 teaspoon baking soda - 1/2 teaspoon salt - 2-3 ripe peaches - 1 tablespoon fresh lemon juice - 1/2 teaspoon ground cinnamon - 1 cup all-purpose flour - 1/2 cup brown sugar - 1/4 cup unsalted butter, melted - 1/2 teaspoon ground cinnamon - Powdered sugar for dusting - Vanilla ice cream for serving To make Southern Peach Crumb Cake, you need fresh and quality ingredients. The main ingredients create a moist and rich base. The peaches add sweetness and flavor. Using ripe peaches ensures the cake tastes great. The crumb topping adds a crunchy layer on top. It contrasts nicely with the soft cake. You can also dust the cake with powdered sugar. This gives it a nice look. Serving it with vanilla ice cream is a treat. For the full recipe, check out the details above. Enjoy making this delicious cake! - Preheat the oven to 350°F (175°C). - Grease and flour a 9x13 inch baking dish. - Cream together butter and granulated sugar. - Add eggs and vanilla; mix until smooth. - Fold in sour cream and dry ingredients. To make the batter, start by creaming butter and sugar. This means mixing until it's light and fluffy. It usually takes about 3-4 minutes. You want to be sure the sugar is well blended with the butter. Next, add the eggs one at a time. Make sure to mix well after each egg. This helps the batter become smooth. After that, pour in the vanilla extract. Now, it’s time to add the sour cream. Use a spatula to fold it in gently. This keeps the batter light. In another bowl, whisk together the flour, baking powder, baking soda, and salt. Slowly add this dry mix to your wet ingredients. Stir gently until combined. Be careful not to overmix. - Toss diced peaches with lemon juice. - Fold peaches into the batter evenly. For the peaches, start by chopping them into small pieces. Toss the diced peaches with lemon juice. This step adds flavor and prevents browning. Next, fold the peaches into the batter. Make sure they are evenly spread throughout. You want each bite to have peach goodness. Once the peaches are in the batter, you’re ready to pour it into your prepared dish. This is where the magic happens. You can find the full recipe for more detailed steps. To make your cake moist, always use room temperature ingredients. This helps the batter blend well. Also, be careful not to overmix the batter. Overmixing can make your cake tough instead of light and fluffy. Your crumb topping should look like coarse crumbs. This texture adds a nice crunch. To achieve this, use chilled butter. Chilled butter creates a better texture in the topping. Serve your Southern Peach Crumb Cake warm or at room temperature. It tastes great either way! For a special touch, dust it with powdered sugar. You can also enjoy it with a scoop of ice cream. This adds a delightful creaminess to each bite. For the full recipe, check the earlier section. {{image_4}} You can switch out peaches for other fruits. Try using blueberries for a tasty twist. You can also mix fruits for a colorful crumb cake. Strawberries, raspberries, and cherries are great choices. Each fruit brings its own flavor. This makes your cake fun and unique. Want to add some crunch? Toss in some nuts like walnuts or pecans. They give a great texture to the cake. You can also add spices like nutmeg or ginger. These spices add warmth and depth to the taste. Just a pinch can change the whole flavor! If you need a gluten-free cake, don’t worry! You can use gluten-free all-purpose flour instead. It works just like regular flour. This way, everyone can enjoy your Southern Peach Crumb Cake. Just follow the same recipe for best results. For the full recipe, you can check out the detailed instructions above. You can store this cake at room temperature for up to 2 days. Keep it in an airtight container to preserve its flavor and moisture. If it’s warm out, you might want to refrigerate it earlier. Refrigerate any leftovers for up to a week. This keeps the cake fresh and tasty. You can also freeze the cake for up to 3 months. Before serving, remember to thaw it completely. To enjoy a slice warm, heat it in the microwave for about 15 seconds. You can also warm it in the oven at 350°F for about 10 minutes. After reheating, add fresh toppings like whipped cream or a scoop of ice cream for extra delight. For the full recipe, check out the link provided. To boost flavor, add a dash of almond extract or a pinch of nutmeg. Almond extract brings out the peach's sweetness. Nutmeg adds warmth and depth. Try these small changes for big taste! Yes, you can use canned peaches. Just make sure to drain the excess liquid before adding them. This step keeps the cake from becoming too wet. Canned peaches can be just as tasty when used right. To avoid a soggy bottom, make sure the batter is well-mixed. Bake it until it turns golden brown. This ensures the cake cooks evenly and gets that perfect texture. Keep an eye on the bake time for best results. Yes, you can make this cake ahead of time. It stores well for several days. You can even freeze it for up to three months. Just thaw it before serving for a fresh taste. Check the Full Recipe for more details. This recipe for Southern Peach Crumb Cake blends sweet peaches with a rich crumb topping. You learned how to choose top ingredients, prepare the batter, and bake perfectly. Remember to mix well and avoid overbaking for a moist cake. You can also switch fruits or add nuts for variety. Enjoy storing and reheating leftovers to savor every last bite. Baking this delightful cake will impress anyone who tries it. Enjoy your baking adventure!
Southern Peach Crumb Cake Irresistible and Flavorful Delight
Indulging in a slice of Southern Peach Crumb Cake is like savoring a sunny day in the South. This recipe is simple yet packed with
- 1 medium zucchini, finely grated - 1 cup all-purpose flour - 1 cup whole wheat flour - 1 teaspoon baking powder - 1/2 teaspoon baking soda - 1/2 teaspoon sea salt - 1 teaspoon ground cinnamon - 1/2 cup granulated sugar - 1/2 cup firmly packed brown sugar - 1/2 cup vegetable oil - 3 large eggs - Zest of 1 lemon (about 1 tablespoon) - 1/4 cup freshly squeezed lemon juice - 1 teaspoon pure vanilla extract The main ingredients make this lemon zucchini bread special. Zucchini adds moisture and keeps the bread soft. The mix of all-purpose and whole wheat flour gives a nice texture. Using both granulated and brown sugar balances sweetness, creating a rich flavor. The lemon zest and juice brighten the bread, making each bite refreshing. - 1/2 cup chopped walnuts or pecans (optional) - 1/2 cup powdered sugar (for optional glaze) - 1 tablespoon milk (for optional glaze) You can add nuts for crunch and flavor. Walnuts or pecans work great. If you want a sweet glaze, mix powdered sugar with milk. Drizzle it on top after cooling for a nice touch. - Gluten-free options: Replace flours with a gluten-free blend. - Vegan variations: Use flax eggs instead of regular eggs. If you need a gluten-free bread, just swap the flours. There are many good blends available. For vegan options, mix 1 tablespoon of ground flaxseed with 3 tablespoons of water for each egg. This makes a great egg substitute. Check out the Full Recipe for detailed steps! To start, you need to prepare the zucchini. Take one medium zucchini and finely grate it. Use a box grater or a food processor for this task. Once grated, place the zucchini in a clean kitchen towel. Squeeze out excess moisture. This step helps keep the bread from becoming soggy. Set the prepared zucchini aside. Now, let’s mix the wet ingredients. In a medium bowl, combine the grated zucchini, granulated sugar, brown sugar, vegetable oil, eggs, lemon zest, lemon juice, and vanilla extract. Whisk everything together until it is smooth. Make sure the sugars dissolve well. Next, we will mix the dry ingredients. In a large bowl, whisk together the all-purpose flour, whole wheat flour, baking powder, baking soda, sea salt, and ground cinnamon. Ensure everything is evenly mixed. This step adds air to the flour, making the bread light. Now, it’s time to combine the wet and dry ingredients. Gradually pour the wet mixture into the dry mix. Use a spatula or a wooden spoon to stir. Be gentle and stop mixing as soon as you see no dry flour. If you want, fold in the chopped nuts for some added crunch. Before baking, preheat your oven to 350°F (175°C). Grease and flour a 9x5-inch loaf pan. This prevents the bread from sticking. Pour the batter into the pan. Smooth the top with a spatula. Now, bake the bread for 50-60 minutes. Check for doneness using a toothpick. Insert it into the center; it should come out clean or with just a few moist crumbs. Once done, remove the pan from the oven. Let it cool for about 10 minutes. Then, transfer the bread to a wire rack to cool completely. Enjoy the delightful flavors of this Lemon Zucchini Bread by following the full recipe! To get the best texture, avoid overmixing your batter. When you mix just until combined, the bread stays light and fluffy. Overmixing makes the bread dense and tough. To keep the bread moist, use fresh zucchini. Grate it finely and squeeze out excess water. This adds great moisture without making the batter too wet. You can boost the flavor by adding spices like nutmeg or ginger. A pinch makes the bread more interesting. Adding more lemon zest gives a bright taste. You can also play with flavors by mixing in herbs or citrus zest. This adds depth to the flavor profile. Pair your lemon zucchini bread with tea or coffee. The sweet and tart flavors work great together. For a lovely presentation, slice the bread and arrange it on a platter. Drizzle with the optional glaze for a sweet touch. Garnish with lemon slices and mint leaves for a fresh look. You can find the full recipe for this delicious bread above. {{image_4}} To make your lemon zucchini bread stand out, try adding some savory flavors. You can mix in herbs like rosemary or thyme. These herbs enhance the taste and add a fresh twist. You can also swap in different fruits. Consider adding blueberries or cranberries for a fruity burst. These fruits pair well with the lemon and zucchini. If you need a gluten-free option, use almond flour or coconut flour instead of regular flour. These flours work well and keep the bread moist. For a vegan version, replace the eggs with applesauce or flaxseed meal. Use a mix of 1 tablespoon of flaxseed and 2.5 tablespoons of water for each egg. These substitutions make a tasty and friendly option for all diets. You can adapt the recipe for holidays or seasons. For instance, add pumpkin spice in the fall to warm up the flavors. In summer, mix in fresh berries or peaches for a fruity delight. These seasonal changes keep the bread exciting and fresh. For a festive touch, add a sprinkle of cinnamon or nutmeg during winter. Your family will love these fun variations! For the full recipe, refer to the [Full Recipe]. To keep your lemon zucchini bread fresh, wrap it tightly in plastic wrap. You can also place it in an airtight container. This will help it stay moist. Keep it at room temperature for up to three days. If you want it to last longer, store it in the fridge. Just make sure to wrap it well to avoid drying out. Freezing is a great way to keep your bread. First, let the bread cool completely. Once cooled, wrap it in plastic wrap. Then, place it in a freezer bag or container. Squeeze out as much air as you can. This helps prevent freezer burn. You can freeze it for up to three months. To thaw, take it out and let it sit at room temperature. You can also warm it in the oven for a few minutes. Lemon zucchini bread lasts about three days at room temperature. In the fridge, it can stay fresh for about a week. Look for signs of spoilage. If you see mold or smell something off, it’s time to throw it away. Keeping an eye on its appearance and smell helps ensure you enjoy every slice. Can I use frozen zucchini? Yes, you can use frozen zucchini. Just thaw it first and drain excess water. This keeps the bread from being too wet. Frozen zucchini works well and saves time. How to adjust for high altitude? If you bake at high altitude, reduce sugar by 1-2 tablespoons. Increase flour by 2-4 tablespoons. Also, add a bit more liquid, like lemon juice. These changes help your bread rise better. Caloric content per slice Each slice has about 180 calories. This can change based on added ingredients, like nuts or glaze. Keep this in mind when you serve it. Health benefits of zucchini Zucchini is low in calories and high in fiber. It also has vitamins A and C. These nutrients support good health. Adding zucchini to your diet can help with digestion and hydration. Influence of oven types Different ovens heat differently. If your oven runs hot, check the bread early. If it runs cool, it may need extra time. Using an oven thermometer can help with this. Factors affecting baking duration The size of the loaf pan matters, too. A smaller pan needs less time to bake. Also, the batter’s temperature can change baking time. Always use the toothpick test to check doneness. This guide covered everything you need to make great zucchini bread. We explored the main ingredients, optional additions, and helpful substitutions. I shared step-by-step instructions to simplify the process. You learned tips for perfecting texture and adding exciting flavors. Seasonal variations let you mix it up, while storage tips ensure freshness. With the FAQs, you can address any concerns while baking. Enjoy your tasty creation, and don’t hesitate to experiment! Your zucchini bread journey starts now.
The Best Lemon Zucchini Bread Delightful and Simple Recipe
Are you ready to bake something truly special? My Lemon Zucchini Bread is the perfect blend of sweet and tart, and it’s easy to make!
- 1 medium zucchini, finely grated - 2 ripe bananas, thoroughly mashed - 1 cup all-purpose flour - 1/2 cup unsweetened cocoa powder - 1/2 teaspoon baking soda - 1/2 teaspoon baking powder - 1/4 teaspoon salt - 1/2 cup granulated sugar - 1/4 cup packed brown sugar - 1/4 cup vegetable oil - 2 large eggs - 1 teaspoon pure vanilla extract In this recipe, zucchini adds moisture and nutrition. It makes the bread soft and fluffy. The ripe bananas bring a sweet flavor and natural sugars. They also help bind the mixture together. The dry ingredients include flour, cocoa powder, baking soda, baking powder, and salt. These create the bread's structure and rich chocolate taste. The sugars add sweetness and depth. I use granulated sugar for sweetness and brown sugar for a hint of caramel flavor. Eggs and oil help with moisture and richness. They also aid in binding the ingredients. The vanilla extract gives a lovely aroma and enhances the chocolate taste. - 1/2 cup chocolate chips (optional) - Nuts (optional) Adding chocolate chips makes the bread even more decadent. You can choose dark, milk, or semi-sweet chips. Nuts bring a crunchy texture and nutty flavor. Walnuts or pecans work well, but feel free to use your favorite type. For the full recipe, check out the details above. You’ll love how simple and tasty this Chocolate Zucchini Banana Bread is! 1. Prepping the Oven and Pan Start by preheating your oven to 350°F (175°C). This step is key to getting even heat. While the oven warms, prepare a 9x5 inch loaf pan. Grease it lightly or line it with parchment paper. This helps the bread come out easily. 2. Mixing Wet Ingredients In a medium bowl, combine the finely grated zucchini and mashed bananas. Add the vegetable oil, eggs, and pure vanilla extract. Use a fork or whisk to blend these ingredients until smooth. This creates a moist base for your bread. 3. Combining Dry Ingredients In a large bowl, sift together the all-purpose flour, cocoa powder, baking soda, baking powder, and salt. This helps to mix the dry ingredients well. Next, add both granulated and brown sugar. Whisk until fully combined. This mixture gives your bread a nice sweetness and structure. 1. Mixing Wet and Dry Ingredients Make a well in the center of the dry mix. Pour in the wet mixture. Gently stir with a spatula until just combined. Avoid overmixing, as this can make the bread tough. If you choose to add chocolate chips, fold them in now. 2. Pouring Batter into the Pan Carefully pour the batter into the prepared loaf pan. Smooth the top with the back of a spatula. This helps to create an even surface for baking. 3. Baking Time and Testing for Doneness Place the loaf pan in the preheated oven. Bake for 50-60 minutes. To test for doneness, insert a toothpick into the center. It should come out clean or with just a few moist crumbs. Once baked, let it cool in the pan for about 10 minutes. Then, transfer to a wire rack to cool completely. For the full recipe, check out the ingredients and steps provided. - Overmixing the Batter: This is a big one. If you mix too much, your bread gets tough. You want to mix just until the flour disappears. - Not Measuring Ingredients Accurately: A small mistake in measuring can ruin your bread. Use measuring cups and spoons for best results. - Ensuring Proper Oven Temperature: Always preheat your oven. If it’s too hot or too cold, your bread won’t bake right. Use an oven thermometer for accuracy. - Using Fresh Ingredients: Fresh zucchini and ripe bananas make a big difference. They add moisture and flavor. - Presentation Tips for Serving: Slice the bread and place it on a nice plate. A sprinkle of powdered sugar looks great. You can also serve it with whipped cream for a treat. - Pairing Ideas: Enjoy the bread with a cup of coffee or tea. It also pairs well with fresh fruit or yogurt for a balanced snack. For the full recipe, check out the link above. {{image_4}} You can change the flavor of your Chocolate Zucchini Banana Bread easily. Adding spices like cinnamon and nutmeg can give it a warm, cozy taste. Just a teaspoon of cinnamon or nutmeg in the dry mix can brighten up the flavors. It adds depth without being overpowering. Swapping ingredients can also make the bread healthier. Use whole wheat flour instead of all-purpose flour for more fiber. You can even mix in almond flour for a nutty twist. These swaps keep the bread moist while making it more nutritious. If you need gluten-free options, try using gluten-free all-purpose flour. This keeps the bread soft while making it safe for those with gluten issues. Just ensure that all other ingredients, especially baking powder, are gluten-free. For vegan modifications, replace the eggs with flaxseed meal. Mix one tablespoon of ground flaxseed with three tablespoons of water. Let it sit for five minutes to thicken. This acts as a great egg substitute. You can also swap the vegetable oil for applesauce to cut down on fat. These variations help you enjoy a tasty treat while meeting your dietary needs. Want to try the full experience? Check out the Full Recipe for all the details! Short-Term Storage (Room Temperature) To keep your chocolate zucchini banana bread fresh, store it at room temperature. Wrap it in plastic wrap or foil. This keeps moisture in and prevents it from drying out. Place it in a bread box or a cool, dry place. It will stay good for about 3 to 4 days. Long-Term Storage (Freezing) For longer storage, freezing is your best option. Slice the bread first for easy serving later. Wrap each slice tightly in plastic wrap, then place them in a freezer-safe bag. This helps protect against freezer burn. You can freeze it for up to 3 months. Best Methods to Reheat When you want to enjoy your chocolate zucchini banana bread again, reheating is simple. You can use an oven or a microwave. - Oven Method: Preheat your oven to 350°F (175°C). Place the slices on a baking sheet. Heat for about 10 minutes or until warm. - Microwave Method: Place a slice on a microwave-safe plate. Heat for 15 to 20 seconds. Check if it’s warm enough for your taste. These methods keep the bread moist and delicious! Chocolate Zucchini Banana Bread lasts about 3 to 4 days at room temperature. To keep it fresh, store the bread in an airtight container. If you want it to last longer, refrigerate it. In the fridge, it can stay good for up to a week. Just remember to let it reach room temp before you slice it. Yes, you can freeze Chocolate Zucchini Banana Bread. Wrap the bread tightly in plastic wrap or foil. This prevents freezer burn. You can also put it in a freezer bag. It will stay fresh for about 2 to 3 months. When you want to eat it, thaw it overnight in the fridge. Then, warm it in the oven for a tasty treat. Yes, you can use other fruits! Applesauce can be a great substitute for bananas. It adds moisture and sweetness. You can also try mashed avocados for a creamy texture. If you want a fruity twist, use pureed peaches or pears. Just keep in mind that the flavor and texture may change. Experiment to find your favorite mix! In this post, we explored how to make Chocolate Zucchini Banana Bread. We covered key ingredients like zucchini, bananas, and optional chocolate chips. You learned important steps for preparation, baking, and tips to avoid common mistakes. Don’t forget about the fun variations and serving ideas to impress others. Chocolate Zucchini Banana Bread is a delightful treat. It’s easy to customize and enjoy fresh. Now, go ahead and bake some for yourself or to share!
Chocolate Zucchini Banana Bread Healthy and Tasty Treat
Looking for a tasty treat that’s also good for you? Chocolate Zucchini Banana Bread is the answer! This fun recipe blends already sweet bananas with