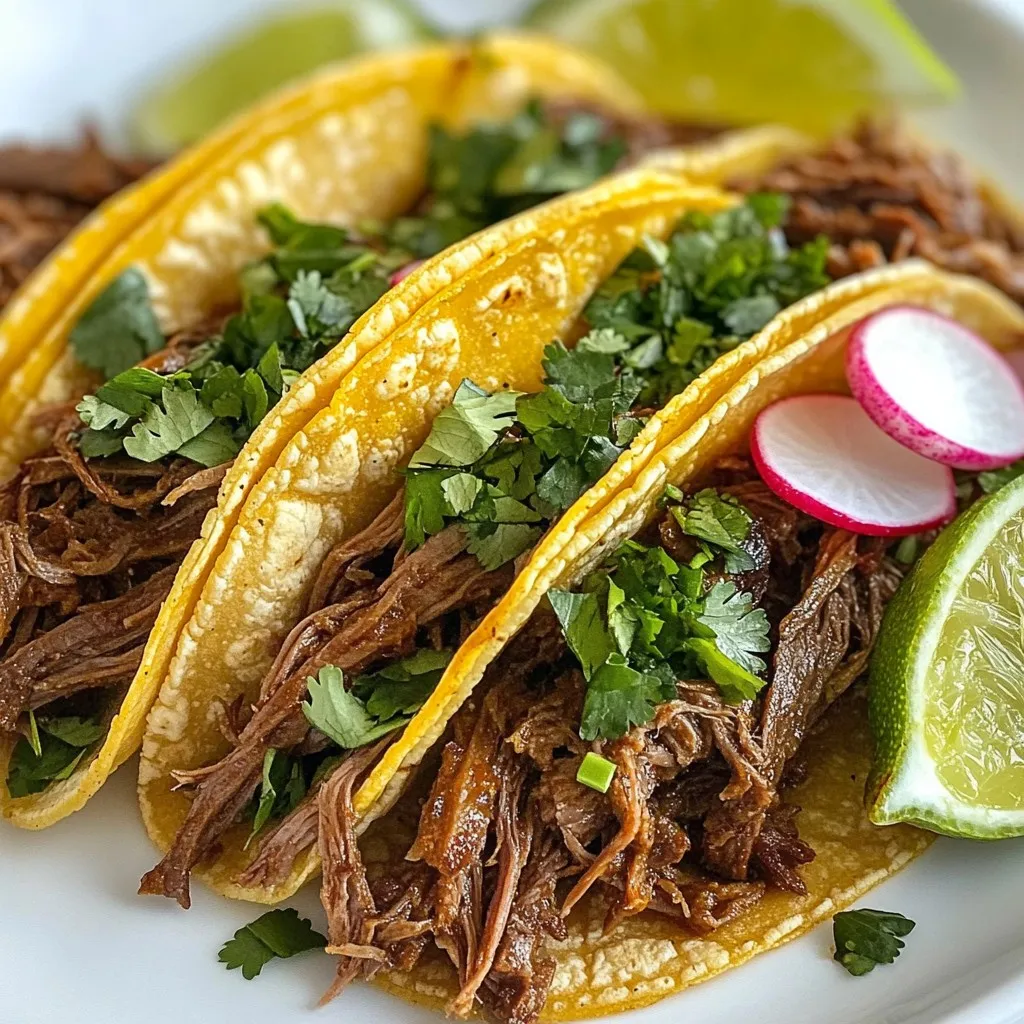
Dinner

- 1 pound large shrimp, peeled and deveined - 1 cup baby potatoes, halved - 1 cup corn on the cob, cut into thirds - 1 red bell pepper, sliced - 1 yellow onion, sliced - 4 cloves garlic, minced - 3 tablespoons Cajun seasoning - 4 tablespoons unsalted butter, melted - 1 lemon, thinly sliced - Fresh parsley, chopped (for garnish) - Salt and pepper to taste Gathering the right ingredients is key to making your Easy Cajun Shrimp Boil Foil Packs shine. You want large shrimp to soak up all the flavors. Baby potatoes add heartiness, while corn on the cob gives a sweet crunch. The red bell pepper and yellow onion bring color and taste. Don't forget the garlic, as it adds a strong aroma. Cajun seasoning is vital. It brings heat and depth. Melted butter coats everything nicely, making it rich. Thin lemon slices brighten the dish. Finally, fresh parsley adds a fresh touch for garnish. - Aluminum foil - Baking sheet - Mixing bowl Using the right tools makes cooking easier. Aluminum foil is essential for sealing in moisture and flavor. A baking sheet helps catch any drips when cooking. A mixing bowl is needed to combine all your tasty ingredients. This combination of ingredients and tools creates a memorable meal you will love to share. For the full recipe, check out the details provided above. - Preheat your oven to 400°F (200°C). - Tear off large aluminum foil pieces, about 12x18 inches each. - Combine the halved baby potatoes, corn pieces, sliced red bell pepper, sliced yellow onion, and minced garlic in a mixing bowl. - Drizzle the melted butter over the veggies. - Sprinkle in the Cajun seasoning with salt and pepper. - Toss gently until the veggies are coated well. - Distribute the veggie mixture evenly onto the foil sheets. - On top of the veggies, add a handful of shrimp and a couple of lemon slices. - Fold the foil edges tightly to seal the packets. - Place the sealed foil packets on a baking sheet for easy handling. - Bake in the oven for 20-25 minutes until the shrimp are pink and the potatoes are tender. This easy Cajun shrimp boil foil pack is not just fun to make but also a treat for your taste buds. You can find the full recipe above for detailed instructions! To make your Cajun shrimp boil shine, always use fresh ingredients. Fresh shrimp and veggies bring out the best taste. The Cajun seasoning should match your taste. If you love spice, add more! If you prefer mild, go easy on the seasoning. Check your shrimp for doneness. They should turn pink and opaque. If you want to be sure, use a meat thermometer. The shrimp should reach 120°F for perfect doneness. To keep things clean, use heavy-duty foil for sealing. This prevents leaks and spills. Also, line the baking sheet with foil or parchment paper. This makes cleanup fast and easy, so you can enjoy your meal without worry. {{image_4}} You can enhance your Cajun shrimp boil by adding more veggies. - Zucchini: Slice zucchini into round pieces. They cook fast and soak up flavors well. - Asparagus: Cut asparagus into smaller sections. These add a nice crunch to the dish. Feel free to mix and match vegetables to your liking. Fresh veggies bring color and taste to your meal. If shrimp isn’t your choice, try other proteins. - Substitute shrimp with chicken or sausage: Cut chicken breasts into small pieces. Sausage adds a savory twist. Both options work great with Cajun spices. - Use plant-based options for a vegetarian version: Try using tofu or tempeh. These options will absorb the Cajun seasoning well while being tasty. Switching proteins can bring new flavors to your foil packs. Want more heat? Add some spice to your recipe. - Include diced jalapeños: Chop fresh jalapeños and toss them in. They add a nice kick. - Add hot sauce to the mixture: A few dashes of your favorite hot sauce can elevate the heat levels. Adjust to your spice preference. Spicy ingredients can make your dish even more exciting. To keep your Cajun shrimp boil fresh, refrigerate it within 2 hours. Place leftovers in airtight containers. This will keep the shrimp and veggies from drying out. Make sure to eat them within 3-4 days for the best taste. For the best texture, reheat in the oven. Preheat your oven to 350°F (175°C). Place the foil pack on a baking sheet and heat for about 10-15 minutes. If you’re in a hurry, use the microwave. Just put the leftovers in a microwave-safe dish and heat for 1-2 minutes. Stir halfway to heat evenly. You can freeze the shrimp boil before cooking. Wrap the foil packs tightly and place them in a freezer-safe bag. When you’re ready to cook, thaw in the refrigerator overnight. This method keeps the shrimp and veggies fresh for later enjoyment. Yes, just make sure to thaw before use. Frozen shrimp work well in this recipe. When you thaw them, they become tender and juicy. You can place them in the fridge overnight or run them under cold water for a quick thaw. This way, you can enjoy that fresh taste even with frozen shrimp. Cooked shrimp boil can last 3-4 days in the fridge. Store it in an airtight container to keep it fresh. If you wait longer than that, the shrimp may lose flavor and quality. Always check for any off smells before eating leftovers. Pair with crusty bread or a side salad for a complete meal. The bread is perfect for soaking up those tasty juices. A fresh salad adds a nice crunch and balances the richness of the shrimp boil. You can even add some lemon wedges for an extra zing! In this blog post, we explored a simple Cajun shrimp boil recipe. We covered ingredients, tools, and step-by-step instructions for a tasty dish. I shared tips for flavor, cooking time, and easy cleanup. You can even customize the dish with different vegetables or proteins. Don't forget to store your leftovers properly. This dish is fun to make and even better to eat. Enjoy the bold flavors and make it your own with your favorite tweaks!
Easy Cajun Shrimp Boil Foil Packs Delightful Recipe
Craving a taste of the South? This Easy Cajun Shrimp Boil Foil Packs recipe is perfect for you! It’s packed with juicy shrimp, fresh veggies,
To make Garlic Butter Shrimp and Broccoli, you need the following: - 1 pound large shrimp, peeled and deveined - 2 cups broccoli florets - 4 tablespoons unsalted butter - 4 cloves garlic, minced - 1 teaspoon grated lemon zest - 2 tablespoons freshly squeezed lemon juice - 1 teaspoon red pepper flakes - Sea salt and freshly ground black pepper, to taste - Fresh parsley, chopped (for garnish) - 1 cup cooked quinoa or rice (optional, for serving) Each ingredient plays a key role in this dish. The shrimp gives a tender bite, while the broccoli adds a fresh crunch. Garlic and butter blend together, creating a rich sauce. Lemon juice and zest bring bright flavors, while red pepper adds a nice kick. Using fresh shrimp makes a big difference in taste. I like to buy shrimp that is wild-caught. It has a better flavor and is often more sustainable. Fresh garlic enhances the aroma and taste, so I always opt for whole cloves over pre-minced options. You can customize this dish by adjusting the red pepper flakes to your taste. If you prefer a milder taste, cut back on them. For a stronger lemon flavor, add more lemon juice and zest. This recipe is not only delicious, but it’s also quick and easy. You can follow the full recipe to create this delightful dish in under 30 minutes. Enjoy! To start, rinse the shrimp under cold water. This step removes any excess grit. After rinsing, pat them dry with a clean towel. Now, season the shrimp with sea salt and freshly ground black pepper. Make sure every piece gets a good coating. Next, bring a large pot of water to a rolling boil. Carefully add the broccoli florets and blanch them for 2-3 minutes. You want them bright green and slightly tender. Once done, drain the broccoli and plunge it into a bowl of ice water. This ice bath halts cooking and keeps the color vivid. Now, let’s make the sauce. In a large skillet, melt unsalted butter over medium heat. Once it starts to froth, add minced garlic and a sprinkle of red pepper flakes. Stir and sauté for 1-2 minutes, just until the garlic smells amazing. Be careful not to let it brown, as burnt garlic can taste bitter. Add the seasoned shrimp to the skillet. Sauté them for about 3-4 minutes. Flip them halfway through cooking. The shrimp are done when they turn pink and opaque. This is key to perfect shrimp! Once the shrimp are cooked, it’s time to blend the flavors. Add the blanched broccoli to the skillet. Drizzle in freshly squeezed lemon juice and sprinkle with lemon zest. Toss everything gently for about 2 minutes. This allows the flavors to meld beautifully. Taste your dish to see if it needs more seasoning. Adjust with extra sea salt and black pepper, if needed. Serve your garlic butter shrimp and broccoli hot over a bed of cooked quinoa or rice. This adds a nice, nutritious base. Don’t forget to garnish with fresh parsley for a pop of color and flavor. For the full recipe, check out the complete guide above! - Best types of garlic to use: I love using fresh garlic. It gives a rich taste that dried garlic just can't match. Look for firm, plump cloves with no sprouts. This ensures the best flavor. - How to avoid burning garlic: To keep garlic from burning, cook it on medium heat. If you see it turning brown, lower the heat. Burnt garlic can ruin your dish, so watch it closely. - Tips for achieving the ideal shrimp texture: Use large shrimp for this recipe. They cook evenly and stay juicy. Don’t overcrowd the pan; this helps them cook well and not steam. - How to tell when shrimp are fully cooked: Look for a pink color and a slight curl. The shrimp should be opaque throughout. This usually takes about 3-4 minutes in the pan. - Alternatives to blanching broccoli: If you want a faster method, try steaming broccoli. It keeps the color bright and the texture tender. Just steam for about 3-4 minutes. - Keeping broccoli bright and vibrant: To keep broccoli bright green, add it to ice water right after cooking. This stops the cooking process and locks in that lovely color. {{image_4}} You can swap shrimp for chicken or tofu. Chicken gives a hearty bite. Tofu adds a nice texture for a plant-based option. Both proteins soak up the garlic butter well. For veggies, try snap peas or green beans. These add crunch and color. Cauliflower offers a fun twist too. Each option adds its own flair to the dish. To boost flavor, add fresh herbs like basil or thyme. These create a fresh aroma. You can also try smoked paprika for a warm, smoky taste. For a spicy kick, add jalapeños or extra red pepper flakes. A dash of hot sauce can also work. If you want citrus, consider lime juice instead of lemon. It brightens the dish nicely. Serve garlic butter shrimp and broccoli with a side of quinoa or brown rice. Both add fiber and make the meal filling. You can also add a simple green salad for more freshness. For a creative twist, pair it with a mango salsa. The sweetness contrasts with the savory shrimp. Another option is a warm crusty bread to soak up the garlic butter sauce. For the full recipe, check out the guidelines above. To keep your garlic butter shrimp and broccoli fresh, use airtight containers. Glass containers work best because they don’t stain or hold odors. Let the dish cool down before sealing to avoid steam buildup. Store it in the fridge for up to three days. To reheat, use a skillet over low heat. This method warms the dish evenly and keeps the flavors intact. Stir the shrimp and broccoli gently to avoid overcooking. Another option is to microwave it on medium power for one to two minutes. If you want to freeze garlic butter shrimp, place it in a freezer-safe bag or container. Remove as much air as possible to prevent freezer burn. You can freeze it for up to three months. When ready to eat, thaw it overnight in the fridge. You can reheat it in a skillet or microwave after thawing. For the full recipe, check out my detailed instructions earlier. Yes, you can use frozen shrimp. Just remember to thaw them first. Place the shrimp in cold water for about 15 minutes. This will help them thaw evenly. Frozen shrimp are often just as tasty as fresh shrimp. They can save you time and are easy to keep on hand. You can add many veggies to this dish. Here are some tasty options: - Bell peppers - Snap peas - Carrots - Asparagus - Zucchini These veggies will add color and flavor. You can mix and match based on what you like or have at home. The shrimp will turn pink and opaque when they are done. You should also look for them to curl slightly. This usually takes about 3-4 minutes. If they look rubbery, they may be overcooked. Keep an eye on them to avoid this. Yes, you can make this dish dairy-free. Use a dairy-free butter or olive oil. These options will still give you a great flavor. You can also try coconut oil for a unique twist. Just remember to adjust the cooking times slightly. I love serving garlic butter shrimp and broccoli over quinoa or rice. This adds a nice base for the dish. You can also serve it in a bowl for a cozy meal. Adding a lemon wedge on the side can enhance the flavors. For garnish, sprinkle some fresh parsley on top. Check out the Full Recipe for fun serving ideas! In this article, we explored a tasty garlic butter shrimp and broccoli dish. We covered essential ingredients, step-by-step instructions, and clever tips to enhance flavor. You learned how to adjust ingredients and cooking methods and found out how to store leftovers. Cooking this dish is easy and fun. Enjoy making it your own with different flavors. You now have the tools and ideas to create a delicious meal. Have fun in the kitchen!
Garlic Butter Shrimp and Broccoli Flavorful Delight
Are you ready to savor a dish that bursts with flavor? In this post, I’ll share my delicious Garlic Butter Shrimp and Broccoli recipe. This
- Corn kernels (fresh or frozen) - Heavy cream for richness - Unsalted butter for flavor enhancement For this dish, corn kernels are the star. You can use fresh corn cut from the cob or grab frozen corn for ease. Both options work well and bring that sweet flavor we love. Heavy cream adds a rich texture, making it feel indulgent. Unsalted butter boosts the taste, giving that mouthwatering essence to every bite. - Garlic, minced for aroma - Smoked paprika and cayenne pepper for spiciness - Salt and black pepper for taste depth Garlic brings a warm, inviting aroma. Mince it finely for even distribution. Smoked paprika adds a hint of smokiness, while cayenne pepper gives a nice kick. Salt and black pepper round out the flavors, ensuring every spoonful is satisfying. - Grated Parmesan cheese for creaminess - Green onions for garnish If you want an extra creamy touch, Parmesan cheese works wonders. It melts beautifully into the dish. Green onions add a fresh burst of color and a slight crunch on top. These add-ons can elevate your Cowboy Butter Creamed Corn to a new level. For the full recipe, check out Cowboy Butter Creamed Corn Delight 🤠. 1. Start by heating a large skillet over medium heat. 2. Add 4 tablespoons of unsalted butter to the skillet. Let it melt completely. 3. Once the butter is melted, add 2 tablespoons of finely minced garlic. Sauté this for about 1 minute. You want the garlic to smell good and turn golden. 4. Now, add 4 cups of fresh corn kernels to the skillet. Stir them into the garlic butter mixture. Cook for about 5 minutes. You’ll want to stir occasionally until the corn is soft and bright. 5. Next, pour in 1 cup of heavy cream. Then add 1 teaspoon of smoked paprika, 1/2 teaspoon of cayenne pepper, 1 teaspoon of salt, and 1/2 teaspoon of black pepper. Mix everything well. 6. Reduce the heat a bit and let the mix simmer for about 8-10 minutes. Stir occasionally until the mixture thickens into a creamy sauce. 7. Once thickened, stir in 1/3 cup of grated Parmesan cheese. Make sure it melts into the creamed corn. This gives it a nice creamy texture. 8. Taste the creamed corn and adjust the seasoning. Add more salt or pepper if needed. 9. Carefully transfer the creamed corn to a serving bowl. Top it with 2 finely chopped green onions for a fresh finish. This recipe is a delightful experience in every bite. For the full recipe, refer to the details above. - How to avoid burning garlic: To keep garlic from burning, cook it over medium heat. Stir it often for about a minute until it smells great. If it turns too brown, it gets bitter and ruins the dish. - Ensuring the right creaminess consistency: For the perfect creamy texture, stir the mix often as it simmers. If it looks too thick, add a splash of cream. If it’s too thin, let it cook a bit longer. - Adjusting spice levels to taste: You can change the heat by adding more or less cayenne pepper. Start small, taste, and then add more if you like it spicy. - Alternative cheese options for added flavor: If you want a different cheese taste, try using feta or cheddar. Each cheese brings its own flavor and makes the dish unique. - Serving suggestions for a rustic look: Serve the creamed corn in a cast-iron skillet or a wooden bowl. This gives a warm, homey feel to your meal. - Pairing ideas for a complete meal: Cowboy Butter Creamed Corn goes well with grilled meats like steak or chicken. It also pairs perfectly with cornbread or biscuits for a true cowboy feast. {{image_4}} You can switch up the cheese in Cowboy Butter Creamed Corn. Try using cheddar for a sharper taste. Or use mozzarella for a milder flavor. Each cheese gives a unique touch to the dish. If you want a vegan option, replace the butter with olive oil. Use coconut cream instead of heavy cream. These swaps keep the dish creamy and rich without dairy. Add fresh herbs like parsley or chives for a pop of freshness. These herbs brighten the dish and add color. You can also mix in thyme or basil for a different twist. For spice lovers, try adding cumin or chili powder. These spices bring warmth and depth to the flavor. Adjust the amount to match your heat preference. You can make Cowboy Butter Creamed Corn in a slow cooker. This method allows flavors to develop over time. Just combine the corn, cream, and spices in the slow cooker and let it cook on low for a few hours. Grilling the corn before adding it to the dish enhances the flavor. The grill adds a smoky note that pairs well with the creamy elements. Cook the corn on the grill until it has nice char marks, then cut it off the cob to use in the recipe. For the full recipe, check out the [Full Recipe](#). To keep Cowboy Butter Creamed Corn fresh, place it in an airtight container. Make sure it cools down first. Store it in the fridge. It stays fresh for about 3 to 4 days. If you want to enjoy it later, freezing is a great option. When reheating, I recommend using the stovetop. This method keeps the texture nice and creamy. Simply add a splash of cream or water to help with moisture. Stir it often until it warms up. If you use a microwave, heat it in short bursts. Stir in between to heat evenly and avoid hot spots. To freeze Cowboy Butter Creamed Corn, let it cool completely. Then, transfer it into a freezer-safe container. Leave some space at the top for expansion. It can last up to 2 months in the freezer. When you are ready to eat, thaw it in the fridge overnight. Reheat on the stovetop, adding some cream if needed to restore its texture. Cowboy butter is a rich, flavorful sauce made from butter, garlic, and spices. It adds zest to many dishes. You can use it for grilled meats, veggies, or even as a dip. It gives a creamy and smoky touch to simple foods. In Cowboy Butter Creamed Corn, it makes the dish extra special. Yes, you can use canned corn. Here are some pros and cons: - Pros: Canned corn is quick and easy to use. It saves time on prep. - Cons: Canned corn can be less sweet than fresh corn. The texture may not be as crisp. If you choose canned corn, rinse it well to remove extra sodium. This helps keep the dish fresh and light. To make Cowboy Butter Creamed Corn dairy-free, use these swaps: - Cream: Replace heavy cream with coconut cream or cashew cream. - Butter: Use vegan butter or olive oil for a lighter option. These alternatives keep the dish creamy and tasty without dairy. You’ll still enjoy all the flavors in the recipe while meeting dietary needs. In this blog post, we explored how to make Cowboy Butter Creamed Corn. We covered essential ingredients like corn, heavy cream, and butter. Seasonings like garlic and paprika added flavor depth. I also shared tips for preparation, variations, and storage. This dish is a great way to enjoy rich flavors with simple steps. With some creativity, you can customize it to fit your taste. Enjoy this delightful side dish with your next meal!
Cowboy Butter Creamed Corn Rich and Flavorful Delight
Welcome to a flavor-packed adventure with Cowboy Butter Creamed Corn! This rich dish blends sweet corn with creamy goodness, creating a delightful side that’s perfect
- 1 lb sirloin steak, cut into 1-inch bite-sized cubes - 2 tablespoons extra virgin olive oil - 1 teaspoon garlic powder - 1 teaspoon onion powder - 1 teaspoon smoked paprika - ½ teaspoon freshly cracked black pepper - ½ teaspoon sea salt - Fresh parsley, finely chopped (for garnish) These ingredients create a simple yet tasty dish. The sirloin steak is the star. When you cut it into bite-sized pieces, it cooks quickly and evenly in the air fryer. The olive oil helps the spices stick. The mix of garlic powder, onion powder, smoked paprika, black pepper, and sea salt adds layers of flavor. Each spice plays a role. Garlic powder gives a warm taste, while smoked paprika adds a nice smokiness. Black pepper and sea salt enhance the steak's natural flavor. Don’t forget the fresh parsley! It brightens the dish. It also adds a nice crunch and color. You can use the parsley as a garnish just before serving. If you want to make it your own, feel free to adjust the spices. You can add a pinch of cayenne for heat or some dried herbs for an extra kick. For the full recipe, check out the details above. With just a few ingredients, you can make a delicious meal that impresses everyone. - In a large bowl, mix 2 tablespoons of extra virgin olive oil with: - 1 teaspoon garlic powder - 1 teaspoon onion powder - 1 teaspoon smoked paprika - ½ teaspoon black pepper - ½ teaspoon sea salt - Toss in 1 lb of sirloin steak cubes. Make sure each cube gets a good coat of the marinade. This step is key to making the steak flavorful. Let the steak marinate for at least 20 minutes at room temperature. - Preheat your air fryer to 400°F (200°C) for about 5 minutes. This ensures your steak bites cook evenly. - Arrange the marinated steak bites in a single layer in the air fryer basket. Leave space between them for air to flow. - Cook the steak bites for 8-10 minutes. Shake the basket halfway through cooking. This helps create a nice sear. For doneness: - 8 minutes for medium-rare - 10 minutes for medium - After cooking, take out the steak bites and let them rest for 3-5 minutes. This step helps keep the juices inside. - Garnish the steak bites with finely chopped fresh parsley. It adds color and a fresh taste. Serve them hot for the best flavor. Check the [Full Recipe] for more details! To make your steak bites just right, timing is key. Here are some tips: - For medium-rare, cook them for about 8 minutes. - If you like it medium, aim for 10 minutes. Using a meat thermometer can help. Aim for 135°F (57°C) for medium-rare and 145°F (63°C) for medium. Marinating the steak is also very important. Let it sit for at least 20 minutes. This time helps the flavors soak in deeply. You can marinate longer if you want a stronger taste. Just be careful not to overdo it, as it may change the meat's texture. Spacing your steak bites is crucial. Place them in a single layer in the basket. This allows hot air to flow freely around each piece. If they are too close, they won’t cook evenly. After cooking, cleaning your air fryer is a must. Let it cool down first. Then, wipe the basket and tray with a damp cloth. For tough spots, use a soft sponge. Avoid harsh chemicals or scrubbing too hard. Keeping it clean will help it last longer. Using these tips will help you make perfect air fryer steak bites every time! For the full recipe, check out the Full Recipe mentioned earlier. {{image_4}} You can change the flavor of your steak bites with different spices. Try these blends: - Italian seasoning: Mix dried oregano, basil, and thyme for a fresh twist. - Cajun spice: Use paprika, cayenne, and garlic for a spicy kick. - Chili lime: Add lime zest and chili powder for a zesty flavor. You can also use different cuts of steak for variety. Sirloin works well, but try these: - Ribeye: This cut is rich and juicy. - Tenderloin: A lean option with a buttery texture. - Flank steak: Great for marinating and adds a robust flavor. Pair your steak bites with tasty dips and sides. Here are some ideas: - Dips: - Creamy garlic aioli - Spicy sriracha mayo - Tangy barbecue sauce - Salads: - A fresh garden salad with mixed greens - A simple Caesar salad with crunchy croutons - A warm potato salad for a hearty side You can also serve steak bites alongside other dishes. Try these pairings: - Mashed potatoes: Creamy and comforting. - Roasted veggies: Carrots, zucchini, or bell peppers add color. - Grilled corn: Sweet corn on the cob complements the flavors. These variations and serving ideas can make your air fryer steak bites a hit at any meal. For the complete recipe, check the Full Recipe. After cooking your steak bites, let them cool down. Store them in an airtight container. Glass containers work best, but plastic ones are fine too. Keep them in the fridge if you plan to eat them soon. They will stay fresh for up to 3 days. When reheating, use the air fryer. Heat it to 350°F (175°C) and cook for about 5 minutes. This keeps the steak bites juicy and crispy. Avoid the microwave, as it can make them tough. If you want to save some for later, freezing is a great option. First, let the steak bites cool completely. Then, place them in a freezer-safe bag. Remove as much air as possible. This helps prevent freezer burn. They can last up to 3 months in the freezer. To thaw, move the bag to the fridge overnight. This method keeps the flavor intact. You can also use the microwave on the defrost setting if you're in a hurry, but be careful not to cook them. Enjoy your steak bites later, just as tasty as when you first made them! Air fryer steak bites take about 8 to 10 minutes to cook. The time depends on how you like your steak. For medium-rare, cook for about 8 minutes. For medium, aim for 10 minutes. Always check the steak's color to make sure it fits your taste. Yes, you can use other cuts of meat. If you don’t have sirloin, try ribeye or tenderloin. These cuts are also tender and flavorful. Flank steak works too, but it can be a bit chewier. Just adjust your cooking time based on the thickness. To keep your steak bites tender, start with quality meat. Look for cuts with good marbling. This means small fat streaks in the meat. Marinate the steak for at least 20 minutes. This helps flavor and softens the meat. Cut the steak against the grain to make it easier to chew. In this post, we explored making steak bites in your air fryer. We talked about the ingredients, the marinade, and the cooking process. I shared tips for perfect doneness and variations to try. Practicing good storage methods keeps these bites tasting fresh. Remember, cooking should be fun and simple. Use these steps to create tasty meals. Enjoy experimenting with flavors and serving ideas. You’ll impress your friends and family with your cooking skills!
Air Fryer Steak Bites Quick and Flavorful Recipe
Are you ready to cook juicy, flavorful steak bites in your air fryer? In just a few simple steps, you can enjoy tender sirloin pieces,
- 2 lbs live crabs, cleaned and prepped - 6 cups water - 1/2 cup unsalted butter - 1/4 cup honey - 6 cloves garlic, minced - 1 tablespoon Old Bay seasoning - 1 tablespoon lemon zest - 1 teaspoon red pepper flakes (adjust to taste) - 1 lemon, cut into wedges (for garnish) - Fresh parsley, chopped (for garnish) - Salt and pepper to taste Gathering the right ingredients is key to a great Garlic Honey Butter Crab Boil. Start with live crabs. You want them fresh and lively for the best flavor. Make sure to clean and prep them well; this makes cooking easier. Next, you need water for boiling. Six cups will do nicely. The butter adds richness, while honey brings a sweet touch. Garlic gives that amazing aroma. Old Bay seasoning adds depth, and lemon zest brightens everything up. The red pepper flakes? They add a nice kick. You can adjust the amount to suit your taste. Lemon wedges and parsley are for garnish. They not only look nice but also add fresh flavors. Salt and pepper round out the dish. You can find the full recipe above to help you with measurements and preparations. - Bring 6 cups of water to a boil in a large stock pot. - Carefully add the cleaned crabs to the pot. Cook for 5 to 7 minutes until they turn vibrant red. - Once cooked, remove the crabs and drain them well. Set them aside for later. - In a spacious skillet, melt 1/2 cup of unsalted butter over medium heat. - Add 6 cloves of minced garlic to the melted butter. Sauté for about 2 to 3 minutes until the garlic is golden and fragrant. - Stir in 1/4 cup of honey, 1 tablespoon of Old Bay seasoning, 1 tablespoon of lemon zest, and 1 teaspoon of red pepper flakes. Cook for an additional 2 minutes to blend all the flavors. - Gently toss the cooked crabs in the garlic honey sauce. Make sure they are evenly coated in the rich mixture. - Let the crabs cook in the sauce for another 2 to 3 minutes. This allows them to absorb all the delightful flavors. - Adjust the seasoning with salt and pepper to your taste. For the full experience, check out the Full Recipe to guide you through every step. Boiling crabs needs the right time to get the best texture. I recommend boiling them for 5-7 minutes. This time lets them turn vivid red, showing they are done. If you cook them too long, they become mushy. Keep an eye on them to avoid this. You can take the flavor of your crab boil to the next level. Try adding spices like smoked paprika or cayenne pepper for a kick. You can also toss in some fresh herbs, like thyme or dill. Marinating the crabs in a mix of honey and spices for one hour before cooking can add depth. It helps the crabs soak up all the wonderful flavors. Serve your garlic honey butter crab boil family-style for a warm feel. Use a big platter to show off your dish. Scatter lemon wedges and chopped parsley on top for color. Don't forget to offer seafood crackers and bibs! They make the meal more fun. Check the [Full Recipe] for details on how to make this dish shine on your table. {{image_4}} You can mix up your crab boil with other seafood. Shrimp is a great choice. They cook quickly and soak up flavors well. You can add lobster for a richer taste. Slice the lobster in half to help it cook evenly. To create a mixed seafood boil, simply combine different types of seafood. Just make sure to adjust cooking times based on what you add. Want more heat? You can add fresh peppers like jalapeños or serranos. Just chop them finely and toss them in with the garlic. If you prefer milder flavors, skip the red pepper flakes. You can also try different seasoning blends, such as Cajun or Creole, for a new twist. Each blend brings its own unique flavor. If you need gluten-free options, check your seasoning labels. Many spices are naturally gluten-free. For a vegetarian version, swap crabs for artichokes or mushrooms. These options can still give you that savory flavor. You can use the same garlic honey butter sauce to enhance these ingredients. This way, you enjoy the same great taste! To keep your crab boil fresh, store leftovers in an airtight container. Place the crabs in the fridge within two hours of cooking. This helps prevent bacteria growth. The crab boil will last up to three days in the fridge. After that, the quality may decline. When reheating, skip the microwave. Instead, use a skillet over low heat. Add a splash of water or broth to keep moisture. This way, crabs stay juicy and tender. Make sure to stir often to avoid sticking. If you want to keep the flavor, heat gently and don’t overdo it. Enjoy every tasty bite! For the full recipe, check the link. You can tell when crabs are cooked by their color. Fresh crabs will turn a bright red when done. Look for the crab's shell to be bright and shiny. The meat inside should be opaque and firm. If the crab is gray or translucent, it needs more time in the pot. Yes, you can use frozen crabs, but adjust the cooking time. Frozen crabs will need a bit longer to cook. If you use frozen, steam them for about 8-10 minutes. The flavor may also differ slightly, as fresh crabs taste sweeter. Always check that they turn bright red before serving. You can enjoy many side dishes with this crab boil. Here are a few ideas: - Corn on the cob: Its sweetness complements the crab. - Coleslaw: The crunch adds texture and freshness. - Garlic bread: Perfect for soaking up the delicious sauce. - Potato salad: Creamy potatoes balance the rich flavors. - Lemonade or iced tea: Refreshing drinks to wash down the meal. Feel free to mix and match these sides for a great crab boil experience. For the full recipe, check out the Garlic Honey Butter Crab Boil. This blog post guides you on how to make a delicious Garlic Honey Butter Crab Boil. You learned about the key ingredients, cooking steps, and helpful tips. Each step matters for great taste. Remember to avoid overcooking to keep your crab tender. Feel free to try different seafood or spice levels to suit your taste. Now, you can impress your friends and family with this feast. Enjoy the flavors and make it your own!
Garlic Honey Butter Crab Boil Savory Seafood Delight
Are you ready to dive into a seafood feast that will impress everyone? In this blog post, I will guide you through creating a mouthwatering
When making the Easy Chipotle Ranch Grilled Chicken Burrito, you need fresh and tasty items. Here’s a complete list of what you will need: - 2 boneless, skinless chicken breasts - 1 cup cooked brown rice - 1 can (15 oz) black beans, thoroughly rinsed and drained - 1 cup corn kernels - 4 large flour tortillas - 1 tablespoon extra virgin olive oil - 1 teaspoon chipotle powder - 1 teaspoon garlic powder - 1 teaspoon onion powder - 1 teaspoon ground cumin - Sea salt and freshly cracked black pepper, to taste - 1 cup shredded sharp cheddar cheese - 1 cup romaine lettuce, chopped - ½ cup diced fresh tomatoes - ½ cup creamy chipotle ranch dressing These ingredients are easy to find. You can get them at any grocery store. Each item adds a unique flavor and texture to your burrito. The chicken provides protein, while the beans and rice add heartiness. The spice rub gives it a kick, making every bite exciting. Fresh veggies and cheese add color and crunch. This mix of ingredients makes your burrito not just tasty, but also fun to eat. Check out the Full Recipe to see how to put it all together! - Preheat the grill to medium-high temperature. - Mix the spice rub ingredients thoroughly. To get started, you want to preheat your grill. Aim for a medium-high temperature. This helps cook the chicken evenly. While the grill heats up, let’s prepare the spice rub. In a small bowl, combine olive oil, chipotle powder, garlic powder, onion powder, ground cumin, sea salt, and black pepper. Mix until blended. This rub will add a burst of flavor to the chicken. - Season and grill the chicken breasts. - Allow to rest before slicing. Next, take the chicken breasts and generously rub the spice mixture over them. Make sure every inch is covered for the best flavor. Place the chicken on the grill and cook for about 6-7 minutes on each side. You want the chicken to reach 165°F (75°C) inside. After grilling, take the chicken off the heat and let it rest for about 5 minutes. This helps keep the juices locked in. Once rested, slice the chicken into strips. - Combine rice, black beans, corn, and tomatoes. - Layer the fillings in the tortillas. - Roll and seal the burritos. While the chicken rests, let's prepare the burrito filling. In a large mixing bowl, combine cooked brown rice, black beans, corn, and diced tomatoes. Mix everything well. Now, it’s time to assemble the burrito. Lay a flour tortilla flat. Spoon a portion of the rice and bean mixture into the center. Next, add the sliced grilled chicken, chopped romaine, shredded cheese, and a drizzle of chipotle ranch dressing. Now, fold the sides of the tortilla over the filling. Roll it tightly from the bottom to the top. Make sure you enclose all the delicious fillings inside. Repeat this process with the remaining tortillas and filling. If you want a crispy touch, place the burritos seam-side down on the grill for 1-2 minutes. This gives a nice finish. You can find the full recipe in the article for more details. Enjoy crafting your Easy Chipotle Ranch Grilled Chicken Burrito Delight! To achieve the best flavor, set your grill to medium-high. Aim for a temperature around 375 to 400 degrees Fahrenheit. Grill the chicken for 6 to 7 minutes on each side. This timing ensures your chicken cooks evenly and stays juicy. To check if the chicken is done, use a meat thermometer. It should read 165 degrees Fahrenheit in the thickest part. If you don’t have a thermometer, cut into the chicken. The meat should be white, not pink. When rolling the burrito, avoid spills by keeping the filling in the center. Fold the sides of the tortilla in before rolling. This way, your filling stays snug and secure. For a crispy exterior, grill the rolled burrito seam-side down for 1 to 2 minutes. This step adds a nice crunch and helps seal the edges. To impress your guests, slice each burrito in half. Arrange them on a platter with the cut side facing up. This shows off the colorful filling. Serve with extra chipotle ranch dressing on the side. A few lime wedges add a pop of color. This makes your dish look fresh and appetizing. {{image_4}} You can easily switch up the protein in this burrito. Instead of chicken, try shredded beef or tofu for a tasty twist. Each option brings its own unique flavor. You can also use different beans or grains. Black beans work great, but pinto or kidney beans can add new tastes. Quinoa or white rice can be good grain choices too. Want to spice things up? Add extra spices like chili powder or paprika to the mix. These can give your burrito a nice kick. You can also use fresh herbs to brighten the flavor. Try cilantro, parsley, or green onions for a fresh touch. They will add brightness and depth to every bite. If you need gluten-free options, look for gluten-free tortillas. They taste great and hold the fillings well. For a vegan burrito, swap the chicken for grilled veggies or beans. Use a plant-based ranch dressing instead of the creamy chipotle ranch. These changes keep the meal delicious while meeting your dietary needs. For more delicious ideas, check the Full Recipe. To store leftovers, keep your burritos in an airtight container. This will help keep them fresh. You can also wrap them in plastic wrap. Store them in the fridge for up to three days. If you want to keep them longer, freezing is a great option. For reheating, the microwave works well. Place the burrito on a microwave-safe plate. Heat it for about one to two minutes. If you want a crispy exterior, use a grill. Heat your grill to medium and place the burrito on it. Grill for about two minutes on each side. This method keeps the filling warm and adds a nice crisp. To freeze burritos, wrap each one tightly in plastic wrap. Then, place them in a freezer bag or container. This keeps out air and helps prevent freezer burn. They can stay in the freezer for up to three months. When you're ready to eat, take a burrito out and let it thaw in the fridge overnight. Reheat it using your preferred method. Enjoy your meal anytime! You can pair this burrito with simple sides. Here are some ideas: - Mexican rice: Fluffy and flavorful, it complements the burrito. - Refried beans: Creamy and rich, they add a nice touch. - Guacamole: Creamy avocado adds freshness and flavor. - Chips and salsa: Crispy chips with zesty salsa make a great snack. - Corn on the cob: Sweet and tender corn is a fun side. - Iced tea or lemonade: Refreshing drinks that go well with spicy food. Yes, you can prep this burrito in advance. Here’s how: - Cook the chicken: Season and grill your chicken. Let it cool. - Prepare fillings: Mix rice, beans, corn, and tomatoes. Store them covered. - Wrap burritos: Assemble and wrap them tightly in foil or plastic. - Refrigerate: Keep your wrapped burritos in the fridge for up to two days. - Reheat: You can grill or microwave them when you are ready to eat. The chipotle ranch dressing has a mild to medium spice level. To adjust it: - Add more ranch: Mix in extra ranch dressing to tone down heat. - Use less chipotle: Start with less chipotle powder in the dressing. - Fresh ingredients: Add diced cucumbers or tomatoes for a cooling effect. This lets you customize the spice to your taste. Making a vegetarian burrito is easy and tasty. Here are some swaps: - Replace chicken: Use grilled veggies like peppers and zucchini. - Add tofu: Marinated and grilled tofu provides great protein. - Non-dairy options: Use a plant-based cheese or leave it out. These changes keep the flavors bright and satisfying for everyone. This blog post shared a simple and tasty recipe for Chipotle Ranch Grilled Chicken Burritos. You learned about key ingredients, step-by-step instructions, and tips for grilling chicken and assembling burritos. We also explored variations, storage tips, and FAQs for your convenience. Now it's time to get creative in your kitchen. These burritos are easy to make and fun to customize. Enjoy every bite while sharing this recipe with friends and family. It’s a real crowd-pleaser!
Easy Chipotle Ranch Grilled Chicken Burrito Delight
Are you ready to tantalize your taste buds? This Easy Chipotle Ranch Grilled Chicken Burrito Delight is a simple and tasty meal you’ll want to
To make Roasted Garlic Butter Parmesan Potatoes, gather these ingredients: - 2 pounds baby potatoes, halved - 6 cloves garlic, minced - 1/2 cup unsalted butter, melted - 1 cup grated Parmesan cheese - 2 tablespoons fresh parsley, chopped - 1 teaspoon dried oregano - 1 lemon, zested and juiced - Salt and freshly ground black pepper to taste Each ingredient plays a key role. The baby potatoes provide a soft, creamy base. Garlic adds a rich, savory flavor. Unsalted butter gives a smooth texture and depth. Parmesan cheese brings a sharp, salty kick. Fresh parsley adds a hint of color and freshness. Oregano introduces earthy notes. Lemon zest and juice brighten the dish. Salt and pepper enhance all these flavors. For the full recipe, check the detailed instructions. You will love how simple it is to create this delightful dish! Start by preheating your oven to 425°F (220°C). This heat will make the potatoes crispy and golden. To make cleanup easier later, line a large baking sheet with parchment paper. This helps prevent sticking and makes it simple to serve. In a large mixing bowl, combine the halved baby potatoes with the minced garlic, melted butter, dried oregano, lemon zest, lemon juice, and a good sprinkle of salt and freshly ground black pepper. Toss everything together well. You want the potatoes to be fully coated in the mix. This step is key to getting great flavor. Spread the seasoned potatoes out on the prepared baking sheet. Make sure they are in a single layer with the cut side down. This helps them get that nice crispiness. - Roasting Guide Place the baking sheet in your preheated oven. Roast the potatoes for 25-30 minutes. They should look golden brown and feel tender when you poke them with a fork. Remember to flip them halfway through cooking. This way, they brown evenly on all sides. - Adding Parmesan Once the potatoes are done, take the baking sheet out of the oven. Sprinkle the grated Parmesan cheese over the hot potatoes right away. This will let the cheese melt nicely. Put the baking sheet back in the oven for an extra 5-7 minutes. You want the cheese to melt and bubble. These steps will lead you to amazing Roasted Garlic Butter Parmesan Potatoes. For the complete recipe, check out the Full Recipe. To get the best crispiness, use small baby potatoes. Their thin skin helps them cook well. Halve the potatoes, then place them cut-side down on the baking sheet. This method creates a nice golden brown surface. Remember to flip them halfway through cooking. This step ensures they brown evenly on both sides. You can easily swap some ingredients based on what you have. Instead of baby potatoes, you can use Yukon Gold or red potatoes. If you don’t have unsalted butter, salted butter works too; just cut back on added salt. For the cheese, feel free to use Asiago or Romano if you want a different flavor. Fresh herbs like thyme or basil can replace parsley for a new twist. These roasted garlic butter parmesan potatoes are great as a side dish. They pair well with a variety of main dishes. Consider serving them with grilled chicken or salmon for a tasty meal. They also go well with steak or pork chops. For a vegetarian option, try them with a fresh salad or roasted vegetables. Enjoy exploring different pairings that suit your taste! You can find the Full Recipe to make these delicious potatoes. {{image_4}} If you crave a kick, try adding red pepper flakes. Mix in one teaspoon with the garlic and butter. This heat enhances the rich flavors of the dish. You can adjust the spice level based on your taste. More flakes mean more heat! You can also serve with a spicy dipping sauce for extra flavor. For a fresh twist, add herbs like thyme or rosemary. Use one tablespoon of chopped fresh herbs along with the garlic. This will give the potatoes an aromatic profile. You can mix and match herbs based on what you love. Fresh herbs bring a burst of color and flavor to your dish. If you want a plant-based version, swap the butter for a vegan alternative. Use your favorite plant-based butter in the same amount. This keeps the creamy texture while making it dairy-free. You can also use nutritional yeast instead of Parmesan for a cheesy taste. This option is healthy and still delicious! For more details, check the [Full Recipe]. After you enjoy your Roasted Garlic Butter Parmesan Potatoes, store any leftovers in an airtight container. This keeps them fresh and tasty. Make sure to let them cool before sealing. You can keep them in the fridge for up to three days. If you want to enjoy them longer, consider freezing. To reheat, preheat your oven to 350°F (175°C). Spread the potatoes on a baking sheet. Heat them for about 10-15 minutes until warm. This method helps restore their crunch. You can also use a microwave for quick reheating, but they might become soft. Best Practices If you want to freeze your Roasted Garlic Butter Parmesan Potatoes, follow these steps. First, let them cool completely. Then, spread them on a baking sheet in a single layer. Freeze for about 1-2 hours until solid. After that, transfer them to a freezer-safe bag or container. Label it with the date. You can freeze them for up to three months. When ready to eat, thaw in the fridge overnight before reheating. To make roasted garlic butter parmesan potatoes, you start by preheating your oven to 425°F (220°C). Then, you mix halved baby potatoes with minced garlic, melted butter, oregano, lemon zest, lemon juice, and salt and pepper in a large bowl. Toss everything well to coat the potatoes. Next, spread them on a baking sheet, cut-side down. Roast them for 25-30 minutes until golden brown. Flip them halfway for even cooking. Finally, add grated Parmesan on top and roast for another 5-7 minutes. The cheese will melt and bubble. Garnish with parsley and serve warm. For more details, check the Full Recipe. Yes, you can use other types of potatoes. While baby potatoes are great for their small size and creamy texture, you can try Yukon Gold or red potatoes. They both taste fantastic when roasted. Just make sure to cut them into similar sizes for even cooking. If you use larger potatoes, cut them into bite-sized pieces. This way, they will cook at the same pace as the rest. You can add many things to enhance the flavor of roasted garlic butter parmesan potatoes. Here are some tips for seasoning: - Add smoked paprika for a warm, smoky taste. - Try fresh herbs like rosemary or thyme for a fragrant touch. - A pinch of red pepper flakes brings heat and spice. - Consider adding a splash of balsamic vinegar for tanginess. - You can even mix in some cooked bacon for a savory crunch. Experiment with different flavors to find what you enjoy most! We explored how to make tasty roasted garlic butter parmesan potatoes. You learned the key ingredients, from baby potatoes to fresh parsley. Following the steps, like preheating the oven and mixing everything carefully, leads to great flavor. Remember, achieving that perfect crispiness can take practice. Don't hesitate to try new variations or ingredients. Enjoy your cooking adventure and share these potatoes with loved ones! Happy roasting!
Roasted Garlic Butter Parmesan Potatoes Delightful Treat
Are you ready to transform humble potatoes into a mouthwatering side dish? My Roasted Garlic Butter Parmesan Potatoes will delight your taste buds and earn
- 2 boneless, skinless chicken breasts - 1 cup finely grated Parmesan cheese - 1 cup panko breadcrumbs - 2 teaspoons garlic powder - 1 teaspoon Italian seasoning blend - 1/2 teaspoon smoked paprika - 2 large eggs - 1 tablespoon extra virgin olive oil - Fresh parsley, finely chopped To make the best Air Fryer Parmesan Crusted Chicken, you need a few key ingredients. The chicken is the star of the dish. It should be fresh and boneless for easy cooking. The Parmesan cheese adds a rich, nutty flavor. Finely grated cheese sticks well to the chicken, ensuring a crispy crust. Panko breadcrumbs are perfect for this recipe. They provide a light, crunchy texture that elevates the dish. When mixed with seasoning, they create a flavorful coating. For seasoning, garlic powder gives a nice kick. Italian seasoning blend adds herbs and depth. Smoked paprika offers a subtle smoky flavor that enhances the overall taste. You will also need eggs to help the coating stick. Olive oil adds moisture and richness. Finally, fresh parsley makes a lovely garnish. It brightens the dish and adds a pop of color. This recipe is simple to follow. You will find the full recipe easy to prepare. - Preheat Air Fryer: Set your air fryer to 400°F (200°C). This helps cook the chicken well. - Combine Coating Ingredients: In a bowl, mix Parmesan cheese, panko, garlic powder, Italian seasoning, smoked paprika, salt, and pepper. Stir until mixed well. - Prepare Egg Mixture: Crack two eggs into a bowl, add olive oil, and whisk them together. This mixture helps the coating stick. - Drying the Chicken: Use paper towels to pat the chicken breasts dry. This step is key for a good coating. - Dipping in Egg Mixture: Take a chicken breast, dip it in the egg mixture, and let excess drip off. - Coating with Breadcrumbs: Next, coat the chicken in the breadcrumb mix. Make sure to cover all sides for great flavor. - Arranging Chicken in Air Fryer: Place the coated chicken in the air fryer basket. Keep space between each piece. This allows hot air to circulate. - Cooking Time and Temperature: Cook the chicken for 12-15 minutes. Check at 12 minutes to see how it looks. - Checking Doneness: The chicken is ready when it is golden brown and reaches 165°F (75°C) inside. Use a meat thermometer for accuracy. - Proper Preheating: Always preheat your air fryer to 400°F (200°C). This step is key. It helps the chicken cook evenly and keeps the crust crispy. - Avoiding Overlapping Chicken: Place the chicken in a single layer. Avoid stacking or overlapping pieces. This allows hot air to flow freely around each piece. - Additional Seasonings Options: Feel free to add spices like cayenne for heat or onion powder for depth. These small changes make a big impact. - Using Fresh Herbs: Adding fresh herbs like thyme or basil can brighten the dish. Mix them into the breadcrumb mix for added flavor. - Plating Ideas: Serve the chicken on a vibrant platter. Garnish it with fresh parsley and lemon wedges. This adds color and freshness. - Accompaniments: Pair the chicken with a crisp salad or roasted veggies. These sides complement the rich flavors and balance the meal. For the full recipe, check out the detailed steps that guide you through making this delicious dish. {{image_4}} Adding Spices You can spice up the chicken by mixing in some cayenne pepper or chili powder. This will add a nice kick to your dish. You might also consider using smoked garlic powder for a deeper flavor. Try mixing in some herbs like thyme or rosemary for extra depth. Using Different Cheeses You can swap out Parmesan for other cheeses. Try using mozzarella for a melty texture or cheddar for a sharper taste. Goat cheese can add a creamy twist, while pecorino Romano gives a saltier flair. Each cheese will bring its unique flavor to the dish. Gluten-Free Options To make this dish gluten-free, use crushed gluten-free crackers or almond flour instead of panko. This keeps the crunch while making it safe for those with gluten allergies. You can also find gluten-free breadcrumbs at most grocery stores. Dairy-Free Alternatives For a dairy-free option, use nutritional yeast as a cheese substitute. It provides a cheesy flavor without dairy. You can also try a dairy-free cheese that melts well. Just check the labeling to ensure it fits your dietary needs. Oven-Baking Instructions If you prefer oven-baking, preheat your oven to 425°F (220°C). Place the coated chicken on a baking sheet lined with parchment paper. Bake for 20-25 minutes, flipping halfway through. This method gives a nice crisp, too. Grilling Tips For grilled chicken, marinate the coated chicken for extra flavor. Heat the grill to medium-high. Cook for about 6-8 minutes per side. Make sure to check the internal temperature to ensure it reaches 165°F (75°C). Grilling adds a lovely smoky flavor to the chicken. Feel free to explore these variations to make this dish truly yours! For the full recipe, check the link above. After you enjoy your Air Fryer Parmesan Crusted Chicken, store any leftovers in the fridge. Place the chicken in an airtight container. It will stay fresh for up to three days. When it's time to eat again, reheat the chicken in the air fryer. Set it to 350°F (175°C) for about 5-7 minutes. This keeps the chicken crispy and warm. If you want to save the chicken longer, freezing is a great option. Wrap each piece in plastic wrap, then place it in a freezer bag. This method helps prevent freezer burn. The chicken can stay frozen for up to three months. To thaw, move the chicken to the fridge overnight. This ensures it thaws safely and stays juicy. To keep the chicken crispy, avoid stacking the pieces in storage. Layering can make the crust soggy. When reheating, using the air fryer is best. This method restores that delicious crunch. You can also use a toaster oven if you don’t have an air fryer. Just remember to keep an eye on it to avoid burning. Yes, you can use chicken thighs. They are juicier and more flavorful. Just ensure they are boneless and skinless for best results. You may need to adjust the cooking time. Thighs may take a few minutes longer to cook through. Check the internal temperature with a meat thermometer. It should reach 165°F (75°C). The chicken will also look golden brown and crispy. If you cut into it, the juices should run clear. This chicken pairs well with many sides. Some great options include: - Steamed broccoli - Garlic mashed potatoes - Fresh salad - Roasted vegetables These sides add color and balance to your meal. To reheat, use the air fryer. Set it to 350°F (175°C) and cook for about 5-7 minutes. This method keeps the chicken crispy. You can also use an oven for the same effect. Just avoid the microwave, as it can make the chicken soggy. For one serving of Air Fryer Parmesan Crusted Chicken, you can expect: - Calories: 400 - Protein: 35g - Fat: 22g - Carbohydrates: 15g - Fiber: 1g These values may vary based on the exact ingredients and portion sizes used in the Full Recipe. This blog explains how to make Air Fryer Parmesan Crusted Chicken. You learned about the main ingredients, like chicken and Parmesan cheese, and how to coat and cook the chicken for the best results. You also found tips for a crispy finish and ways to modify the recipe. Experiment with flavors and enjoy your tasty meal. With these steps, you will make a dish that impresses everyone. Keep this guide handy for your next cooking adventure!
Air Fryer Parmesan Crusted Chicken Easy and Flavorful
Are you ready to elevate your dinner game with a dish that’s both easy and delicious? Air Fryer Parmesan Crusted Chicken is here to impress!
- 4 medium russet potatoes - 2 tablespoons olive oil - 1 teaspoon sea salt - 1/2 teaspoon black pepper - 1 teaspoon garlic powder - 1 teaspoon paprika (smoked or regular) - Optional toppings: sour cream, fresh chives, shredded cheese, crispy bacon bits When I make air fryer baked potatoes, I love using russet potatoes. They have a fluffy inside and a crispy skin that makes them perfect. You start with four medium russet potatoes. Make sure they are firm and have no blemishes. Next, you need some olive oil. Two tablespoons will do the trick. It helps the skin get that golden brown color and adds flavor. For seasoning, I use one teaspoon of sea salt and half a teaspoon of black pepper. These basic spices enhance the potato’s natural taste. I also add one teaspoon of garlic powder. It gives the potatoes a nice, savory kick. Lastly, I sprinkle in one teaspoon of paprika. You can choose smoked or regular, depending on your taste. Smoked paprika adds a deeper flavor. Don’t forget about the toppings! You can add sour cream, fresh chives, shredded cheese, or crispy bacon bits if you like. These add extra flavor and make the dish feel special. For the full recipe, follow the steps to create this crispy and delicious dish! - Thoroughly wash and scrub the russet potatoes. - Pat the potatoes dry with a paper towel. To start, you want your russet potatoes to be clean. Wash them well to remove dirt. Scrubbing them helps to ensure a crispier skin. After washing, use a paper towel to dry them. This step is key for that perfect crunch. - Prick each potato with a fork. - Mix the seasoning ingredients in a bowl. Next, grab a fork and prick each potato about five times. This step lets steam escape. It prevents the potatoes from bursting while cooking. Now, mix your seasoning. In a bowl, combine olive oil, sea salt, black pepper, garlic powder, and paprika. Stir until well-blended to create a tasty coating. - Coat the potatoes with the seasoning. - Preheat the air fryer to 400°F (200°C). - Arrange and cook the potatoes in the air fryer. Now, take each potato and rub the seasoning all over it. Make sure every inch is covered. This ensures great flavor and crispiness. Preheat your air fryer to 400°F (200°C) for about five minutes. Once hot, place the potatoes in the basket. Leave space between each one. Cook them for 35-40 minutes, turning halfway for even cooking. They are ready when the skin is crispy and a fork goes through easily. - Let the potatoes cool for a few minutes. - Slice open and add toppings. After cooking, carefully remove the potatoes. Let them cool for about 2-3 minutes. This makes them easier to handle. Slice them open and fluff the insides with a fork. Now comes the fun part: adding toppings! Use sour cream, chives, cheese, or bacon bits to make them your own. If you want to see the full recipe, check it out. Enjoy your crispy, delicious air fryer baked potatoes! To get that perfect crispy skin on your baked potatoes, start by drying them well. After washing, use a paper towel to pat them dry. A dry surface helps the skin crisp up nicely. Preheating your air fryer is key too. Set it to 400°F (200°C) for about 5 minutes. This heat creates a crunchy shell that seals in the soft potato inside. To make your baked potatoes even tastier, try adding spices. You can mix in some onion powder or cayenne pepper for a kick. Fresh herbs like rosemary or thyme also work great. When it comes to toppings, the options are endless! Sour cream and chives are classic choices. You can also add shredded cheese or crispy bacon bits for a savory treat. The size of your potatoes can affect cooking time. For smaller potatoes, check them at 30 minutes. Larger ones might need up to 45 minutes. Each air fryer cooks a bit differently. If your model runs hot, reduce the time to avoid burning. Always use a fork to test if they’re done. A fork should slide in easily when they are ready. {{image_4}} Loaded baked potatoes are a fun twist on the classic. You can add many toppings to make them special. Here’s a simple recipe to create your loaded baked potatoes. Ingredients: - 4 medium russet potatoes - 1 cup shredded cheese (cheddar or your favorite) - 1/2 cup sour cream - 1/2 cup crispy bacon bits (omit if avoiding pork) - 1/4 cup chopped green onions or chives - Optional: sautéed mushrooms, jalapeños, or broccoli To make loaded baked potatoes, start by cooking the potatoes as you normally would. Once they are done, slice them open. Fluff the insides with a fork. Then, add the cheese first, allowing it to melt. Next, top with sour cream, bacon bits, and green onions. Mix vegetarian options by using sautéed mushrooms or steamed broccoli. Herbs and cheese can elevate your baked potatoes. Adding fresh or dried herbs can give a nice touch. Try using rosemary, thyme, or parsley. They add flavor and make the dish look beautiful. Cheese Choices: - Cheddar - Gruyère - Feta - Goat cheese To infuse herbs into your seasoning, chop them finely and mix them with olive oil. Rub this mixture on the potatoes before cooking. For cheese, sprinkle it on top after baking. The cheese will melt perfectly, creating a delicious layer of flavor. Sweet potatoes are another great option for air fryer baked potatoes. They are naturally sweet and packed with nutrients. Here’s how to make sweet potato baked potatoes in the air fryer. Ingredients for Sweet Potatoes: - 4 medium sweet potatoes - 1 tablespoon olive oil - 1 teaspoon cinnamon - 1 tablespoon brown sugar (optional) - Toppings: butter, maple syrup, or chopped nuts Start by cooking the sweet potatoes in the air fryer as you would russet potatoes. After baking, slice them open and fluff the insides. For seasoning, mix olive oil with cinnamon and brown sugar. Drizzle this mixture over the sweet potatoes for added sweetness. You can also add butter or maple syrup for extra flavor. For more details, check the Full Recipe. To store leftover baked potatoes, let them cool first. Place them in an airtight container. Make sure to separate layers with parchment paper. This keeps them from sticking together. Store the container in the fridge. They will taste best if eaten within three to four days. When you are ready to eat, reheat them in the air fryer for about 5–10 minutes. This will keep the skin crispy. If you want to freeze baked potatoes, cool them completely first. Wrap each potato tightly in plastic wrap. Then, place them in a freezer bag. Remove as much air as you can from the bag. This helps prevent freezer burn. When you want to eat them, take the potatoes out and let them defrost in the fridge overnight. Reheat them in the air fryer until hot. Baked potatoes can last up to four days in the fridge. If you freeze them, they can last for up to three months. Always check for any signs of spoilage before eating. If they smell off or look strange, it’s best to throw them away. Keeping track of how long they have been stored helps ensure you enjoy them at their best! To cook baked potatoes in an air fryer, set it to 400°F (200°C). Cook for 35 to 40 minutes. Make sure to turn the potatoes halfway through for even cooking. They are ready when the skin is crispy and a fork easily goes through the center. Yes, you can cook other types of potatoes in the air fryer. Try Yukon Gold or red potatoes for different flavors. Fingerling potatoes are great too, and they cook quickly. Just adjust the cooking time based on the size. One common mistake is not drying the potatoes well. Water on the skin can make them soft, not crispy. Another mistake is overcrowding the basket. Give each potato space for air to flow. This helps them cook evenly. Yes, you can use parchment paper in the air fryer. It helps catch drips and keeps the basket clean. Just make sure it does not block the air flow. Cut it to size and place it under the food. Always check the parchment for safety based on your air fryer model. You now have all the steps to make perfect air fryer baked potatoes. We've covered everything from choosing the right ingredients to cooking tips that ensure crispy skin. Don't forget to get creative with toppings and flavors. Whether you prefer classic loaded potatoes or sweet versions, there's a recipe for everyone. Remember, proper storage methods will keep your leftovers fresh. I hope you enjoy making and eating these baked potatoes as much as I do!
Air Fryer Baked Potatoes Crispy and Delicious Dish
Craving a crispy, delicious baked potato? Look no further! Air fryer baked potatoes are the perfect combo of soft and crunchy. In just a short
- 1 pound sirloin steak, cut into cubes - 2 tablespoons Cajun seasoning blend - 4 tablespoons unsalted butter, divided - 4 cloves garlic, minced - 1 tablespoon fresh parsley, for garnish - Juice of 1/2 lemon - 1 teaspoon olive oil (optional for extra richness) - Salt and pepper to taste When I cook Cajun Garlic Butter Steak Bites, I focus on simple yet bold flavors. The main ingredient is sirloin steak. I cut it into bite-sized cubes to ensure quick cooking. The Cajun seasoning adds a great kick. I like to use a blend that has paprika, garlic powder, and cayenne. This mix gives the steak its signature taste. Next, I use unsalted butter for richness. I divide it into parts: one for searing the meat and the rest for the sauce. Fresh garlic is key. I always mince it myself to get the best flavor. For garnish, I use fresh parsley. It adds color and freshness to the dish. A squeeze of lemon juice brightens the flavors. If you want a richer taste, a little olive oil works well too. Finally, I always season with salt and pepper. This step is important to enhance all the flavors. You can find the full recipe linked above. To start, you need to coat the steak with Cajun seasoning. Take 1 pound of sirloin steak cut into bite-sized cubes. In a mixing bowl, add 2 tablespoons of Cajun seasoning, along with salt and pepper. Toss the steak until every piece is well coated. This seasoning gives the steak that bold Cajun flavor. Next, set the cooking environment by heating the skillet. Use a large skillet and put it over medium-high heat. Add 1 tablespoon of unsalted butter. Wait until the butter melts and bubbles but does not brown. This is the perfect time to add your steak. Now, let’s sear the steak bites. Carefully add the seasoned steak cubes to the hot skillet in a single layer. Avoid overcrowding the pan. Sear them for about 2-3 minutes on each side. Look for a golden crust. Check for your preferred doneness—medium-rare is often the best choice. Once done, transfer the steak bites to a plate. While the steak rests, it’s time to make the garlic butter sauce. Lower the skillet heat to medium. Add the remaining 3 tablespoons of butter to the skillet. Allow it to melt completely. Then, sauté the garlic. Stir in 4 cloves of minced garlic. Cook for about 30 seconds until fragrant. Be careful not to let it brown, as burnt garlic can spoil the sauce. Now, combine the steak with the garlic butter. Return the cooked steak bites to the skillet, tossing them in the garlic butter. For a zesty twist, squeeze the juice of 1/2 lemon over the top. Sprinkle in 1 tablespoon of finely chopped fresh parsley. Mix well to coat the steak in that delicious sauce. For a final touch, cook everything together for one more minute. This helps the flavors blend beautifully. Now, your Cajun Garlic Butter Steak Bites are ready to serve. For the full recipe, check the details above. Enjoy every bite! For the best Cajun Garlic Butter Steak Bites, know your steak doneness levels. Medium-rare is your friend. It keeps the steak juicy and tender. Aim for an internal temperature of 130°F to 135°F. If you prefer it medium, go for 140°F to 145°F. To avoid overcooking, use a meat thermometer. Insert it into the thickest part of the steak. Also, let the meat rest for a few minutes after cooking. This helps the juices redistribute, making each bite flavorful. Plating matters! Arrange your steak bites on a rustic wooden board or a clean white plate. This makes the dish look inviting. Garnish with fresh parsley for color. Lemon wedges add a nice touch too. They brighten up the dish. Consider serving with a side of garlic bread or a fresh salad. These add color and balance to your plate. Your guests will love the look and taste of your meal. Want to boost the flavor? Try different seasonings. Smoked paprika can add a nice depth. A pinch of cayenne pepper gives heat without overwhelming the dish. Don't forget herbs! Fresh thyme or oregano can elevate the taste. Add them to the garlic butter for extra flavor. You can also mix in some fresh basil for a twist. For the full recipe, check out the details and enjoy making these delicious bites! {{image_4}} You can switch up the steak cut for your Cajun Garlic Butter Steak Bites. Sirloin is great, but ribeye or tenderloin works too. Each cut gives a different taste and texture. Butter is key in this recipe, but you can use ghee or coconut oil instead. Ghee offers a rich, nutty flavor. Coconut oil adds a hint of sweetness. Both options keep the dish delicious. Want extra heat? Add cayenne pepper or a splash of hot sauce. A little goes a long way, so adjust to your taste. This kick enhances the Cajun spices. You can also mix in vegetables for added nutrition. Bell peppers and mushrooms complement the steak well. Just sauté them in the garlic butter before adding the steak. This gives you a colorful and tasty dish. Cajun flavors can blend well with other cuisines. Try adding Italian herbs like oregano or basil for a twist. This adds a fresh layer to the dish. You can also fuse Cajun with Mexican flair. Adding cumin or chili powder brings warmth and depth. Each fusion creates a unique dish that surprises your taste buds. For the full recipe, check out the [Full Recipe]. Store leftover Cajun Garlic Butter Steak Bites in the fridge. Place them in an airtight container. This keeps the flavors fresh and tasty. It’s best to eat them within three days. To reheat, use a skillet over low heat. Add a splash of water or broth to keep them moist. Heat for about five minutes. You want them warm but not dry. Avoid the microwave if you can; it can make them tough. You can freeze Cajun Garlic Butter Steak Bites for later. Put them in a freezer-safe container. Try to remove as much air as possible. They can stay fresh for up to three months. When ready to eat, thaw them overnight in the fridge before reheating. For the full recipe, check out the Cajun Garlic Butter Steak Bites 🥩🧄 section earlier in this article. The best steak for steak bites is sirloin. It is tender and flavorful. Ribeye is also a good choice. It has more fat, making it juicy. Tenderloin is another option. It is very tender but can be pricey. Choose the cut that fits your taste and budget. Yes, you can make this dish ahead. Cook the steak bites and store them in the fridge. To reheat, use a skillet to warm them gently. This keeps the steak juicy. Avoid using the microwave, as it can dry out the meat. These steak bites pair well with many sides. Try serving them with rice or mashed potatoes. They also go nicely with grilled vegetables or a fresh salad. For a fun twist, serve them on skewers with bell peppers and onions. The spice level can vary. Cajun seasoning has a kick, but you can adjust it. If you like it mild, use less seasoning. For more heat, add cayenne pepper or hot sauce. This way, you can make it perfect for your taste. Cajun Garlic Butter Steak Bites are easy to make and packed with flavor. We looked at the main ingredients, including sirloin steak and Cajun seasoning. You learned step-by-step how to prepare, cook, and present these tasty bites. Tips on doneness and garnishing enhance your cooking skills. Feel free to experiment with variations and flavors. Store extras safely and reheat them well. Enjoy cooking, and make this dish your own!
Cajun Garlic Butter Steak Bites Flavorful Cooking Delight
Are you ready to elevate your cooking game? Cajun Garlic Butter Steak Bites are a quick and savory dish that bursts with flavor. Made with