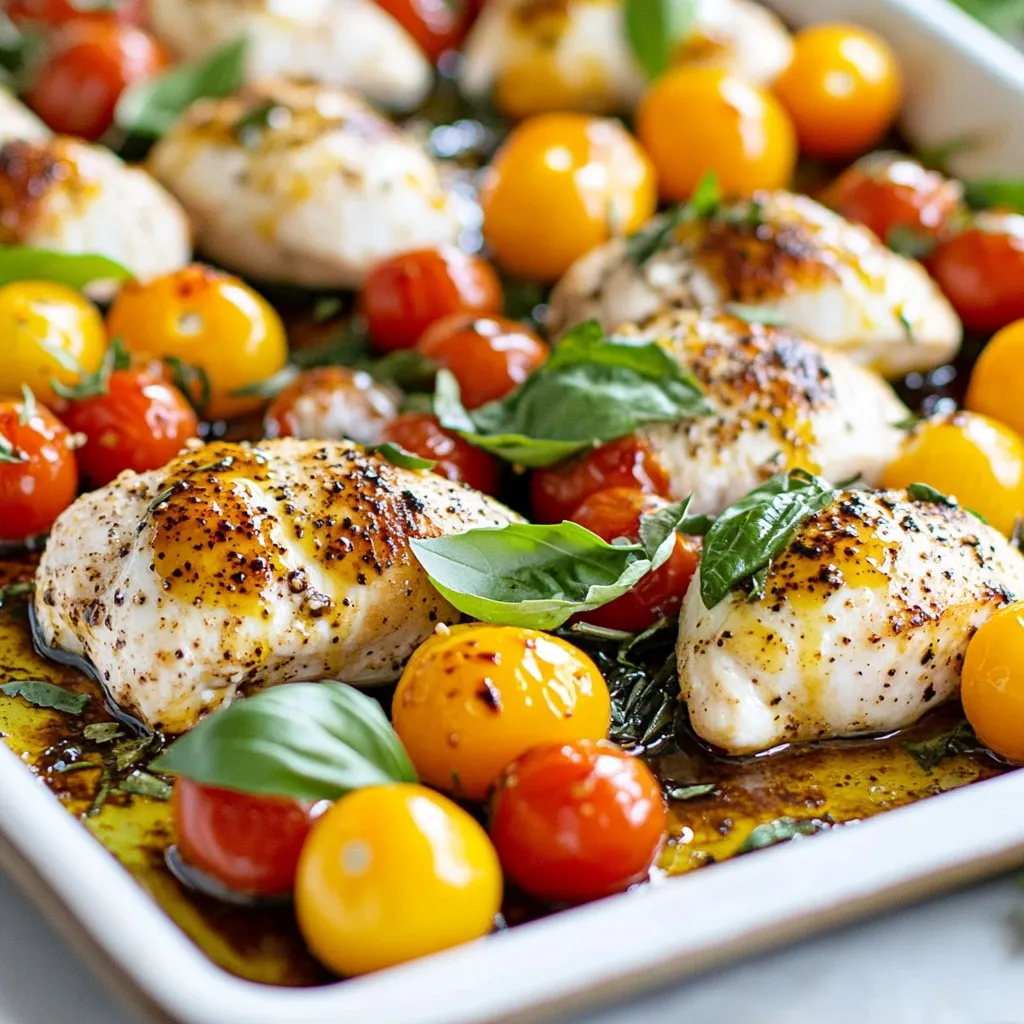
Dinner

For this easy scalloped zucchini, you will need: - 4 medium zucchinis, thinly sliced - 1 cup sharp cheddar cheese, shredded - 1/2 cup grated Parmesan cheese - 1 cup heavy cream - 2 cloves garlic, minced - 1 teaspoon dried thyme - 1 teaspoon onion powder - Salt and pepper to taste - 1/2 cup panko bread crumbs - 2 tablespoons olive oil - Fresh parsley, chopped (for garnish) You can switch some ingredients to fit your taste: - Use mozzarella cheese instead of cheddar for a milder flavor. - Swap heavy cream with half-and-half for a lighter dish. - If you don’t have panko, regular bread crumbs work too. - Fresh herbs can replace dried thyme. Use basil or oregano for a twist. When choosing zucchini, look for these signs: - Pick firm zucchinis that feel heavy for their size. - Choose those with smooth, shiny skin. Avoid ones that are dull or wrinkled. - Smaller zucchinis tend to taste sweeter and are less watery. - Check for any blemishes or soft spots on the skin. Fresh zucchinis should be free of these. Using these tips, your scalloped zucchini will taste amazing! Don't forget to check out the [Full Recipe] for more details! Start by gathering all your ingredients. You will need: - 4 medium zucchinis, thinly sliced - 1 cup sharp cheddar cheese, shredded - 1/2 cup grated Parmesan cheese - 1 cup heavy cream - 2 cloves garlic, minced - 1 teaspoon dried thyme - 1 teaspoon onion powder - Salt and pepper to taste - 1/2 cup panko bread crumbs - 2 tablespoons olive oil - Fresh parsley, chopped (for garnish) Ensure your zucchinis are fresh and firm. Wash them well before slicing. Thin slices cook evenly and blend well with the creamy mixture. Heat the olive oil in a large skillet over medium heat. Once hot, add the minced garlic. Sauté it for about one minute until it smells good and turns golden. Next, add the thin zucchini slices. Sprinkle with thyme, onion powder, salt, and pepper. Stir often for about 5-7 minutes. The zucchinis should soften a bit but still have some crunch. In a separate bowl, mix the heavy cream, half of the cheddar cheese, and half of the Parmesan cheese. Whisk until the mixture is smooth. Add a pinch of salt and pepper to taste. This creamy mix is what makes the dish rich and tasty. Now, prepare your baking dish. Grease it lightly with some oil or cooking spray. Start by layering half of the sautéed zucchini in the dish. Pour half of the cream mixture over this layer. Repeat with the remaining zucchini and cream mixture. Top it all with the rest of the cheddar and Parmesan cheeses. Finally, sprinkle the panko bread crumbs on top for a nice crunchy finish. Place the baking dish in the preheated oven at 375°F (190°C). Bake for 25-30 minutes, until the top is golden brown and bubbly. When done, let it cool for a few minutes. Garnish with fresh parsley before serving. For the full recipe, check [Full Recipe]. To get the right texture, it is key to slice the zucchini thin. Aim for about 1/8 inch thick. This helps them cook evenly. You want them tender but not mushy. Sautéing them lightly before baking also adds to the texture. Cook them just until they soften slightly, about 5-7 minutes. This keeps some bite in each slice. For extra flavor, add fresh herbs. Consider using basil or oregano. They pair well with zucchini. Try adding a pinch of red pepper flakes for some heat. You can also mix in different cheeses. Gruyère or mozzarella can add a nice twist. Use fresh garlic for the best flavor. Mince it finely and sauté it until fragrant. One common mistake is overcooking the zucchini. If you cook them too long, they lose their structure. Another mistake is not seasoning enough. Always taste your layers as you build them. Avoid using too much cream; it can make the dish heavy. Lastly, don’t forget the panko topping. It adds a lovely crunch. These tips will help you create a delicious dish. For a full recipe, check out the Cheesy Scalloped Zucchini Delight. {{image_4}} You can make easy scalloped zucchini even better with add-ins. Try adding cooked ground beef or sausage for a heartier dish. Cook the meat first, then mix it with the zucchini. You can also add other veggies like bell peppers or mushrooms. Just chop them up and sauté them with the zucchini. This adds flavor and color to your meal. If you want to switch up the cheese, go ahead! Use mozzarella for a milder taste. Gouda adds a nice smoky flavor. You can even try a mix of cheeses for more depth. Just keep the cheese ratio the same to keep the creaminess. To make this dish vegan or dairy-free, use plant-based cheese and cream. Many brands offer great options that melt well. You can also use cashew cream for a rich texture. Just soak cashews in water, blend them, and you have a creamy base. Don’t forget to season well. You want your dish to be just as tasty! To keep your scalloped zucchini fresh, place it in an airtight container. Make sure it cools down before sealing. This helps keep moisture in and odors out. Store it in the fridge for up to three days. When you’re ready to enjoy it again, check for any signs of spoilage before reheating. For the best taste, reheat your scalloped zucchini in the oven. Preheat your oven to 350°F (175°C). Place the dish in the oven for about 15-20 minutes. Cover it with foil to keep it from drying out. You can also use the microwave if you’re in a hurry. Heat it in short bursts, stirring in between, until warm. Just be careful not to overcook it! You can freeze scalloped zucchini for later use. First, let it cool completely. Then, cut it into portions for easy thawing. Wrap each piece tightly in plastic wrap and place them in a freezer-safe bag. It can last in the freezer for up to three months. When you’re ready to eat, thaw it in the fridge overnight. Then, reheat it in the oven for the best flavor. Enjoy a delicious meal any time! For the complete recipe, check out the Full Recipe. The best way to cut zucchini is to slice it thinly. Aim for about 1/4 inch thick. This size helps the zucchini cook evenly. When you cut it thin, it will soak up the creamy sauce well. I like to use a sharp knife or a mandoline for even slices. Yes, you can make easy scalloped zucchini ahead of time. Prepare the dish up to the baking step. Cover it with plastic wrap and keep it in the fridge. You can store it for up to 24 hours. When ready to bake, just remove the wrap and pop it in the oven. If it's cold, it might need a few extra minutes to bake. To make this recipe gluten-free, swap regular panko bread crumbs for gluten-free ones. Many stores offer gluten-free options now. You can also skip the bread crumbs if you prefer a lighter dish. Just make sure to check other ingredients, like cheese, to ensure they are gluten-free as well. This blog post covered all you need to make delicious scalloped zucchini. We talked about choosing fresh zucchini, ingredient options, and detailed steps to cook it right. You can explore flavors and textures with various add-ins and seasonings. Remember to store any leftovers properly and use our tips to reheat them well. If you follow these steps, you'll enjoy a tasty and versatile dish. Happy cooking!
Easy Scalloped Zucchini Simple and Delicious Recipe
Are you ready to whip up a tasty dish that celebrates zucchini? This Easy Scalloped Zucchini recipe is simple, quick, and full of flavor. You’ll
- 4 boneless, skinless chicken thighs - 4 cloves garlic, finely minced - 1/2 cup unsalted butter, divided (1/4 cup for cooking, 1/4 cup for sauce) - 1 tablespoon extra virgin olive oil - 1 teaspoon dried thyme - 1 teaspoon smoked paprika - Salt and freshly ground black pepper - Fresh parsley, finely chopped - Lemon wedges Each ingredient plays a key role in making garlic butter chicken flavorful and simple. The chicken thighs give a juicy base, while garlic adds depth. Unsalted butter and olive oil create a rich sauce that brings everything together. Dried thyme and smoked paprika add a lovely aroma and flavor that you will enjoy. Salt and pepper are essential for seasoning. They enhance every bite. Fresh parsley brings color and a fresh taste to the dish. Lastly, lemon wedges brighten the flavors and add a zesty touch. For the complete recipe, check out the Garlic Butter Chicken Delight. It provides step-by-step instructions for creating this easy meal. 1. Start by seasoning the chicken thighs. Take 4 boneless, skinless chicken thighs. 2. Sprinkle smoked paprika, dried thyme, salt, and pepper on both sides. Make sure to cover them well. 3. Next, melt the butter and olive oil. In a large skillet, add 1/4 cup of unsalted butter with 1 tablespoon of extra virgin olive oil. 4. Heat over medium heat. Wait until the butter melts and bubbles gently. 1. Once the skillet is hot, add the seasoned chicken thighs. 2. Cook on one side for about 6-7 minutes. Look for a golden brown crust. 3. After that, flip the chicken. Cook for another 6-7 minutes. The chicken should reach 165°F (75°C) inside. 1. Remove the chicken from the skillet. Place it on a plate and cover it with foil to keep warm. 2. In the same skillet, lower the heat a bit. Add the remaining 1/4 cup of unsalted butter and 4 minced garlic cloves. 3. Sauté for 1-2 minutes. Stir often until the garlic smells good and turns lightly golden. 4. Be careful not to burn the garlic; burnt garlic tastes bad. 5. Return the cooked chicken to the skillet. Spoon the garlic butter sauce over the top. 6. Let it simmer for 1-2 minutes. This helps the chicken soak up the flavors. For the complete recipe, check out Garlic Butter Chicken Delight. - Achieving the right chicken temperature: Always check the internal temperature of your chicken. Use a meat thermometer to ensure it reaches 165°F (75°C). This step keeps your chicken juicy and safe to eat. Letting it rest for a few minutes after cooking helps keep the juices inside. - Avoiding burnt garlic: Garlic cooks quickly, so watch it closely. Add minced garlic to the pan only after the chicken is done. Stir it often for 1-2 minutes. If it turns dark, it may taste bitter. - Ideal pairings with sides: Garlic butter chicken goes well with rice, mashed potatoes, or steamed veggies. A crisp salad or roasted asparagus also complements the rich flavors. - Enhancing flavors with garnishes: Fresh parsley adds color and a hint of flavor. Lemon wedges brighten the dish. Squeeze them over the chicken just before serving for an extra kick. For the complete recipe, check out Garlic Butter Chicken Delight. This dish is simple, yet full of flavor! {{image_4}} You can switch up the protein in this dish. Salmon or shrimp works well. They absorb the garlic butter flavor nicely. If you're feeling adventurous, try tofu for a vegetarian option. You can also mix up the herbs and spices. Fresh basil or oregano can add a unique twist. Experiment with your favorites. Just remember, balance is key. Too much spice can overpower the dish. You have options when it comes to cooking methods. Oven-baked garlic butter chicken is a great choice. Preheat your oven to 400°F. Place the seasoned chicken in a baking dish. Pour the garlic butter sauce over it and bake for about 25-30 minutes. This method keeps the chicken juicy. Grilling is another fun idea. It gives the chicken a smoky flavor. Preheat your grill to medium-high heat. Grill the chicken for about 6-7 minutes on each side. Brush with garlic butter during cooking for extra taste. Both methods can create a delicious meal. Each offers a unique flavor profile and experience. For the full recipe, check out Garlic Butter Chicken Delight. After enjoying your garlic butter chicken, store any leftovers properly. Place the chicken in an airtight container. Refrigerate it within two hours of cooking. This keeps it fresh. It will last for up to four days in the fridge. You can also freeze the chicken if you want to save it longer. Wrap each piece tightly in plastic wrap. Then, place them in a freezer-safe bag. This helps prevent freezer burn. Frozen garlic butter chicken can last up to three months. When it’s time to enjoy your leftovers, reheating them well is key. You have several options for reheating: - Microwave: Place the chicken on a microwave-safe plate. Cover it with a damp paper towel. Heat on medium for 1-2 minutes. Check if it’s warm throughout. - Stovetop: Heat a skillet over medium-low heat. Add a splash of water or broth to prevent sticking. Place the chicken in the skillet. Cover and heat for about 5-7 minutes, flipping halfway. - Oven: Preheat your oven to 350°F (175°C). Place the chicken in a baking dish and cover it with foil. Heat for about 15-20 minutes, or until warmed through. Using these methods helps maintain flavor and texture. Enjoy your garlic butter chicken just like the first time! You can serve garlic butter chicken with many tasty sides. Here are some great options: - Steamed broccoli - Garlic mashed potatoes - Roasted carrots - Caesar salad - Rice pilaf - Simple green salad These sides pair well and add color to your plate. To spice up your garlic butter chicken, try these tips: - Add red pepper flakes while cooking. - Use spicy paprika instead of smoked. - Mix in some chopped jalapeños. - Serve with hot sauce on the side. These ideas add heat without losing flavor. Yes, you can use frozen chicken thighs. Just keep these steps in mind: - Thaw the chicken in the fridge overnight for best results. - If cooking from frozen, increase your cooking time by about 50%. - Ensure the chicken reaches 165°F (75°C) inside for safety. Cooking from frozen is handy when you need a quick meal. You can find the full recipe for Garlic Butter Chicken Delight in the recipe section above. It gives you step-by-step instructions to create this mouthwatering dish. This blog post covered the key ingredients for garlic butter chicken, including chicken thighs, garlic, and seasoning. I shared simple steps for preparation, cooking, and making a tasty garlic butter sauce. You learned tips to perfect your dish and storage options for leftovers. Now, you can easily customize the recipe to fit your taste. Try different proteins or spices for a change. Enjoy making and sharing this dish with friends and family!
Garlic Butter Chicken Flavorful and Simple Recipe
If you love simple, tasty meals, garlic butter chicken is for you. This easy recipe makes juicy chicken thighs burst with bold flavors. With just
- Fresh corn kernels (4 cups) - Zucchini (2 medium) - Onion (1 medium) - Garlic (2 cloves) - Vegetable broth (4 cups) - Heavy cream or coconut milk (1 cup) - Smoked paprika (1 teaspoon) - Dried thyme (1 teaspoon) - Salt and black pepper - Choosing the best corn: Look for ears with bright green husks. The kernels should be plump and milky when pressed. This tells you the corn is fresh and sweet. - Picking ripe zucchinis: Choose zucchinis that are firm and smooth. They should have a vibrant green color. Avoid any with blemishes or soft spots. - Importance of fresh herbs: Fresh herbs add vital flavor. Look for bright green leaves and a strong aroma. Basil and thyme are great choices for this chowder. Use these tips to ensure your chowder bursts with flavor. Fresh ingredients make all the difference! For the full recipe, check out the details above. 1. Start by heating the olive oil in a large pot over medium heat. 2. Add the chopped onion and sauté it for about 5 minutes. You want the onion soft and translucent. 3. Next, add the minced garlic to the pot. Cook for another minute, stirring often. The garlic should smell nice and golden. 4. Now, it's time to add the diced zucchini and corn kernels. Stir them well. Cook for another 3-5 minutes. The zucchini should soften, and the corn will start to smell sweet. 1. Pour in the vegetable broth. Increase the heat until it boils gently. 2. Once boiling, lower the heat and let it simmer uncovered for 15-20 minutes. The zucchini should be tender, and the flavors will blend well. 3. Use an immersion blender to blend half of the chowder. This gives it a creamy texture while keeping some chunks. If you don't have one, carefully transfer half to a blender, then return it to the pot. 1. Stir in the heavy cream or coconut milk. Add smoked paprika and dried thyme for extra flavor. 2. Season with salt and pepper to taste. Let it simmer for another 5-10 minutes. This ensures it heats through and the flavors meld. 3. Serve your chowder warm, garnished with fresh basil leaves for a lovely touch. This recipe is a perfect summer dish. You can find the full recipe in the article. Enjoy! - Best blending techniques: For a creamy chowder, use an immersion blender. Blend only half the chowder, keeping some chunks intact. This gives you a nice mix of creamy and chunky texture. If you don’t have an immersion blender, carefully transfer half to a regular blender, blend, and return it to the pot. - Avoiding overcooking veggies: Cook the zucchini until soft but not mushy. This keeps the flavor bright and fresh. Add the zucchini after the onion and garlic. Cook just until they are tender, about 3 to 5 minutes. - Suggestions for ingredient swaps: Try using fresh herbs like dill or cilantro instead of basil. They can add a fresh twist to your chowder. For a different taste, swap heavy cream with coconut milk. It offers a nice, creamy texture without dairy. - Incorporating spices for depth: Add a pinch of cayenne pepper for heat or some curry powder for warmth. Smoked paprika is great for a smoky flavor. Just a teaspoon will elevate your chowder instantly. - Prepping ingredients in advance: Chop your onion and zucchini the night before. Store them in the fridge for a quick start. You can also shuck the corn ahead of time, making cooking easier. - Using frozen corn and store-bought broth: Frozen corn works well in this recipe. It’s sweet and saves time. Store-bought broth can cut down on cooking time too. Just choose low-sodium options for better control over the salt. Using these tips, you can make your Summer Corn and Zucchini Chowder simple, tasty, and quick! For the complete preparation, check out the Full Recipe. {{image_4}} To make this chowder vegan-friendly, swap the heavy cream for coconut milk. This gives it a creamy texture without dairy. Use vegetable broth instead of chicken broth to keep it plant-based. Your taste buds won’t miss a thing! For gluten-free options, ensure your broth is gluten-free. Most vegetable broths work great. If you add any thickeners, check they are gluten-free as well. You can elevate the chowder by adding proteins like chicken or shrimp. Cook these proteins separately and add them during the last simmer. This adds richness and heartiness to the dish. Incorporating different herbs can change the flavor. Try fresh dill or cilantro for a unique twist. They add bright notes that enhance the chowder's freshness. Instead of zucchini, use butternut squash. It brings a sweet, nutty flavor and a creamy texture. This swap works well in the fall and adds a seasonal touch. You can also substitute other summer vegetables. Bell peppers or green beans can add crunch and color. Mixing in seasonal produce keeps the chowder exciting and fresh. For the full recipe, check out the Sunny Summer Corn and Zucchini Chowder. After enjoying your chowder, store any leftovers in the fridge. Use an airtight container. This keeps the chowder fresh for up to three days. If you want to save it longer, freeze it! Pour the cooled chowder into freezer-safe bags or containers. Be sure to leave some space for expansion. It can last up to three months in the freezer. When ready to eat, reheat the chowder carefully. The best way is on the stove over low heat. Stir often to avoid burning. You can also use a microwave. Pour the chowder into a microwave-safe bowl. Heat it in short increments, stirring in between. This method helps keep the texture smooth and flavors intact. How long can you keep chowder? In the fridge, it lasts about three days. If frozen, it's good for three months. Always check for spoilage. Look for changes in smell or color. If it smells sour or looks off, throw it away. Enjoy your Summer Corn and Zucchini Chowder knowing you can store it safely for later meals! For the full recipe, check the details above. Summer Corn and Zucchini Chowder is a creamy soup full of fresh flavors. It features sweet corn and tender zucchini, making it a perfect summer dish. You will enjoy the delightful mix of textures. The chowder has a rich taste, thanks to the heavy cream and spices. It is easy to make and can be a meal on its own or a side dish. Yes, you can make this chowder a day in advance. Just store it in the fridge after cooking. The flavors will deepen overnight, making it even tastier. When ready to serve, simply reheat it on the stove. Make sure to stir well as it warms up. This chowder pairs well with many sides. You can serve it with crusty bread for dipping. A light salad with fresh greens also works nicely. For a heartier meal, consider a grilled cheese sandwich. Each option complements the chowder's flavors. You can use frozen corn and zucchini if fresh ones aren’t available. They are easy to find and save time. Just make sure to thaw them before cooking. This will help retain the texture and flavor in your chowder. Using frozen veggies can still yield a tasty dish! We explored how to make a delicious summer corn and zucchini chowder, using simple ingredients like fresh corn, zucchini, and broth. I shared tips for selecting fresh produce and techniques to achieve the perfect texture. You can adjust flavors and make variations for dietary needs. Remember to store leftovers properly and know their shelf life. This chowder is not just easy to make; it's also versatile and tasty for any meal. Dive in and enjoy creating this comforting dish!
Summer Corn and Zucchini Chowder Simple and Tasty Dish
Summer is here, and there’s nothing better than a bowl of my Summer Corn and Zucchini Chowder! This dish is fresh, light, and bursting with
- Chicken and Seasoning Components - 4 boneless, skinless chicken breasts - 1 teaspoon smoked paprika - 1 teaspoon garlic powder - 1 teaspoon onion powder - Salt and black pepper to taste - Cheese and Bacon Ingredients - 1 cup shredded Monterey Jack cheese - 1 cup cooked and crumbled turkey bacon (or crispy turkey jerky for a crunch) - Optional Garnishes and Dressing - 1/2 cup honey mustard dressing - 2 tablespoons olive oil - Fresh parsley, chopped (for garnish) When I cook Alice Springs Chicken, I focus on fresh ingredients. Each component brings its own flavor to the dish. I love using boneless, skinless chicken breasts because they cook evenly. The spice blend adds depth and warmth. Smoked paprika gives a nice touch of smokiness. The Monterey Jack cheese melts into a creamy layer that pairs well with the savory turkey bacon. If I want extra flavor, I add crispy turkey jerky—it's a fun twist! The honey mustard dressing ties everything together with its sweetness and tang. For garnish, I choose fresh parsley. It adds color and a hint of freshness to the dish. Each ingredient plays a role in making this meal delicious and visually appealing. If you want the full recipe, check out the details. Preheating the Oven Start by preheating your oven to 375°F (190°C). This step is vital for even cooking. Seasoning the Chicken Breasts Mix smoked paprika, garlic powder, onion powder, salt, and black pepper in a bowl. Rub this mix all over the chicken. Make sure to cover every part. This creates a tasty flavor that will shine through. Searing the Chicken Heat olive oil in a large oven-safe skillet over medium-high heat. When the oil is hot, add the seasoned chicken breasts. Sear them for 5 to 7 minutes on each side. Look for a golden brown crust. This step locks in the juices. Adding Honey Mustard Dressing, Bacon, and Cheese Once seared, take the skillet off the heat. Drizzle honey mustard dressing over each chicken breast. Make sure each piece is well-coated. Next, sprinkle crumbled turkey bacon on top. Finish by adding shredded Monterey Jack cheese, covering it all. Transfer to Oven and Cooking Time Carefully move the skillet to your preheated oven. Bake for 20 to 25 minutes. The chicken should reach an internal temperature of 165°F (74°C). Checking for Doneness After baking, check the chicken for doneness. Look for melted cheese and golden edges. Let the chicken rest for a few minutes before serving. This helps keep it juicy. For the full recipe, check the section above. Enjoy your delicious Alice Springs chicken! To cook chicken evenly, use a meat thermometer. It helps check the chicken's internal heat. The ideal temperature is 165°F (74°C). Sear the chicken first for a nice crust. This step seals in the juices. Use an oven-safe skillet for better heat control. This allows you to move directly from the stove to the oven with ease. Add herbs like rosemary or thyme for extra taste. These herbs pair well with the honey mustard. For a kick, sprinkle in some cayenne pepper. You can also use fresh garlic for a bold flavor. Serve Alice Springs chicken with a side of crisp greens or roasted veggies. The freshness brightens the dish and balances the rich cheese. For presentation, serve the chicken on a large platter. Drizzle extra honey mustard dressing over the top. This adds extra flavor and looks appealing. Garnish with chopped parsley for a pop of color. Great side dishes include mashed potatoes or a light salad. These additions complete your meal beautifully. For a fun twist, serve with sweet potato fries for a crunchy contrast. {{image_4}} Alternative Cheeses You can switch up the cheese to change the taste. Try gouda or cheddar. Both bring a nice melt and flavor. If you want a lighter option, use low-fat cheese. It still melts well and keeps the dish tasty. Different Sauces or Dressings While honey mustard is classic, you could use barbecue sauce. It adds a smoky twist. Ranch dressing also works! It gives a creamy touch that many love. Feel free to mix and match to find your favorite. Grilling vs. Baking Grilling gives a nice smoky flavor to the chicken. It cooks quickly and adds lovely grill marks. Just be sure to keep an eye on it to prevent drying out. Baking is easier and hands-off. It lets the cheese melt evenly over the chicken. Using a Slow Cooker Using a slow cooker is great for busy days. Just season the chicken, add the sauce, and let it cook. It will be tender and flavorful. You can even add cheese during the last hour of cooking for that gooey goodness. Gluten-Free Options To make this dish gluten-free, check your sauces. Many honey mustard dressings contain gluten. Look for a gluten-free brand or make your own. Using gluten-free breadcrumbs can also help if you want a crunchy topping. Low-Carb Alternatives If you're watching carbs, skip the honey mustard dressing. Instead, use olive oil and spices for flavor. You can serve the chicken with a side of veggies instead of rice or bread. This keeps the meal light and healthy. You can find the full recipe [here](#). - Refrigeration Tips: Store leftover Alice Springs Chicken in an airtight container. This keeps it fresh and tasty. Make sure to refrigerate it within two hours of cooking. The chicken will last for about 3 to 4 days in the fridge. To prevent drying, cover it well with plastic wrap or foil. - Freezing Guidelines: You can freeze Alice Springs Chicken for longer storage. Place the cooled chicken in freezer-safe bags, removing as much air as possible. Label the bags with the date. The chicken can stay frozen for up to 3 months. For best quality, eat it sooner. - Best Methods for Reheating: The best way to reheat Alice Springs Chicken is in the oven. Preheat your oven to 350°F (175°C). Place the chicken in an oven-safe dish and cover it with foil. Heat for about 20 minutes or until it reaches 165°F (74°C). You can also use a microwave for quick reheating, but it may dry out the chicken. - Shelf Life of Leftovers: Leftover Alice Springs Chicken stays good for 3 to 4 days in the fridge. If frozen, it should be used within 3 months. Always check for any signs of spoilage before eating. Enjoy your meal with confidence! For the full recipe, check out the earlier section. Alice Springs Chicken is a tasty dish made with chicken, cheese, and bacon. Its roots trace back to the restaurant chain Outback Steakhouse. They created this dish to showcase bold flavors and a unique blend of ingredients. Many restaurants offer their own spin on it. Some use different cheeses or add extra spices for a twist. Yes, you can prepare Alice Springs Chicken ahead. This helps save time on busy nights. To prep, season the chicken and store it in the fridge for up to one day. You can also mix the spices and store them in a small container. The turkey bacon can be cooked in advance, too. Just keep it in the fridge until you are ready to bake. Great side dishes include steamed veggies or a fresh salad. Roasted potatoes also pair well, adding a nice crunch. If you want something light, try a simple fruit salad. For drinks, opt for a chilled white wine or a refreshing iced tea. Each of these choices will enhance your dining experience and complement the flavors in the dish. In this blog post, we covered how to make Alice Springs Chicken. You learned about the key ingredients like chicken, cheese, and bacon. I explained how to prepare, cook, and bake the dish for the best flavor. I shared tips for even cooking and tasty enhancements. You also found variations and storage info, plus answers to common questions. With this knowledge, you can create a delicious meal that impresses everyone. Enjoy your cooking journey and have fun experimenting!
Savory Alice Springs Chicken Easy Dinner Recipe
Looking for a simple yet delicious dish for dinner? Try my easy Alice Springs Chicken recipe! With tender chicken, crispy bacon, and melty cheese drizzled
To make tasty air fryer chicken breasts, you need these main ingredients: - 4 boneless, skinless chicken breasts - 2 tablespoons olive oil - 1 teaspoon garlic powder - 1 teaspoon onion powder - 1 teaspoon smoked paprika - 1 teaspoon Italian seasoning - Salt and black pepper, to taste - 1/2 teaspoon cayenne pepper (optional, for a spicy kick) - Fresh parsley, chopped (for a vibrant garnish) These ingredients work together to create juicy, flavorful chicken that cooks quickly. I love using a mix of spices for air fryer chicken. The garlic powder and onion powder give a nice base flavor. Smoked paprika adds depth and a hint of smokiness. Italian seasoning brings in herbs that boost the taste. If you want heat, cayenne pepper is a great choice. Just remember to adjust salt and black pepper to your liking. If you have allergies or follow a special diet, here are some easy swaps: - Use avocado oil instead of olive oil for a different flavor. - Swap garlic and onion powders with fresh minced garlic and onion if you prefer fresh ingredients. - For a gluten-free option, all spices used are naturally gluten-free. - If you want a milder dish, skip the cayenne pepper altogether. These substitutions keep the dish safe and tasty for everyone. Check the [Full Recipe] for all details on making this dish perfectly! First, set your air fryer to 380°F (190°C). Preheating is key for crispy chicken. Let it run for about 5 minutes. This step warms up the air fryer and readies it for cooking. Next, take your chicken breasts and dry them with paper towels. This removes extra moisture. A dry surface helps the chicken become crispy. In a bowl, mix the following spices: - 1 teaspoon garlic powder - 1 teaspoon onion powder - 1 teaspoon smoked paprika - 1 teaspoon Italian seasoning - Salt and black pepper, to taste - 1/2 teaspoon cayenne pepper (optional for heat) Rub the chicken with 2 tablespoons of olive oil. This adds flavor and keeps it moist. Then, sprinkle your spice blend on both sides of the chicken. Make sure to coat it well for the best taste. Now, place the chicken breasts in the air fryer basket. Arrange them in a single layer. This allows hot air to circulate for even cooking. Cook the chicken for 12-15 minutes. Remember to flip them halfway through. The chicken is ready when the inside reaches 165°F (74°C). The outside should be golden and crispy. After cooking, let the chicken rest for 5 minutes. This helps keep the juices inside. Finally, garnish with fresh parsley before serving. For the full recipe, check the earlier section. Enjoy your delicious air fryer chicken! To get that crispy outside, dry your chicken breasts well. Use paper towels to remove any moisture. A dry surface helps the spices stick. It also allows for a nice sear in the air fryer. Preheat your air fryer to 380°F (190°C) for five minutes. This step is key to crispiness. When you place the chicken in the basket, make sure they are not touching. This allows hot air to circulate around each piece. Flip them halfway through cooking for an even crisp. Seasoning is essential for tasty chicken. Use a mix of garlic powder, onion powder, and smoked paprika. This combo gives great depth to the flavor. Don’t forget salt and black pepper to enhance everything. If you like heat, add cayenne pepper to your mix. Rub olive oil over the chicken before seasoning. This helps the spices stick. Cover all sides of the chicken for a balanced flavor. Let the chicken sit for a few minutes after seasoning. This allows the flavors to soak in before cooking. One common mistake is not preheating the air fryer. Skipping this step can result in uneven cooking. Another mistake is overcrowding the basket. If the chicken pieces touch, they won’t crisp up well. Always flip the chicken halfway through cooking time. This ensures both sides get that golden crust. Lastly, don’t skip resting the chicken after cooking. Resting helps keep it juicy and tender. For more details, check out the Full Recipe for crispy air fryer chicken breasts. {{image_4}} For a fresh twist, try an herb and citrus marinade. This will add bright flavors to your chicken. To make this marinade, combine: - 1/4 cup olive oil - Zest of 1 lemon - Juice of 1 lemon - 1 tablespoon chopped fresh rosemary - 1 tablespoon chopped fresh thyme - Salt and pepper to taste Mix the ingredients well. Marinate the chicken breasts for at least 30 minutes. This allows the flavors to soak in. Then, follow the cooking steps from the recipe. You will enjoy a bright, zesty flavor. If you love spice, try the spicy buffalo style. This will give your chicken a nice kick. Here's how to do it: - Replace the olive oil with 1/4 cup hot sauce. - Add 1 tablespoon of melted butter to the hot sauce. - Coat the chicken breasts in this mixture before cooking. Cook as directed in the recipe. When done, serve with celery sticks and blue cheese dressing for a classic buffalo meal. A sweet and savory glaze can add a unique flavor to your chicken. Here are a couple of ideas: - Honey Garlic Glaze: Mix 1/4 cup honey with 2 tablespoons soy sauce and 2 minced garlic cloves. Brush this mixture on the chicken before cooking. - Maple Mustard Glaze: Combine 1/4 cup maple syrup with 2 tablespoons Dijon mustard. Apply this glaze to the chicken before cooking for a sweet and tangy flavor. These glazes will make your chicken juicy and delicious. Enjoy trying out these variations! For the full recipe, refer back to the earlier section. To store leftover chicken breasts, first, let them cool down. Placing hot food in a container can create steam and make the chicken soggy. Once cooled, wrap the chicken tightly in plastic wrap or foil. You can also use an airtight container. Store the wrapped chicken in the fridge. It’s best to eat it within 3 to 4 days for the best flavor and safety. To reheat your chicken and keep it juicy, use the air fryer again. Set it to 350°F (175°C) and heat for about 5 to 7 minutes. Check the chicken often to avoid overcooking. You can also use a microwave, but this may dry out the chicken. Place a damp paper towel over the chicken in the microwave to help keep it moist. If you want to keep chicken for longer, you can freeze it. Wrap the chicken tightly in plastic wrap and then in foil. You can also use a freezer bag. Label the bag with the date. Frozen chicken is best used within 3 months. To thaw, move the chicken to the fridge for a day. If you need it faster, use the defrost setting on your microwave. Make sure to cook it right after thawing to ensure safety. For the full recipe, check out the Crispy Air Fryer Chicken Breasts section! You cook chicken breasts in an air fryer for 12 to 15 minutes. The time may vary based on the size of the breasts. Flip them halfway through to ensure even cooking. Always check that they reach an internal temperature of 165°F. Yes, you can use frozen chicken breasts in the air fryer. However, cooking times will increase. Plan on cooking them for about 20 to 25 minutes. Check the internal temperature to ensure it reaches 165°F. The internal temperature of chicken breasts should be 165°F. This ensures they are safe to eat while remaining juicy. Use a meat thermometer for accurate results. Always let the chicken rest after cooking for the best flavor and texture. For more tips, check out the Full Recipe. Cooking air fryer chicken breasts is easy and fun. We covered key ingredients, perfect seasonings, and helpful substitutions. I shared step-by-step instructions to ensure juicy results. You learned tips for crispy texture and common mistakes to avoid. We explored tasty variations like herb marinades and spicy options. Finally, proper storage and reheating tips keep leftovers fresh. In short, air frying chicken breasts gives you tasty meals quickly. Enjoy experimenting to find your favorite flavors. Happy cooking!
The Best Air Fryer Chicken Breasts Quick and Tasty Recipe
Ready to make the best air fryer chicken breasts? This quick and tasty recipe will change your dinner game forever! I’ll show you how to
To make Grandma’s 2-Step Tomato Pie, gather these key ingredients: - 1 pre-made pie crust - 4 medium ripe tomatoes, sliced - 1 cup shredded mozzarella cheese - 1 cup mayonnaise - 1/2 cup grated Parmesan cheese - 1 tablespoon fresh basil, finely chopped - 1 teaspoon garlic powder - Salt and freshly ground black pepper to taste These ingredients create a delicious blend of flavors. The ripe tomatoes add freshness, while the cheeses give richness. Mayonnaise acts as a creamy binder, making each bite decadent. You can customize your pie with these optional ingredients: - 1/2 cup cooked and crumbled bacon - 1/2 cup chopped spinach or kale - 1 teaspoon dried oregano or thyme - Sliced olives for a briny kick These additions can enhance your pie’s taste. For instance, bacon adds a savory crunch. Fresh herbs can make the pie bright and aromatic. Feel free to mix and match based on your taste preferences. When serving your tomato pie, consider these pairings: - A crisp green salad with vinaigrette - Garlic bread or crusty baguette - A glass of chilled white wine These pairings complement the pie's rich flavors. A salad adds freshness and balance, while bread can soak up any delicious juices. Enjoy your meal with family and friends. For the complete recipe, check out the Full Recipe. To start, preheat your oven to 375°F (190°C). This makes sure your pie bakes evenly. Grab the pre-made pie crust and place it gently in your pie dish. Make sure to press it against the edges. Use a fork to poke holes in the bottom. This prevents the crust from bubbling up while it bakes. Now, let's layer the tomatoes and cheese. First, take half of the sliced tomatoes and spread them evenly in the crust. Sprinkle salt and pepper over the tomatoes. This step brings out their best flavor. In a bowl, mix mayonnaise, mozzarella, Parmesan, garlic powder, and basil. Stir until it’s creamy. Spread half of this mixture over the tomatoes. Add the rest of the sliced tomatoes on top. Finally, use the remaining cheese mixture to cover everything. Smooth it out with a spatula. Place your pie in the preheated oven. Bake it for about 30-35 minutes. Look for a golden brown top that bubbles. This means it’s ready! After baking, take it out and let it cool for a few minutes. This cooling time helps with slicing. Once cool, cut the pie into wedges and serve warm. Enjoy this tasty dish! Choosing the right tomatoes makes all the difference in your pie. Look for medium ripe tomatoes. They should feel firm but give slightly when you press them. The skin should be smooth and shiny. Avoid tomatoes that are bruised or have dark spots. Heirloom or vine-ripened varieties work great. They add rich flavor and sweetness to your dish. To make a perfect pie, avoid some common pitfalls. First, do not skip the steps for preparing the crust. Poking holes helps it bake evenly. Next, layer the tomatoes properly. Do not pile them high; this can lead to sogginess. Finally, keep an eye on the baking time. Every oven is different, so check for that golden brown top. Fresh herbs and spices truly elevate your tomato pie. Use basil for a classic touch. It pairs well with tomatoes and adds a fresh taste. You can also try oregano for a warm flavor. Garlic powder gives a nice kick, but fresh garlic adds depth. Just remember, use these in moderation. You want the tomato flavor to shine through. For more tips, check out the Full Recipe to see how these flavors come alive! {{image_4}} You can make Grandma’s 2-Step Tomato Pie even better with more veggies. Try adding spinach, zucchini, or bell peppers. Chop these into small pieces and layer them with the tomatoes. They add color and flavor. You can also use mushrooms for a nice earthy taste. This is a great way to sneak in some healthy greens. If you need a gluten-free option, don’t worry! You can find pre-made gluten-free pie crusts at most stores. Just check the label to ensure it meets your needs. You can also make your own crust using almond flour or a blend of gluten-free flours. Both options work well and keep the pie delightful. For a heartier pie, consider adding proteins like bacon or chicken. If you choose bacon, cook it first until crispy, then crumble it over the tomato layer. If you prefer chicken, use cooked, shredded chicken. Mix it into the cheese mixture for extra flavor and texture. These additions turn the pie into a filling meal. For the complete cooking process, check the Full Recipe. To keep your leftover tomato pie fresh, let it cool first. Then, cover it tightly with plastic wrap or foil. You can also place it in an airtight container. This helps lock in the flavors and keep it moist. Store it in the fridge for up to three days. Remember to label it with the date, so you know when to enjoy it again. When you're ready to eat the leftover pie, preheat your oven to 350°F (175°C). Place the pie on a baking sheet and cover it with foil. This helps it warm evenly without drying out. Bake for 15-20 minutes or until heated through. If you want a crispy crust, uncover it for the last five minutes. Enjoy each warm slice like it's fresh from the oven! If you want to save the pie for later, freezing is a great option. First, let the pie cool completely. Wrap it tightly in plastic wrap, then cover it with foil. This double layer helps prevent freezer burn. You can freeze it for up to three months. When you're ready to eat it, thaw it in the fridge overnight before reheating. Enjoy Grandma’s tomato pie anytime! For the full recipe, check out the details above. Grandma's 2-Step Tomato Pie lasts about 3 to 5 days in the refrigerator. Store it in an airtight container to keep it fresh. Make sure it cools completely before you cover it. This helps avoid extra moisture that can make the pie soggy. Yes, you can make this pie ahead of time! Prepare the pie up to the baking step. Cover it well and keep it in the fridge for a day or two. When you’re ready, bake it straight from the fridge. Just add a few extra minutes to the baking time to ensure it heats through. This tomato pie goes great with many sides! Here are some tasty options: - A fresh garden salad with light dressing - Roasted vegetables for a warm touch - Garlic bread for a crunchy contrast - Coleslaw for a cool, crispy side These sides will balance the rich flavors of the pie very well. Enjoy your meal! In this blog post, we explored Grandma’s 2-step tomato pie recipe. You learned about key and optional ingredients, plus how to customize flavors. I gave detailed steps for making the pie, along with tips for choosing fresh tomatoes and avoiding common mistakes. We discussed variations for diet needs and how to store leftovers. Making this dish is simple and rewarding. Enjoy experimenting with flavors to make it your own! Happy cooking!
Savory Grandma’s 2-Step Tomato Pie Recipe Delight
Welcome to my kitchen, where I’ll share Grandma’s 2-Step Tomato Pie recipe, a true comfort food! This dish combines ripe tomatoes, cheese, and herbs for
To make Baked Crunchy Hot Honey Chicken, you need a few simple ingredients. Here’s what you’ll need: - 4 boneless, skinless chicken thighs - 1 cup buttermilk - 1 cup all-purpose flour - 1/2 cup cornmeal - 1 teaspoon smoked paprika - 1 teaspoon garlic powder - 1 teaspoon onion powder - 1/2 teaspoon cayenne pepper (adjust this for more or less spice) - 1/2 teaspoon salt - 1/2 teaspoon black pepper - 1/4 cup hot honey (store-bought or homemade) - Fresh parsley, finely chopped (for garnish) These ingredients come together to create a dish that is crispy, sweet, and spicy. The buttermilk keeps the chicken juicy, while the flour and cornmeal give it a perfect crunch. The spices add warmth and depth, and the hot honey brings everything together with a sweet kick. For the full recipe, just follow along with the steps in the next section! Marinate the Chicken Start by placing the chicken thighs in a large bowl. Pour in the buttermilk, covering the chicken entirely. Cover the bowl with plastic wrap. Let it chill in the fridge for at least 1 hour. For even better flavor, marinate overnight if you can. Prepare the Coating In another bowl, mix the flour, cornmeal, and spices. Add smoked paprika, garlic powder, onion powder, cayenne pepper, salt, and black pepper. Whisk them together well. This mix gives your chicken a yummy taste and nice crunch. Preheat the Oven Set your oven to 425°F (220°C). Line a baking sheet with parchment paper. This step prevents sticking and makes cleanup easy. Coat the Chicken Take the marinated chicken out of the buttermilk. Let any extra buttermilk drip off. Now, dredge each thigh in the flour mix. Press down to coat well. Arrange the coated chicken on your baking sheet. Bake the Chicken Lightly spray the chicken with cooking spray or drizzle some olive oil on top. This helps it get extra crunchy. Bake for 25 to 30 minutes. Your chicken is ready when it is golden brown and reaches 165°F (75°C) inside. Finish with Hot Honey When the chicken comes out of the oven, drizzle hot honey over each piece. The heat from the chicken makes the honey melt just a bit, adding more flavor. For the full recipe, check out the instructions above! To get that crunchy texture, focus on your coating. Start by pressing the flour mixture firmly onto the chicken. This helps the coating stick well. Use a light mist of cooking spray or a drizzle of olive oil before baking. This adds a crisp layer without frying the chicken. You want the coating to be golden and crispy, not soggy. For extra flavor, play with the spices in the mix. If you want more heat, add more cayenne pepper. You can also try adding some dried herbs like oregano or thyme for a different taste. A bit of garlic powder can also brighten the dish. Adjust the spices based on your taste. Don’t be afraid to experiment! Make your dish look great by arranging the chicken nicely on a platter. Drizzle some hot honey on top for a shiny effect. Scatter freshly chopped parsley around the chicken for color. Serve it with sides like coleslaw or fresh veggies. This adds a nice crunch and balances the meal. For more ideas, check the Full Recipe. {{image_4}} If you don't have buttermilk, use plain yogurt or milk mixed with lemon juice. This will give you a similar tangy flavor. For all-purpose flour, you can swap it with whole wheat flour or almond flour. These options will change the taste slightly but still work well in this recipe. You can easily change the spice level. If you want it milder, cut the cayenne pepper in half or leave it out. For a spicier kick, add more cayenne or try using hot paprika instead. Taste the coating mix before you coat the chicken to find the right heat for you. If you prefer a faster method, try using an air fryer. Set it to 400°F (200°C) and cook the chicken for about 20 minutes. For stovetop cooking, heat oil in a skillet over medium heat. Cook each piece for 5-7 minutes per side until golden brown. Both methods yield crispy chicken, just like the oven! Find the Full Recipe to explore these variations and make this dish your own! To keep your Baked Crunchy Hot Honey Chicken fresh, place it in an airtight container. Let the chicken cool before sealing. Store it in the fridge for up to three days. Make sure to keep it away from strong-smelling foods to avoid flavor transfer. To reheat your chicken and keep it crunchy, use the oven. Preheat your oven to 375°F (190°C). Place the chicken on a baking sheet. Heat for about 10-15 minutes until warm and crispy. Avoid using the microwave, as it can make the chicken soggy. If you want to freeze the chicken, let it cool completely. Wrap each piece tightly in plastic wrap, then place them in a freezer bag. This way, it will last for up to three months. To thaw, move the chicken to the fridge overnight. Reheat it in the oven for the best crunch. For more detailed instructions, check the Full Recipe. The best way to marinate chicken is to use buttermilk. It keeps the meat juicy and adds flavor. Aim to marinate for at least 1 hour. For the best taste, let it sit overnight. This longer time allows the chicken to absorb more flavor. Always cover your bowl with plastic wrap to keep it fresh. Yes, you can use chicken breasts, but thighs are better. Thighs have more fat, which keeps them moist. They also have a richer flavor. Chicken breasts can dry out quicker when cooked. If you use breasts, check them often to avoid overcooking. Making homemade hot honey is easy! Here’s a quick recipe: - Ingredients: - 1 cup honey - 1-2 tablespoons of your favorite hot sauce (adjust to your spice level) - Instructions: 1. In a small saucepan, mix honey and hot sauce. 2. Heat over low heat until it's warm. 3. Stir well and remove from heat. 4. Let it cool before using. This hot honey adds a sweet and spicy kick to your dish. For sides, you have many tasty options. Here are some ideas: - Coleslaw for crunch and creaminess. - Roasted vegetables for a healthy touch. - Mashed potatoes to soak up the hot honey. - Rice to balance the flavors. - Cornbread for a sweet side. These sides complement the chicken well and make a complete meal. In this post, we covered the key steps to make Baked Crunchy Hot Honey Chicken. You learned about the best ingredients, how to prepare and bake the chicken, and tips for achieving crunch. We also explored variations and storage ideas. Baking this dish is simple yet rewarding. With just a few tweaks, you can make it your own. Enjoy your tasty creation and the smiles it brings!
Baked Crunchy Hot Honey Chicken Flavorful Delight
Looking to spice up your dinner routine? Discover the joy of Baked Crunchy Hot Honey Chicken! This dish brings together juicy chicken, a crispy coating,
For a tasty cheese and tomato quiche, you need: - 1 pre-made pie crust (9-inch) - 1 cup cherry tomatoes, halved - 1 cup shredded mozzarella cheese - 1 cup crumbled feta cheese - 4 large eggs - 1 cup heavy cream - 1 tablespoon fresh basil, chopped - 1 teaspoon dried oregano - Salt and pepper to taste - 1 tablespoon olive oil These ingredients create a rich and creamy quiche. The pie crust holds everything together, while the cheeses add depth. The cherry tomatoes bring freshness, and the herbs tie it all together. You can add more flavors to your quiche with these optional ingredients: - Spinach or kale for added greens - Cooked bacon or ham for a meaty twist - Different cheeses like cheddar or goat cheese - Sun-dried tomatoes for a tangy kick Feel free to mix and match these options. Each addition will give your quiche a unique taste. You can make it your own! If you have dietary needs, here are some great alternatives: - Use a gluten-free pie crust if you're gluten-free. - Swap heavy cream for coconut milk to make it lighter. - Replace eggs with a flaxseed mix for a vegan option. These swaps make the quiche more inclusive. You can enjoy a tasty meal no matter your diet. Remember, cooking should be fun and flexible! For the complete recipe, check out the Full Recipe section. Start by preheating your oven to 375°F (190°C). This helps the crust bake evenly. Take your pre-made pie crust and place it in a pie dish. Use a fork to poke several small holes in the bottom. This prevents bubbling while baking. Bake it for about 10 minutes until it turns light golden. Remove the crust and let it cool on a wire rack. Next, grab a medium skillet and heat 1 tablespoon of olive oil over medium heat. Add 1 cup of halved cherry tomatoes and sauté them for about 5 minutes. You want them to soften and release their juices. Season with salt, pepper, and 1 teaspoon of dried oregano. Once done, remove the skillet from heat and let the tomatoes cool. In a large mixing bowl, whisk together 4 large eggs and 1 cup of heavy cream. Mix until fully combined and frothy. Add in 1 tablespoon of chopped fresh basil, 1 cup of shredded mozzarella cheese, and 1 cup of crumbled feta cheese. Stir gently to mix all the ingredients evenly. Once the tomatoes have cooled, gently fold them into the egg and cheese mixture. Be careful not to break the tomatoes too much. Pour this mixture into your pre-baked pie crust. Spread it evenly with a spatula. Place the quiche in the preheated oven and bake for 30 to 35 minutes. It’s done when the center is set and the top is light golden. After baking, remove the quiche from the oven. Let it cool for about 10 minutes. This helps it set and makes slicing easier. Serve individual slices on plates and garnish with fresh basil leaves. Enjoy your cheesy tomato dream quiche! For the complete recipe, refer to the Full Recipe section. To get a great quiche crust, use a pre-made pie crust. This saves time and effort. Poke holes in the bottom with a fork. This helps steam escape while baking. Bake it for about 10 minutes at 375°F (190°C). The goal is a light golden color. Let it cool before you add the filling. A well-cooked crust keeps your quiche from getting soggy. For extra flavor, add fresh herbs like basil or thyme. These herbs brighten each bite. You can also mix in garlic or onion for a savory kick. Use salt and pepper to taste. Don't forget to season your tomatoes when sautéing them. This step adds depth to your dish. A little sprinkle of cheese on top before baking creates a nice crust. Sauté your tomatoes in olive oil over medium heat. This brings out their natural sweetness. Cook them for about 5 minutes, just until they soften. Season them with salt, pepper, and dried oregano. This adds a lovely taste. Let the tomatoes cool before folding them into your egg mixture. This keeps the egg from cooking too fast. Remember, gentle mixing is key to keeping the tomatoes whole! {{image_4}} You can add spinach to your quiche for a fresh twist. Spinach blends well with cheese and tomatoes. To do this, simply wash and chop about 1 cup of fresh spinach. Sauté it briefly in a little olive oil until it wilts. Mix the spinach in with the egg and cheese mixture. This adds color and nutrients. Plus, it makes the quiche more filling. Changing the cheese can change the taste a lot. You can use sharp cheddar for a bold flavor or creamy goat cheese for a tangy twist. Mixing cheeses, like mozzarella and Parmesan, gives a nice texture. Try using a mix! Each cheese brings its own taste, making your quiche special. Just keep the total cheese amount to about 2 cups for balance. If you want a vegan quiche, swap eggs and cream for tofu and almond milk. Blend firm tofu until smooth. Add spices like turmeric and nutritional yeast for flavor. For a gluten-free crust, use a mixture of almond flour and coconut flour. This way, everyone can enjoy a delicious quiche. You can still use tomatoes and veggies for a tasty filling. Check out the Full Recipe for more guidance! After enjoying your quiche, store leftovers in the fridge. Place it in an airtight container. This keeps it fresh for up to three days. If you have sliced pieces, cover them tightly with plastic wrap. This helps maintain moisture and flavor. For longer storage, freeze your quiche. First, let it cool completely. Then, wrap it tightly in plastic wrap. Follow this with aluminum foil for extra protection. You can freeze quiche for up to three months. When ready to eat, thaw it in the fridge overnight. Reheating quiche is easy. Preheat your oven to 350°F (175°C). Place the quiche on a baking sheet. Heat it for about 20-25 minutes. This warms it through without making it soggy. You can also microwave slices for quick meals, but the oven keeps the crust crispy. Enjoy your Cheese and Tomato Quiche warm! Bake your Cheese and Tomato Quiche for 30 to 35 minutes. The center should be set, and the top should look light golden. This ensures a fluffy and tasty quiche. Yes, you can use a homemade crust! Just make sure it fits your pie dish well. A homemade crust can add a personal touch and extra flavor to your quiche. Serve your quiche with a fresh green salad. A light vinaigrette pairs well. You can also add some fruit for a sweet touch. Check the center of the quiche. It should be firm and not jiggly. A knife inserted into the center should come out clean. Cheese and Tomato Quiche offers protein from eggs and cheese. Tomatoes add vitamins A and C. Using fresh herbs can boost flavor and nutrients too. Absolutely! You can prepare the quiche a day in advance. Store it in the fridge. Just reheat before serving for the best taste. Check out the Full Recipe for more details. Now you know how to make a tasty cheese and tomato quiche. We covered key ingredients and alternatives for special diets. You learned step-by-step instructions to create the perfect quiche. Tips helped you enhance flavors and achieve a great crust. Variations mean you can try new flavors like spinach or vegan options. Proper storage and reheating keep leftovers delicious. Enjoy your quiche-making journey and share it with friends!
Cheese and Tomato Quiche Tasty and Simple Recipe
Looking for a quick and tasty dish? This Cheese and Tomato Quiche recipe is just for you. It combines fresh tomatoes and melty cheese into
To make a delicious eggplant tomato pie, you'll need the following ingredients: - 2 medium eggplants, cut into 1/4-inch thick rounds - 3 medium ripe tomatoes, sliced evenly - 1 large onion, thinly sliced - 3 cloves garlic, minced finely - 1 teaspoon dried oregano - 1 teaspoon fresh basil, chopped (or 1/2 teaspoon dried) - 1/2 teaspoon red pepper flakes (optional, for an extra kick) - 1 cup creamy ricotta cheese - 1 cup shredded mozzarella cheese - 1/2 cup grated Parmesan cheese - 1 pre-made pie crust (store-bought or homemade) - Olive oil for drizzling - Salt and freshly cracked black pepper to taste Nutritional information per serving (based on 6 servings) is approximately: - Calories: 300 - Fat: 20g - Carbohydrates: 25g - Protein: 10g For the best quality, choose ripe, firm eggplants and juicy tomatoes. Look for cheeses that are fresh and creamy. If you're out of ricotta, cottage cheese works well as a substitute. You can also swap the pie crust for a gluten-free option or make your own from scratch for a personal touch. The freshness of your herbs can greatly enhance the flavor, so opt for fresh basil when you can. If you want to add some extra flavors, consider using smoked mozzarella or adding a sprinkle of fresh herbs on top before serving. Enjoy creating this savory dish! For the complete cooking steps, check the Full Recipe. To make the Eggplant Tomato Pie, start by prepping your ingredients. Here’s how: 1. Preheat the Oven: Set your oven to 375°F (190°C) to get it ready for baking. 2. Sauté Onions and Garlic: In a large skillet, drizzle olive oil and heat it over medium heat. Add thinly sliced onions and minced garlic. Sauté for about 5 minutes until the onions are soft and clear. 3. Cook the Eggplant: Add the eggplant rounds to the skillet. Cook for 5-7 minutes, stirring until they are tender and lightly golden. Season with salt, black pepper, dried oregano, and fresh basil. If you like spice, add red pepper flakes. 4. Cool the Mixture: Once cooked, remove the skillet from the heat and let the vegetable mixture cool a bit. 5. Prepare the Pie Crust: Roll out the pie crust to fit your pie dish. Press it in gently and prick the bottom with a fork to prevent bubbling. Now, for layering the pie: 6. Spread Ricotta Cheese: Evenly spread the ricotta cheese across the bottom of the crust. 7. Layer Ingredients: Start with half of the cooked eggplant mixture, followed by half of the sliced tomatoes. Repeat with the rest of the eggplant and tomatoes for a great look. 8. Add Cheese: Sprinkle the shredded mozzarella and grated Parmesan cheese on top of the layered veggies. This makes a deliciously cheesy crust. 9. Final Touches: Drizzle a little olive oil over the cheese. Add a pinch of salt and black pepper for extra flavor. Now, it’s time to bake: 1. Bake the Pie: Place your pie in the preheated oven. Bake for 30-35 minutes. Look for the cheese to be bubbly and golden brown. 2. Cool Before Serving: When done, take the pie out and let it cool for about 10 minutes. This helps the flavors settle and makes slicing easier. Now you have a beautiful Eggplant Tomato Pie! For the complete instructions, check the Full Recipe. Enjoy your cooking! When you make Eggplant Tomato Pie, a few common mistakes can happen. One big error is not seasoning enough. Salt and pepper bring out the flavors of the vegetables. Taste as you go to get it right. Another mistake is overcooking the vegetables. If you cook them too long, they can become mushy. Aim for a tender texture while keeping some bite. To boost the taste of your pie, think about adding herbs and spices. Fresh thyme and rosemary add a nice twist. If you want a bit of heat, try smoked paprika or cayenne pepper. They can change the whole flavor. For side dishes, a fresh salad works well. A side of garlic bread is also a hit. Both add a nice touch to the meal. You can even serve it with a light soup for a complete dinner. It’s all about balancing flavors. For more details, check out the Full Recipe for Eggplant Tomato Pie. {{image_4}} You can easily adapt this eggplant tomato pie for different diets. To make it vegan, swap out the cheese for plant-based options. There are many great vegan ricotta and mozzarella products available. For a gluten-free version, use a gluten-free pie crust. Many brands offer ready-made options that taste great. If you want to reduce carbs, consider using a cauliflower crust. You can also make a crust from almond flour. This keeps it crunchy while lowering the carb count. Both options work well and taste delicious. You can tweak this recipe by adding other veggies or proteins. Zucchini adds a nice texture and taste. You could also add cooked chicken or turkey for a heartier version. Want to explore global flavors? Try adding spices from different cuisines. For a Mediterranean twist, add feta cheese and olives. For an Italian flair, mix in pesto sauce. You can even use curry spices for an Indian-inspired eggplant pie. For the full recipe, check the section above. Enjoy experimenting! After enjoying your Eggplant Tomato Pie, store leftovers properly. First, let the pie cool completely. This prevents moisture buildup. Next, slice the pie into wedges. Use an airtight container for storage. If you have no container, wrap the pie tightly in plastic wrap. Store it in the fridge for up to three days. For longer storage, freeze the pie. Place the wedges in a freezer-safe container or bag. You can freeze it for up to three months. Just remember to label it with the date! To reheat your Eggplant Tomato Pie, the oven is best. Preheat it to 350°F (175°C). Place the pie slices on a baking sheet. Cover them loosely with foil. This helps keep the top from getting too brown. Heat for about 15-20 minutes. Check to see if it's hot all the way through. If you want to avoid sogginess, don’t use a microwave. Microwaves can make the crust soft. Enjoy your delicious, warm pie just like the first time! If you want to switch up the pie crust, you have options. You can use a puff pastry for a flakier texture. For a gluten-free option, try a gluten-free pie crust. You can even make a simple homemade crust. Mix flour, butter, and water to form a dough. Roll it out to fit your pie dish. It can taste fresh and delicious! Yes, you can prepare Eggplant Tomato Pie ahead of time. Just assemble the pie without baking it. Cover it tightly and store it in the fridge. You can keep it fresh for one day. When you are ready to bake, take it out and let it sit for a few minutes. Then, follow the baking instructions from the Full Recipe. This way, you save time on busy days! Scaling up the Eggplant Tomato Pie is simple. You can double the ingredients for a larger pie. Use a bigger pie dish to hold everything. Another option is to make two smaller pies. Each pie can serve about six people. This is great for parties or family gatherings! When choosing a wine, think about the flavors in the pie. A light red wine, like Pinot Noir, works well. It enhances the taste of the eggplant and tomatoes. A crisp white wine, like Sauvignon Blanc, is also a good match. It adds freshness to each bite. Enjoy experimenting with these pairings! You now have a complete guide to making Eggplant Tomato Pie. We covered the ingredients, preparation steps, baking tips, and flavor enhancements. You learned how to avoid common mistakes and create tasty variations. With storage and reheating advice, you’ll keep leftovers fresh and delicious. This recipe is versatile, allowing for dietary needs and personal tastes. I hope you feel inspired to create this dish. Enjoy your cooking journey!
Eggplant Tomato Pie Savory and Flavorful Delight
If you love savory and hearty dishes, Eggplant Tomato Pie is a must-try! This delightful recipe combines rich flavors and textures that will satisfy any
To make amazing chicken fried steak, you need a few simple ingredients: - 4 beef cubed steaks (approximately 4 ounces each) - 1 cup buttermilk - 1 cup all-purpose flour - 1 teaspoon garlic powder - 1 teaspoon onion powder - 1 teaspoon paprika - 1 teaspoon black pepper - 1/2 teaspoon cayenne pepper (optional, for added heat) - 1 teaspoon salt - 1 egg, beaten - Vegetable oil (for frying) These ingredients combine to create a crispy, flavorful dish. If you don’t have buttermilk, you can use regular milk mixed with a little vinegar. This creates a similar tangy flavor. For the flour, you can use gluten-free flour if needed. If you want less spice, skip the cayenne pepper or reduce the amount. Choose fresh cubed steaks. Look for meat that is bright red with some marbling. This helps keep the steak juicy. For buttermilk, check the expiration date to ensure freshness. When selecting spices, choose high-quality ones for the best flavor. Fresh spices can make a big difference in your dish. To start, take your beef cubed steaks and place them in a resealable bag. Pour in 1 cup of buttermilk until the steaks are fully covered. Seal the bag and place it in the fridge. Let them marinate for at least 1 hour. For even better taste, marinate overnight. This helps make the meat tender and flavorful. Once your steaks are ready, it’s time to coat them. In a shallow dish, mix 1 cup of all-purpose flour, 1 teaspoon of garlic powder, 1 teaspoon of onion powder, 1 teaspoon of paprika, 1 teaspoon of black pepper, and 1 teaspoon of salt. If you like a bit of heat, add 1/2 teaspoon of cayenne pepper. In another bowl, whisk 1 beaten egg with the remaining buttermilk from the marinated steaks. Now, heat vegetable oil in a large skillet. Pour enough to reach a depth of about 1/4 inch. Heat it over medium-high until it shimmers. This means it’s hot enough! Next, take a marinated steak out of the buttermilk. Let any extra drip off. Dip it first into the egg mixture, then coat it well with the flour mix. Press down firmly to help the coating stick. Carefully place the breaded steak into the hot oil. Fry the steak for about 3-4 minutes on one side until it turns golden brown. Flip it over and cook for another 3-4 minutes. You want it cooked through and crispy! Once done, place the steaks on a plate lined with paper towels to absorb excess oil. Repeat this process with the other steaks. When all steaks are fried, it’s time to serve. For a nice touch, use a pre-warmed plate. Garnish with fresh chopped parsley for color. Don’t forget a rich, creamy gravy on top! Pair your chicken fried steak with fluffy mashed potatoes or a side of coleslaw. This creates a comforting and classic meal. Enjoy every bite! You can find the detailed Full Recipe linked here. To get a crispy coating, start with the right technique. First, marinate the cubed steaks in buttermilk. This step makes the meat tender and flavorful. After marinating, use a mix of flour and spices. Press the coating firmly onto the steaks. This helps it stick well while frying. One common mistake is not letting the oil heat enough. If the oil isn't hot, the coating can become soggy. Another mistake is overcrowding the pan. Frying too many steaks at once can cause them to steam instead of fry. Lastly, be careful with the salt. Too much salt in the coating can overpower the flavor. Fry at a consistent medium-high heat. This helps cook the meat evenly while keeping the outside crisp. Use a thermometer to check the oil temperature, aiming for around 350°F. Keep an eye on the steaks as they cook. Flip them when they turn golden brown. This ensures both sides cook properly. For more tips, check the Full Recipe for detailed frying guidance. {{image_4}} If you want a lighter version of chicken fried steak, try these swaps: - Use chicken breast instead of beef steaks. - Substitute whole wheat flour for all-purpose flour. - Use almond milk instead of buttermilk. - Air fry instead of deep-frying for less oil. These changes lower the calories and fat but keep the taste great. You can spice up this dish in fun ways: - Add a teaspoon of chili powder for a spicy kick. - Mix in fresh herbs like thyme or rosemary for a fragrant touch. - Try a tangy marinade with lemon juice and zest for a different flavor. Experimenting with spices and herbs keeps your meals exciting. Pair your chicken fried steak with these sides for a complete meal: - Creamy mashed potatoes enhance the comfort factor. - Coleslaw adds a crunchy, fresh element. - Green beans or asparagus provide a healthy veggie option. - Biscuits with gravy are a classic Southern touch. These sides complement the dish and make it truly satisfying. For the full recipe, refer back to the earlier section. To keep your chicken fried steak fresh, let it cool first. Place it in an airtight container. This helps prevent moisture loss and keeps the steak tasty. Store in the fridge for up to three days. If you want to enjoy it later, freezing is a great option. Reheating your chicken fried steak can be simple. For the best results, use an oven. Preheat it to 350°F (175°C). Place the steak on a baking sheet and heat for about 10-15 minutes. This keeps the coating crispy. You can also use a skillet over medium heat for about 5 minutes per side. Avoid the microwave, as it can make the coating soggy. If you want to freeze your chicken fried steak, wrap it well. Use plastic wrap or aluminum foil, then place it in a freezer bag. Remove as much air as possible. This helps prevent freezer burn. You can freeze it for up to three months. When ready to eat, thaw it in the fridge overnight before reheating. For the full recipe, check out the detailed steps above. Chicken Fried Steak comes from the Southern United States. It combines a classic breading technique with beef. This dish likely started with German immigrants who brought their traditions to America. They adapted their schnitzel to use local beef. Today, it’s a favorite comfort food served in diners and homes alike. You can prepare Chicken Fried Steak ahead of time with ease. First, marinate the steaks in buttermilk. This step helps to tenderize the meat. You can marinate them overnight for the best flavor. Then, bread the steaks and keep them in the fridge before frying. When you’re ready to serve, simply fry them until golden brown. This method saves time on busy days. To make sure your steak is tender, marinate it in buttermilk. The acidity in buttermilk breaks down tough fibers in the meat. Letting it sit for at least one hour helps. You can also use a meat mallet to pound the steak lightly. This technique helps to further tenderize the meat. With these tips, you'll enjoy a juicy and tender Chicken Fried Steak. Making chicken fried steak is a simple and fun task. Start by marinating your beef cubed steaks in buttermilk. This step makes the meat tender and flavorful. You can let the steaks soak for one hour, or if you have time, overnight is best. Next, prepare your coating mixture. Combine flour, garlic powder, onion powder, paprika, black pepper, and salt in a shallow dish. Mix them well to ensure a good flavor. After that, create your egg mixture. Whisk the beaten egg with the leftover buttermilk from marinating the steaks. This step helps the coating stick to the meat. Now it’s time to heat the oil. Pour vegetable oil into a large skillet to about 1/4 inch deep. Heat it over medium-high heat until it shimmers. The oil should be around 350°F. When the oil is ready, take the marinated steaks out of the buttermilk. Let any extra buttermilk drip off. Dip each steak into the egg mixture, then coat it with the flour mix. Make sure to press the flour onto the steak for a thick crunch. Carefully place the breaded steaks in the hot oil. Fry them for about 3-4 minutes on each side until they turn golden brown. Once cooked, transfer them to a plate lined with paper towels to soak up extra oil. Repeat this process for all your steaks. You'll have a tasty meal ready to serve! If you follow a gluten-free diet, you can easily adapt this recipe. Swap out all-purpose flour for a gluten-free flour blend. This change will still give you a crispy coating. For those following a dairy-free diet, use a non-dairy milk substitute, like almond or oat milk, instead of buttermilk. You can add a bit of vinegar or lemon juice to mimic the tangy flavor of buttermilk. Planning to feed a crowd? You can make chicken fried steak in bulk. Simply double or triple the recipe. Marinate the steaks in batches to save time. When frying, you may need to do it in stages. Avoid overcrowding the pan. This way, each steak gets enough oil to fry evenly and stay crispy. Serve with plenty of gravy and sides for a hearty meal everyone will love! We explored every part of making chicken fried steak. From selecting fresh ingredients to frying techniques, you have all the tools. Remember, quality matters for taste and texture. Be bold with flavors and try new side dishes. Storing leftovers will keep your meal fresh and tasty. Use these tips to make your dish stand out. With practice, you’ll master this classic recipe. Enjoy every bite, and share your results with others. Happy cooking!
Amazing Chicken Fried Steak Simple and Tasty Recipe
Are you ready to savor the soul of comfort food? This Amazing Chicken Fried Steak recipe will delight your taste buds and impress your loved