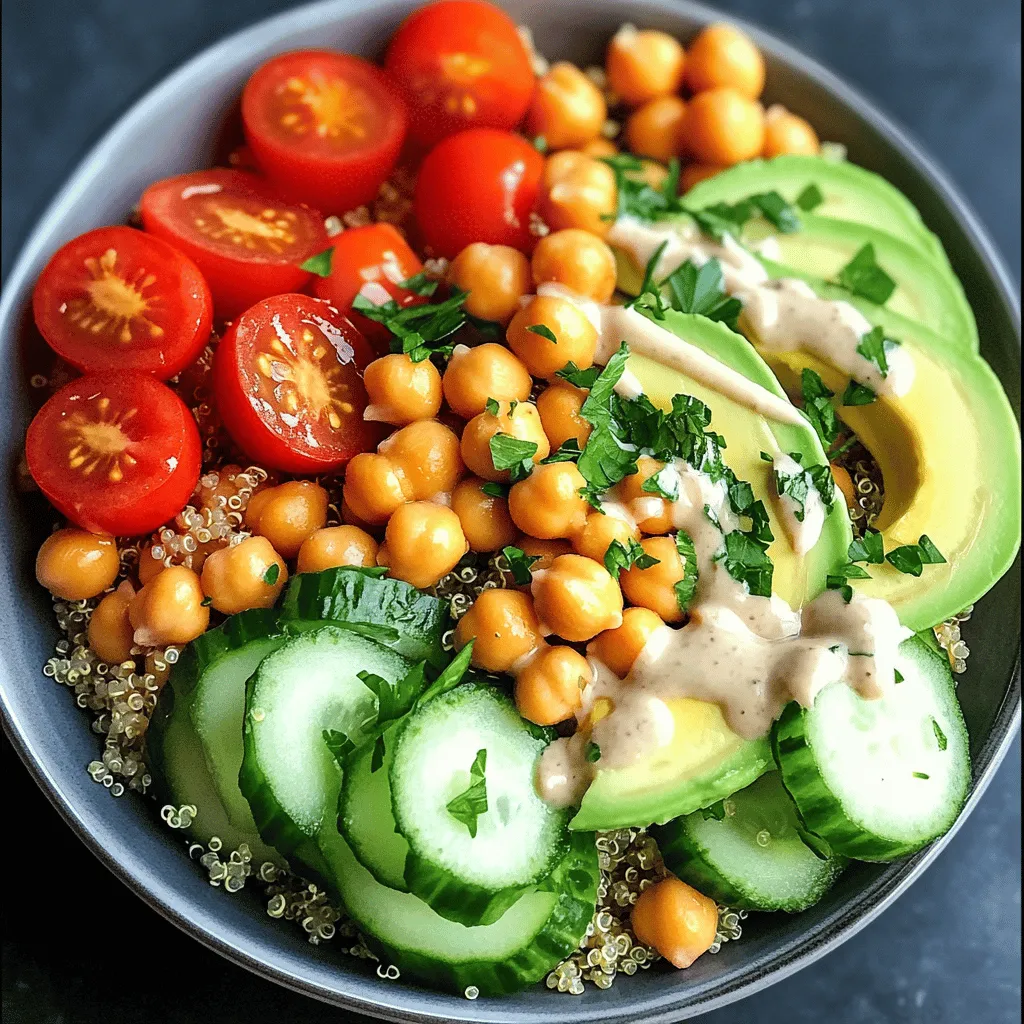
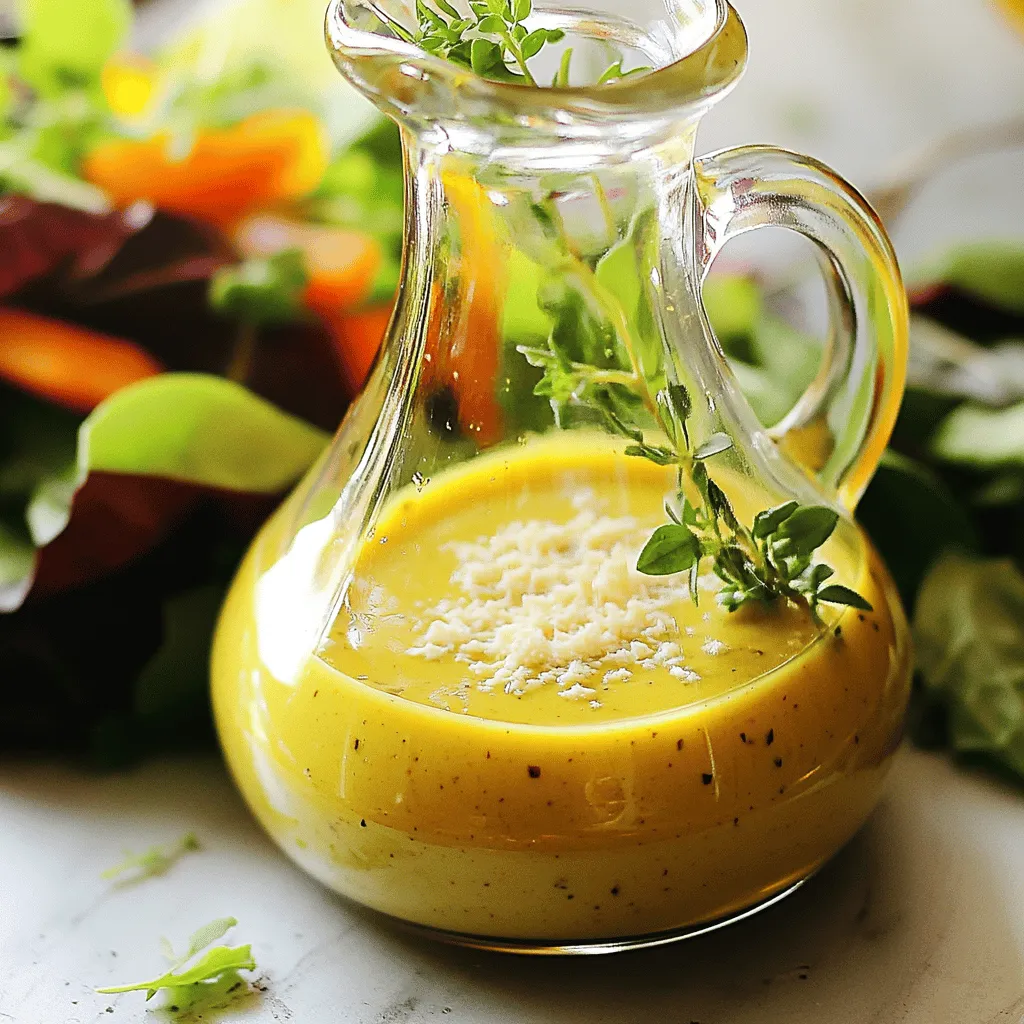
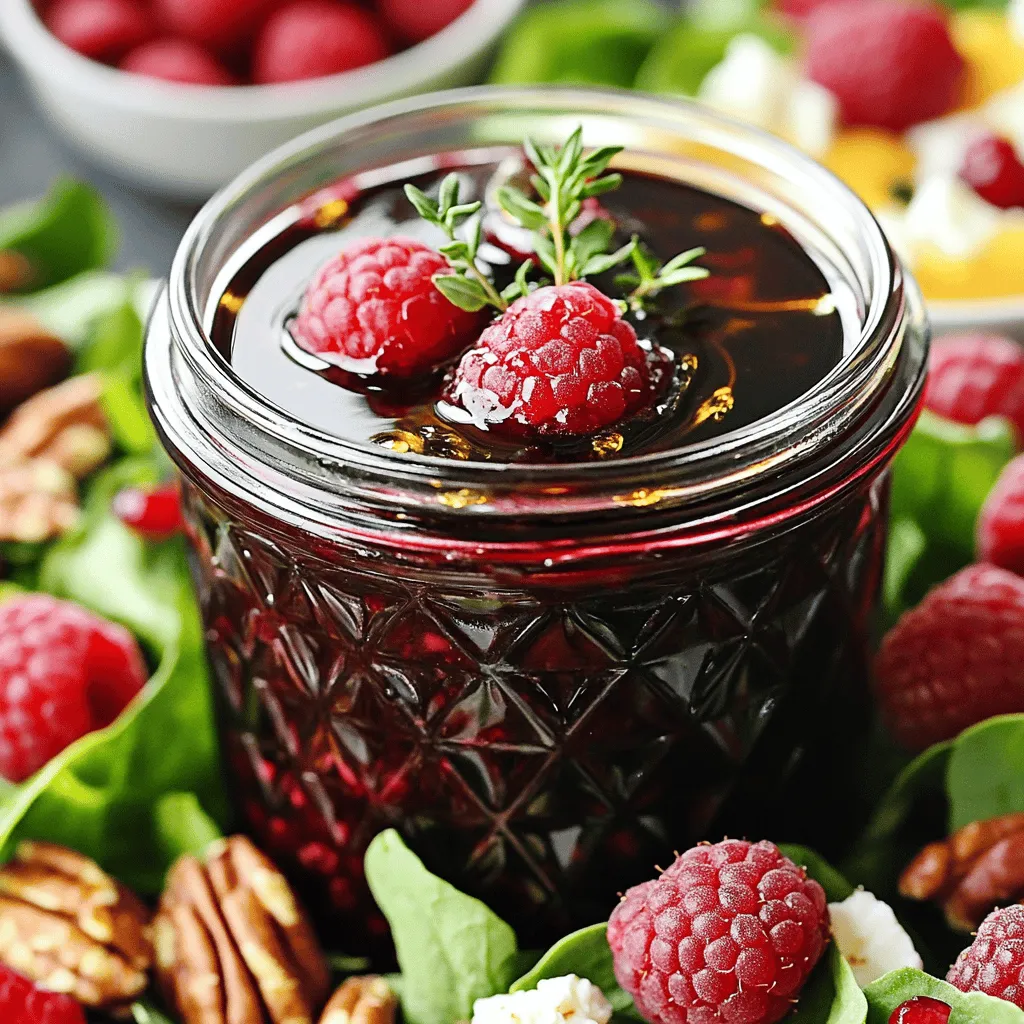
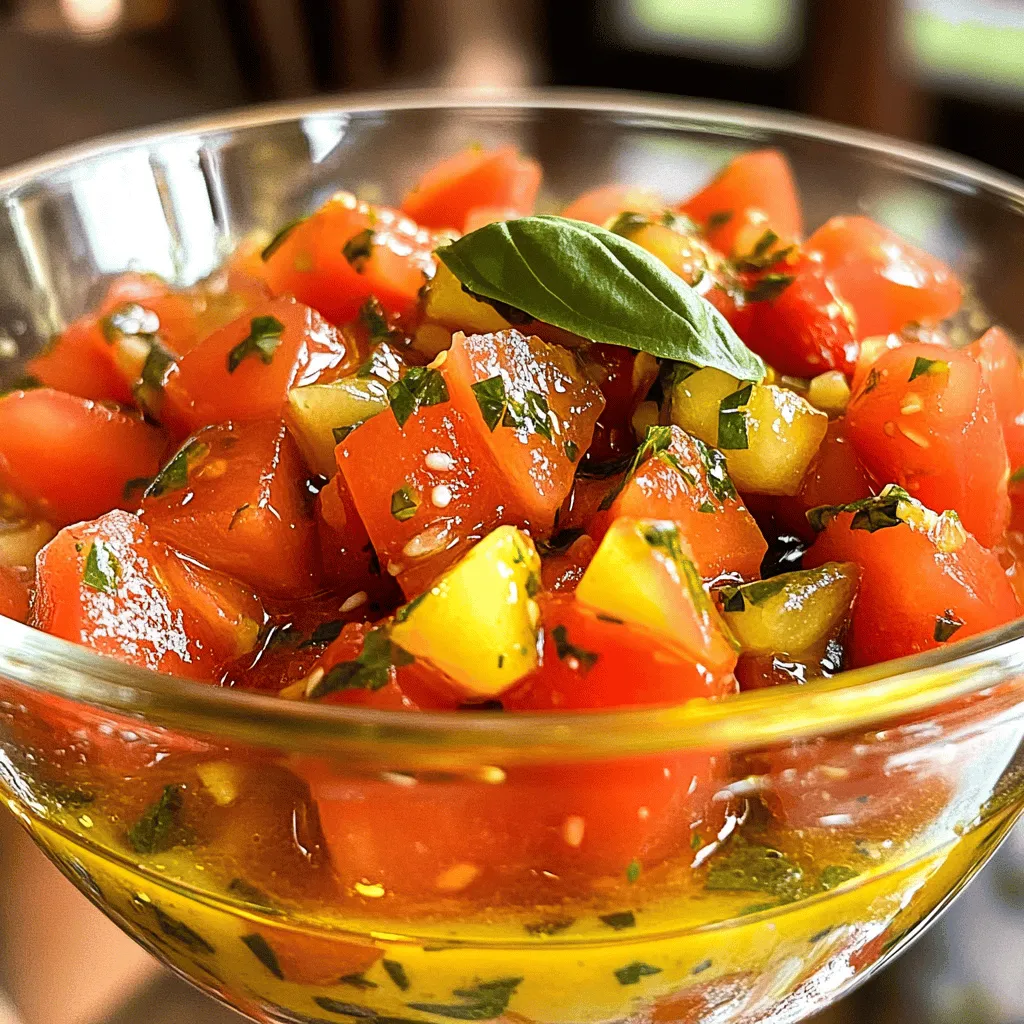
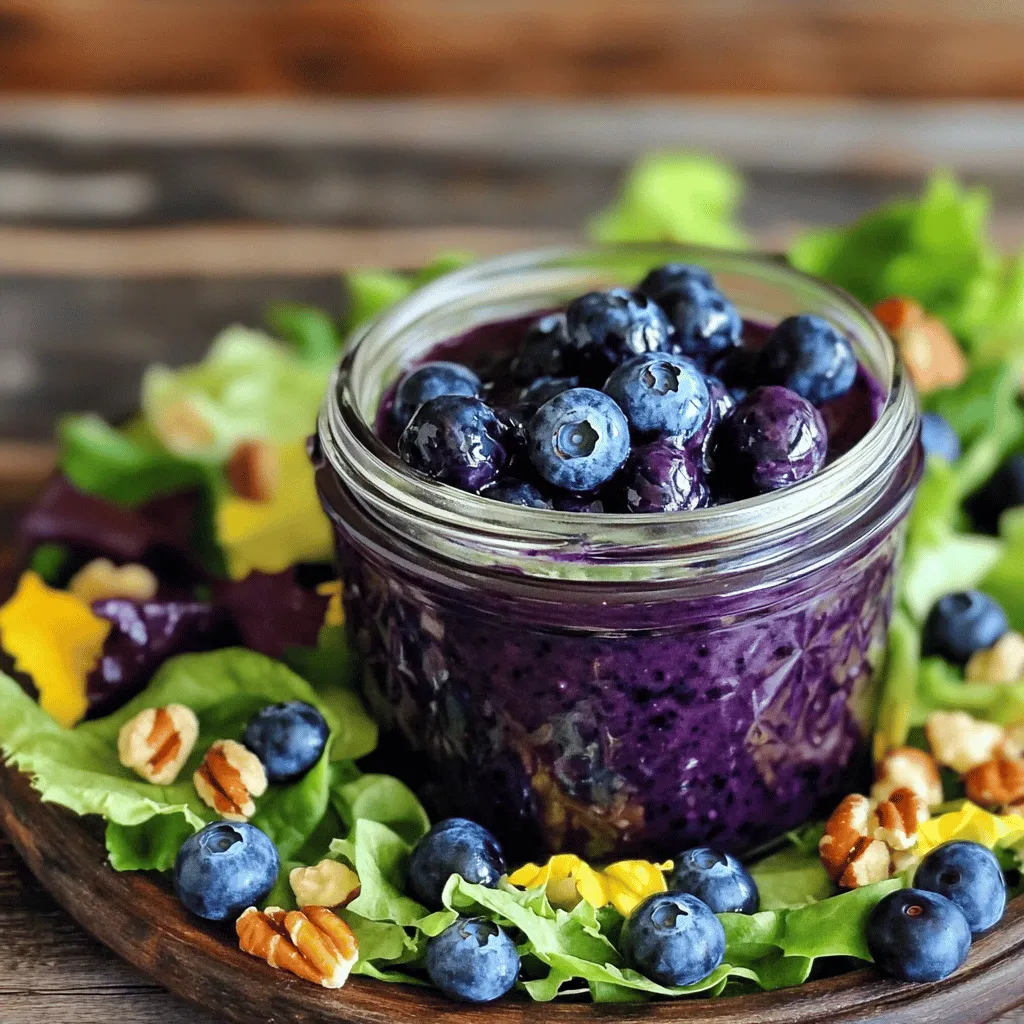
Salads

- 4 cups of seedless watermelon - 1 cup of fresh strawberries - 1 cup of blueberries - 1 cup of raspberries In this Berry Watermelon Fruit Salad, fresh fruit shines. The star is seedless watermelon. It adds sweetness and juiciness. Choose ripe, firm watermelon for the best flavor. Strawberries bring a bright red color and a tangy taste. Blueberries and raspberries add lovely pops of color and flavor. They are also packed with antioxidants. This mix creates a colorful, tasty treat. - 2 tablespoons of honey - 2 tablespoons of freshly squeezed lime juice - A pinch of fine sea salt The dressing is simple yet flavorful. Honey adds sweetness. Fresh lime juice gives a zesty kick. The pinch of sea salt enhances the flavors. Combine these ingredients for a balanced dressing that ties the salad together. - ½ cup of fresh mint leaves Fresh mint leaves make this salad special. They add a refreshing aroma and bright green color. Chop the mint finely for even distribution. This garnish elevates the salad, making it visually appealing and full of flavor. For the full recipe, check the details above. This salad is easy to make and perfect for hot days! To cut watermelon into uniform cubes, start by placing the watermelon on a stable cutting board. Cut off both ends to create flat surfaces. Then, slice the watermelon in half. Lay each half flat and cut it into long strips. Finally, slice the strips into cubes. Aim for about one-inch pieces for even bites. Next, let's hull and slice the strawberries. Hold a strawberry in one hand. Use a small paring knife to remove the green top. Then, slice the berry into thin wedges. Aim for about four to five slices per berry for a nice presentation. For washing blueberries and raspberries, place them in a colander. Rinse gently under cool water. This removes dirt without mashing the delicate berries. Let them drain while you finish preparing the other fruits. To make the dressing, combine honey and lime juice in a small bowl. Measure two tablespoons of honey and two tablespoons of lime juice. This mix adds sweetness and tang. For a smooth consistency, use a whisk. Whisk the honey and lime juice together until they blend well. The mix should look shiny and smooth. A pinch of fine sea salt brings out the flavors. It balances the sweetness and enhances the taste of the fruit. Now, let's assemble the salad. Start by mixing the prepared fruits in a large bowl. Gently fold them together to avoid mashing the berries. You want to keep them whole for a beautiful look. Next, drizzle the honey-lime dressing evenly over the fruit mix. This ensures each piece gets a taste of the dressing. Use a spatula to toss everything lightly. Incorporate the dressing without crushing the berries. To finish, sprinkle finely chopped mint leaves over the top. The mint adds a fresh aroma and a pop of color. Toss the salad one more time to mix the mint in evenly. For the best flavor, cover the bowl and chill it in the fridge for at least 15 minutes. This waiting time lets the flavors meld beautifully, making each bite a refreshing delight. Enjoy your Berry Watermelon Fruit Salad! For the best taste, chill your salad for at least 15 minutes. This lets the flavors blend well. If you want it sweeter, add a little honey to the dressing. You can also taste it before serving. Adjust the sweetness based on your preference. Choose a clear glass bowl for serving. This lets everyone see the colorful fruits inside. For a decorative touch, garnish with extra mint leaves on top. You can also sprinkle a few berries around the edge for a pop of color. To keep your salad fresh, store it in an airtight container. Place it in the fridge and eat within two days. If you have leftovers, try to keep the mint separate until serving. This helps it stay fresh and vibrant. {{image_4}} You can add a fun twist to your Berry Watermelon Fruit Salad by including tropical fruits. Try adding fresh pineapple or ripe mango. Both fruits add sweetness and a lovely texture. Pineapple gives a nice tartness, while mango adds a creamy feel. You can also sprinkle coconut flakes on top. This adds a crunchy texture and a tropical flair. Berries are the stars of this salad, but you can mix it up! Swap in blackberries or strawberries for a new flavor. You can use whatever is fresh and in season. Seasonal fruits like peaches or cherries can add a tasty surprise. The different berry combinations keep the salad exciting and fresh. The dressing can change the whole salad. Instead of honey, try using agave nectar. It’s a great option for those who want a vegan choice. For a zesty kick, use citrus juice like orange or grapefruit. This gives the salad a bright and refreshing taste. Just remember, the dressing ties all the flavors together in this fruit salad. Check out the Full Recipe for more details! Watermelon is mostly water, which means it keeps you hydrated. It has vitamins A and C, plus antioxidants. These help your skin and immune system. Watermelon is low in calories. That makes it a great snack! Berries are a superfood. Strawberries, blueberries, and raspberries are loaded with vitamins and fiber. They help your heart and boost brain health. Mint adds a fresh flavor and may help with digestion. Together, these ingredients make this salad not just tasty, but good for you too! Each serving of Berry Watermelon Fruit Salad has about 100 calories. Most of these calories come from the fruit. The sugar in fruit is natural and gives you energy. It’s different from added sugars in snacks. Eating whole fruits, like berries and watermelon, is a smart choice. This salad is perfect for many diets. It is gluten-free, making it safe for those with gluten issues. It is also vegan-friendly. You can enjoy this refreshing dish no matter your diet! To keep your Berry Watermelon Fruit Salad fresh, store it in an airtight container. This helps to lock in moisture and flavor. You can keep it in the fridge for up to 3 days. However, the berries may lose some texture over time. To keep them firm and juicy, eat the salad within 24 hours if possible. Yes, you can make this salad ahead of time! Prepare all the fruits and mix them together. However, I recommend adding the dressing just before serving. This keeps the fruit crisp and bright. If you make it a few hours early, keep it chilled in the fridge to let the flavors blend. Feel free to add more fruits to your salad! Consider including: - Pineapple chunks for extra sweetness - Kiwi slices for a tangy kick - Grapes for added crunch - Mango for a tropical twist These fruits can make your salad even more colorful and delicious. Mix and match based on your taste! This fruit salad is easy and refreshing. We covered the ingredients, from fresh fruits to a simple dressing. You learned how to prepare, mix, and serve the salad perfectly. Don't forget the tips on enhancing flavor and storing leftovers. Feel free to add new fruits or change the dressing to fit your taste. Enjoy making this healthy treat anytime!
Berry Watermelon Fruit Salad Refreshing Summer Treat
Looking for a delicious and easy way to cool off this summer? My Berry Watermelon Fruit Salad is the perfect treat! Bursting with juicy watermelon,
- 2 cups romaine lettuce - 1 cup cherry tomatoes - 1 cup corn kernels - 1 can black beans - 1 large red bell pepper - 1 ripe avocado - 1/2 cup red onion - 1/2 cup shredded cheddar cheese - 1/4 cup fresh cilantro - Juice of 2 limes - 3 tablespoons olive oil - 1 teaspoon ground cumin - 1 teaspoon chili powder - Salt and pepper Cowboy Salad is all about fresh and crunchy flavors. You need crisp romaine lettuce, juicy cherry tomatoes, and sweet corn kernels. I love using canned black beans because they are easy to add. The red bell pepper adds color and crunch, while the avocado gives creaminess. Don't forget the red onion for a little bite! - Other types of beans - Grilled chicken or beef - Crunchy tortilla strips You can switch things up with other beans or add grilled chicken. For a fun crunch, add tortilla strips. These options make each salad unique! - Lime juice - Olive oil - Ground spices The dressing is simple but tasty. Just mix lime juice with olive oil. Add ground cumin and chili powder for flavor. This dressing ties all the ingredients together beautifully. Check out the [Full Recipe] to get started! - Combine chopped lettuce, cherry tomatoes, corn, black beans, diced bell pepper, and red onion in a large bowl. - Carefully incorporate diced avocado and shredded cheddar cheese. Do this gently to keep the avocado intact. - In a separate bowl, prepare the dressing. Whisk together lime juice, olive oil, ground cumin, chili powder, salt, and pepper. - Drizzle the dressing over the salad mixture. Toss gently to coat all the ingredients evenly. - Adjust the flavor by adding salt and pepper to taste. - For a beautiful presentation, serve the salad in individual bowls or on a large platter. - Garnish with extra cilantro and lime wedges for a vibrant look. This Cowboy Salad is a fresh and flavorful meal idea that is easy to make. You can find the full recipe above. Enjoy! Choosing ripe avocados is key. Look for avocados that yield slightly to gentle pressure. Avoid ones with dark spots or mushiness. Store your ingredients in the fridge until you’re ready to use them. This keeps them crisp and fresh. Consider adjusting your seasonings. If you like it spicier, add more chili powder. For extra zing, squeeze in more lime juice. Balancing acidity and richness makes a big difference. The lime juice brightens the salad, while the olive oil adds creaminess. Serve the Cowboy Salad chilled for the best taste. It’s refreshing and perfect for a hot day. For a fun twist, pair it with tortilla chips or grilled meats. This makes for a complete meal that everyone will enjoy. {{image_4}} Cowboy Salad is fun to make, and you can change it up easily. Try a Mediterranean Cowboy Salad by adding feta cheese and olives. This gives the salad a salty taste that mixes well with the veggies. Another tasty option is the Southwest Cowboy Salad. Here, you can add jalapeños and corn salsa. This will give it a spicy kick and a zesty flavor. You can also change Cowboy Salad to fit your diet. For a vegan option, simply leave out the cheese and use a vegan dressing. This keeps the salad fresh while making it plant-based. If you're watching carbs, replace the black beans with other veggies like zucchini or bell peppers. This keeps the salad light but still filling. Cowboy Salad has roots in American cowboy culture. It often uses local ingredients, which makes it special. You can add items from your region to give it a unique taste. For example, if you live near the coast, adding fresh seafood can be a fun twist. This salad not only fills you up but also tells a story about where it comes from. For the full recipe, check out the Cowboy Salad recipe above and get cooking! To store leftovers, place the Cowboy Salad in an airtight container. This keeps it fresh longer. You should refrigerate the salad right after serving. Avoid leaving it out for more than two hours. For best results, eat the salad within 2-3 days. To preserve freshness, keep the dressing separate if possible. Add it just before serving. This prevents the salad from getting soggy. If you have mixed it, stir it gently each time before serving. Freezing the Cowboy Salad is not recommended as a whole. The fresh ingredients do not freeze well. However, you can freeze components separately. For example, freeze cooked beans or corn. These can last up to 3 months in the freezer. After freezing, use the thawed ingredients in soups or stews. You can also add them to other salads for extra flavor. For safe consumption, follow these timeframes: - Fresh Cowboy Salad: 2-3 days in the fridge - Frozen ingredients: up to 3 months Signs of spoilage include a sour smell or mushy vegetables. If you see any mold, throw it away. Always trust your senses when checking food. Cowboy Salad is a hearty, colorful dish that packs a punch. It blends fresh veggies, beans, and cheese. This salad is popular in the American West. It reflects the cowboy spirit of using what you have. You can customize it based on your taste. The mix of textures and flavors makes it fun to eat. You can enjoy it as a main dish or a side. Yes, you can prep Cowboy Salad ahead of time. Chop the veggies and store them separately. Keep the dressing in a jar or container. This way, the salad stays fresh and crunchy. Mix the salad and dressing just before serving. This keeps the salad from getting soggy. You can enjoy the flavors without losing texture. You can easily swap ingredients in Cowboy Salad. Here are some common substitutes: - Use kale or spinach instead of romaine lettuce. - Swap black beans for kidney beans or chickpeas. - Choose a different cheese, like feta or goat cheese. - Replace corn with diced cucumbers for a crisp bite. These swaps can fit different diets or personal tastes. If you like heat, you have options! Add diced jalapeños for a fresh kick. You can also mix in hot sauce or chili flakes. Another idea is to use pepper jack cheese instead of cheddar. For a smoky flavor, try adding chipotle powder. Adjust the spice to make it your own! You now know how to make a delicious Cowboy Salad. We covered the key ingredients, preparation steps, and serving tips. I shared variations to suit different tastes and dietary needs. Remember, using fresh ingredients is key to flavor. Feel free to experiment with spices and add-ins. This salad is not just tasty but also fun to create. Enjoy your cooking and make it your own!
Cowboy Salad Fresh and Flavorful Meal Idea
Looking for a fresh and tasty meal idea? Cowboy Salad is here to please! Packed with vibrant veggies and bold flavors, this salad is perfect
- 2 cups elbow macaroni - 1 cup mayonnaise - 1 tablespoon Dijon mustard - 1 teaspoon apple cider vinegar - 1 cup celery, finely chopped - 1 cup red bell pepper, diced - 1/2 cup red onion, finely chopped - 1/2 cup sweet pickle relish - 1/4 cup fresh parsley, chopped - Salt and freshly cracked pepper to taste - 1 tablespoon hot sauce (for a spicy kick) Guy Fieri’s macaroni salad shines because of its balance. The elbow macaroni forms the base. You want to cook it just right, so it stays firm. The creamy dressing blends perfectly with the crunch of veggies. The mayonnaise gives it a rich texture. Dijon mustard adds a nice zing. The apple cider vinegar brings a touch of tang. Together, these create a dressing that is both creamy and bright. Now, let’s talk about the veggies. Celery adds crunch. Red bell pepper provides sweetness. Red onion gives a bite, while sweet pickle relish adds a unique taste. Fresh parsley brightens the dish with its color and flavor. Don’t skip the salt and pepper; they enhance every bite. If you like a kick, add hot sauce. It’s optional, but it can take the salad up a notch. You can mix and match these ingredients as you like, but this combo makes the salad a crowd-pleaser. This simple but tasty recipe is perfect for gatherings or a quick side. Check the [Full Recipe] for complete instructions, and get ready to impress! To cook al dente macaroni, start by filling a large pot with salted water. Bring the water to a rolling boil. Add 2 cups of elbow macaroni. Cook it for about 7 to 8 minutes. Check the package for exact times. You want it firm but not hard. Once the macaroni is done, drain it in a colander. Rinse it quickly under cold water. This stops the cooking process. After rinsing, transfer the pasta to a large mixing bowl. Let it cool completely. For the creamy dressing, gather these ingredients: - 1 cup mayonnaise - 1 tablespoon Dijon mustard - 1 teaspoon apple cider vinegar - 1 tablespoon hot sauce (optional) In a separate bowl, whisk together the mayonnaise, Dijon mustard, and apple cider vinegar. If you want some heat, mix in the hot sauce. Blend everything until it is smooth and creamy. This will give the salad its rich flavor. To combine the pasta and vegetables, add the cooled macaroni to the large mixing bowl. Now, add: - 1 cup celery, finely chopped - 1 cup red bell pepper, diced - 1/2 cup red onion, finely chopped - 1/2 cup sweet pickle relish - 1/4 cup fresh parsley, chopped Gently fold the chopped veggies into the pasta. This keeps everything intact. Next, pour the creamy dressing over the mixture. Using a spatula or wooden spoon, fold everything together. Make sure all the ingredients are well-coated. Season with salt and freshly cracked pepper to taste. Adjust the seasoning as needed. For a full recipe, check out the section on Guy Fieri’s Flavorful Mac Attack Salad. To make Guy Fieri’s macaroni salad extra tasty, you can add a splash of acidity. A little apple cider vinegar brightens the flavors. It makes each bite pop! For advanced seasoning, consider adding fresh herbs. Basil or dill can add a nice touch. You might also add a pinch of garlic powder for depth. These little tweaks can elevate your dish! When serving, choose a vibrant bowl. A colorful dish draws the eye and makes the food look appealing. You can also layer the salad for a fun look. Garnishing is key! A sprinkle of fresh parsley adds color. You can also place slices of hard-boiled eggs around the salad. This not only looks good but adds extra protein too! Chilling is crucial for flavor. After you mix the salad, cover it and put it in the fridge. Let it chill for at least one hour. If you can, chill it overnight. This allows the flavors to meld. Timing matters! The longer it sits, the tastier it gets. Just remember: before serving, give it a gentle stir. This helps to mix the flavors again and keeps it fresh. {{image_4}} You can change up the veggies in Guy Fieri's macaroni salad. Try adding: - 1 cup of diced cucumbers for crunch - 1 cup of shredded carrots for sweetness - 1 cup of chopped green onions for a fresh bite For dressings, you can switch things up too. Try using: - Greek yogurt instead of mayonnaise for a healthier twist - Ranch dressing for a creamy, zesty flavor - A vinaigrette for a lighter taste If you need gluten-free options, use gluten-free elbow pasta. It cooks the same way as regular pasta. For a vegan version, swap mayonnaise with a plant-based mayo or silken tofu. This keeps the creamy texture while making it lighter. You can also add more veggies for extra health benefits. Every region has its unique tastes. Consider adding: - Bacon bits for a smoky flavor - Avocado for a creamy, rich texture - Spicy jalapeños for a kick You can also personalize the salad to fit your taste. Add your favorite herbs or spices. These simple swaps make this salad your own. Check out the full recipe for more tips! To store macaroni salad, place it in an airtight container. This keeps it fresh and safe. Make sure to seal it tightly. In the fridge, it lasts for about 3 to 5 days. If you see any signs of spoilage, like off smells or mold, throw it away. Yes, you can freeze macaroni salad, but it may change in texture. To freeze, use a freezer-safe container. Leave some space at the top for expansion. When you're ready to eat, thaw it in the fridge overnight. Serve it cold, and stir well to mix everything again. Before serving, taste the salad and refresh the flavors. You might want to add a bit more mayonnaise or vinegar. This helps bring back the taste after storage. Always check for safety. If it smells odd or looks strange, do not serve it. Enjoy your meal safely! Chill macaroni salad for at least one hour. This time helps all the flavors blend well. If you can chill it longer, even better! Letting it sit overnight is best for taste. Yes, you can make this salad ahead of time! Just prepare it and store it in the fridge. It will stay fresh for about three days. Making it a day before can save time for your event. You can add many tasty ingredients! Here are some ideas: - Chopped pickles for crunch - Diced ham or chicken for protein - Chopped olives for a briny kick - Fresh herbs like dill or chives - Cheese cubes for creaminess Feel free to mix and match to create your own version! This macaroni salad is a fun dish that packs a lot of flavor. You can whip it up in no time. Here’s a summary of what you need and how to make it. Ingredients: - 2 cups elbow macaroni - 1 cup mayonnaise - 1 tablespoon Dijon mustard - 1 teaspoon apple cider vinegar - 1 cup celery, finely chopped - 1 cup red bell pepper, diced - 1/2 cup red onion, finely chopped - 1/2 cup sweet pickle relish - 1/4 cup fresh parsley, chopped - Salt and freshly cracked pepper to taste - 1 tablespoon hot sauce (optional for a spicy kick) Steps: 1. Cook the Pasta: Start by boiling water in a big pot. Add salt and macaroni. Cook it until it's al dente, about 7-8 minutes. 2. Drain and Cool: Drain the pasta in a colander. Rinse it under cold water to stop cooking. Move it to a big bowl and let it cool. 3. Prepare the Dressing: In another bowl, mix mayonnaise, Dijon mustard, apple cider vinegar, and hot sauce if you want some heat. Blend it until smooth. 4. Combine Ingredients: Add the chopped celery, diced red bell pepper, chopped red onion, sweet pickle relish, and parsley to the macaroni. 5. Mix in Dressing: Pour the dressing over the salad. Use a spatula to fold everything together gently. 6. Season to Taste: Add salt and pepper as needed to get the right flavor. 7. Chill: Cover and refrigerate the salad for at least 1 hour. If you can, let it chill longer for better flavor. 8. Final Touches: Before serving, stir the salad again. Taste it and add more seasoning if you need to. Feel free to check out the Full Recipe for more details! This blog post covered how to create a tasty macaroni salad. We explored the main ingredients, including pasta, savory veggies, and creamy dressing. I shared tips for mixing and enhancing flavors. You learned about variations to suit different diets and hands-on advice for storage. Remember, the key to this dish is balance and fresh flavors. Enjoy making your version, and don't be afraid to experiment with new ingredients!
Guy Fieri’s Macaroni Salad Tasty and Easy Recipe
Are you ready to elevate your BBQ game? Guy Fieri’s Macaroni Salad is the perfect side dish. It’s creamy, crunchy, and bursting with flavor. You
- 1 can black beans, drained and rinsed - 2 cups fresh romaine lettuce, chopped - 1 cup cherry tomatoes, halved - 1 cup corn kernels (fresh or frozen) - 1 ripe avocado, diced - 1/2 medium red bell pepper, diced - 1/2 cup plain Greek yogurt - 1/4 cup salsa - 1 tablespoon fresh lime juice When I make this black bean taco salad, I love how vibrant and fresh it looks. The black beans bring protein and a nice texture. Romaine lettuce adds crunch, while cherry tomatoes give a juicy burst. Corn kernels add sweetness, and ripe avocado brings creaminess. The red bell pepper adds color and a slight crisp. Each bite is a mix of flavors and textures. For the dressing, I use Greek yogurt for creaminess without being heavy. Salsa gives it a fresh taste, and lime juice adds a zesty kick. This dressing ties all the ingredients together beautifully. If you want the full experience, check out the Full Recipe. It gives you all the steps to create this delightful dish! To make the creamy salsa dressing, gather your ingredients. In a medium bowl, add the Greek yogurt, salsa, lime juice, olive oil, minced garlic, and cayenne pepper if you want some spice. Mix these ingredients together with a whisk until smooth. This dressing is creamy and tangy. Once mixed, set it aside for later. Now, it's time for the salad. Take a large mixing bowl and add the drained black beans, chopped romaine lettuce, halved cherry tomatoes, corn, diced avocado, diced red bell pepper, and finely chopped red onion. Each ingredient adds flavor and color. Toss all the ingredients together gently. This ensures they mix evenly and look great. Next, add your seasonings. Sprinkle in the ground cumin, chili powder, and a pinch of salt and pepper. Toss the salad again to coat everything with the spices. This step brings all the flavors together. Now, layer the salad mixture on individual plates or in a large bowl. Top each serving with crispy tortilla strips and shredded cheese. Just before serving, drizzle the creamy salsa dressing over the salad. You can also serve it on the side for guests to add as they like. For the full recipe, check out the complete instructions. You can make your Black Bean Taco Salad even better! Here are some ideas: - Add proteins: Grilled chicken or shrimp boosts flavor and makes the meal heartier. - Include extra veggies: Try adding bell peppers, cucumbers, or carrots for more nutrition and taste. These simple changes can help you create a salad that fits your cravings and needs. A beautiful dish makes any meal more fun. Here’s how to present your salad: - Use colorful bowls: Bright bowls enhance the salad's look and make it more inviting. - Garnish with lime wedges: Add lime wedges and extra toppings. This gives a nice touch and adds extra flavor. These tips will help your salad shine at any gathering or family meal. For the full recipe, check out the Black Bean Taco Salad Fiesta. {{image_4}} You can easily make this salad vegetarian or vegan. If you want to keep it vegan, here are some swaps: - Cheese: Substitute the regular cheese with vegan cheese. Look for options made from nuts or soy. - Dressing: Instead of Greek yogurt, use tahini or ripe avocado. Both give a creamy texture and rich flavor. These changes keep the taste delicious while meeting dietary needs. Feel free to play with different ingredients to make the salad your own. Here are a few ideas: - Grain Base: Swap black beans for quinoa or farro. Both add a nice texture and extra nutrition. - Bean Choices: If you want to change up the flavors, try kidney beans or pinto beans instead of black beans. They all work great in this salad. These simple swaps can enhance the salad and keep it interesting. You can find the full recipe [here](#). To keep your salad fresh, store the salad components separately. This way, your lettuce stays crisp. Place the black beans, corn, tomatoes, and other veggies in a bowl or container. For the dressing, use an airtight container. This helps keep it creamy and delicious. Your salad components will last about 2-3 days in the fridge. This gives you time to enjoy leftovers without worry. The creamy salsa dressing can last up to a week. Just check for freshness before using it again. Keeping track of these times helps you enjoy every bite of your Black Bean Taco Salad with Creamy Salsa Dressing! Yes, you can prepare the ingredients ahead of time. Just keep them separate in the fridge. Wait to assemble the salad until right before serving. This keeps the salad fresh and crisp. Yes, this recipe can be gluten-free. Just make sure your tortilla strips are labeled gluten-free. This ensures no hidden gluten sneaks into your meal. To add heat to your dressing, mix in more cayenne pepper. You can also add diced jalapeños for an extra kick. Adjust the spice level to fit your taste. This blog post shared how to make a tasty Black Bean Taco Salad. You learned the main ingredients, like black beans and fresh veggies, and how to make a creamy dressing. I included tips to customize it and store leftovers. You can easily adapt this salad to fit your taste or dietary needs. I hope you feel inspired to try this recipe! Enjoy making your delicious and healthy salad.
Black Bean Taco Salad with Creamy Salsa Dressing Delight
Are you ready to whip up a fresh and tasty meal? My Black Bean Taco Salad with Creamy Salsa Dressing is just what you need!
- 1 cup fresh strawberries, hulled and sliced - 1 cup ripe pineapple, diced - 1 cup kiwi, peeled and sliced - 1 cup plump blueberries - 1 banana, sliced - 1 can (14 oz) sweetened condensed milk - 1 tablespoon freshly squeezed lime juice - 1 teaspoon pure vanilla extract - Fresh mint leaves, for garnish To make this fruit salad, you need fresh fruits. Strawberries, pineapple, kiwi, blueberries, and banana work best. These fruits not only taste great but also add vibrant colors to your dish. Next, gather the condensed milk components. Sweetened condensed milk gives a creamy texture. Lime juice adds a zing, while vanilla extract brings warmth. For an extra touch, consider garnishing with fresh mint leaves. They add a refreshing flavor and bright color. When you have all these ingredients, you're ready to make a delightful fruit salad. You can find the Full Recipe in the next section. - Step 1: Combine strawberries, pineapple, kiwi, blueberries, and banana. Start by gathering your fresh fruits. Use a large mixing bowl. Add the hulled and sliced strawberries, diced pineapple, peeled and sliced kiwi, plump blueberries, and sliced banana. The mix of colors and textures makes the salad inviting. - Step 2: Toss fruits gently to avoid bruising. Use a spatula or your hands to toss the fruits. Be gentle so you do not mash them. You want to keep each fruit piece whole for a pretty presentation. - Step 3: Whisk together condensed milk, lime juice, and vanilla extract. In a small bowl, add the sweetened condensed milk, freshly squeezed lime juice, and pure vanilla extract. Use a whisk to blend these together. This creamy dressing will coat the fruit nicely. - Step 4: Ensure a smooth and homogenous mixture. Keep whisking until the mixture is smooth and well combined. A good dressing has no lumps. - Step 5: Pour dressing over fruits and toss gently. Now, pour the creamy dressing over your fruit medley. Using a spatula, toss the fruits gently again. Make sure every piece is coated with the dressing for a rich flavor. - Step 6: Cover and refrigerate for 30 minutes before serving. Cover the bowl with plastic wrap or a lid. Place it in the fridge for about 30 minutes. This chilling time helps the flavors blend well, making each bite delicious. For the complete recipe, check [Full Recipe]. Enjoy your sweet and simple fruit salad! - Use ripe fruits for better flavor. - Always wash fruits thoroughly before preparation. To keep your fruit salad fresh, choose ripe fruits. Ripe fruits taste better and add more sweetness. Strawberries should be bright red and firm. Pineapples should smell sweet and feel slightly soft. Kiwi should be slightly soft but not mushy. Always wash your fruits. This step removes dirt and pesticides. Rinsing under cold water works best. - Adjust sweetness by adding more or less condensed milk. - Experiment with citrus juices for variety. The dressing makes this salad special. You can change its taste by adjusting the condensed milk. If you want it sweeter, add more condensed milk. For a tangy twist, try adding lime or lemon juice. This balance keeps the salad bright and fresh. You can even use orange juice for a sweeter flavor. - Best served chilled for maximum flavor. - Pair with whipped cream or yogurt for added richness. Serving the salad cold enhances its taste. Chill it for at least 30 minutes. This time allows flavors to mix well. You can serve it on its own or with whipped cream. A dollop of yogurt also adds creaminess. Both options make the dish richer and more satisfying. {{image_4}} You can make a tropical version of this salad. Simply replace pineapple and blueberries with mango and passionfruit. This swap brings bright colors and bold flavors to the dish. To enhance these tropical notes, sprinkle in some coconut flakes. They add a nice crunch and a hint of sweetness. Using seasonal fruits can make your salad even better. In summer, try adding fresh peaches for a juicy twist. In autumn, crisp apples can bring a delightful crunch. You can adjust the dressings based on what fruits you pick. This helps you make the most of what's ripe and in season. If you're looking for lighter options, consider using low-fat condensed milk or Greek yogurt. Both choices still taste great and reduce calories. For added crunch and nutrition, toss in some nuts or seeds. This not only boosts health but also gives your salad a fun texture. For a detailed guide, check out the Full Recipe. Store your fruit salad in an airtight container. This keeps it fresh in the fridge. You should eat it within 2-3 days. This way, you enjoy the best taste and texture. You can freeze the fruits before making the salad. This gives you a refreshing frozen treat. Just remember to thaw the salad before serving. This helps keep the right texture. To keep bananas looking fresh, mix lime juice with them. This stops the bananas from browning. Always cover the salad tightly to limit air exposure. This helps maintain the salad's bright colors. For the full recipe, check the details above! Yes, prepare it a few hours prior, but add bananas just before serving. This keeps them fresh and prevents browning. You can chop all other fruits and mix them with the dressing. Just hold off on the bananas until it's time to serve. Use coconut cream or Greek yogurt as alternatives. Both options add creaminess without losing flavor. Coconut cream gives a tropical twist, while Greek yogurt adds a tangy taste. You can adjust sweetness as needed. Absolutely! It’s a crowd-pleaser and easy to scale up. You can double or triple the recipe for larger gatherings. Everyone loves a colorful and tasty salad. Plus, it requires no cooking, which saves time. Yes, feel free to mix and match according to your preferences! Try peaches in summer or apples in autumn. Berries are also great options. Just keep the balance of flavors in mind. Using seasonal fruits can enhance the taste. This fruit salad recipe is simple and fun to make. You learned about choosing fresh fruits like strawberries, blueberries, and kiwi. I shared how to create a tasty dressing with condensed milk, lime juice, and vanilla. Remember to chill it for the best flavor. Try the tips and variations for a unique touch. This dish is great for any event or just a tasty snack. Enjoy experimenting with different fruits and dressings. Celebrate fresh food in every bite!
Fruit Salad With Condensed Milk Simple and Sweet Treat
If you crave a sweet and simple treat, you’ll love this fruit salad with condensed milk! It combines fresh fruits like strawberries, kiwi, and banana
To make your Chicken Caesar Pasta Salad, gather the following ingredients: - 8 oz rotini pasta - 1 cup cooked chicken breast, diced - 1 cup romaine lettuce, chopped into bite-sized pieces - ½ cup cherry tomatoes, halved - ¼ cup freshly grated Parmesan cheese - ⅓ cup Caesar dressing (store-bought or homemade) - 2 tablespoons extra virgin olive oil - 1 teaspoon garlic powder - Salt and freshly cracked black pepper to taste - Fresh parsley, chopped, for garnish (optional) You can easily swap some ingredients to suit your taste or needs: - Pasta: Use penne or fusilli instead of rotini for a different shape. - Chicken: Substitute with grilled shrimp or diced tofu for a lighter option. - Lettuce: Try kale or spinach if you want more nutrients. - Tomatoes: Use diced bell peppers or cucumbers for crunch. - Cheese: Feta or goat cheese can replace Parmesan for a tangy twist. - Dressing: If you don’t have Caesar dressing, a ranch or vinaigrette works too. Each serving of Chicken Caesar Pasta Salad provides: - Calories: 450 - Protein: 30g - Carbohydrates: 40g - Fat: 20g - Fiber: 3g - Sugar: 2g This salad is balanced and filling, making it a great meal option. You can feel good knowing it has protein and fiber to keep you satisfied. For the full recipe, check out the details above. Enjoy making this dish! To make this Chicken Caesar Pasta Salad, start cooking the pasta first. Boil a large pot of salted water. Once boiling, add 8 oz of rotini pasta. Cook it for about 8-10 minutes until it is al dente. Drain the pasta and rinse it under cold water. This stops the cooking and cools it down. Set the pasta aside when it’s cool. Next, grab a big mixing bowl. In this bowl, combine the cooled pasta with 1 cup of cooked chicken breast, diced. Add in 1 cup of chopped romaine lettuce and ½ cup of halved cherry tomatoes. Use a gentle hand to toss the ingredients. This helps to mix everything evenly without breaking the lettuce. Now, let’s make the dressing. In a small bowl, whisk together ⅓ cup of Caesar dressing, 2 tablespoons of extra virgin olive oil, and 1 teaspoon of garlic powder. Add a pinch of salt and pepper. Mix until it is smooth. Pour the dressing over the pasta mixture next. Use tongs or a large spoon to toss the salad gently, ensuring every piece gets coated in that creamy dressing. Sprinkle ¼ cup of freshly grated Parmesan cheese on top. Fold it in lightly to let the cheese mix with the salad. Taste the salad and adjust the seasoning with salt and pepper if needed. Finally, cover the salad and chill it in the fridge for about 30 minutes. This step allows the flavors to blend and taste even better. - Use plenty of water: This helps the pasta cook evenly and prevents sticking. - Don’t overcook: Keep an eye on the clock. Al dente pasta has a nice bite. - Rinse with cold water: This stops the cooking process and cools the pasta fast. - Salt the water: It adds flavor right to the pasta as it cooks. If you want to try a homemade Caesar dressing, it’s simple! Here’s how: - Ingredients: - ½ cup mayonnaise - 2 tablespoons lemon juice - 1 teaspoon Dijon mustard - 1 clove garlic, minced - ⅓ cup freshly grated Parmesan cheese - Salt and pepper to taste - Instructions: 1. In a bowl, mix the mayonnaise, lemon juice, and Dijon mustard. 2. Add in the minced garlic and Parmesan cheese. 3. Season with salt and pepper. Mix until smooth. This homemade dressing adds a fresh touch to your Chicken Caesar Pasta Salad! When making Chicken Caesar Pasta Salad, watch out for a few key mistakes. First, don't overcook the pasta. It should be firm to the bite, or al dente. Next, cold pasta is best for the salad. Rinsing it under cold water helps it cool quickly. Also, be careful with the dressing. Too much can make the salad soggy. Start with a little dressing and add more if needed. Lastly, avoid using wilted lettuce. Fresh romaine makes the salad crisp and tasty. To boost the flavor of your Chicken Caesar Pasta Salad, consider adding fresh herbs. Basil or dill can add a fresh taste. You can also mix in some garlic. Roasted garlic gives a rich flavor. For a kick, try adding a pinch of red pepper flakes. If you love cheese, add more Parmesan for a creamy touch. Don't forget to balance the saltiness of the dressing with fresh black pepper. A squeeze of lemon juice can brighten the whole dish. Serve your Chicken Caesar Pasta Salad in a large bowl for sharing. For individual servings, use smaller bowls. Top with extra Parmesan and whole cherry tomatoes for color. You can add croutons for crunch or serve it with crusty bread. This salad is great for picnics and potlucks. If you want to make it a meal, pair it with grilled shrimp or chicken. For the best taste, chill it in the fridge for 30 minutes before serving. For the full recipe, check out the complete instructions above. {{image_4}} You can easily make this dish vegetarian. Replace the chicken with chickpeas or tofu. Both add protein and texture. You can also use roasted vegetables for a hearty bite. Try bell peppers, zucchini, or even artichokes. These swaps keep the salad fresh and vibrant. To make this salad gluten-free, simply select gluten-free rotini pasta. Many brands offer delicious options made from rice or corn. This way, you enjoy the same great flavor without gluten. Check the labels to ensure there are no hidden gluten ingredients. Seasonal ingredients can enhance your salad's flavor. In summer, add fresh corn or diced cucumber. In fall, consider roasted butternut squash or crispy apples for a sweet twist. Fresh herbs, like basil or cilantro, also work wonders. They bring brightness to your dish while keeping it light and fresh. For the full recipe, refer to the complete guide above. To store your Chicken Caesar Pasta Salad, use an airtight container. This helps keep the salad fresh. If you have leftovers, make sure to cool it first. Then, transfer it to the container. Keep the dressing separate if you plan to store it for more than a day. This keeps the lettuce crisp and prevents sogginess. You won’t need to reheat this salad since it’s best served cold. If you do prefer a warm dish, you can warm the chicken separately in a pan. Just heat it gently to avoid overcooking. Then, mix it back into the salad. Your Chicken Caesar Pasta Salad will last about 3 to 4 days in the fridge. After this time, the lettuce may start to wilt. Always check for any off smells or changes in texture before eating. This way, you enjoy it at its best! For more details, refer to the [Full Recipe]. Yes, you can! Rotini pasta adds a fun twist to any salad. Its spiral shape holds onto dressings and flavors well. You can try it in pasta salads with veggies, beans, or even tuna. Just cook it al dente for the best texture. Rotini works great in cold salads, too, keeping them fresh and tasty. No problem! If you lack Caesar dressing, you can make a simple substitute. Mix together some mayonnaise, lemon juice, and a touch of garlic powder. You can also add a bit of Worcestershire sauce for extra flavor. This mix gives you a creamy dressing that works well with your salad. Feel free to get creative with your ingredients! Absolutely! This salad is perfect for meal prep. You can make it a day ahead and store it in the fridge. Just keep the dressing separate until you’re ready to serve. This helps the salad stay crisp and fresh. Toss it all together right before eating, and enjoy a quick, tasty meal! This blog post covered how to make a delicious pasta salad. We explored the key ingredients, helpful cooking tips, and common mistakes. I shared ways to boost flavors and suggested fun variations. You learned about proper storage and got answers to your questions. Enjoy this versatile salad now or later. With these tips, you can create a dish everyone will love. Try it out and make it your own!
Savory Chicken Caesar Pasta Salad Easy and Fresh Dish
Are you ready to elevate your summer meals? This Chicken Caesar Pasta Salad combines the classic flavors you love with a fresh twist that’s easy
- 2 cups romaine lettuce, coarsely chopped - 1 cup cherry tomatoes, halved - ½ cup cucumber, diced - ½ cup bell pepper, diced - ½ cup red onion, finely sliced - 1 cup salami, cut into thin strips - 1 cup provolone cheese, cubed - ½ cup pepperoncini, sliced - ¼ cup olives, pitted - Olive oil, vinegar, and Italian seasoning - Salt and black pepper to taste Gathering fresh ingredients is key to this salad. Start with the romaine lettuce. Its crispness adds a nice crunch. Next, cherry tomatoes bring color and sweetness. Chop cucumbers for a refreshing bite. Choose your favorite bell pepper for taste and color. The red onion gives a nice kick that balances the flavors. Now, let’s talk proteins. Salami is a classic choice here. It adds rich flavor and texture. Provolone cheese complements the salami perfectly. Their combination makes the salad hearty. Don't forget the condiments. Pepperoncini adds a zing, while olives give a briny touch. The dressing is simple but essential. Use olive oil and vinegar for a light finish. Italian seasoning enhances the salad's flavor. Finally, add salt and black pepper to taste. This mix of ingredients creates a vibrant Low Carb Italian Grinder Salad. You can find the Full Recipe to dive deeper into the process! - Wash and chop all fresh vegetables. - Start with 2 cups of romaine lettuce. Chop it coarsely. - Halve 1 cup of cherry tomatoes. - Dice ½ cup of cucumber into small cubes. - Dice ½ cup of bell pepper. Use your favorite color. - Slice ½ cup of red onion finely. - Place all these veggies in a large bowl. This will be your fresh base. - Now, add the proteins and cheeses. - Combine 1 cup of salami cut into thin strips. - Add 1 cup of provolone cheese, cubed into bite-sized pieces. - Toss in ½ cup of sliced pepperoncini and ¼ cup of pitted olives. - This mix adds great flavor and texture. - In a small bowl, whisk together ¼ cup of olive oil and 2 tablespoons of red wine vinegar. - Add 1 tablespoon of Italian seasoning blend. - Include a pinch of salt and black pepper. Whisk until well mixed. - Drizzle the dressing over the salad. - Toss everything gently with tongs or a spoon. - Ensure all ingredients are evenly coated. - Let the salad rest for about 10-15 minutes. - This time allows the flavors to meld together. - Serve on large plates or in wide bowls. - Garnish with extra olives and a sprinkle of Italian seasoning for a nice touch. - Enjoy the fresh taste of your Low Carb Italian Grinder Salad! For the full recipe and details, check out the [Full Recipe]. If you want to switch things up, you can try using turkey or ham instead of salami. For cheese, mozzarella or feta can work well. You can also use goat cheese for a tangy flavor. For vinegar, red wine vinegar is great, but apple cider vinegar is a tasty substitute too. To boost the taste, try adding fresh basil or oregano. A bit of garlic powder can also add depth. For garnishing, sprinkle some fresh parsley or a few extra olives on top. You can even add a few slices of lemon for a fresh pop. For a fun twist, serve this salad in a large hollowed-out cucumber or bell pepper. It makes a great centerpiece! Pair your salad with grilled chicken or zucchini noodles for a complete low-carb meal. You can also offer a side of roasted veggies to keep everything low-carb and colorful. {{image_4}} You can make your Low Carb Italian Grinder Salad even better by adding more veggies. Try adding zucchini, radishes, or spinach. Each new vegetable adds unique flavors and textures. More colors on your plate also make the salad look more inviting. Fresh vegetables bring vitamins and minerals. They keep your meal light and healthy, which is a big plus. Want to add protein? You can use cooked chicken or turkey. They fit great in this salad and boost its flavor. If you prefer vegetarian options, try using chickpeas or tofu. Both options add protein without meat. Mix and match proteins to find your favorite. Homemade dressings can change your salad game. You can whisk together olive oil, lemon juice, and some herbs. This simple dressing is tasty and low in carbs. For a creamier option, mix Greek yogurt with herbs and spices. You can also try store-bought low-carb dressings. Just check the labels to keep it healthy. To keep your Low Carb Italian Grinder Salad fresh for 1-2 days, store it in an airtight container. Make sure to keep the dressing separate until you are ready to eat. This helps the salad stay crisp and tasty. If you mix the dressing in too soon, the veggies can get soggy. You can also use a paper towel in the container to absorb extra moisture. You cannot freeze the Low Carb Italian Grinder Salad as a whole. Freezing can change the texture of fresh veggies and cheese. However, you can freeze some ingredients separately. For example, freeze the salami and cheese in small bags. This way, you can use them later in other dishes. For leftovers, it’s best to enjoy them cold. If you need to rehydrate any ingredients, soak them briefly in a little water. This can help restore some freshness. If the salad seems dry, you can add a bit more dressing to make it tasty again. Enjoy your meal with a simple twist! A Low Carb Italian Grinder Salad is a fresh, vibrant dish. It features crunchy vegetables, savory meats, and creamy cheese. The salad is full of flavor and low in carbs, making it a healthy choice. Key ingredients include romaine lettuce, salami, provolone cheese, and pepperoncini. This dish is colorful and perfect for lunch or dinner. To prepare this salad in advance, start by washing your vegetables. Chop the romaine, halving the cherry tomatoes and dicing the cucumber and bell pepper. Slice the red onion thinly. Store your chopped veggies in airtight containers. Keep the meats and cheese separate to avoid sogginess. Mix the salad just before serving to keep it fresh. Yes, this salad is great for meal prep! It stores well in the fridge for a couple of days. The flavors blend nicely over time. Just remember to keep the dressing separate until you’re ready to eat. This way, your salad stays crisp and tasty throughout the week. It's an easy way to enjoy healthy meals every day. Absolutely! You can swap salami for turkey or ham. If you prefer chicken, that works too. For cheese, try mozzarella or feta for a twist. Use what you love or what you have on hand. This salad is flexible and allows you to customize it to fit your taste. This salad has about 8-10 grams of carbs per serving. The low-carb vegetables keep the count down. Plus, the healthy fats from olive oil and cheese help you feel full. Choosing low-carb options like this salad supports a balanced diet while still being delicious. Check the Full Recipe for exact measurements and nutritional info. In this article, we explored how to make a Low Carb Italian Grinder Salad. We discussed fresh produce, proteins, and dressings needed for a tasty mix. You learned tips for substitutions, flavor enhancements, and unique serving ideas. This salad is not just delicious; it’s also flexible for meal prep. Enjoy experimenting with different ingredients to suit your taste. Remember, keeping it fresh and storing it right will help you savor each bite longer. Enjoy your healthy creation and make it your own!
Low Carb Italian Grinder Salad Fresh and Tasty Delight
Looking for a fresh and tasty salad? You’re in the right place! This Low Carb Italian Grinder Salad packs flavor without the carbs. Loaded with
- Fresh baby spinach - Ripe peach - Fresh blueberries - Creamy feta cheese - Chopped walnuts - Natural honey - Balsamic vinegar - Extra virgin olive oil - Seasoning: Sea salt and black pepper To make the Blueberry Peach Feta Salad, you'll need fresh and simple ingredients. Start with two cups of fresh baby spinach. This leafy green base gives the salad a nice crunch and lots of nutrients. Next, grab a ripe peach. Slice it into thin wedges. The sweet taste of peach pairs perfectly with the salad. Then, add one cup of fresh blueberries. These little gems burst with flavor and add a pop of color. You'll also need half a cup of creamy feta cheese. Crumbling it over the salad adds a salty richness. Don’t forget about a quarter cup of chopped walnuts. Toast them lightly for an extra layer of flavor and crunch. For the dressing, you’ll mix two tablespoons of natural honey with one tablespoon of balsamic vinegar. This blend gives a sweet and tangy taste. Add one tablespoon of extra virgin olive oil to bring it all together. Season with sea salt and black pepper to your liking. This list of ingredients is key to creating a tasty and refreshing salad. For the full recipe, check the details above. 1. Washing and drying spinach Start by rinsing the fresh baby spinach under cold water. Make sure to wash off any dirt or grit. After washing, gently dry the spinach using a salad spinner or a clean kitchen towel. Dry spinach helps the dressing stick better. 2. Adding fruit to the salad bowl Take a large salad bowl and place the dried spinach at the bottom. Next, add the sliced ripe peaches and fresh blueberries. Spread the fruit evenly over the spinach. This adds color and flavor to your salad. 3. Sprinkling feta and walnuts Once your fruit is in the bowl, sprinkle the crumbled feta cheese on top. Then, add the chopped and toasted walnuts. The feta brings a creamy texture, while walnuts add a nice crunch. 4. Mixing the dressing ingredients In a small mixing bowl, combine the natural honey, balsamic vinegar, and extra virgin olive oil. Use a whisk to blend the ingredients well. Don’t forget to season with sea salt and freshly cracked black pepper. Taste it to make sure it’s just right! 5. Drizzling dressing and tossing salad Now, take your dressing and drizzle it over the salad. Carefully toss all the ingredients together. Be gentle to avoid bruising the fruit. You want everything to be coated in that tasty dressing. 6. Taste and adjust seasoning After tossing, taste your salad. If you think it needs more flavor, feel free to add extra salt, pepper, or honey. Adjust to your liking! This Blueberry Peach Feta Salad is fresh and full of flavor. For more detailed instructions, you can check the Full Recipe. To make the perfect Blueberry Peach Feta Salad, you can adjust the dressing. If you want it sweeter, add more honey. If you like it tangy, add extra balsamic vinegar. This helps you tailor the flavor to your taste. If you want alternatives for honey, try maple syrup. It makes a great swap. For vinegar, apple cider vinegar can also work well. Each choice gives a unique twist. When tossing the salad, be gentle. Bruising the fruit can ruin the look and taste. Use your hands to toss lightly. This keeps the blueberries and peaches intact. It helps maintain a fresh and vibrant salad. For the Full Recipe, remember that the balance of flavors is key. Adjust to your liking, and enjoy each bite! {{image_4}} You can easily change the fruit in this salad. Strawberries add a sweet twist. They mix well with the feta. You could also use mandarin oranges for a zesty flair. They bring a bright pop of flavor. Cheese is another fun area to explore. Instead of feta, try goat cheese. It has a creamy texture and a tangy taste. It pairs well with both peaches and blueberries. Nuts and seeds can also change the salad's crunch. If you want a lighter option, swap walnuts for sliced almonds. Sunflower seeds can add a nice crunch as well. You can even skip nuts if you prefer a nut-free dish. Feel free to mix and match these options. Each choice brings new flavors and textures. Your salad will always be fresh and exciting. Check out the Full Recipe for more details. To keep your blueberry peach feta salad fresh, store it in an airtight container. This helps prevent moisture from getting in. How to store leftovers: 1. Place leftover salad in the container. 2. If you have dressing left, store it separately. 3. Keep the salad in the fridge to keep it cool. Duration for freshness in the refrigerator: Your salad will stay fresh for about 2 days. After that, the fruits may lose their crunch. The feta will still taste good but may not look great. Best practices for maintaining texture and flavor: - Avoid mixing the dressing with the salad until you’re ready to eat. This keeps the greens crisp and the fruits bright. - If you notice any sogginess, try adding fresh spinach or new fruit to revive it. - Always check for any signs of spoilage before eating, especially after a day or two. For the complete recipe, check the Full Recipe. How long does Blueberry Peach Feta Salad stay fresh? Blueberry Peach Feta Salad stays fresh for about 1 to 2 days in the fridge. The key is to keep it in an airtight container. The fruit can lose some texture, but it still tastes great. Can I make Blueberry Peach Feta Salad in advance? Yes, you can make this salad in advance. However, I suggest adding the dressing right before serving. This keeps the spinach and fruit crisp. What is the best way to serve Blueberry Peach Feta Salad? Serve Blueberry Peach Feta Salad chilled. You can use individual bowls or a large platter. Garnish with extra blueberries or peach slices for a nice touch. Is Blueberry Peach Feta Salad suitable for meal prep? Absolutely! This salad is great for meal prep. Just pack the spinach and toppings separately. Add the dressing when you are ready to eat. Can I use frozen blueberries for the salad? You can use frozen blueberries, but fresh ones taste better. If you use frozen, thaw them first. Drain any excess water to keep the salad from getting soggy. For the complete recipe, check out the Full Recipe section. This blog post shared a simple, delicious Blueberry Peach Feta Salad recipe. We covered all the ingredients, steps to prepare the salad, and tips to enhance flavor. You can customize it with different fruits and cheeses. I also explained how to store leftovers to keep them fresh. Enjoy making this salad for your next meal. It’s easy and full of flavor. Don't hesitate to experiment and find your perfect mix!
Blueberry Peach Feta Salad Fresh and Flavorful Mix
Craving a refreshing salad that bursts with flavor? Look no further! My Blueberry Peach Feta Salad is a vibrant mix of fresh ingredients that will
- 2 large carrots - 1 large sweet apple (e.g., Honeycrisp or Fuji) - 1/2 cup raisins or dried cranberries - 1/4 cup walnuts - 1/4 cup Greek yogurt or dairy-free alternative - 1 tablespoon honey or maple syrup - 1 tablespoon fresh lemon juice - 1 teaspoon ground cinnamon - Salt to taste - Extra chopped walnuts - Ground cinnamon for dusting The main ingredients in this salad make it vibrant and full of flavor. The carrots add a crunchy texture, while the sweet apple brings a nice balance. I love using Honeycrisp or Fuji apples. They are sweet, juicy, and perfect for this dish. Raisins or dried cranberries add a chewy sweetness. They pair well with the crunch of walnuts, which provide healthy fats. The walnuts also give a nutty flavor that enhances the salad. For the dressing, Greek yogurt gives creaminess. You can use a dairy-free option if needed. Honey or maple syrup adds natural sweetness. Fresh lemon juice brightens the flavors and makes the salad refreshing. Ground cinnamon adds warmth and spice, making it even more enjoyable. I like to sprinkle extra walnuts and a little cinnamon on top for a nice finish. This salad is full of flavor and good for you, too! For the full recipe, check out the Crunchy Carrot Apple Delight. - Grate the carrots and dice the apple. - Combine the grated carrots and diced apple in a large mixing bowl. Start by grating two large carrots. Use a box grater or food processor for speed. Next, take one large sweet apple, like a Honeycrisp or Fuji. Core and dice it into small pieces. These steps are simple but key to a tasty salad. - Stir in raisins or dried cranberries and chopped walnuts. Now, add in 1/2 cup of raisins or dried cranberries. These give the salad a sweet touch. Then, toss in 1/4 cup of roughly chopped walnuts. This adds a nice crunch and nutty flavor. Mixing these ingredients helps create layers of taste. - Whisk together yogurt, honey (or maple syrup), lemon juice, cinnamon, and salt. In a small bowl, whisk together 1/4 cup of Greek yogurt. You can also use a dairy-free option if you prefer. Add in 1 tablespoon of honey or maple syrup. This brings natural sweetness. Then, mix in 1 tablespoon of fresh lemon juice and 1 teaspoon of ground cinnamon. A pinch of salt will enhance the flavors too. Whisk until smooth and creamy. - Pour the dressing over the carrot and apple mixture. - Toss ingredients until well-coated. Once your dressing is ready, pour it over the carrot and apple mix. Use a spatula or wooden spoon to toss everything together. Make sure every piece is coated in the creamy dressing. This helps the flavors blend well. - Allow the salad to sit for 10 minutes at room temperature. Letting the salad sit for 10 minutes allows the flavors to meld beautifully. This small step makes a big difference in taste. You will enjoy a fresher, more vibrant salad. For the full recipe, check out the Crunchy Carrot Apple Delight. - Choose firm apples to prevent sogginess. Firm apples stay crisp and add crunch. - Grate carrots just before use for maximum freshness. Freshly grated carrots taste better. - Experiment with spices like nutmeg or ginger. These spices add warmth and depth. - Add a pinch of black pepper for a kick. This small touch can elevate the flavors. - Use clear serving dishes to showcase the salad's colors. Bright colors draw the eye and make it appealing. - Garnish with a sprinkle of extra nuts or herbs. It adds texture and a pop of flavor. For the full recipe, see the section above. {{image_4}} You can easily change the nuts in this salad. If you want a different flavor, try pecans or almonds instead of walnuts. Both nuts add a nice crunch and unique taste. Pecans are sweeter, while almonds give a slight almond flavor. You can even mix them for a fun twist! To make the salad even more exciting, think about adding other fruits. Diced celery or pears can give extra crunch. They also add a fresh taste that pairs well with carrots and apples. If you want a burst of flavor, try adding citrus segments. Oranges or grapefruits can brighten the salad and add zest. The dressing can change the whole vibe of the salad. For a simple yet tasty option, try a vinaigrette with olive oil and apple cider vinegar. This mix is light and tangy. If you prefer something creamy, use tahini. It gives a nutty flavor and smooth texture that blends beautifully with the salad. For the full recipe, you can check the Crunchy Carrot Apple Delight. Store your carrot apple salad in an airtight container in the refrigerator. This keeps it fresh and crisp. Make sure the lid seals tightly to avoid air exposure. Consume your salad within 3 days for optimal freshness. After that, the flavors may fade, and the texture could change. Always check for any signs of spoilage before eating. You can prep the ingredients ahead of time. Grate the carrots and dice the apple early in the day. However, mix everything just before serving. This way, the salad stays crunchy and tasty. For the full recipe, check out the Crunchy Carrot Apple Delight. Yes, but it's best to add dressing right before serving for optimal texture. If you prepare the salad earlier, the carrots and apples may lose their crunch. Keep the salad fresh by storing the mix and dressing separately. When ready to eat, combine them for a crisp bite. Yes, it’s rich in vitamins from the carrots and apples and has healthy fats from walnuts. Carrots are high in beta-carotene, which helps your eyes. Apples provide fiber and antioxidants. Walnuts add omega-3 fatty acids, good for heart health. Together, they create a balanced and nutritious dish. Absolutely! Experiment with various fruits, such as berries or dried fruits. Berries like blueberries or strawberries add a nice pop of color and flavor. Dried fruits, like apricots or figs, offer a sweet twist. Mixing fruits keeps the salad exciting and fun. You can create your own version every time! Carrot apple salad is a tasty and healthy dish. You need simple main ingredients like carrots, sweet apples, and walnuts. Adding a zesty dressing makes it even better. Remember to store leftovers correctly to keep them fresh. Try different nuts and fruits to find your favorite mix. This salad is easy to make and fun to customize. Enjoy creating your version of this bright, vibrant dish!
Carrot Apple Salad Flavorful and Fresh Choice
Are you looking for a fresh, crunchy salad that’s packed with flavor? This Carrot Apple Salad is a vibrant mix of sweet apples, crisp carrots,
In this Mediterranean Chickpea Salad, fresh ingredients shine. Each bite bursts with flavor and color. Here’s what you need: - 1 can (15 oz) chickpeas, thoroughly rinsed and drained - 1 medium cucumber, diced into bite-sized pieces - 1 cup cherry tomatoes, halved for freshness - 1/2 red onion, finely chopped for a sweet crunch - 1 red bell pepper, diced to add color and sweetness - 1/2 cup Kalamata olives, pitted and halved to enhance the briny flavor - 1/4 cup fresh parsley, finely chopped for a burst of freshness - 1/4 cup feta cheese, crumbled (optional, for extra creaminess) - 3 tablespoons extra virgin olive oil for richness - 2 tablespoons freshly squeezed lemon juice for acidity - 1 teaspoon dried oregano to infuse Mediterranean essence - Salt and freshly cracked pepper to taste Each ingredient plays a role in this vibrant dish. The chickpeas provide protein and texture. The cucumber adds a refreshing crunch, while the tomatoes bring juiciness. Red onion and bell pepper give sweetness and color. Kalamata olives add a briny bite, making the salad unique. Fresh parsley brightens the dish, and feta cheese adds creaminess. The olive oil and lemon juice create a rich dressing that ties everything together. This recipe is simple, yet each ingredient matters. It’s a fast and healthy option for lunch or a side dish. You can find the full recipe to guide you through the steps. Enjoy the flavors of the Mediterranean with each delicious bite! Step 1: Preparing the Base Start with a large mixing bowl. Add the rinsed chickpeas. Next, toss in the diced cucumber, halved cherry tomatoes, finely chopped red onion, and diced red bell pepper. Then, mix in the halved Kalamata olives and chopped parsley. You create a colorful medley that looks inviting and fresh. Step 2: Making the Dressing In a separate small bowl, pour in the extra virgin olive oil. Add the freshly squeezed lemon juice next. Then, sprinkle in the dried oregano and a pinch of salt and pepper. Whisk everything together until it blends well. This dressing adds a zesty touch to your salad. Step 3: Combining Ingredients Drizzle the dressing over your chickpea mixture. With gentle motions, toss everything together. Make sure each ingredient gets coated in that tasty dressing. If you choose to add feta, sprinkle it on top right before you toss again. This keeps the cheese intact while blending the flavors. Step 4: Allowing Flavors to Meld Let the salad rest for at least 10 minutes. You can also refrigerate it for up to 30 minutes. This time helps all the flavors blend together. The longer you wait, the better it tastes. You will enjoy a salad full of vibrant flavors. For the full recipe with detailed instructions, check out the link provided. How to Serve and Present When serving your Mediterranean Chickpea Salad, choose a wide bowl or individual plates. This helps showcase the bright colors of the salad. For a finishing touch, sprinkle extra parsley on top. You can also add a lemon wedge for a zesty look. Presenting the salad this way makes it more inviting. Best Accompaniments for the Salad This salad pairs well with many dishes. Serve it with grilled chicken or fish for protein. You can also enjoy it with pita bread or hummus for a full meal. It makes a great side for any Mediterranean dish. Pair it with a light white wine to enhance the flavors. Nutritional Value of Chickpeas Chickpeas are packed with protein and fiber. They help keep you full and satisfied. A 15 oz can provides about 30 grams of protein. Plus, they have essential vitamins and minerals, such as iron and magnesium. This makes them a great choice for a healthy diet. Why Include Fresh Ingredients Fresh ingredients boost the salad's flavor and nutrition. Getting fresh veggies adds vitamins and antioxidants. They also make the dish colorful and appealing. Using fresh herbs like parsley gives a burst of flavor that dried herbs cannot match. Fresh lemon juice brightens the salad and adds a tangy taste. {{image_4}} You can easily change this Mediterranean chickpea salad to fit your taste. Here are some ideas: - Vegan Adaptations: To make it vegan, skip the feta cheese. You can add avocado for creaminess. Nutritional yeast works well too, adding a cheesy flavor. - Adding Protein: If you want to add protein, grilled chicken or canned tuna works great. Both options boost the salad's heartiness and keep it satisfying. Sometimes, you may not have all the ingredients. Here are some swaps you can try: - Alternatives for Feta Cheese: If you don’t have feta, use goat cheese or a dairy-free cheese. They add a similar tangy taste. - Different Olive Options: Kalamata olives add a great briny flavor. If you can’t find them, green olives or black olives are good substitutes. Each brings its own unique taste to the salad. For the full recipe, check out the Mediterranean Chickpea Salad Delight! How do you store leftovers? To keep your Mediterranean Chickpea Salad fresh, place it in an airtight container. This helps to keep out air and moisture. Always refrigerate leftovers right away. They stay crisp and tasty this way. What container should you use? Use a glass or BPA-free plastic container. Both options are safe and easy to clean. If you want to take the salad to a picnic, use a cooler bag with ice packs. This keeps it fresh and cool. When should you eat it for best freshness? Enjoy the salad within three days for the best taste. After three days, the veggies may lose their crunch. The flavors may not be as bright, either. If you see any signs of spoilage, throw it away. Always trust your nose and eyes! Can I make this salad ahead of time? Yes, you can make this salad ahead of time. It tastes even better after the flavors mix. Store it in the fridge for up to a day. Just toss it again before serving. What can I substitute for chickpeas? If you can't find chickpeas, try black beans or white beans. Both add protein and taste great. You can also use lentils for a different texture. How do I adjust the recipe for larger servings? To make more servings, just double or triple the ingredients. Keep the ratios the same. This way, everyone can enjoy a plate. Is this salad gluten-free? Yes, this salad is gluten-free! All the ingredients are safe for those who avoid gluten. Enjoy it without worry. What are the best herbs to add? For extra flavor, add fresh herbs like basil or mint. They bring a fresh taste to the salad. You could also try dill for a unique twist. Can this salad be frozen? I don't recommend freezing this salad. The fresh veggies lose their crunch and flavor when thawed. It's best enjoyed fresh. How to make it spicier? To add some heat, mix in diced jalapeños or red pepper flakes. Start with a little, then taste it. You can always add more if you like it spicier. This salad combines simple, healthy ingredients for a fresh meal. We used chickpeas, fresh veggies, and a tasty dressing. Remember, you can customize it and change ingredients to suit your taste. Make it vegan or add protein like chicken. Store leftovers well for later enjoyment. Overall, this salad is not just easy to make; it also packs flavor and nutrition. Enjoy it alone or with friends. Try these tips, and you'll impress everyone at your table.
Mediterranean Chickpea Salad Fresh and Simple Delight
Welcome to a fresh and simple delight! Mediterranean Chickpea Salad is a vibrant dish packed with flavor and nutrients. In just a few easy steps,