WANT TO SAVE THIS RECIPE?
Are you ready for a fun twist on a classic treat? S’Mores Hand Pies combine gooey marshmallows, rich chocolate, and crunchy graham crackers all wrapped in flaky pastry. This easy recipe is perfect for a family dessert night or a sweet snack on-the-go. In this post, I’ll share everything you need to know, from the right ingredients to helpful tips, ensuring your hand pies turn out delicious every time. Let’s get baking!
Why I Love This Recipe
- Deliciously Nostalgic: These hand pies bring the classic campfire s’mores experience into a portable, flaky treat that everyone loves.
- Easy to Make: With simple ingredients and straightforward steps, this recipe is perfect for bakers of all skill levels, from beginners to pros.
- Customizable Filling: Feel free to mix and match the fillings! Add peanut butter, fruit, or different types of chocolate for a unique twist.
- Perfect for Sharing: These hand pies are great for gatherings, parties, or just as a sweet treat to share with friends and family.
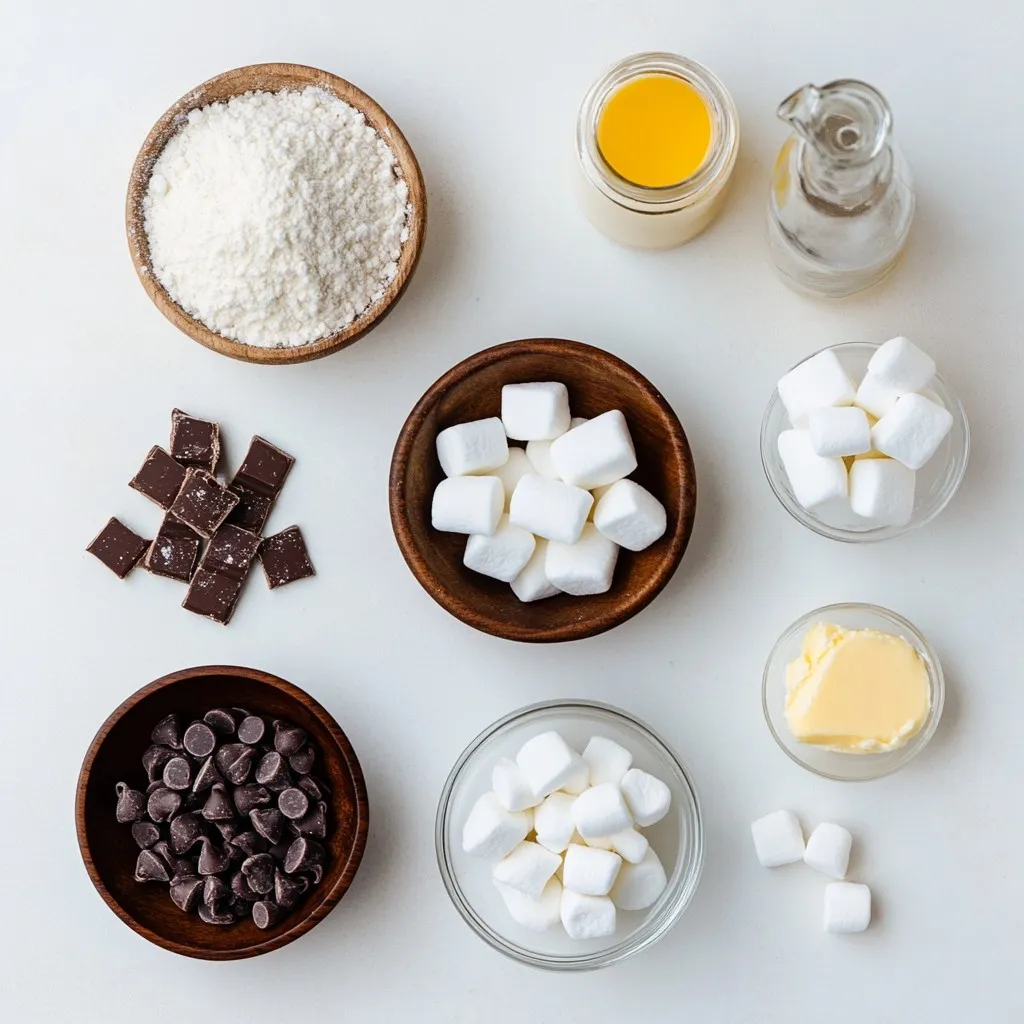
Ingredients
Dry Ingredients
– 2 cups all-purpose flour
– 1/4 cup granulated sugar
– 1/2 teaspoon salt
Wet Ingredients
– 1/2 cup unsalted butter, cold and cubed
– 1/4 cup cold water
– 1 teaspoon vanilla extract
– 1 egg, beaten (for egg wash)
S’Mores Filling
– 1 cup mini marshmallows
– 1/2 cup semi-sweet chocolate chips
– 1/2 cup crushed graham crackers
To make S’Mores hand pies, start with the dry ingredients. You need all-purpose flour, granulated sugar, and salt. These basics create a great pie crust.
Next, gather the wet ingredients. Cold butter is key. It helps the pie crust stay flaky. Then, add cold water and vanilla extract. The egg wash gives the pies their golden color.
Now, let’s talk about the filling. You’ll need mini marshmallows, semi-sweet chocolate chips, and crushed graham crackers. This mix gives you that classic s’mores flavor.
These ingredients come together to make a fun and tasty treat. Once you have everything ready, you’ll be on your way to baking delicious S’Mores hand pies.
Step-by-Step Instructions
Preparing the Dough
First, mix the dry ingredients. In a large bowl, whisk together 2 cups of flour, 1/4 cup of sugar, and 1/2 teaspoon of salt. This blend will form the base of your dough. Next, add 1/2 cup of cold, cubed butter. Use a pastry cutter or your fingers to blend the butter with the dry mix. Aim for a coarse crumb texture, with some pea-sized pieces of butter still visible. This helps create a flaky crust. Now, slowly add 1/4 cup of cold water, one tablespoon at a time. Stir gently after each addition until the dough holds together. Don’t overwork it; this keeps the crust tender.
Chilling the Dough
Once your dough is ready, divide it into two equal disks. Wrap each disk in plastic wrap. Chilling is key here. Refrigerate the dough for at least 30 minutes. This step firms up the butter, ensuring a flakier texture in your hand pies. It also makes the dough easier to roll out later.
Assembling the Hand Pies
After chilling, it’s time to assemble. Preheat your oven to 375°F (190°C). Roll out one disk of dough on a lightly floured surface. Aim for a thickness of about 1/8-inch. Use a cookie cutter or a glass to cut out circles, about 3 inches in diameter. You should get enough circles for at least 8 hand pies. On one half of each circle, add a small handful of mini marshmallows, a sprinkle of crushed graham crackers, and a few chocolate chips. Make sure not to overfill, or they might burst during baking. Fold the dough over to form a semi-circle and press the edges together. Use a fork to crimp the edges for a fun look and to seal them well.
Baking the Hand Pies
Now, arrange your hand pies on lined baking sheets. Brush the tops with a beaten egg. This gives them a golden finish. Bake in your preheated oven for 20-25 minutes. Check for doneness when they are golden brown and slightly puffed. After baking, let them cool on the sheets for a few minutes. Then, transfer them to a wire rack to cool down a bit more. Enjoy the sweet smell of freshly baked S’mores hand pies!
Tips & Tricks
Perfecting the Dough
To make great hand pies, start with cold ingredients. Cold butter helps create a flaky crust. When mixing, keep the butter in small pieces. This ensures your dough stays light. Avoid overworking the dough. This can make it tough. Mix just until it holds together. Then, chill the dough for at least 30 minutes. This step makes a big difference in texture.
Customizing the Filling
While mini marshmallows, chocolate chips, and graham crackers are classic, feel free to get creative! You can try peanut butter or fruit jam for a twist. Balance sweetness by adding a pinch of salt. This can enhance the flavors and make them pop. Experiment with different combinations to find your favorite filling.
Serving Suggestions
For a fun presentation, serve the hand pies warm on a wooden board. Dust them lightly with powdered sugar for a sweet touch. You can also include a small bowl of melted chocolate for dipping. This makes them extra special and fun to eat. Pair these treats with milk or hot cocoa for a cozy dessert experience.
Pro Tips
- Chill the Dough: Allowing the dough to chill for at least 30 minutes helps to firm up the butter, resulting in a flakier crust when baked.
- Don’t Overfill: While it’s tempting to pack in the filling, be careful not to overfill the hand pies to prevent them from bursting during baking.
- Use a Fork for Sealing: Crimping the edges with a fork not only seals the hand pies but also adds a decorative touch that makes them look more appealing.
- Serve Warm: These hand pies are best enjoyed warm, so serve them fresh out of the oven for the ultimate gooey s’mores experience.

Variations
Different Flavor Combinations
You can mix up your s’mores hand pies with new flavors. One fun option is peanut butter s’mores hand pies. Just add a spoonful of creamy peanut butter along with the chocolate chips and marshmallows. This twist adds a nutty taste that kids and adults love.
Another great combo is Nutella and banana filling. Spread some Nutella on the dough and top it with banana slices. This sweet mix gives a rich and fruity flavor. Your friends will crave these unique hand pies!
Gluten-Free Option
If you need a gluten-free version, it’s easy to swap a few ingredients! Use gluten-free all-purpose flour instead of regular flour. Make sure it has a binder like xanthan gum. This will help keep the dough together. You can also check that your chocolate chips and graham crackers are gluten-free. Enjoy your tasty treats without worry!
Vegan Adaptations
You can make these hand pies vegan too! Start by using dairy-free butter instead of regular butter. Replace the egg wash with a splash of almond milk to brush on top. For the filling, stick with vegan chocolate chips and mini marshmallows. These simple swaps make your pies plant-based and still delicious!
Storage Info
Storing Hand Pies
To keep your s’mores hand pies fresh, store them in an airtight container. This helps avoid dryness. If you have a lot of pies, you can stack them with parchment paper between layers. This keeps them from sticking together. The best temperature for storage is at room temperature. They stay good for about 2 days.
For longer storage, you can freeze them. Wrap each hand pie in plastic wrap, then place them in a freezer bag. This way, they last up to 3 months. When you’re ready to eat them, just take them out and let them thaw.
Reheating Tips
To reheat your hand pies, use the oven for the best results. Preheat your oven to 350°F (175°C). Place the hand pies on a baking sheet. Heat them for about 10-15 minutes. This helps keep them crispy and warm.
If you want to refresh them, try a microwave for a quick fix. Heat each pie for about 15-20 seconds. However, this might make the crust a bit soft. For a crispy texture, the oven is always best. Enjoy your tasty treat just like it was fresh!
FAQs
Can I make the dough ahead of time?
Yes, you can make the dough a day ahead. Just wrap it well in plastic wrap and store it in the fridge. This will help the flavors meld. When you’re ready to bake, let it sit for a few minutes at room temperature. This makes it easier to roll out.
How do I prevent the filling from leaking?
To keep the filling inside the hand pies, seal them well. After adding the filling, fold the dough over and press the edges firmly. Use a fork to crimp the edges. This creates a strong seal. Make sure not to overfill the pies. A small amount of filling is best.
Can I freeze the hand pies?
Yes, you can freeze the hand pies. After assembling, place them on a baking sheet and freeze until firm. Then transfer them to a freezer bag. When you’re ready to bake, no need to thaw. Just add a few extra minutes to the baking time.
What can I serve with s’mores hand pies?
You can serve s’mores hand pies with melted chocolate for dipping. A scoop of vanilla ice cream also goes well. For a fun twist, try a sprinkle of sea salt on top. These options enhance the dessert and make it more enjoyable.
This blog post covered how to make delightful s’mores hand pies. We began with the right ingredients, from flour to mini marshmallows. Then, I explained the steps to make the dough, chill it, assemble the pies, and bake them. I shared tips for perfecting the dough and customizing fillings. Lastly, we explored storage and reheating methods.
Now you can enjoy warm, gooey hand pies anytime. Get creative with flavors and fillings. Happy bakin
S’Mores Hand Pies
Delicious hand pies filled with marshmallows, chocolate, and graham crackers, reminiscent of classic s'mores.
Course Dessert
Cuisine American
Servings 8
Calories 200 kcal
- 2 cups all-purpose flour
- 0.25 cup granulated sugar
- 0.5 teaspoon salt
- 0.5 cup unsalted butter, cold and cubed
- 0.25 cup cold water
- 1 cup mini marshmallows
- 0.5 cup semi-sweet chocolate chips
- 0.5 cup crushed graham crackers
- 1 each egg, beaten (for egg wash)
- 1 teaspoon vanilla extract
Begin by preparing your dough: In a large mixing bowl, whisk together the all-purpose flour, granulated sugar, and salt until well combined.
Next, incorporate the cold, cubed butter into the dry mixture. Use a pastry cutter or your fingers to blend the butter until the mixture looks like coarse crumbs, with some pea-sized pieces remaining.
Gradually add the cold water to the mixture, one tablespoon at a time, stirring gently after each addition. Stop adding water when the dough holds together; be careful not to overwork it to ensure a tender crust.
Once ready, divide the dough into two equal disks. Wrap each disk in plastic wrap and refrigerate for at least 30 minutes. This chilling step is crucial as it helps the butter firm up for a flakier pie crust.
Preheat your oven to 375°F (190°C) and prepare two baking sheets by lining them with parchment paper for easy cleanup.
After the dough has chilled, take one disk out and roll it out on a lightly floured surface to a thickness of about 1/8-inch. Use a cookie cutter or a glass to cut out circles that are approximately 3 inches in diameter. You should have enough for at least 8 hand pies.
On one half of each circle, generously place a handful of mini marshmallows, a sprinkle of crushed graham crackers, and a few chocolate chips, ensuring not to overfill.
Gently fold the other half of the dough over the filling to form a semi-circle. Firmly press the edges together to seal, then use a fork to crimp the edges for a decorative pattern.
Arrange the prepared hand pies on the lined baking sheets. To achieve a nice golden finish, brush the tops with the beaten egg.
Bake in your preheated oven for 20-25 minutes, or until the hand pies are golden brown and slightly puffed.
Once baked, allow them to cool on the baking sheets for a few minutes before transferring them to a wire rack to cool slightly.
For a delightful serving experience, arrange the hand pies warm on a rustic wooden board. Lightly dust with powdered sugar and serve with a small bowl of melted chocolate for dipping, reminiscent of campfire s’mores. Enjoy!
Keyword dessert, hand pies, s'mores
WANT TO SAVE THIS RECIPE?