Craving a sweet treat that’s both easy to make and delicious? Look no further! This No-Bake Biscoff Cheesecake Cups recipe is perfect for anyone wanting a quick dessert without the fuss of baking. With creamy layers and a crunchy cookie crust, these cups are sure to impress. I’ll guide you step-by-step, sharing tips and tricks to make your treats irresistible. Let’s dive into this simple and tasty delight!
Ingredients
Main Ingredients
– 1 cup Biscoff cookies, finely crushed
– 1/4 cup unsalted butter, melted
– 8 oz cream cheese, softened to room temperature
– 1/2 cup powdered sugar
– 1 cup heavy whipping cream
– 1/2 cup Biscoff spread (for swirling and drizzling)
– Pinch of salt
– Extra Biscoff cookies for garnish
Equipment Needed
– Medium-sized mixing bowl
– Electric mixer
– Serving cups or small glasses
– Rubber spatula
– Plastic wrap
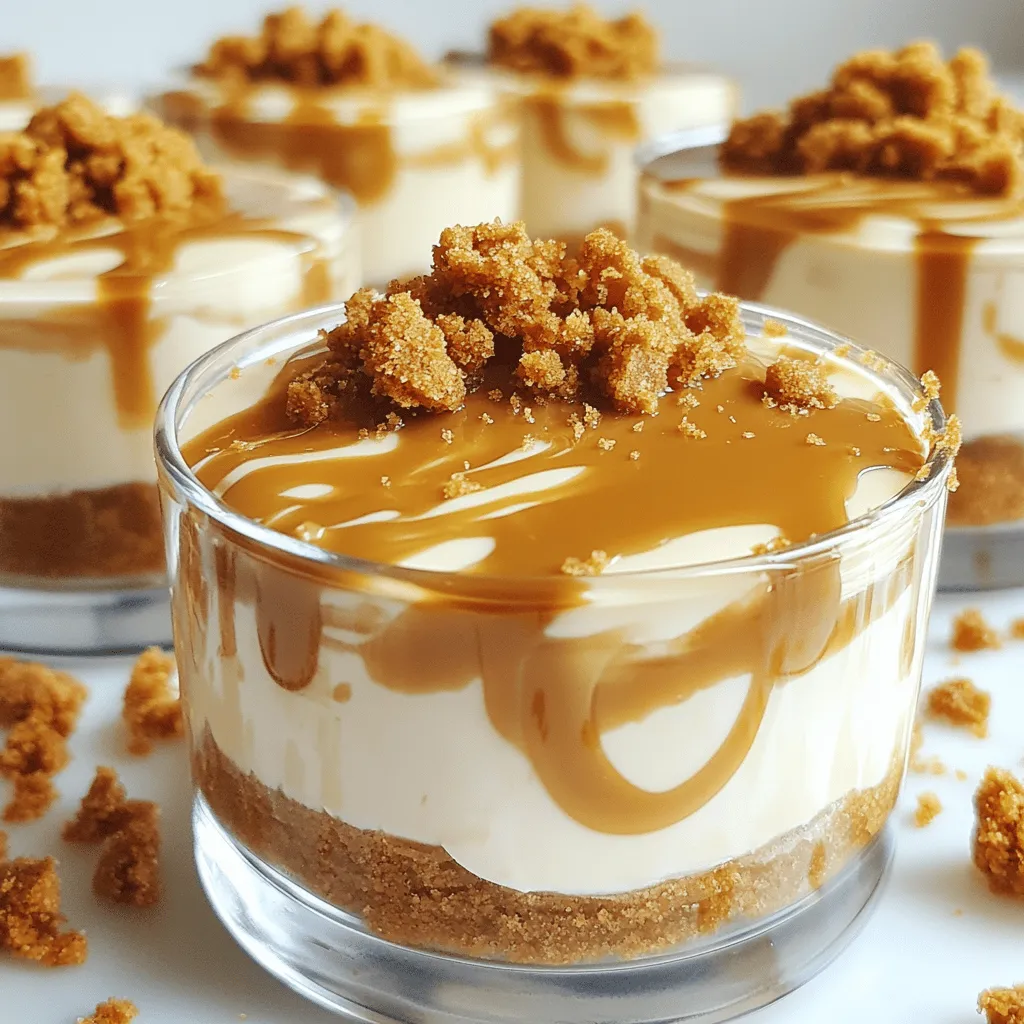
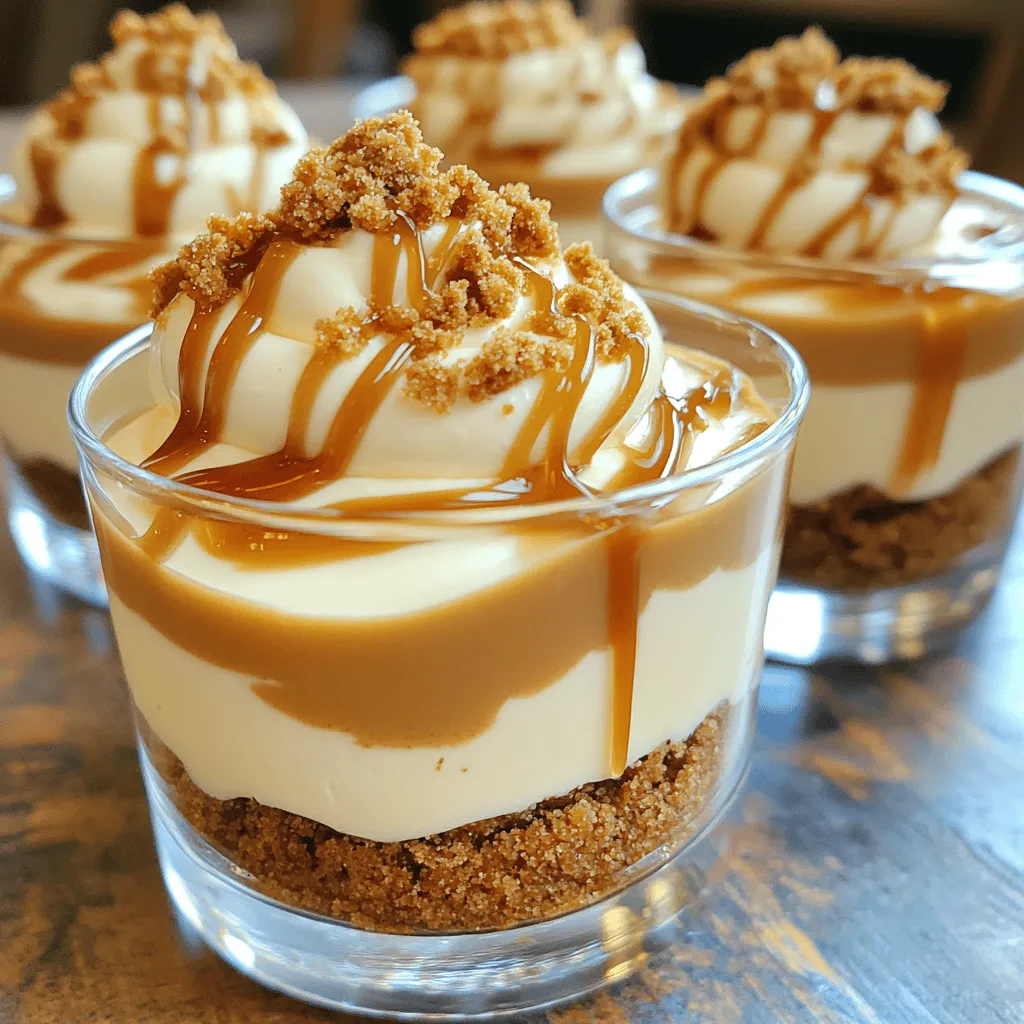
I love using Biscoff cookies in this recipe. Their spice and sweetness shine in every bite. For the crust, mix crushed Biscoff cookies with melted unsalted butter. This will give you a rich and flavorful base.
Next, I use cream cheese for the filling. It adds a smooth texture and rich taste. Mix the cream cheese with powdered sugar until it is creamy. Make sure to beat in heavy whipping cream. This will help the filling get fluffy and light.
Don’t forget to add Biscoff spread into the cheesecake mix. It creates lovely swirls. The pinch of salt helps balance all the sweetness. Finally, I like to garnish each cup with extra Biscoff cookies. This adds a nice crunch and looks fantastic!
Gathering the right tools is key. A medium-sized mixing bowl is perfect for mixing. An electric mixer will speed up the process. Use serving cups or small glasses to show off your treat. A rubber spatula will help you mix and scoop nicely. Lastly, plastic wrap is needed to keep your cups fresh while they chill.
With these ingredients and tools, you are set to make a delicious no-bake Biscoff cheesecake cup!
Step-by-Step Instructions
Preparing the Crust
To start, you need to make the crust. In a medium bowl, combine 1 cup of finely crushed Biscoff cookies with 1/4 cup of melted unsalted butter. Mix well until the crumbs are fully coated with the butter. The mixture should feel like wet sand.
Next, take about 2 tablespoons of this cookie mixture. Spoon it into the bottom of each serving cup. Press down firmly using the back of a spoon or your fingers. This helps to create a solid and even crust at the base.
Making the Cheesecake Filling
Now, let’s move on to the cheesecake filling. In a large mixing bowl, beat 8 oz of softened cream cheese with 1/2 cup of powdered sugar. Use an electric mixer for a smooth and creamy texture.
Then, slowly pour in 1 cup of heavy whipping cream. Keep beating until the mixture thickens and forms soft peaks. This step adds lightness to your cheesecake.
Next, fold in about 2-3 tablespoons of Biscoff spread. Use a rubber spatula for this. Gently mix until you see swirls of Biscoff. Be careful not to overmix; you want those pretty swirls.
Filling and Chilling
Now it’s time to fill the cups. Carefully spoon the cheesecake filling over the crust in each cup. Fill them about three-quarters full. This leaves some room for garnishing later.
Cover each cup tightly with plastic wrap. Place them in the fridge to chill. Let them sit for at least 4 hours, or until the cheesecake is firm and set. This chilling time is crucial for the best texture.
Tips & Tricks
Perfecting the Cheesecake Texture
To get the best texture, mix the cream cheese and sugar well. It should be smooth. Then, slowly add the heavy cream. Beat it until you see soft peaks. This step is key for a creamy cheesecake. When you fold in Biscoff spread, do it gently. Use a rubber spatula and scoop from the bottom. This keeps the swirls of flavor intact. Don’t overmix; you want those pretty swirls!
Serving Suggestions
For a great presentation, use clear serving cups. This lets the layers shine. Place them on a nice tray to catch the eye. Just before serving, drizzle some Biscoff spread on top. Sprinkle crushed Biscoff cookies for a tasty crunch. You can also add a mint sprig for a touch of color. This makes your cheesecake cups look even more inviting!
Variations
Alternative Flavor Additions
You can easily change the flavor of your cheesecake cups. Swap the Biscoff cookies for other cookies like Oreos or graham crackers. This change gives you a new taste, while still keeping the fun of a no-bake dessert.
You can also try different flavored whipping creams. Consider using vanilla, chocolate, or even coffee-flavored cream. This twist adds excitement and pairs well with the cheesecake’s rich texture. You can mix and match to find your favorite flavor!
Dietary Adjustments
If you’re looking for gluten-free options, use gluten-free cookies. Many brands offer gluten-free Biscoff-style cookies. Just make sure to check the label to ensure they fit your diet.
For vegan alternatives, substitute the cream cheese with a plant-based cream cheese. Use coconut cream instead of heavy whipping cream for a creamy texture. You can also use maple syrup or coconut sugar in place of powdered sugar. These swaps keep the dessert tasty while meeting your dietary needs.
Storage Info
Proper Storage Techniques
To keep your No-Bake Biscoff Cheesecake Cups fresh, store them in the refrigerator. Place each cup in an airtight container. This helps maintain their flavor and texture. If you plan to eat them later, wrap each cup in plastic wrap. This keeps them safe from odors in the fridge.
For longer preservation, you can freeze the cheesecake cups. First, chill them in the fridge for at least four hours. Then, cover each cup with plastic wrap and aluminum foil. This double layer prevents freezer burn. When ready to eat, thaw them in the fridge overnight.
Shelf Life
Enjoy your cheesecake cups within five days for the best taste. After five days, they may start to lose flavor and texture. Look for signs of spoilage, such as an off smell or changes in texture. If you see any liquid separation or mold, it’s time to toss them. Always trust your senses. If something seems off, it’s better to be safe and not eat it.
FAQs
How long do No-Bake Biscoff Cheesecake Cups last?
No-Bake Biscoff Cheesecake Cups can last up to five days in the fridge. Keep them covered with plastic wrap or a lid. This keeps them fresh and tasty. If you notice any changes in smell or texture, it’s best to toss them.
Can I make these cheesecake cups ahead of time?
Yes, you can prepare these cups a day in advance. Just follow the full recipe and chill them overnight. This helps the flavors blend well. It also saves time for your event or dessert night.
What can I use instead of Biscoff spread?
You can use cookie butter or any nut butter you like. Nutella is a great choice for a chocolate twist. If you want a lighter option, try cream cheese with a touch of honey. Each choice will give a unique flavor to your cheesecake cups.
You now know how to make delicious No-Bake Biscoff Cheesecake Cups. We covered key ingredients like Biscoff cookies and cream cheese. You learned step-by-step instructions for the crust and filling. We also shared tips for the best texture and serving ideas.
These cheesecake cups are tasty and easy to customize. Whether you want gluten-free or vegan options, you can adapt the recipe. Follow the storage tips to keep your treats fresh. Enjoy creating and sharing these delightful desserts!
