Go Back
- 1 ½ cups Oreo cookie crumbs (about 20 Oreo cookies) - ½ cup unsalted butter, melted - 8 oz cream cheese, softened to room temperature - ½ cup granulated sugar - 1 large egg, at room temperature - ½ cup mini chocolate chips - Extra crushed Oreos for topping - Mixing bowls - Electric mixer - Muffin tin - Cooking spray or cupcake liners - Pair with vanilla ice cream - Use colorful cupcake liners for presentation The main ingredients create a rich flavor. The Oreo cookie crumbs form a crunchy base. Then, the cream cheese adds creamy goodness. The butter helps bind everything together, while sugar sweetens the mix. Including mini chocolate chips makes each bite fun and tasty. Topping with crushed Oreos gives a delightful crunch. For equipment, you will need some simple tools. A mixing bowl lets you combine the ingredients easily. An electric mixer helps beat the cream cheese until smooth. A muffin tin holds the cookie cups in shape, while cooking spray or cupcake liners makes removal easy. When serving, I love to pair these treats with vanilla ice cream. The cold ice cream contrasts nicely with the warm cookie cups. Using colorful cupcake liners adds a festive touch. This way, they look as good as they taste! - Set to 350°F (175°C). This helps the cookie cups bake evenly. - Combine 1 ½ cups of Oreo cookie crumbs with ½ cup of melted butter. Stir until it looks like wet sand. - Lightly grease a muffin tin or use cupcake liners for easy removal. - Press about 2 tablespoons of the Oreo mixture into each muffin cup. Make sure it’s firm. Bake the crusts for 8 minutes to set them. - In a clean bowl, beat 8 oz of cream cheese until smooth. This is key for a creamy filling. - Gradually add ½ cup of granulated sugar, mixing well. Then, pour in 1 teaspoon of vanilla extract and mix again. - Add 1 large egg, beating until everything is smooth. Avoid lumps for a nice texture. - Fold in ½ cup of mini chocolate chips and some crushed Oreos. This adds flavor and fun bits. - Fill each cooled crust with the cheesecake mixture. Fill each cup about ¾ full. - Place the muffin tin back in the oven. Bake for 15-18 minutes. The centers should jiggle a bit when you shake the pan. - Once done, take them out and let them cool at room temp for about 30 minutes. After cooling, chill them in the fridge for at least 2 hours. This helps the flavors blend and sets the filling. - Always ensure your cream cheese is fully softened. Cold cream cheese makes it hard to mix. - Avoid overmixing the filling. Too much mixing can add air and cause cracks. - Leave a slight jiggle when baking. This jiggle means your cheesecake will be creamy. - Let the cups cool before chilling in the refrigerator. Cooling prevents soggy bases. - Use mini forks for serving. They add charm and make it fun to eat. - Garnish with whipped cream. This adds a creamy touch and looks great. {{image_4}} You can make these cookie cups even more fun. Try adding different flavored extracts like almond or mint. Just a tiny bit can change the whole taste. You can also add fruit toppings. Fresh berries like strawberries or raspberries look great and taste amazing. They add a nice contrast to the rich cheesecake. Why not switch up the base? You can use chocolate chip cookies instead of Oreos for a new twist. It gives a sweet, chewy texture. If you need gluten-free options, you can try gluten-free cookies. They work just as well and keep the flavor rich. You can easily adapt this recipe for different diets. For a vegan version, use plant-based cream cheese. It tastes just as good! If you're watching sugar, there are sugar-free options. Alternative sweeteners like stevia or erythritol work well. These changes let everyone enjoy this treat without worry. You can store your Oreo cheesecake cookie cups in the fridge for up to five days. To keep them fresh, cover them tightly with plastic wrap or place them in an airtight container. This way, they won’t dry out. Yes, you can freeze the cookie cups! They freeze well for up to three months. To freeze, place them in a single layer in a freezer-safe container, separating layers with parchment paper. When you are ready to eat, move them to the fridge overnight to thaw. This keeps them soft and tasty. You can also let them sit at room temperature for about 30 minutes before serving. For a warm treat, you can gently reheat the cookie cups. Use a microwave and heat them for about 10-15 seconds. Check them to avoid sogginess. If you prefer the oven, set it to 350°F (175°C) and warm them for 5-10 minutes. Enjoy them warm for the best taste! Oreo cheesecake cookie cups are mini desserts made with an Oreo crust and creamy cheesecake filling. They have a rich, sweet flavor and a fun texture. Each cup has a crunchy base topped with a smooth, creamy layer. They are perfect for parties or a sweet treat at home. Yes, you can make these cookie cups ahead of time. They store well in the refrigerator for up to five days. Just cover them with plastic wrap or place them in an airtight container. This makes them a great option for meal prep or special events. To adjust the sweetness, you can reduce the sugar amount in the recipe. Start by cutting the sugar by one-fourth. You can always taste and add more if needed. For a less sweet option, consider using a sugar substitute. Just check the package for the right amount to use. If you need a substitute for cream cheese, there are several options. You can use Greek yogurt for a lighter version. For a vegan option, try plant-based cream cheese. Silken tofu blended until smooth also works well. Each option will change the flavor slightly, so choose one that fits your taste. We've covered how to make delicious Oreo cheesecake cookie cups. You learned the key ingredients and equipment needed. I shared step-by-step instructions for baking them just right. Tips helped you perfect texture and presentation. We explored tasty variations and storage info to keep them fresh. These cookie cups are fun, easy, and sure to impress. Whether for a party or a treat, they’re a hit! Enjoy baking and sharing these delightful desserts!

Oreo Cheesecake Cookie Cups

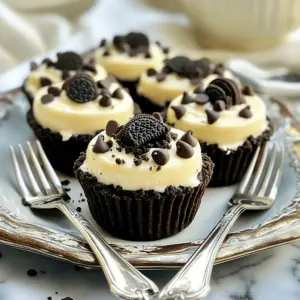
Indulge in the ultimate dessert with these Oreo Cheesecake Cookie Cups! Combining a crunchy Oreo crust with a rich, creamy cheesecake filling and mini chocolate chips, these treats are sure to impress. Perfect for parties or a sweet snack at home, they're easy to make and incredibly delicious. Click through for the full recipe and discover how to create these delightful cookie cups that everyone will love!

Ingredients
  

1 ½ cups Oreo cookie crumbs (approximately 20 Oreo cookies)

½ cup unsalted butter, melted

8 oz cream cheese, softened to room temperature

½ cup granulated sugar

1 teaspoon pure vanilla extract

1 large egg, at room temperature

½ cup mini chocolate chips

Extra crushed Oreos for topping

Instructions
 

Oven Vorbereiten: Begin by preheating your oven to 350°F (175°C) to ensure that it’s hot enough for baking.

    Cookie-Boden Herstellen: In a medium mixing bowl, combine the Oreo cookie crumbs with the melted butter. Stir until the mixture has a sandy consistency, similar to wet sand.

      Muffinblech Vorbereiten: Lightly grease a muffin tin with cooking spray or line it with colorful cupcake liners for easy removal and an extra pop of color.

        Cookie Cups Formen: Take about 2 tablespoons of the Oreo mixture and press it firmly into the bottom of each muffin cup to create a solid crust. Bake the crusts in the preheated oven for 8 minutes, then remove them and let them cool slightly.

          Cheesecake-Füllung Zubereiten: In a clean mixing bowl, beat the softened cream cheese using an electric mixer on medium speed until it’s completely smooth. Gradually add in the granulated sugar, beating until well combined and creamy.

            Vanille und Ei Hinzufügen: Pour in the vanilla extract and mix until incorporated. Then add the egg, beating the mixture until everything is smooth and creamy without lumps.

              Schokoladenstückchen Falten: Carefully fold in the mini chocolate chips along with a few crushed Oreo pieces to enhance the texture and flavor of the filling.

                Cup-Füllung: Use a spoon to fill each cooled cookie crust with the cheesecake mixture, filling each cup to approximately ¾ full to allow for any rising during baking.

                  Backen: Place the filled muffin tin back in the oven and bake for an additional 15-18 minutes. The centers should be set yet still have a slight jiggle when you gently shake the pan.

                    Abkühlen und Kühlen: Once baked, take the cookie cups out of the oven and let them cool at room temperature for about 30 minutes. After that, transfer them to the refrigerator and chill for at least 2 hours or until thoroughly cooled.

                      Garnieren und Servieren: Just before serving, sprinkle additional crushed Oreos over each cheesecake cup for an attractive topping and delicious crunch.

                        Vorbereitungszeit: 20 Minuten | Gesamtzeit: 2 Stunden 30 Minuten | Portionen: 12 Tassen

                          - Präsentationstipps: Arrange the cookie cups on a charming platter and garnish with adorable miniature forks for a playful presentation! For an added touch of indulgence, serve them alongside a scoop of creamy vanilla ice cream. Enjoy!